Table of Contents
Advertisement
Quick Links
Download this manual
See also:
Instruction Manual
Advertisement
Table of Contents

Related Manuals for Luvion PLATINUM


Summary of Contents for Luvion PLATINUM
- Page 1 LUVION ® P L A T I N U M INSTRUCTION MANUAL LUVION ® Premium Babyproducts...
- Page 2 English...
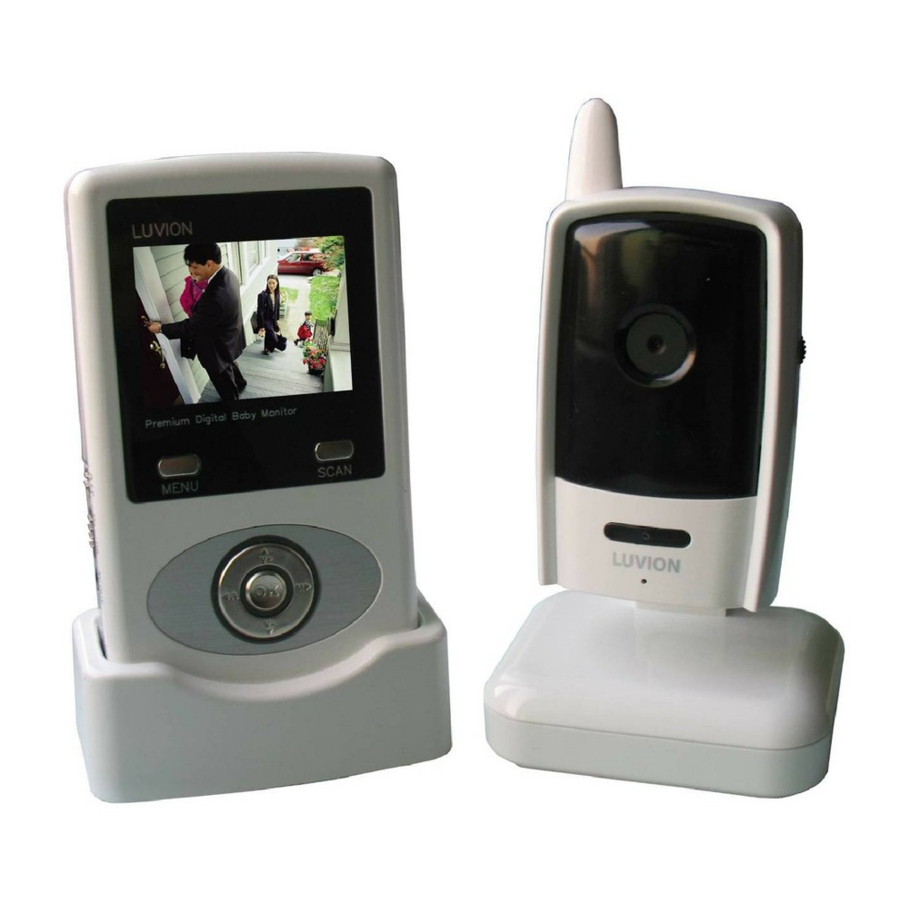
- Page 3 VGA resolution camera. Main menu • Night vision allows for low light viewing up to 15 feet / 4.5 meters. Camera Pairing • Built-in microphone. Troubleshooting • Camera can be battery operated for true portable wireless operation. Technical specifications monitor Technical specifications camera Receiver features Introduction • 2.4” color LCD monitor/receiver with superior image quality. • Video/Audio output for viewing on TV/Monitor or recording on VCR/DVD recorder. Congratulations with your brand new Luvion Baby monitor! ® • Rechargeable lithium polymer battery for true portability. Becoming a mom or dad is one of the most exciting moment in your life. • Convenient receiver cradle included. We do understand that very well. We hope you will enjoy watching your • Audio level indicator and alarm. baby or child grow up on the Luvion baby monitor. ® The Luvion Baby monitor is very useful when you would like to see and ® hear your baby or child. Off course, you can also use the Luvion baby ®...
-
Page 4: Wireless Receiver Installation
Wireless receiver installation Functionbuttons front- and backside reciever Determine if you will be using the receiver cradle, or connecting the cables directly to the receiver before installation: Place the receiver cradle or receiver in a place that will have clear reception with your camera(s). Plug the AC adaptor power output cable into the 9V POWER input of the cradle or receiver. Plug the power plug into a wall outlet or surge protector. Leave the receiver to charge for 6 hours prior to first time use so the built-in rechargeable receiver battery is fully charged. DO NOT remove the power cable from the receiver / from the cradle during initial charge process. After initial charge, charge the receiver as required. If you wish to view the receiver images on a larger screen, connect the included AV cable to the cradle or receiver, and connect the other end of the cable to the Video IN (Yellow) and Audio IN (White) ports on the TV, VCR or other viewing/ recording device. NOTE: the purpose of the AV output is for convenience only. When using Power/Audio Level LEDs – The green LED indicates the receiver with large screen TV/Monitor, the picture might be grainy as the camera power is ON or OFF. The red LEDs indicate the audio levels (low to high). - Page 5 Function buttons edge wireless receiver Function buttons wireless camera Night Light Button – Press to turn night light ON or OFF (for the camera currently being displayed on the LCD screen). Alarm +/- Button – Press to increase or decrease the volume of the audio alarm. Receiver antenna – Receives & sends signals from or to the cameras. Antenna Locking Switch – Slide the switch to unlocking position, the receiver antenna will pop up. Then you can adjust the antenna to vertical position for better signal reception. Power Slide Switch – Slide the switch to ON or OFF position to switch on/off the receiver.
-
Page 6: Camera Installation
Camera installation Connecting wireless camera adapter Before you install the camera, carefully plan where and how it will be positioned, and where The camera can be powered either by using the provided power adaptor , or using you will route the cable that connects the camera to the power adaptor . Before starting per- batteries (requires 4 AA type batteries, not included). NOTE: Wireless cameras manent installation, verify its performance by observing the image on the receiver when require a power source (either an electrical outlet or battery power) to operate. camera is positioned in the same location/position where it will be permanently installed If you plan to permanently mount the camera in a location, it is recommended to and the receiver is placed in the location where it will be used most of the time. use the included camera power adaptor to prevent interruptions in the image, as using battery power is intended as a temporary power solution. Installation Warnings: Aim the camera(s) to best optimize the viewing area: Select a location for the Power adaptor camera that provides a clear view of the area you want to monitor , which is free Connect the power adaptor to the camera. Make sure the power adaptor is placed from dust, and is not in line-of-sight to a strong light source or direct sunlight. into a grounded outlet or surge bar to protect the camera from power fluctuations. Avoid installing the cameras with thick walls, or obstructions between the cameras and the receiver . Installation of the camera Carefully unpack the camera. NOTE: If you are installing cameras that did not come with the system, please see the camera pairing section of this manual for details on installation. -
Page 7: Camera Pairing
Main menu Camera Pairing: The Main Menu contains 4 submenus: The system comes with camera(s) that have already been paired. These cam- Pairing - Use the pairing menu to add camera(s) to the receiver. eras will communicate with the receiver once powered on. The pairing function EV - Adjusts the exposure level of the camera. assigns each camera to a different channel on the wireless receiver (up to 4 Power saving - Turns on the receiver power save mode (when cameras), and is necessary for configuring additional cameras. no activity on the cameras is detected). Settings - Sets the AV Out options, and resets the receiver to NOTE: It is highly recommended to pair the cameras to the receiver before factory defaults (erases all configurations). permanently mounting the cameras. Use the UP and DOWN arrows to scroll down the Power on the camera by connecting the power adaptor or battery pack, and menu buttons. -
Page 8: Troubleshooting
Troubleshooting Technical wireless receiver specifications If you have problems with the system, there is often a quick and simple Receiving frequency range 2.400GHz~2.482GHz solution. Please try the following: Data rate 1.5 Mbps Receiving sensitivity -81dBm Problem Solution Demodulation type GFSK with FHSS No picture from a camera 1 Check all connections to the camera. Make sure the adaptor is plugged in. Resolution H: 480 V: 240 2 Make sure that the cameras and receiver are... - Page 9 Technical wireless camera specifications Transmit frequency range 2.400GHz~2.485GHz Data rate 1.5 Mbps Transmitting power 14dBm (TYP) Modulatie type GFSK with FHSS Transmitting distance 150m (line of sight) Image sensor type 1/4” kleur CMOS image sensor Effective pixels H: 640 V: 480 Image processing Motion JPEG Image Resolution / Frame Rate H: 640 V: 480 / 30FPS Max...
Need help?
Do you have a question about the PLATINUM and is the answer not in the manual?
Questions and answers