
Related Manuals for Luvion Grand Elite


Summary of Contents for Luvion Grand Elite
- Page 1 G R A N D E L I T E INSTRUCTION MANUAL HANDLEIDING LUVION Premium Babyproducts MOD- LUVION Premium Babyproducts EL: Grand...
-
Page 2: Table Of Contents
- To avoid damage to your batteries, please do not expose the baby monitor to temperatures higher than 30°C. Please remove the optional batteries from the baby unit if you do not use the product for more than 1 month. LUVION Delft, The Netherlands www.luvion.com... -
Page 3: Introduction
INTRODUCTION Thank you for purchasing the Luvion Grand Elite. Now you can see and hear your baby or even more babies/children by using additional camera’s. Please retain your original dated sales receipt for your records. For service –and warranty issues you will always be asked for a copy of the receipt. For warranty issues you can contact your Luvion dealer or your local Luvion distributor. -
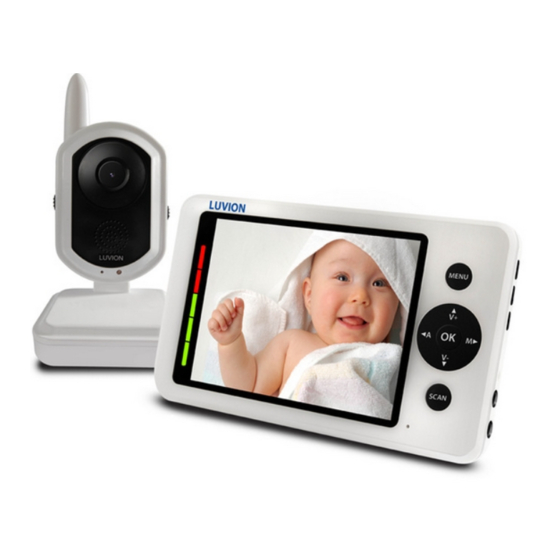
Page 4: Overview Parent Unit
OVERVIEW PARENT UNIT (MONITOR) -
Page 5: Overview Baby Unit
OVERVIEW BABY UNIT (CAMERA) LUVION Premium Babyproducts... -
Page 6: Parent Unit
Parent unit Antenna Recieves the video and sound from the baby unit. Antenna locking switch Slide the switch to the unlock position, to make the antenna pop up and improve reception. Record Press this button to start recording, press it again to stop recording. Menu button Press this button to enter the main menu. -
Page 7: Baby Unit
DC 9V power adapter Enables you to connect the baby unit to the electricity grid. Note: The baby unit also works on 4 AA batteries (not included). Do not leave the batteries in the baby unit when you use it with the power adapter. LUVION Premium Babyproducts... -
Page 8: Getting Started
GETTING STARTED Parent unit Determine whether you will be using the docking station, or connecting the cables directly to the parent unit before installation. Carefully unpack the parent unit. Place the parent unit (in the docking station) in a place that has clear reception with the baby unit. -
Page 9: Using The System
The baby unit has no charging function. USING THE SYSTEM Cam1 The video of the baby unit will be displayed on the screen of the parent unit when both are switched on. 1. Signal indicator 2. Channel indicator LUVION Premium Babyproducts... - Page 10 1. Signal indicator Signal strength Indicator Warning The signal indicator shows the strength Perfect None of the signal being recieved from the baby unit. One or no bars indicates a Good None poor signal and 4 bars indicate a strong Fair None signal.
-
Page 11: Menu Options
Settings menu The settings menu contains 10 submenus: 1. Date & Time 2. Brightness 3. Temperature Unit 4. Temperature alert 5. Camera Volume 6. Zoom 7. A/V out 8. Screen saver 9. Format 10. Default LUVION Premium Babyproducts... - Page 12 1. Date & Time You can display the time on the screen by setting it in this submenu. The date and time have the following value YY/MM/DD HH:MM:SS. 2009/01/04 00:39:15 2. Brightness The brightness of the screen can be adjusted with the buttons.
- Page 13 Or you can select Blank screen to make the screen black in SCAN mode. 9. Format Select Yes to format the Micro SD card. Formatting will delete all the data stored on the Micro SD card. Note: Use with caution! LUVION Premium Babyproducts...
- Page 14 10. Default Select Yes to reset the parent unit to factory default settings. All menu settings will then be reset. Note: Pairing settings will not be affected by a reset. Baby unit(s) will remain paired with the parent unit. Record Menu You can set the recording parameters in this menu.
-
Page 15: Auto Mute/Pairing Menu
Use the buttons to select the desired pairing channel, and press the OK button to begin the pairing process. Note: It is highly recommended to pair the baby units to the parent unit before permanently mounting them. LUVION Premium Babyproducts... -
Page 16: Baby Unit Pairing
BABY UNIT PAIRING The system comes with a baby unit that has already been paired with the parent unit. These units will communicate with each other once they are switched The pairing function gives each baby unit a seperate channel on the parent unit (with a maximum of 4 baby units) this is necessary for configuring additional baby units. -
Page 17: Micro Sd Card Recording And Playing
3. Select a folder and press OK to enter the subfolders. For example 101024_1 means that a video is recorded at 10:10:24 on camera 1. 4. When you select a video and press OK, the video will start playing. LUVION Premium Babyproducts... -
Page 18: Troubleshooting
TROUBLESHOOTING Problem Solution No video from the baby 1. Make sure the power adapter is plugged in. unit 2. Make sure that both the baby and parent unit are switched on. 3. Make sure that the baby unit is in range of the parent unit. 4. - Page 19 Operating humidity 0% ~ 85% Environmental rating -10° ~ 60° C NOTE Please connect the right power adapter to the camera and monitor, they require a different voltage! Check the white label on the cord of the adapter. LUVION Premium Babyproducts...
- Page 20 - Om schade aan de batterijen te voorkomen stelt u de babyfoon niet bloot aan tempera- turen boven de 30°C en haalt u de batterijen uit de baby unit indien u die langer dan 1 maand niet gebruikt. LUVION Delft, The Netherlands www.luvion.com...
-
Page 21: Voorwoord
VOORWOORD Hartelijk dank voor de aanschaf van deze Luvion Grand Elite beeldbabyfoon. Vanaf nu kunt u uw baby horen én zien en/of zelfs meerdere kinderen monitoren. Zorgt u ervoor dat u altijd uw originele aankoopbewijs bewaart. Voor garantiegevallen zal u altijd gevraagd worden om een kopie van uw aankoopbewijs. -
Page 22: Overzicht Van Uw Ouder Unit
OVERZICHT VAN UW OUDER UNIT (MONITOR) -
Page 23: Overzicht Van Uw Baby Unit
OVERZICHT VAN UW BABY UNIT (CAMERA) LUVION Premium Babyproducts... - Page 24 Ouder unit Antenne Ontvangt de beelden en het geluid van de baby unit. Antenne vergrendeling Schuif het knopje uit de vergrendeling en de antenne zal omhoog komen voor een beter ontvangst. Het is normaal dat de antenne niet geheel verticaal komt. Record Druk op deze knop om het opnemen te starten, druk nogmaals om het opnemen te stoppen.
- Page 25 DC 9V voedingsadapter Hiermee kunt u de baby unit via de adapter aan het stroomnetwerk koppelen. Let op: De camera kan ook werken op 4xAA batterijen (niet meegeleverd). Laat de batterijen niet in de camera zitten indien de camera via de adapter gebruikt wordt. LUVION Premium Babyproducts...
-
Page 26: Klaarmaken Voor Gebruik
KLAARMAKEN VOOR GEBRUIK Ouder unit Beslis of u de ouder unit gaat gebruiken met of zonder het docking station. Neem voorzichtig de ouder unit uit de verpakking. Plaats de ouder unit (eventueel met het docking station) op een plaats waar u goed bereik heeft met de baby unit. -
Page 27: Gebruik
De baby unit heeft geen oplaadfunctie. GEBRUIK Cam1 De camerabeelden van de baby unit verschijnen op het beeldscherm van de ouder unit wanneer beiden zijn ingeschakeld. 1. Signaal indicator 2. Kanaal indicator LUVION Premium Babyproducts... - Page 28 1. Signaal indicator Singnaalsterkte Indicator Waarschuwing De signaal indicator geeft aan hoe sterk Perfect Geen het signaal is dat wordt ontvangen van de baby unit. Een of geen streepje wijst Goed Geen op een slecht signaal en 4 streepjes Redelijk Geen wijzen op een sterk signaal.
-
Page 29: Menu Opties
Settings menu Het Settings menu bevat 10 submenu’s 1. Date & Time 2. Brightness 3. Temperature Unit 4. Temperature alert 5. Camera Volume 6. Zoom 7. A/V out 8. Screen saver 9. Format 10. Default LUVION Premium Babyproducts... - Page 30 1. Date & Time U kunt de datum en tijd weergeven op het beeldscherm door deze in dit submenu in te stellen. De datum en tijd hebben de volgende waarden JJ/MM/DD UU:MM:SS. 2009/01/04 00:39:15 2. Brightness De helderheid van het beeldscherm kan worden aangepast met de knopjes.
- Page 31 SCAN modus. 9. Format Kies Yes om de Micro SD kaart te formatteren. Formatteren verwijdert alle data van de Micro SD kaart. Let op: Wees voorzichtig in het gebruik van deze functie. LUVION Premium Babyproducts...
- Page 32 10. Default Kies Yes om de fabrieksinstellingen te herstellen. Alle menu instellingen zullen dan gereset worden. Let op: Pairing instellingen zullen niet gereset worden met deze functie. Alle baby units zullen gepaired blijven met de ouder unit. Record Menu U kunt de opname parameters in dit menu aanpassen. Let op: Om gebruik te kunnen maken van de opname functie, moet een Micro SD kaart geplaatst worden in de ouder...
- Page 33 Druk op de OK knop om het ‘pairing’ proces met een baby unit te starten. Let op: Het wordt aangeraden om de baby unit en de ouder unit met elkaar te ‘pairen’ voordat de baby unit pemanent gefixeerd wordt. LUVION Premium Babyproducts...
-
Page 34: Baby Unit Pairing
BABY UNIT PAIRING Het systeem wordt geleverd met een baby unit die al ‘gepaired’ is met de ouder unit. Deze units zullen met elkaar communiceren op het moment dat ze ingeschakeld zijn. De ‘pairing’ functie geeft iedere baby unit een apart kanaal op de ouder unit (maximaal 4 baby units per ouder unit) dit is nodig om extra baby units te kunnen aansluiten. -
Page 35: Micro Sd Kaart Opname
3. Selecteer een map en druk op OK om de submappen in te gaan. Bijvoorbeeld 101024_1 betekent dat de video is opgenomen om 10:10:24 door camera 1. 4. Door de video te selecteren en op OK te drukken zal de video afgespeeld worden. LUVION Premium Babyproducts... -
Page 36: Probleem En Oplossing
PROBLEEM EN OPLOSSING Probleem Oplossing Geen camerabeeld 1. Controleer of de voedingsadapter aangesloten is. 2. Controleer of zowel de ouder als baby unit zijn ingeschakeld. 3. Controleer of de baby unit in het bereik van de ouder unit is. 4. Wanneer u batterijen gebruikt, vervang deze. De ouder unit geeft “Out of 1. - Page 37 250mA (zonder Night Light) Gebruikstemperatuur 10°C ~ 40°C Luchtvochtigheid 0% ~ 85% Omgevingstemperatuur -10° ~ 60° C LET OP Sluit de juiste adapter aan op camera en monitor, ze hebben een verschillend voltage! Zie wit labeltje op draad LUVION Premium Babyproducts...
Need help?
Do you have a question about the Grand Elite and is the answer not in the manual?
Questions and answers