Table of Contents
Advertisement
Quick Links
Download this manual
See also:
Instruction Manual
Advertisement
Table of Contents

Subscribe to Our Youtube Channel
Related Manuals for Luvion Platinum


Summary of Contents for Luvion Platinum
- Page 1 PORTABLE DIGITAL WIRELESS MONITORING SYSTEM INSTRUCTION MANUAL MODEL: Luvion Platinum...
-
Page 2: Camera Features
Features • Digital wireless technology provides excellent image quality and clarity • Interference free, secure and private signal ① • Up to 450ft wireless transmission range • Listen in with exceptional sound clarity • Safety warning feature notifies you when out of range ②... -
Page 3: Wireless Receiver
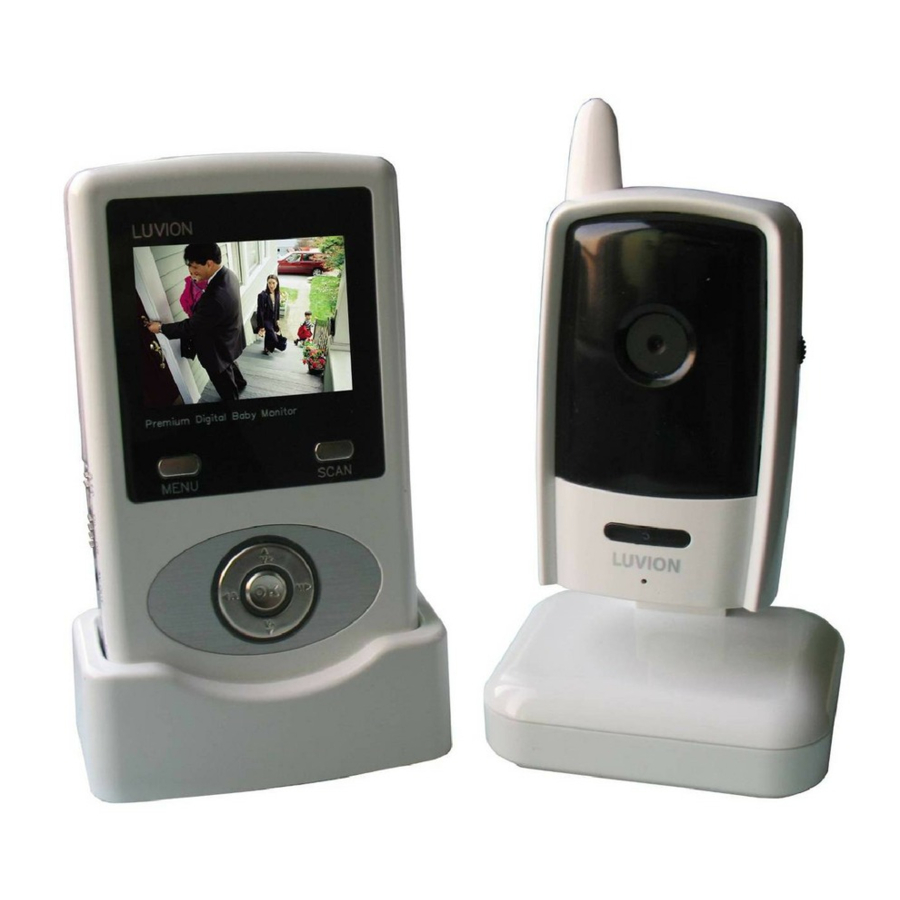
Wireless Receiver Front/Back Controls 1. Power/Audio Level LEDs – The green LED indicates the receiver power is ON or OFF. The red LEDs indicate the audio levels (low to high). 2. LCD Screen – Displays video from the camera. 3. SCAN Button – When the SCAN button is pressed, the LCD screen is turned off and the s ystem... -
Page 4: Side Controls
Side Controls 9. Night Light Button – Press to remotely turn night light ON or OFF (for the camera currently being displayed on the LCD screen). 10. Alarm +/- Button – Press to increase or decrease the volume of t audio alarm. -
Page 5: Wireless Receiver Installation
Wireless Receiver Installation Determine if you will be using the receiver cradle, or connecting the cables directly to the receiver before installation: 1. Place the receiver cradle or receiver in a place that will have clear reception with your camera(s). 2. -
Page 6: Camera Installation
Side Controls 7. Sound Alarm Trigger – Adjust the trigger to set the sound alarm sensitivity. The receiver will beep to alert the user when the sound is above a preset sound level. Adjust the side wheel to increase or decrease the level. 8. -
Page 7: Viewing Mode
Connecting Camera Power The camera can be powered either by using the provided power adaptor, or using batteries (requires 4 AA type batteries, not included). NOTE: Wireless cameras require a power source (either an electrical outlet or battery power) to operate. If you plan to permanently mount the camera in a location, it is recommended to use the included camera power adaptor to prevent interruptions in the image, as using battery power is intended as a temporary power solution. -
Page 8: Adjusting The Receiver Volume
2. Channel Indicator – Displays the current channel number. Press the RIGHT ► arrow on the receiver to switch between available cameras. Note: To automatically switch between channels, press the LEFT arrow (AUTO). Low Signal / No Signal Warnings When the camera is positioned too far from the receiver, warning messages will be displayed. Adjusting the Receiver Volume The receiver volume can be adjusted by using the UP/DOWN▲▼... -
Page 9: Pairing Menu
Pairing Menu The system comes with camera(s) that have already been paired. The pairing function assigns each camera to a different channel on the wireless receiver (up to 4 Cameras), and is necessary for configuring additional cameras. Use the UP▼ and DOWN▲ arrows to navigate. Select the desired pairing channel, and press the OK button to begin the pairing process with a camera. -
Page 10: Camera Pairing
A/V Out Menu The A/V Out menu option is used to adjust the resolution quality of the image sent to the viewing device (such as a TV, VCR or Monitor). Use the UP and DOWN ▼▲ arrows to select a resolution, and press OK to accept. -
Page 11: Troubleshooting
5. Press the Pair button located on the bottom of the receiver using a pen tip or paperclip. 6. A message will be displayed on the receiver screen. The receiver will count down from 30~0 – you must press the Pair button on the camera during this time to successfully pair the camera. -
Page 12: Appendix #1 - Receiver Specifications
The purpose of the AV output is for convenience only. When using with large screen TV/Monitor, the picture might be grainy as the camera limits video resolution to VGA (640x480 pixels). This is not a The Picture appears to be grainy product defect. - Page 13 On 1/2000 ~ 1/20 sec White Balance AGC / Range On / 0dB~24dB Lens 4.9mm / F2.8 Viewing Angle (Diagonal) 60° Minimum Illumination 2.5 LUX (IR Off), 0 LUX (IR On) IR LED / Night Vision Range 8 LEDs / 840nm 5m (with IR LED) Power Requirement 9V DC ±5% 360mA MAX (with Night Light)
Need help?
Do you have a question about the Platinum and is the answer not in the manual?
Questions and answers