Table of Contents
Advertisement
Quick Links
QUICK START GUIDE
FEATURES:
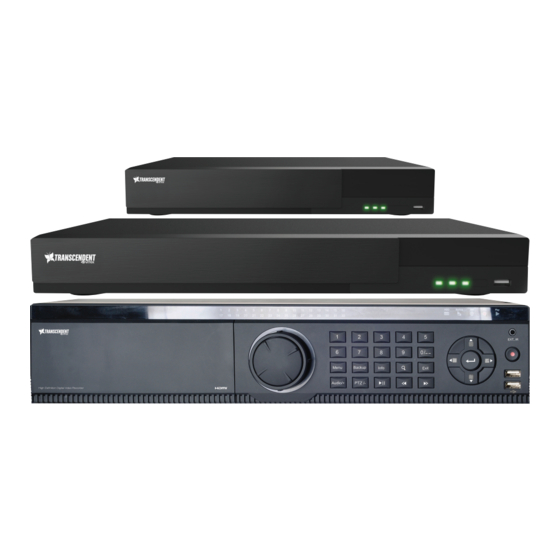
● 4, 8, 16, or 32 Channel HD-TVI/AHD/960H BNC Inputs + IP Camera Support
● 1-Channel IP Camera Support (VT-TTAR410 / VT-TTAR810) / 4-Channel IP Camera Support (VT-TTAR1620 &
VT-TTAR3280)
● Simple plug and play, point-to-point connection from camera to DVR
● H.264 Compression
● HDMI, VGA, and BNC (Spot) Video Outputs
● 2-Way Audio
● PTZ Control over RS-485
● 4 Alarm inputs / 1 Alarm Output
● Pentaplex: Live Display / Record / Playback / Backup / Remote Access
● 1 Internal SATA2/SATA3 HDD Slot supporting up to 6TB (VT-TTAR410 / VT-TTAR810) / 2 Internal SATA2/SATA3
HDD Slots supporting up to 12TB (VT-TTAR1620) / 8 Internal SATA2/SATA3 HDD Slots supporting up to 48TB
(VT-TTAR3280) /
● Applications for iOS & Android
● Remote Viewing over the Internet via Web Browser or LAN
● Mac OS® Client & CMS Central Management Software Included
● Supports both Dynamic and Static IP Addresses
● Control locally via USB Mouse or IR Remote control
PLEASE NOTE:
Complete User Guide, Software, Tools, and Updates
are available online. Scan the QR Code or visit:
http://www.vitekcctv.com/Downloads
VT-TTAR Series
Transcendent Series 4, 8, 16, and 32 Channel
HD-TVI/AHD/960H/IP Digital Video Recorders
Advertisement
Table of Contents

Related Manuals for Vitek VT-TTAR Series


Summary of Contents for Vitek VT-TTAR Series
-
Page 1: Quick Start Guide
VT-TTAR Series Transcendent Series 4, 8, 16, and 32 Channel HD-TVI/AHD/960H/IP Digital Video Recorders QUICK START GUIDE FEATURES: ● 4, 8, 16, or 32 Channel HD-TVI/AHD/960H BNC Inputs + IP Camera Support ● 1-Channel IP Camera Support (VT-TTAR410 / VT-TTAR810) / 4-Channel IP Camera Support (VT-TTAR1620 &... - Page 2 SETUP & CONFIGURATION: 1. Notes ● Please read this instruction carefully for correct use of the product and preserve it for reference purposes. ● This manual is suitable for 4/8/16 CH HD TVI Hybrid DVR. All the examples and pictures used here are for reference only.
- Page 3 7. Network Configuration & Adding IP Cameras After you finish adding IP cameras, you can see the live images through the monitor of the DVR. The following will mainly introduce how to add the IP cameras via LAN/WAN. ►LAN 1 Set the network of the DVR. Go to Start → Settings → Network →TCP/IPv4. Input IP address, subnet mask, gateway, etc.
- Page 4 9. NAT ► NAT Settings 1 The DVR shall be powered on and connected to the network. TCP/ IPv4 Port DDNS E-mail UPnP Network Status 2 Go to Start → Settings → Network → TCP/IPv4. You can obtain the IP address, subnet mask and gateway automatically. You can also manually enter them according to the actual network situation.
Need help?
Do you have a question about the VT-TTAR Series and is the answer not in the manual?
Questions and answers