
Related Manuals for QERIDOO KidGoo2 – Q9000-S


Summary of Contents for QERIDOO KidGoo2 – Q9000-S
- Page 1 User manual KidGoo2 – Q9000-S This product fulfils all safety requirements of the European standard for bicycles and bicycle trailers (DIN EN 15918).
- Page 2 When necessary, individual items of information can be changed quickly and without special notification. This documentation can be ordered from Qeridoo GmbH in other languages, or is available for download on our website if already available. Visit us at: www.qeridoo.com...
-
Page 3: Table Of Contents
Contents Introduction Utilisation Proper use Operating the brake Performance limits Braking during the journey Using the parking brake Notes on the user manual Adjusting the brake Safety instructions Adjusting the push handle Users Setting the mode Conditions of use Adjusting the buggy wheel Passengers Folding the tow bar in or out Towing vehicle (Trailer mode) -
Page 4: Introduction
Introduction Proper use was designed as a bicycle trailer and comes with an additional buggy and walker KidGoo2 function. For Trailer mode, use a tow bar with coupler to connect the trailer to a suitable towing vehicle (bicycle or motorised pedelec with a maximum speed of 25 km/h). With the buggy wheel can be used as a child carrier in Buggy mode. -
Page 5: Notes On The User Manual
Introduction The following additional restrictions apply to Trailer mode: Requirements for the tow bar Permissible tow bar load range (on the coupler pocket) 3 – 8 kg Requirements for the towing vehicle Vehicle type Bicycle (also recumbent bicycle), pedelec (supported for up to 25 km/h) Maximum permissible speed 25 km/h;... -
Page 6: Safety Instructions
Safety instructions Danger! Read the safely instructions below carefully. The safety and accident prevention regulations valid in your region and statutory rules such as the road traffic regulations also apply, and take precedence in cases where there is doubt. Make sure that the is used only by suitable persons, as defined below. -
Page 7: Passengers
“Care and maintenance” on page Install and use only original accessories and spare parts manufactured or recommended by ƒ Qeridoo. Using other products relieves the manufacturer of liability. Only carry out structural modifications or extensions to the vehicle which are necessary for ƒ... -
Page 8: Cycling With A Trailer
Safety instructions Cycling with a trailer The way in which the bicycle moves changes significantly when it is pulling a trailer, and this is particularly noticeable when braking and cornering. With regard to this, pay attention to the following: Practice cycling with the trailer before going out onto the road. ƒ... -
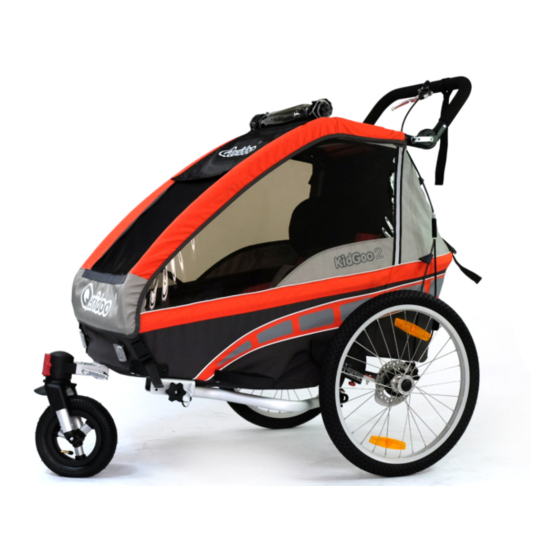
Page 9: Product Overview
Product overview Scope of delivery Cabin with seats, back pad and 5-point 2 head rests safety harnesses Sun visor Wheel guard (2x) Tow bar with coupler and retaining strap Push handle with hand strap and brake 2 leaf suspension covers with imprinted lever adjustment scale Wheel axle with disc brake system and... -
Page 10: Components And Control Elements
Product overview Components and control elements Side view Cabin (frame made from aluminium tubes Wheel axle with disc brake system and with weatherproof fabric cover) adjustable suspension Side window (right, incl. ventilation Wheel guard for deflecting obstacles window) Tow bar for Trailer mode (folded in) Canopy with insect, rain and sun cover;... -
Page 11: Rear View
Product overview Components and control elements Rear view Pushbutton for adjusting the height of the Storage space with inside pocket, push handle (both sides) accessible from the outside (max. 5 kg baggage) Push handle with safety function as roll-bar Rear reflector, red Hand strap for Buggy and Walker mode Wheel axle Brake lever, lockable... -
Page 12: Accessories
Product overview Accessories Using the accessories listed here, you can extend your and optimally adapt it to suit your KidGoo2 needs and the age of your children: Coupler Art. no.: K-587K Rear light, battery operated Art. no.: FK589 Jogger air wheel with hand brake Art. - Page 13 Art. no.: S-58697 Seat cushion Art. no.: SI-5555 Rain cover Art. no.: JR-8-1 Folding garage Art. no.: 035689 You can find our current list of dealers on the Internet at: http://qeridoo.com/index.php/en/haendlersuche-english Subject to change. – 05|2016 – 13 KidGoo2 – Q9000-S...
-
Page 14: Assembly
Assembly Below you can read all the information that you will need to assemble your properly. KidGoo2 Make sure that you have sufficient space to assemble it. Also pay attention to the door width at the place of installation: The is 85 cm wide KidGoo2 with the wheel guards fitted. -
Page 15: Securing The Wheel Axle
Assembly Tilt back the cabin and place it on its reverse side. This makes the lower cabin frame accessible for assembly. Securing the wheel axle The wheel axle is equipped with a disc brake system and adjustable leaf suspensions. The suspension effect of the two red leaf suspension plates can be adjusted by moving a clamp, see “Adjusting the suspension”... -
Page 16: Fitting The Wheel Guard
Assembly Fitting the wheel guard The wheel guard on both sides of the cabin prevents the wheels from getting stuck on pillars or similar obstacles. Prepare the wheel guard by removing the two prefitted screws from the holes. Hold the wheel guard close to the wheel against the cabin frame so that the following conditions are fulfilled: The holes on the wheel guard face the holes in the cabin frame tube. -
Page 17: Relocating Brake Cable
Assembly Place the quick-release screws from the outside through the holes of the following parts to secure the connection: Reinforcement plate (outside of the push handle) – Push handle – Tube ends of the cabin roof – Place the nut onto the thread and tighten until the quick-release clamp can only be closed with a bit of force. -
Page 18: Tightening The Backrest
Assembly Danger! After mounting the wheels, secure the whenever you park it so as to prevent KidGoo2 it from rolling away, see “Using the parking brake” on page Check whether there is sufficient air in the wheels (recommended air pressure: 1.7 – 2.4 bar). If necessary, use an air pump for car valves to top up with air. -
Page 19: Optional Assembly Steps
Assembly Optional assembly steps Installing the buggy wheel You need the buggy wheel for Buggy and Walker mode. It consists of two components: The wheel suspension is fitted to the wheel mount of the cabin frame by means of a quick- ƒ... -
Page 20: Mounting The Coupler Onto A Bicycle
Assembly Fold the tow bar into the desired position. Lock the tow bar in the front or rear hole of the tow bar mount by pushing through the cotter pin and folding closed the securing bracket. Tighten the star grip nut in order to securely connect the tow bar to the cabin. -
Page 21: Installing Optional Accessories
13 kg in the KidGoo2 The adapter is screwed tightly into the cabin frame; the click system of the adapter is compatible with models from Maxi Cosi and the Qeridoo baby seat 0+ ( art. 1298). Danger! Please remember that KidGoo2 can no longer be used to transport 2 children if the adapter is attached. - Page 22 Assembly You will need a hex key (size 4) as well as 2 spanners (width 8 and 11) for assembly. After removing the bench seat, the adapters are screwed to the horizontal bars of the cabin floor on the left and right side.
- Page 23 Assembly Inserting baby seat Danger! Read the manual which you received with the baby seat. Pay particular attention to all instructions regarding the safety of the baby. Open the harness catch of the safety harness. Place the baby seat into the adapter; the lock of the baby seat must engage audibly on both sides.
-
Page 24: Utilisation
Utilisation Below you will find all the information for adapting the to the required modes and to KidGoo2 allow you to use all the convenience functions. Operating the brake The disc brake system of the is used as a parking brake but is also used for braking during KidGoo2 the journey in the buggy and walker mode. -
Page 25: Adjusting The Push Handle
Utilisation Checking the brake effect It is easy to check whether both disc brakes are experiencing the same brake effect: Activate the parking brake by locking the brake lever. Then try to push the in a straight line despite the locked brakes. When doing this, the KidGoo2 can move in the following ways: KidGoo2... -
Page 26: Setting The Mode
Utilisation Release the two pushbuttons in order to activate the engagement function. Move the push handle slightly up or down until the height adjustment engages audibly. Setting the mode You can use the in one of the following modes: KidGoo2 Trailer mode: Carrying children in the when cycling ƒ... -
Page 27: Folding The Tow Bar In Or Out
Utilisation Tip! Carry the buggy wheel e.g. in the storage space in order to allow you to use the flexibly at your destination. Instructions for re-mounting it can be found in the KidGoo2 chapter “Installing the buggy wheel” on page 19. Setting the wheel so that it turns freely (Buggy mode) It must be possible for the wheel to move freely through 360°... -
Page 28: Securing The Load
Utilisation Securing the load Loading the baggage Loading the storage space Undo the Velcro fasteners of the storage space cover and lift it. Pack larger items such as bags, toys or coats in the storage space. Also use the inside pocket which is integrated into the cover. -
Page 29: Embarking The Child
Utilisation Put the harness catch, including the pad, onto the centre harness on the front of the seat. Use the harness catch of the left or right seat to do this. Repeat this procedure in reverse order whenever you require the safety harnesses for carrying two children. Embarking the child Preparing the cabin Apply the parking brake to secure the... -
Page 30: Checking The Weight Distribution And Tow Bar Load
Utilisation Pull the side harnesses to the middle and connect the two parts of the tongue. Push the tongue into the harness catch until it engages audibly. Check that all parts of the 5-point safety harness fit properly and comfortably. Close the cover and the associated toggle and Velcro fasteners. -
Page 31: Connecting The Trailer To A Bicycle
Utilisation Changing the towbar load Adjust the tow bar load by moving or reducing your baggage: Tow bar load over 8 kg: Move items of baggage to the rear, e.g. from the storage space to the pouch for small items. Tow bar load less than 3 kg: Move items of baggage forward, e.g. -
Page 32: Using The Comfort Functions
Utilisation Using the comfort functions offers some climate functions for the cabin and can be conveniently adjusted by KidGoo2 adapting the suspension. Using the climate functions Adjusting the 2-in-1 canopy The 2-in-1 canopy is comprised of an insect net and a weather canopy: The inner part of the 2-in-1 canopy must be closed during every journey because the integral ƒ... -
Page 33: Adjusting The Suspension
Utilisation Rear ventilation window: To open, roll up the cover and lock it with the top Velcro fastener. To close, secure the cover with the Velcro fastener again. Danger! Open the ventilation windows on hot days or in heavy traffic in order to remove warm air or exhaust fumes from the cabin more quickly. -
Page 34: Storage
Utilisation Move the clamp right to the front (0 – 9 kg) if you – have a very light child and are not transporting a lot of luggage (soft suspension). Move the clamp to the back (36 – 44 kg) if you are –... -
Page 35: Care And Maintenance
The storage location should be dry, well ventilated and protected against direct sunlight. ƒ At higher storage temperatures, you should store the wheels separately from the cabin ƒ because the tyres’ rubber can cause odours. Use a Qeridoo folding garage if the must be kept outdoors, see “Accessories” on ƒ KidGoo2 page Subject to change. -
Page 36: Maintenance Intervals
Care and maintenance Maintenance intervals Caution! Replace corroded steel and aluminium parts immediately. Never bend back deformed or bent aluminium parts (risk of breakage). Replace bent aluminium parts immediately. Immediately replace plastic parts that have become porous or fragile due to the effects of the weather, for example. -
Page 37: Semi-Annually (Or Every 500 Km)
Care and maintenance Semi-annually (or every 500 km) Care for all sliding and moving parts with silicone spray. ƒ Clean the inside and outside of the cabin thoroughly. ƒ Every three years (or every 3000 km) Have a full inspection carried out by a specialist workshop no later than every three years. Subject to change. -
Page 38: Appendix
Appendix Technical data External dimensions Length (without buggy wheel) 102 cm Length (with buggy wheel) 117 cm Length (with tow bar) 148 cm Width (external width from wheel to wheel) 85 cm Height (from ground to cabin roof) 93 cm Height of push handle (lowest / highest set dimension) 80 cm / 112 cm Pack size of the collapsed cabin (L x W x H) -
Page 39: Warranty Terms
Under no circumstances shall Qeridoo be liable for material damage or injury attributable to improper assembly, the intentional alteration of components or the non-observance of warning and maintenance notices. -
Page 40: Spare Parts
Appendix Spare parts (valid from 2016) Frame components Pos. Article Article no. Front horizontal bar of the bench seat 9R-187 Rear horizontal bar of the bench seat 8R-99 Roof support 1R-589 Horizontal bar U-shape QR-K873 Connecting piece for rear frame rod 3R-88 Rear frame rod 5R-99... - Page 41 Appendix Pos. Article Article no. AD-800 Holding rod of the adapter set (Optional accessory) STR-45 Lateral frame rod QT-5999 Horizontal bar foot space Frame connecting plate 12R-552 Complete tow bar with coupler DIE-900-1 8.5" buggy wheel, complete BG-555K (with wheel suspension and quick-release clamp) Plastic holder for roof frame rods front PLK-Q8 Front frame rod...
- Page 42 Appendix Complete tow bar with coupler Push-in axle / hub axle Art. no.: DIE-900-1 Art. no.: ZT6-2016 Tow bar mount Wheel axle complete with disc (plastic insert) brakes ING-58993 ACS-09L-S Art. no.: Art. no.: Screw set for tow bar Brake cable incl. brake lever GFR-8899 Art.
- Page 43 Appendix Plastic cover for rear rod Art. no.: PKU-Q89 Tube cap Art. no.: RDLL-Q8 Tube cap small RDLL-Q99 Art. no.: Folding handle (lock of the FX folding system) Art. no.: FRJ-Q8 Screw set (1 set with all the required assembly screws) Art.
- Page 44 KidGoo2 – Q9000-S Qeridoo GmbH Reutherstraße 3, 53773 Hennef (Sieg) Germany www.qeridoo.com info@qeridoo.com...
Need help?
Do you have a question about the KidGoo2 – Q9000-S and is the answer not in the manual?
Questions and answers