BRAND Titrette Operating Manual
Hide thumbs
Also See for Titrette:
- Operating manual (233 pages) ,
- Manual (9 pages) ,
- Operating manual (241 pages)
Table of Contents
Advertisement
Available languages
Available languages
Quick Links
Advertisement
Chapters
Table of Contents

Related Manuals for BRAND Titrette


Summary of Contents for BRAND Titrette
- Page 1 Titrette ® Manual de Operação Operating Manual · · BRAND. For lab. For life.
-
Page 3: Table Of Contents
Índice Página Instruções de segurança Limitações de uso Elementos de Operação Primeiros passos Inicializar - Purgar Purga do ar Titulação Função Pausa Interace com PC (opcional) Meios sensíveis Substituição do visor de inspeção Instalação do tubo de secagem (opcional) Limites de erro (Volume Nominal, Volume Parcial) Verificação do volume (calibração) Funções adicionais Ajuste da Calibração... -
Page 4: Instruções De Segurança
8. Nunca remova o tubo de titulação quando o cilindro de vidro estiver cheio. Funções e Limitações de Uso A bureta para frascos Titrette com display eletrônico digital é utilizada para titulação de soluções aquosas ® e não aquosas (ex. KOH alcoólico) até uma concentração máx. de 1mol/l (veja pág. 5) para faixas de aplicação recomendadas). -
Page 5: Limitações De Uso
A recomendação acima reflete os testes realizados antes desta publicação (Status 1115/4). Sempre siga as intruções do manual de operação do instrumento, assim como as especificações dos fabricantes de reagentes. Se necessitar informações sobre produtos químicos não listados, contate seu fornecedor local ou a BRAND. -
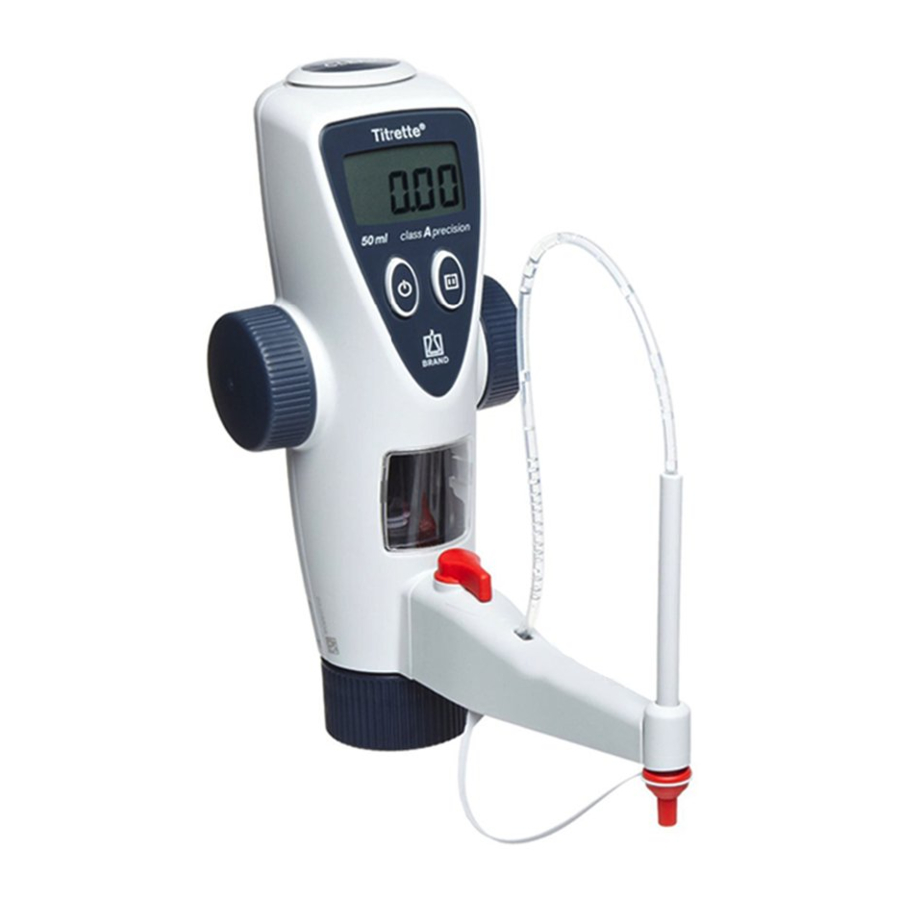
Page 6: Elementos De Operação
Bloco de válvulas com válvula de (rosca p/frascos GL 45) saída integrada Tubo de Recirculação Tubo Telescópico Tampa Rosqueável A chave de monta- gem é armazenada na tampa traseira. As características fundamentais da bureta para frascos Titrette ® estão patenteadas internacionalmente. -
Page 7: Primeiros Passos
Primeiros Passos Todos os elementos estão na embalagem? Confirme que se na sua embalagem estão incluídos: Bureta para frascos Titrette de 25ml ou 50ml; tubo ® telescópico de enchimento (comprimento 170-330mm); tubo de recirculação; 2 pilhas 1,5V (AAA/UM4/ LR03); 4 adaptadores para frasco em PP (GL45/32-33; GL 45/38; GL45/S40; GL32-33/NS 29/32); 2 visores de inspeção coloridos (âmbar);... - Page 8 Primeiros Passos Inicializar Purgar (cont.) Atenção: Use vestimenta de proteção, óculos de segurança e luvas! Siga as instruções de segurança e observe as limitações de uso e operações não recomendadas (pág. 5). Montagem do Ajuste o comprimento do tubo telescópi- tubo de enchime- co de enchimento para a altura do frasco nto e do tubo de...
-
Page 9: Purga Do Ar
Preliminares Observação: Antes de utilizar o equipamento pela primeira vez, certifique de que foi rinsado cuidadosamente e descarte as primeiras dispen- sações. Evite respingos. Certifique-se de que a tampa rosca de segurança da cânula de titulação está firmemente rosqueada. Gire a válvula de recirculação até a posição “Recircular” (Fig. 2). Primeiro, gire o comando para mover o pistão completamente para baixo. -
Page 10: Titulação
Titulação O que fazer Como fazer Pressionar as teclas Leitura no Display Ligar o instrumen- Para ligar o instrumento, pressione o botão Liga/ Desliga. Encher o instru- Encha o instrumento suave- mento mente até a posição superior girando os comandos ma- nuais. -
Page 11: Função Pausa
A Função Pausa Se bolhas de ar aparecerem durante a titulação devido à preparação incompleta do instrumento, o líquido pode ser dispensado em um recipiente diferente para a preparação do instrumento, sem que o valor no display seja alterado. Iniciar a função Pressione a tecla Pausa. -
Page 12: Meios Sensíveis
Meios sensíveis Substituição do visor de inspeção Para meios sensíveis à luz (ex. iodo, potássio permanganato e soluções de prata nitrato) recomendamos o uso do visor colorido de inspeção protetor contra a luz. Desrosqueie a tampa de ventilação com a mão ou utilize uma moeda (Fig.1). -
Page 13: Limites De Erro (Volume Nominal, Volume Parcial)
20 °C com DIN EN ISO 8655-6 com o instrumento completamente cheio e com dispensação suave e uniforme até o volume nominal ou parcial. Comparação dos limites de erro: Titrette Requerimentos para Buretas de vidro ® Bureta de topo para buretas de pistão de... -
Page 14: Verificação Do Volume (Calibração)
Este período deve ser ajustado para corresponder aos requerimentos individuais. O procedimento de teste completo (SOP) pode ser baixado em www.brand.de. Além disso uma inspeção simples também pode ser realizada em períodos mais curtos, por exemplo titulando contra um padrão. Para avaliação e do- ™... -
Page 15: Funções Adicionais
Funções Adicionais Página Modo CAL Ajuste A técnica Easy Calibration torna os ajustes do instrumento rápidos e simples, além de serem realizados sem o auxilio de ferramenta. Modo GLP Agendamento de Calibração Insira a data da próxima caibração programada pelas BPL (GLP). Modo APO Auto Power Off Configure o desligamento automático para... -
Page 16: Ajuste Da Calibração
Ajuste Modo CAL · Técnica Easy Calibration Um ajuste pode ser necessário após um longo período de uso ou após a substituição do conjunto pistão/ cilindro, para corrigir diferenças de exatidão até um máximo de 0,999ml. Uma mudança na configuração padrão de fábrica é... - Page 17 Novo Ajuste Modo CAL · Técnica Easy Calibration A informação contínua do símbolo CAL no dispaly indica que a configuração padrão de fábrica foi altera- da. Ao inserir um novo valor de ajuste, este será automaticamente adicionado ao valor de ajuste existente. O que fazer Como fazer Pressionar as teclas...
- Page 18 Padrão de Fábrica Modo CAL · Técnica Easy Calibration A informação contínua do símbolo CAL no dispaly indica que a configuração padrão de fábrica foi altera- da. Se deseja restaurar a configuração de fábrica, siga as seguintes instruções. O que fazer Como fazer Pressionar as teclas Leitura no Display...
-
Page 19: Agendamento Da Calibração
Agendamento de Calibração Modo GLP A data programada para a próxima calibração pode ser armazenada no Modo GLP (BPL = Boas Práticas de Laboratório). O que fazer Como fazer Pressionar as teclas Leitura no Display Selecionar o Com o instrumento ligado, >... -
Page 20: Auto Power Off
Auto Power Off Modo APO · Ajustes No Modo APO, o tempo para desligamento automático pode ser ajustado de 1 a 30 minutos. Nas configurações padrão de fábrica o instrumento se desligará automaticamente após 3 minutos. Quanto menor o tempo de desligamento automático, maior a vida útil da bateria. O que fazer Como fazer Pressionar as teclas... -
Page 21: Casas Decimais
Alterar as casas decimais Modo dP No Modo dP, o display pode ser selecionado para mostrar 2 ou 3 casas decimais (padrão de fábrica é 2). Observação: Por razões técnicas, volumes de titulação acima de 20,00ml somente podem ser indicados com 2 casas decimais. -
Page 22: Limpeza
Limpeza O instrumento deve ser limpo nas seguintes situações para garantir a correta operação. I Imediatamente, se os botões giratór- I Antes de desmontar o instrumento ios ficarem difíceis de girar I Regularmente, quando se utiliza so- I Antes de mudar o reagente luções que cristalizam I Antes de um longo período de arma- I Se líquido acumula na tampa rosca do... -
Page 23: Limpeza Intensa
Limpeza Solte o anel de segurança do conjunto cilindro/pistão com a ferramenta de montagem, e desrosqueie completamente com a mão (Fig. 9). Libere o mecanismo de trava do pistão e mova-o para cima (Fig. 10). Movimente a parte superior do instrumento todo o percurso para cima girando os botões giratórios, e remova-a (Fig.11). -
Page 24: Tubo De Tiltulação
Limpeza Desmontagem do instrumento · Substituição de componentes Remover e limpar/substituir o tubo de titulação (verificar alteração estrutural para os números de série 01K, consultar manual original na pág. 25) a) Posicione a válvula para “recircular” e puxe o comando da válvula par cima (Fig. - Page 25 Limpeza Desmontagem do instrumento · Substituição de componentes b) Utilize um pano macio para limpar o cilindro de dispen- sação e o pistão, ou substitua-os. c) Para substituir o pistão, primeiro desloque o anel de se- gurança cinza claro do pistão para cima (Fig. c), então desenrosque a cabeça do pistão (Fig.
-
Page 26: Parte Superior Da Carcaça
Limpeza Desmontagem do instrumento · Substituição de componentes Montar o tubo de titulação (Note mudança da estrutura a partir do número de série 01K na pág. anterior) Montar o tubo de titulação limpo ou substituto: a) Empurre o tubo de titulação aprox. 5mm. b) Desloque a carcaça do tubo de titulação para cima até... - Page 27 Limpeza Desmontagem do instrumento · Substituição de componentes c) Eleve o anel de segurança da unidade dosificadora e verifique se a rosca do anel se encaixa com segurança. Então rosqueie o anel de segurança manualmente e com firmeza. (Fig. c). d) Coloque a ferramenta de montagem posicionando próximo à...
-
Page 28: Válvula De Enchimento
Limpeza Desmontagem do instrumento · Substituição de componentes Limpar / substituir a válvula de enchimento Sempre realize uma limpeza padrão antes de desmontar o instru- mento! a) Remova a carcaça traseira e retire a ferramenta de montagem. b) Remova o tubo telescópico de enchimento e o tubo de recirculação (Fig. -
Page 29: Substituição Das Baterias
Substituição das baterias Substituição das baterias Um simbolo de baterias piscando será mostrado no display se capacidade das pilhas estiver reduzida. As pilhas então devem ser substituídas. Use somente o tipo de pilha especificado: 1,5V (AAA/UM4/ LR03). As pilhas não são recarregáveis. Remova a tampa rosca da entrada de ventilação (Fig. -
Page 30: Informaçãos De Pedido · Acessórios · Peças
Informação para pedido · Acessórios · Peças de reposição Titrette ® Padrão Com interface RS 232 Volume Ref. Ref. 10 ml 4760 141 4760 241 25 ml 4760 151 4760 251 50 ml 4760 161 4760 261 Adaptador para frascos, PP, Embalagem com 1 und. - Page 31 Emb. com 2. Emb. com 2. Ref. 8857 Ref. 7260 Para instrumentos com interface para PC Cabo de conexão RS Software Titrette CD- ROM. comprimento 2m. Em- Inglês / Alemão. balagem com 1 und. Embalagem com 1 und. Ref. 8850 Ref.
-
Page 32: Resolução De Problemas
Resolução de Problemas Problema Possível causa Ação corretiva Líquido aparece acima do Vazamento no pistão Realize uma limpeza, substitua o pistão conjunto pistão/cilindro (pág. 24). Pistão difícil de mover Conjunto pistão/cilindro está conta- Realize uma limpeza, substitua minado ou danificado por depósitos o conjunto pistão/cilindro, se cristalinos necessário (pág 24). -
Page 33: Reparo · Endereços De Contato
O modelo também se encontra na página www.brand.de para download. Nos EUA e Canada: – Contate a Brand Tech Scientific, Inc. e obtenha a autorização para retorno antes de enviar o instrumento para serviço. – Retorne somente instrumentos limpos e descontaminados, com o Número de Autorização para Retorno permanentemente visível do lado de fora da... -
Page 34: Serviço De Calibração · Informações De Garantia · Descarte
Simplesmente envie o instrumento para ser calibrado, acompanhado por uma indicação de qual tipo de calibração é desejada. Seus instrumentos serão retornados em poucos dias juntamente com o relatório (Serviço de Calibração BRAND) ou um certificado DAkkS. Para maiores informações, por favor contate seu fornecedor ou a BRAND. Garantia Não nos responsabilizamos por consequências causadas pelo manuseio im-... - Page 35 Table of Contents Page Safety Instructions Functions and Limitations of Use Operating Elements First Steps Initializing Priming Titrating Pause function PC interface (optional) Sensitive Media Replacing the inspection window Installing a drying tube (optional) Error Limits (Nominal Volume, Partial Volume) Checking the Volume (Calibration) Additional Functions Calibration Adjustment...
-
Page 36: Safety Instructions
Thus, it should be cleaned regularly. Functions and Limitations of Use The bottle-top burette Titrette with an electronic digital display is used for the titration of aqueous and ® non-aqueous titration media (e.g., alcoholic KOH) up to a max. concentration of 1 mol/l (see page 37 for recommended application range). -
Page 37: Functions And Limitations Of Use
The above recommendations reflect testing completed prior to publication (Status as of 1115/4). Always follow instructions in the operating manual of the instrument as well as the reagent manufacturer‘s specifications. Should you require information on chemicals not listed, please feel free to contact BRAND. -
Page 38: Operating Elements
Valve block with integrated (bottle thread GL 45) discharge valve Recirculation tube Telescoping filling tube Screw cap The mounting tool is stored in the rear housing. The essential features of the Titrette bottle-top ® burette are internationally patent pending. -
Page 39: First Steps
First Steps Is everything in the package? Confirm that your package includes: Titrette bottle-top burette, size 25 ml or 50 ml; telescoping filling tube ® (length 170 - 330 mm); recirculation tube; 2 micro-batteries 1.5 V (AAA/UM4/LR03); 4 bottle adapters PP (GL 45/32-33, GL 45/38, GL 45/S 40, GL 32-33/NS 29/32);... - Page 40 First Steps Initializing (cont.) Attention: Wear protective clothing, eye protection and gloves! Follow all safety instructions and observe limitations of use and operating limitations (see page 37). Mounting the Adjust the length of the telescoping fill- filling tube and ing tube to the bottle height and attach recirculation tube it.
-
Page 41: Priming
Priming Note: Before using the instrument for the first time, ensure it is rinsed carefully and discard the first few samples dispensed. Avoid splashes. Ensure that the screw cap for the titrating tube is screwed on firmly. Turn the valve in the direction of the arrow to 'Recirculate' (Fig. -
Page 42: Titrating
Titrating What to do How to do it Keys to press Display readout Powering on To power on the instrument, the instrument press the On/Off key. Filling the Fill the instrument smoothly instrument up to the upper position by turning the hand wheels. Press the CLEAR key once briefly in order to set the display value to zero. -
Page 43: Pause Function
The Pause function If air bubbles appear during titration because the instrument has not been completely primed, liquid can be dispensed into a different receptacle for priming without the display value being changed. Start the Pause Press the Pause key. function The Pause signal blinks. -
Page 44: Sensitive Media
Sensitive Media Replacing the inspection window For light-sensitive media (e.g., iodine, potassium permanganate and silver nitrate solutions), we recommend the use of the colored light shield inspection window. Unscrew the air vent cap by hand or use a coin (Fig. 1). Remove the rear housing (Fig. -
Page 45: Error Limits (Nominal Volume, Partial Volume)
(20 °C/68 °F). Testing takes place according DIN EN 20 °C ISO 8655-6 with a completely filled instrument and with uniform and smooth dispensing up to the nominal or partial volume. Comparison of error limits: Titrette Requirements for piston Glass burette ® bottle-top burette burettes according to Class A acc. -
Page 46: Checking The Volume (Calibration)
The complete testing procedure (SOP) can be down- loaded at www.brand.de. In addition, a function test can also be carried out over shorter time spans, for example by titration against a standard. For GLP- and ISO-compliant evaluations and documentation, we recommend the EASYCAL ™... -
Page 47: Additional Functions
Additional Functions Page CAL Mode Adjustment The Easy Calibration technique makes rapid and simple instrument adjustments possible without tools. GLP Mode Calibration Schedule Input the scheduled date for calibration designated by GLP. APO Mode Auto Power Off Set up the automatic shut-down for long periods when the instrument is not in use. -
Page 48: Calibration Adjustment
Adjustment CAL Mode · Easy Calibration Technique An adjustment might be necessary after a long period of usage or following the replacement of the pis- ton/cylinder assembly, in order to balance out differences in accuracy up to a maximum of ±0.999 ml. A change from the factory default setting is indicated by the small 'CAL' icon at the top of the display. - Page 49 Adjustment CAL Mode · Easy Calibration Technique The continuously displayed CAL symbol indicates that the factory default setting has been changed. By entering a new adjustment value, this will be added automatically to the already existing adjustment value. What to do How to do it Keys to press Display readout...
- Page 50 Factory Default CAL Mode · Easy Calibration Technique The continuously displayed CAL symbol indicates that the factory default setting has been changed. If you wish to restore the factory default setting, complete the following instructions. What to do How to do it Keys to press Display readout Bring up the...
-
Page 51: Calibration Schedule
Calibration Schedule GLP Mode The schedule for the next calibration can be stored in GLP Mode (GLP = Good Laboratory Practice). What to do How to do it Keys to press Display readout Bring up the With the instrument powered >... -
Page 52: Auto Power Off
Auto Power Off APO Mode · Settings In APO mode, the time for automatic power off can be set from 1 to 30 minutes. In factory default setting the instrument will power down automatically after 3 minutes. The shorter the Auto Power Off setting, the longer battery service life will be. What to do How to do it Keys to press... -
Page 53: Decimal Place
Changing the Decimal Place Settings dP Mode In dP mode, the display can be selectively set to show 2 or 3 decimal places (factory default setting is 2). Note: For technical reasons, titration volumes above 20.00 ml can only be displayed to 2 decimal places. What to do How to do it Keys to press... -
Page 54: Cleaning
Cleaning The instrument must be cleaned in the following situations to assure correct operation: I immediately, if the hand wheels I prior to dismantling the instrument become harder than usual to turn I regularly when using crystallizing I before changing the reagent liquids I prior to long term storage I if liquid has accumulated in the... -
Page 55: Intensive Cleaning
Cleaning Loosen the safety ring of the piston/cylinder assembly with the mounting tool, and unscrew it completely by hand (Fig. 9). Withdraw the locking mechanism of the piston rod up to the stop (Fig. 10). Move the top part of the instrument all the way to the top by turning the hand wheels, and remove it (Fig. -
Page 56: Piston/Cylinder Assembly
Cleaning Dismantling instrument · Component replacement Removing and Cleaning / replacing titration tube (Note to structural change from serial-number 01K on page 57.) a) Set the valve to 'Recirculate' and pull the valve lever upwards (Fig. a). b) Hold the titrating tube as shown in the figure. To dis- connect the housing, press the titrating tube upwards to the stop, then use gentle up and down motions to pull it forward (Fig. - Page 57 Cleaning Dismantling instrument · Component replacement b) Use a soft cloth to clean the dispensing cylinder and piston, or replace them. c) To replace the piston, first slide the light grey safety ring of the piston rod upwards (Fig. c), and then un- screw the piston head (Fig.
- Page 58 Cleaning Dismantling instrument · Component replacement Mounting the titrating tube (Note to structural change from serial-number 01K on page 57.) Mounting the cleaned or replaced titrating tube a) Push in the titrating tube approx. 5 mm. b) Slide up the housing of the titrating tube to the upper stop.
- Page 59 Cleaning Dismantling instrument · Component replacement c) Lift the safety ring of the piston/cylinder assembly and check that the nut and bolt mesh securely. Then, screw in the safety ring hand tight (Fig. c). d) Set the mounting tool on the right-hand edge of the housing, and tighten it towards the left-hand edge (Fig.
-
Page 60: Filling Valve
Cleaning Dismantling instrument · Component replacement Cleaning / replacing the filling valve Always perform a standard cleaning before dismantling the instrument! a) Remove the rear housing and take out the mounting tool. b) Pull out the telescoping filling tube and the recirculation tube (Fig. -
Page 61: Changing Batteries
Replacing Batteries Replacing the batteries A blinking battery symbol will show on the display if the battery capacity is depleted. The batteries should then be replaced. Use only the specified battery type: 1.5 V (AAA/UM4/LR03) micro-battery. Batteries are not rechargeable. Unscrew the air vent cap by hand or use a coin (Fig. -
Page 62: Ordering Information · Accessories · Spare Parts
Ordering Information · Accessories · Spare Parts Titrette ® Standard with RS 232 interface Volume Cat. No. Cat. No. 10 ml 4760 141 4760 241 25 ml 4760 151 4760 251 50 ml 4760 161 4760 261 Bottle adapter, PP. Pack of 1. - Page 63 Battery case cover Pack of each 2. Pack of 2. Cat. No. 8857 Cat. No. 7260 For instruments with a PC interface Connection cable Titrette software RS 232 CD-ROM Length 2 m German/English pack of 1. pack of 1. Cat. No. 8850 Cat.
-
Page 64: Troubleshooting
Troubleshooting Problem Possible cause Corrective action Liquid is above the piston Piston leaks Perform a cleaning, replace the piston/cylinder assembly (see page 56). Piston difficult to move Piston/cylinder assembly is Perform a cleaning, replace contaminated or damaged by the piston/cylinder assembly, if crystalline deposits necessary (see page 56). -
Page 65: Repairs · Contact Addresses
– Complete the “Declaration on Absence of Health Hazards” and send the instrument to the manufacturer or supplier. Ask your supplier or manufacturer for the form. The form can also be downloaded from www.brand.de. In the U.S. and Canada: – Contact BrandTech Scientific, Inc. and obtain authorization for the return before sending your instrument for service. -
Page 66: Calibration Service · Warranty Information · Disposal
Just send in the instruments to be calibrated, accompanied by an indica- tion of which kind of calibration you wish. Your instruments will be returned within a few days together with a test report (BRAND Calibration Service) or with a DAkkS Calibration Certificate. For further information, please contact your dealer or BRAND. - Page 68 BRAND GMBH + CO KG · Postfach 11 55 · 97861 Wertheim · Germany Tel.: +49 9342 808-0 · Fax: +49 9342 808-98000 · E-Mail: info@brand.de · Internet: www.brand.de 9974 08 · Printed in Germany · 0117/7...
Need help?
Do you have a question about the Titrette and is the answer not in the manual?
Questions and answers