BRAND Titrette Operating Manual
Hide thumbs
Also See for Titrette:
- Operating manual (233 pages) ,
- Manual (9 pages) ,
- Operating manual (15 pages)

Subscribe to Our Youtube Channel
Related Manuals for BRAND Titrette


Summary of Contents for BRAND Titrette
- Page 1 Titrette ® Gebrauchsanleitung · Operating Manual · Mode d'emploi Instrucciones de manejo · Istruzioni per l'uso · 操作手册...
-
Page 3: Table Of Contents
Inhaltsverzeichnis Seite Sicherheitsbestimmungen Funktion und Einsatzgrenzen Bedienelemente Erste Schritte Inbetriebnahme Entlüften Titrieren Pausenfunktion PC-Schnittstelle (optional) Empfindliche Medien Sichtfenster tauschen Trockenrohr (optional) montieren Fehlergrenzen (Nennvolumen, Teilvolumen) Volumen kontrollieren (Kalibrieren) Zusatzfunktionen Justieren Kalibriertermin Auto-Power-Off Dezimalstellen Reinigung Standard-Reinigung Intensiv-Reinigung (Gerät zerlegen, Komponenten austauschen) Gehäuseoberteil 23, 26 Titrierkanüle... -
Page 4: Sicherheitsbestimmungen
9. In der Verschlusskappe der Titrierkanüle kann sich Reagenz ansammeln. Daher regelmäßig reinigen. Funktion und Einsatzgrenzen Die Flaschenaufsatzbürette Titrette mit elektronischer Digitalanzeige dient zum Titrieren von wässrigen ® und nichtwässrigen Titriermedien (z.B. alkoholische KOH) bis zu einer Konzentration von max. 1 mol/l. -
Page 5: Funktion Und Einsatzgrenzen
Diese Tabelle ist sorgfältig geprüft und basiert auf dem derzeitigen Kenntnisstand (Stand: 0219/4). Stets die Gebrauchsanweisung des Gerätes sowie die Angaben der Reagenzienhersteller beachten. Sollten Sie Aussagen zu Chemikalien benötigen, die nicht in der Liste genannt sind, können Sie sich gerne an BRAND wenden. -
Page 6: Bedienelemente
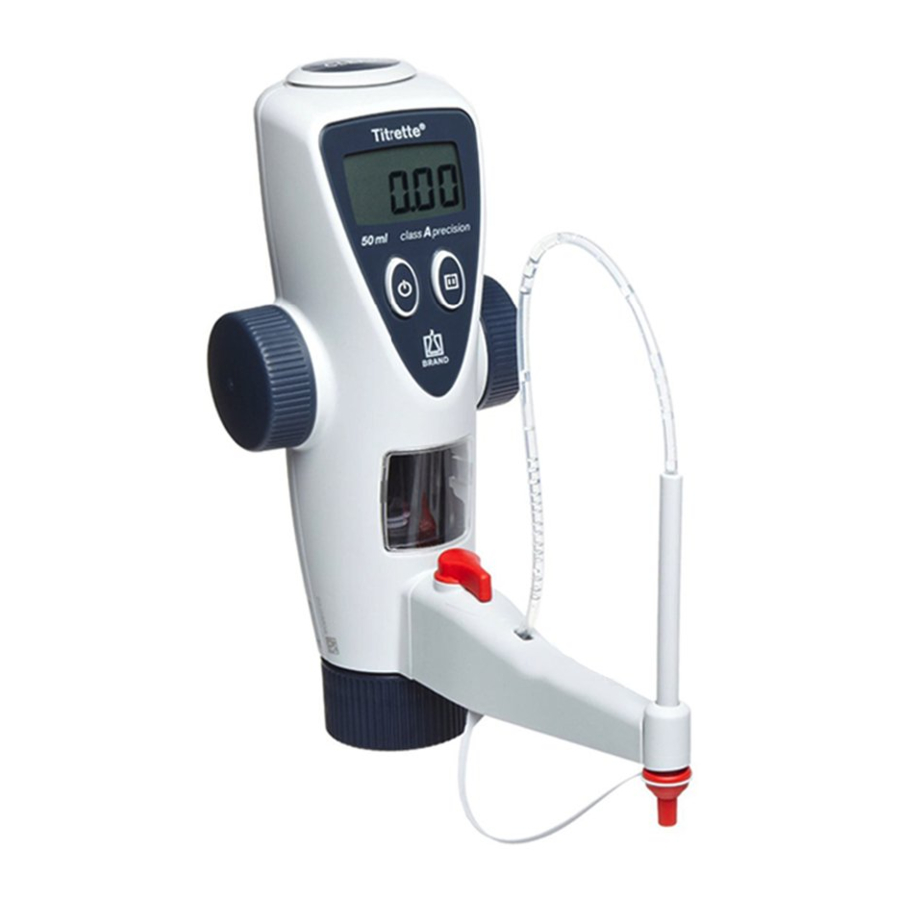
Dosierzylinder Ventil (Titrieren/ Rückdosieren) Titrierkanüle mit integriertem Ausstoßventil, Ventilblock horizontal und (Flaschengewinde GL 45) vertikal verstellbar Rückdosierrohr Teleskop-Ansaugrohr Schraubkappe Der Montage- schlüssel befindet sich in der hinteren Gehäuseschale. Wesentliche Merkmale der Flaschenaufsatz- bürette Titrette sind ® international zum Patent angemeldet. -
Page 7: Erste Schritte
Erste Schritte Ist alles in der Verpackung? In der Verpackung befinden sich: Flaschenaufsatzbürette Titrette , Größe 25 ml oder 50 ml, Teleskop- ® Ansaugrohr (Länge 170 - 330 mm), Rückdosierrohr, 2 Mikro-Batterien 1,5 V (AAA/UM4/LR03), 4 PP-Fla- schenadapter (GL 45/32-33, GL 45/38, GL 45/S 40, GL 32-33/NS 29/32), 2 eingefärbte Lichtschutz- Sichtfenster, ein Qualitätszertifikat und diese Gebrauchsanleitung. - Page 8 Erste Schritte Inbetriebnahme (Forts.) Achtung: Schutzkleidung, Augenschutz und Schutzhandschuhe tragen! Alle Sicherheitsbestimmungen befolgen sowie Einsatzgrenzen und Ein- satzbeschränkungen beachten (s. Seite 5). Ansaug- und Länge des Teleskop-Ansaugrohres ent- Rückdosierrohr sprechend der Flaschenhöhe einstellen montieren und montieren. Rückdosierrohr mit der Öffnung nach außen einstecken (Abb. 3). Hinweis: Bei stark kristallisierenden Medien wie z.B.
-
Page 9: Entlüften
Entlüften Hinweis: Vor dem ersten Gebrauch das Gerät gründlich spülen und die ersten Dosierungen verwerfen. Spritzer vermeiden. Sicherstellen, dass die Schraubkappe der Titrierkanüle fest auf- geschraubt ist. Ventil in Pfeilrichtung auf 'Rückdosieren' drehen (Abb. 2). Zuerst den Kolben durch Drehen der Handräder ganz nach unten bewegen. -
Page 10: Titrieren
Titrieren Was muss ich tun? Wie geht das? Welche Taste? Was zeigt das Display? Gerät einschalten Zum Einschalten die Ein/ Aus-Taste kurz drücken. Gerät füllen Durch Drehen der Hand- räder das Gerät sanft bis zum oberen Anschlag füllen. CLEAR-Taste 1x kurz drü- cken um den Anzeigewert auf Null zu stellen. -
Page 11: Pausenfunktion
Pausenfunktion Treten während der Titration Luftblasen auf, weil das Gerät unvollständig entlüftet wurde, so kann in der Pausenfunktion zum Entlüften Flüssigkeit in ein anderes Gefäß abgegeben werden, ohne dass sich der Anzeigewert ändert. Pausenfunktion Pause-Taste drücken. starten Das Pausensignal blinkt. (Beschreibung s. -
Page 12: Empfindliche Medien
Empfindliche Medien Sichtfenster tauschen Für lichtempfindliche Medien (z.B. Iod-, Kaliumpermanganat- und Silbernitratlösung) empfehlen wir, die eingefärbten Lichtschutz- Sichtfenster zu verwenden. Belüftungsstopfen von Hand oder mit einer Münze heraus- schrauben (Abb. 1). Hintere Gehäuseschale entfernen (Abb. 2). Clip des hinteren Sichtfensters auf einer Seite lösen und herausnehmen (Abb. -
Page 13: Fehlergrenzen (Nennvolumen, Teilvolumen)
Wasser. Die Prüfung erfolgte gemäß DIN EN ISO 8655-6 bei vollständig gefülltem Gerät und gleichmäßiger und ruckfreier Dosierung bis zum Nenn- bzw. Teilvolumen. Fehlergrenzen im Vergleich: Flaschenaufsatz- Flaschenaufsatz- Glasbürette bürette Titrette büretten nach Klasse A nach ® DIN EN ISO 8655-3 DIN EN ISO 385 Volumen... -
Page 14: Volumen Kontrollieren (Kalibrieren)
Das 10 ml Gerät zur Kalibrierung auf 3 Dezimalstellen einstellen (Seite 21). Dieser Zyklus sollte entsprechend den individuellen Anforderungen angepasst werden. Die ausführliche Prüfanweisung (SOP) steht unter www.brand.de zum Download bereit. Zusätzlich können Sie auch in kürzeren Zeitabständen eine Funktionsprüfung durchführen, z.B. durch Titration gegen einen Standard. Für die GLP- und ISO-gerechte Auswertung und Dokumentation empfehlen wir die Kalibriersoftware EASYCAL ™... -
Page 15: Zusatzfunktionen
Zusatzfunktionen Seite CAL-Modus Justieren Die Easy-Calibration-Technik erlaubt eine einfache und schnelle Gerätejustierung ohne Werkzeug. GLP-Modus Kalibriertermin Eingeben eines vorgesehenen Kalibrier- termins nach GLP. APO-Modus Auto-Power-Off Einstellen des automatischen Abschaltens bei längeren Arbeitsunterbrechungen. dP-Modus Dezimalstellen Wählen der Anzeige mit 2 oder 3 Dezimalstellen bis 20 ml. -
Page 16: Justieren
Justieren CAL-Modus · Easy Calibration Technik Nach längerem Gebrauch oder nach dem Austausch der Dosiereinheit kann eine Justierung erforderlich werden, um Richtigkeitsunterschiede bis maximal ± 0,999 ml auszugleichen. Die Veränderung der Werks- justierung wird im Display angezeigt. Was muss ich tun? Wie geht das? Welche Taste? Was zeigt das Display? - Page 17 Erneutes Justieren CAL-Modus · Easy Calibration Technik Das im Display ständig angezeigte CAL-Symbol weist auf eine bereits vorgenommene Justierung hin. Bei Eingabe des neuen Justagewertes wird dieser automatisch zu dem bereits vorhandenen Justagewert addiert. Was muss ich tun? Wie geht das? Welche Taste? Was zeigt das Display? Justagewert...
- Page 18 Werksjustierung CAL-Modus · Easy Calibration Technik Das im Display ständig angezeigte CAL-Symbol weist auf eine bereits vorgenommene Justierung hin. Es soll jedoch die Werksjustierung wiederhergestellt werden. Was muss ich tun? Wie geht das? Welche Taste? Was zeigt das Display? CAL-Modus >...
-
Page 19: Kalibriertermin
Kalibriertermin einstellen GLP-Modus Im GLP-Modus (Good Laboratory Practice) kann der Termin für die nächste Kalibrierung gespeichert werden. Was muss ich tun? Wie geht das? Welche Taste? Was zeigt das Display? GLP-Modus Bei eingeschaltetem Gerät > 3 s aufrufen CLEAR-Taste länger als 3 s gedrückt halten bis im Dis- play wiederholt nacheinander folgende Modi angezeigt... -
Page 20: Auto-Power-Off
Auto-Power-Off APO-Modus · Einstellung Im APO-Modus kann die Zeit für das automatische Abschalten von 1 bis 30 min eingestellt werden. In der Werkseinstellung schaltet das Gerät automatisch nach 3 Minuten ab. Je kürzer die Auto-Power-Off Zeit eingestellt ist, desto länger ist die Batterielebensdauer. Was muss ich tun? Wie geht das? Welche Taste? -
Page 21: Dezimalstellen
Dezimalstellen ändern dP-Modus Im dP-Modus kann die Anzeige wahlweise auf 2 oder 3 Dezimalstellen eingestellt werden (Werks- einstellung 2 Dezimalstellen). Hinweis: Titriervolumina ab 20,00 ml können technisch bedingt nur mit 2 Dezimalstellen angezeigt werden. Was muss ich tun? Wie geht das? Welche Taste? Was zeigt das Display? dP-Modus... -
Page 22: Reinigung
Reinigung Damit eine einwandfreie Funktion gewährleistet ist, muss das Gerät in folgenden Fällen gereinigt werden: n sofort, wenn die Handräder sich n vor dem Zerlegen des Gerätes schwerer als gewohnt drehen lassen n regelmäßig bei Verwendung von kristalli- n vor Reagenzwechsel sierenden Lösungen n vor längerer Lagerung n wenn sich Flüssigkeit in der Schraub-... -
Page 23: Intensiv-Reinigung
Reinigung Sicherungsring der Dosiereinheit mit dem Montageschlüssel lösen und von Hand vollständig abschrauben (Abb. 9). Die Verriegelung der Kolbenstange bis zum Anschlag heraus- ziehen (Abb. 10). Geräteoberteil durch Drehen der Handräder vollständig nach oben bewegen und abnehmen (Abb. 11). Eventuelle Kristallablagerungen am oberen Rand des Dosier- zylinders z.B. -
Page 24: (Gerät Zerlegen, Komponenten Austauschen)
Reinigung Gerät zerlegen · Komponenten austauschen Titrierkanüle abnehmen und reinigen / austauschen (Konstruktive Änderung ab Seriennummer 01K, Seite 25 beachten) a) Ventil auf 'Rückdosieren' stellen und Ventilhebel nach oben abziehen (Abb. a). b) Titrierkanüle wie abgebildet umgreifen. Zum Entriegeln das Gehäuse der Titrierkanüle bis zum Anschlag nach oben drücken und unter leichtem Auf- und Abbewegen nach vorne abziehen (Abb. - Page 25 Reinigung Gerät zerlegen · Komponenten austauschen b) Dosierzylinder und Kolben mit einem weichen Tuch reinigen bzw. austauschen. c) Zum Austausch des Kolbens erst den hellgrauen Siche- rungsring der Kolbenstange nach oben schieben (Abb. c), dann den Kolben abschrauben (Abb. c'). d) Neuen Kolben auf die Kolbenstange schrauben und festziehen.
-
Page 26: Titrierkanüle
Reinigung Gerät zerlegen · Komponenten austauschen Titrierkanüle montieren (Konstruktive Änderungen ab Januar 2012, Seite 25 beachten.) Montage der gereinigten bzw. ausgetauschten neuen Titrierkanüle: a) Die Titrierkanüle ca. 5 mm weit aufschieben. b) Das Gehäuse der Titrierkanüle ganz nach oben drücken. c) Anschließend die Titrierkanüle bis zum Anschlag auf- schieben. - Page 27 Reinigung Gerät zerlegen · Komponenten austauschen c) Den Sicherungsring der Dosiereinheit anheben und kon- trollieren, dass Nut und Feder ineinandergreifen. Dann den Sicherungsring von Hand festschrauben (Abb. c). d) Den Montageschlüssel an der rechten Gehäusekante ansetzen und bis zur linken Gehäusekante festziehen (Abb.
-
Page 28: Ansaugventil
Reinigung Gerät zerlegen · Komponenten austauschen Ansaugventil reinigen / austauschen Vor dem Zerlegen grundsätzlich die Standard-Reinigung durch- führen! a) Hintere Gehäuseschale entfernen und den Montage- schlüssel entnehmen. b) Teleskopansaugrohr und Rückdosierrohr abziehen (Abb. b). c) Ansaugventil mit dem Montageschlüssel heraus- schrauben (Abb. -
Page 29: Batteriewechsel
Batteriewechsel Austausch der Batterien Ist die Batteriekapazität erschöpft, so wird dies durch das blinkende Batteriesymbol im Display angezeigt. Die Batterien müssen dann ausgetauscht werden. Nur die angegebene Batterietype Mikro-Batterien 1,5 V (AAA/ UM4/LR03) verwenden: Die Batterien sind nicht (!) wiederauf- ladbar! Belüftungsstopfen von Hand oder mit einer Münze heraus- schrauben (Abb. -
Page 30: Bestelldaten · Zubehör · Ersatzteile
Bestelldaten · Zubehör · Ersatzteile Titrette ® Standard mit RS 232 Schnittstelle Volumen Best.-Nr. Best.-Nr. 10 ml 4760 141 4760 241 25 ml 4760 151 4760 251 50 ml 4760 161 4760 261 Flaschenadapter, PP, Verp.-Einh. 1 Stück. Außen- für Flaschengewinde/ Best.-Nr. - Page 31 Batteriefach- Abdeckungen Abdeckungen Verp.-Einh. 2 Stück. Verp.-Einh. je 2 Stück. Best.-Nr. 8857 Best.-Nr. 7260 Für Geräte mit PC-Schnittstelle Schnittstellenkabel Titrette Software RS 232 CD-ROM Länge 2 m deutsch/englisch Verp.-Einh. 1 Stück. Verp.-Einh. 1 Stück. Best.-Nr. 8850 Best.-Nr. 7075 38...
-
Page 32: Störung - Was Tun
Störung – was tun? Störung Mögliche Ursache Was tun? Flüssigkeit steht oberhalb Kolben undicht Reinigung durchführen, des Kolbens Dosiereinheit austauschen (s. Seite 24). Kolben schwergängig Dosiereinheit durch Kristall- Reinigung durchführen, ablagerungen verunreinigt evtl. Dosiereinheit austauschen bzw. beschädigt (s. Seite 24). Füllen nicht möglich Ansaugventil verklebt Ansaugventil reinigen, evtl. -
Page 33: Reparatur · Kontaktadressen
– Senden Sie ausschließlich gereinigte und dekontaminierte Geräte an die Adresse, die Sie zusammen mit der Rücksendenummer erhalten haben. Die Rücksendenummer außen am Paket gut sichtbar anbringen. Kontaktadressen BRAND GMBH + CO KG Indien: Otto-Schott-Straße 25 BRAND Scientific Equipment Pvt. Ltd. -
Page 34: Kalibrierservice · Mängelhaftung · Entsorgung
Gerät. Bei hoher Gebrauchshäufigkeit oder aggressiven Medien sollte häufiger geprüft werden. Die ausführliche Prüfanweisung steht unter www.brand.de bzw. www.brandtech.com zum Download bereit. BRAND bietet Ihnen darüber hinaus die Möglichkeit, Ihre Geräte durch un- seren Werks-Kalibrierservice oder durch das BRAND-DAkkS-Labor kalibrie- ren zu lassen. - Page 35 Table of Contents Page Safety Instructions Functions and Limitations of Use Operating Elements First Steps Initializing Priming Titrating Pause function PC interface (optional) Sensitive Media Replacing the inspection window Installing a drying tube (optional) Error Limits (Nominal Volume, Partial Volume) Checking the Volume (Calibration) Additional Functions Calibration Adjustment...
-
Page 36: Safety Instructions
Thus, it should be cleaned regularly. Functions and Limitations of Use The bottle-top burette Titrette with an electronic digital display is used for the titration of aqueous and ® non-aqueous titration media (e.g., alcoholic KOH) up to a max. concentration of 1 mol/l (see page 37 for recommended application range). -
Page 37: Functions And Limitations Of Use
The above recommendations reflect testing completed prior to publication (Status as of 0219/4). Always follow instructions in the operating manual of the instrument as well as the reagent manufacturer‘s specifications. Should you require information on chemicals not listed, please feel free to contact BRAND. -
Page 38: Operating Elements
Valve block with integrated (bottle thread GL 45) discharge valve Recirculation tube Telescoping filling tube Screw cap The mounting tool is stored in the rear housing. The essential features of the Titrette bottle-top ® burette are internationally patent pending. -
Page 39: First Steps
First Steps Is everything in the package? Confirm that your package includes: Titrette bottle-top burette, size 25 ml or 50 ml; telescoping filling tube ® (length 170 - 330 mm); recirculation tube; 2 micro-batteries 1.5 V (AAA/UM4/LR03); 4 bottle adapters PP (GL 45/32-33, GL 45/38, GL 45/S 40, GL 32-33/NS 29/32);... - Page 40 First Steps Initializing (cont.) Attention: Wear protective clothing, eye protection and gloves! Follow all safety instructions and observe limitations of use and operating limitations (see page 37). Mounting the Adjust the length of the telescoping fill- filling tube and ing tube to the bottle height and attach recirculation tube it.
-
Page 41: Priming
Priming Note: Before using the instrument for the first time, ensure it is rinsed carefully and discard the first few samples dispensed. Avoid splashes. Ensure that the screw cap for the titrating tube is screwed on firmly. Turn the valve in the direction of the arrow to 'Recirculate' (Fig. -
Page 42: Titrating
Titrating What to do How to do it Keys to press Display readout Powering on To power on the instrument, the instrument press the On/Off key. Filling the Fill the instrument smoothly instrument up to the upper position by turning the hand wheels. Press the CLEAR key once briefly in order to set the display value to zero. -
Page 43: Pause Function
The Pause function If air bubbles appear during titration because the instrument has not been completely primed, liquid can be dispensed into a different receptacle for priming without the display value being changed. Start the Pause Press the Pause key. function The Pause signal blinks. -
Page 44: Sensitive Media
Sensitive Media Replacing the inspection window For light-sensitive media (e.g., iodine, potassium permanganate and silver nitrate solutions), we recommend the use of the colored light shield inspection window. Unscrew the air vent cap by hand or use a coin (Fig. 1). Remove the rear housing (Fig. -
Page 45: Error Limits (Nominal Volume, Partial Volume)
(20 °C/68 °F). Testing takes place according DIN EN ISO 8655-6 with a completely filled instrument and with uniform and smooth dispensing up to the nominal or partial volume. Comparison of error limits: Titrette Requirements for piston Glass burette ®... -
Page 46: Checking The Volume (Calibration)
The complete testing procedure (SOP) can be down- loaded at www.brand.de. In addition, a function test can also be carried out over shorter time spans, for example by titration against a standard. For GLP- and ISO-compliant evaluations and documentation, we recommend the EASYCAL ™... -
Page 47: Additional Functions
Additional Functions Page CAL Mode Adjustment The Easy Calibration technique makes rapid and simple instrument adjustments possible without tools. GLP Mode Calibration Schedule Input the scheduled date for calibration designated by GLP. APO Mode Auto Power Off Set up the automatic shut-down for long periods when the instrument is not in use. -
Page 48: Calibration Adjustment
Adjustment CAL Mode · Easy Calibration Technique An adjustment might be necessary after a long period of usage or following the replacement of the pis- ton/cylinder assembly, in order to balance out differences in accuracy up to a maximum of ±0.999 ml. A change from the factory default setting is indicated by the small 'CAL' icon at the top of the display. - Page 49 Adjustment CAL Mode · Easy Calibration Technique The continuously displayed CAL symbol indicates that the factory default setting has been changed. By entering a new adjustment value, this will be added automatically to the already existing adjustment value. What to do How to do it Keys to press Display readout...
- Page 50 Factory Default CAL Mode · Easy Calibration Technique The continuously displayed CAL symbol indicates that the factory default setting has been changed. If you wish to restore the factory default setting, complete the following instructions. What to do How to do it Keys to press Display readout Bring up the...
-
Page 51: Calibration Schedule
Calibration Schedule GLP Mode The schedule for the next calibration can be stored in GLP Mode (GLP = Good Laboratory Practice). What to do How to do it Keys to press Display readout Bring up the With the instrument powered >... -
Page 52: Auto Power Off
Auto Power Off APO Mode · Settings In APO mode, the time for automatic power off can be set from 1 to 30 minutes. In factory default setting the instrument will power down automatically after 3 minutes. The shorter the Auto Power Off setting, the longer battery service life will be. What to do How to do it Keys to press... -
Page 53: Decimal Place
Changing the Decimal Place Settings dP Mode In dP mode, the display can be selectively set to show 2 or 3 decimal places (factory default setting is 2). Note: For technical reasons, titration volumes above 20.00 ml can only be displayed to 2 decimal places. What to do How to do it Keys to press... -
Page 54: Cleaning
Cleaning The instrument must be cleaned in the following situations to assure correct operation: n immediately, if the hand wheels n prior to dismantling the instrument become harder than usual to turn n regularly when using crystallizing n before changing the reagent liquids n prior to long term storage n if liquid has accumulated in the... -
Page 55: Intensive Cleaning
Cleaning Loosen the safety ring of the piston/cylinder assembly with the mounting tool, and unscrew it completely by hand (Fig. 9). Withdraw the locking mechanism of the piston rod up to the stop (Fig. 10). Move the top part of the instrument all the way to the top by turning the hand wheels, and remove it (Fig. -
Page 56: Dismantling Instrument · Component Replacement
Cleaning Dismantling instrument · Component replacement Removing and Cleaning / replacing titration tube (Note to structural change from serial-number 01K on page 57.) a) Set the valve to 'Recirculate' and pull the valve lever upwards (Fig. a). b) Hold the titrating tube as shown in the figure. To dis- connect the housing, press the titrating tube upwards to the stop, then use gentle up and down motions to pull it forward (Fig. - Page 57 Cleaning Dismantling instrument · Component replacement b) Use a soft cloth to clean the dispensing cylinder and piston, or replace them. c) To replace the piston, first slide the light grey safety ring of the piston rod upwards (Fig. c), and then un- screw the piston head (Fig.
-
Page 58: Titrating Tube
Cleaning Dismantling instrument · Component replacement Mounting the titrating tube (Note to structural change from January 2012 on page 57.) Mounting the cleaned or replaced titrating tube a) Push in the titrating tube approx. 5 mm. b) Slide up the housing of the titrating tube to the upper stop. - Page 59 Cleaning Dismantling instrument · Component replacement c) Lift the safety ring of the piston/cylinder assembly and check that the nut and bolt mesh securely. Then, screw in the safety ring hand tight (Fig. c). d) Set the mounting tool on the right-hand edge of the housing, and tighten it towards the left-hand edge (Fig.
-
Page 60: Filling Valve
Cleaning Dismantling instrument · Component replacement Cleaning / replacing the filling valve Always perform a standard cleaning before dismantling the instrument! a) Remove the rear housing and take out the mounting tool. b) Pull out the telescoping filling tube and the recirculation tube (Fig. -
Page 61: Changing Batteries
Replacing Batteries Replacing the batteries A blinking battery symbol will show on the display if the battery capacity is depleted. The batteries should then be replaced. Use only the specified battery type: 1.5 V (AAA/UM4/LR03) micro-battery. Batteries are not rechargeable. Unscrew the air vent cap by hand or use a coin (Fig. -
Page 62: Ordering Information · Accessories · Spare Parts
Ordering Information · Accessories · Spare Parts Titrette ® Standard with RS 232 interface Volume Cat. No. Cat. No. 10 ml 4760 141 4760 241 25 ml 4760 151 4760 251 50 ml 4760 161 4760 261 Bottle adapter, PP. Pack of 1. - Page 63 Battery case cover Pack of each 2. Pack of 2. Cat. No. 8857 Cat. No. 7260 For instruments with a PC interface Connection cable Titrette software RS 232 CD-ROM Length 2 m German/English pack of 1. pack of 1. Cat. No. 8850 Cat.
-
Page 64: Troubleshooting
Troubleshooting Problem Possible cause Corrective action Liquid is above the piston Piston leaks Perform a cleaning, replace the piston/cylinder assembly (see page 56). Piston difficult to move Piston/cylinder assembly is Perform a cleaning, replace contaminated or damaged by the piston/cylinder assembly, if crystalline deposits necessary (see page 56). -
Page 65: Repairs · Contact Addresses
– Complete the “Declaration on Absence of Health Hazards” and send the instrument to the manufacturer or supplier. Ask your supplier or manufacturer for the form. The form can also be downloaded from www.brand.de. In the U.S. and Canada: – Contact BrandTech Scientific, Inc. and obtain authorization for the return before sending your instrument for service. -
Page 66: Calibration Service · Warranty Information · Disposal
Just send in the instruments to be calibrated, accompanied by an indica- tion of which kind of calibration you wish. Your instruments will be returned within a few days together with a test report (BRAND Calibration Service) or with a DAkkS Calibration Certificate. For further information, please contact your dealer or BRAND. - Page 67 Table des matières Page Règles de sécurité Fonction et limites d'emploi Eléments de commande Premiers pas Mise en service Désaérage Titration La fonction pause Interface PC (en option) Milieux sensibles Remplacement de la fenêtre Montage du tube de séchage (en option) Limites d'erreur (Capacité, Volume partiel) Contrôle des volumes (Calibrage) Fonctions additionnelles...
-
Page 68: Règles De Sécurité
Fonction et limites d'emploi La burette adaptable sur flacon Titrette avec affichage numérique électronique, sert à la titration de milieux ® aqueux et non-aqueux (par ex. KOH alcooliques) jusqu'à une concentration de 1 mol/l max. (pour la table de résistance, voir page 69). -
Page 69: Fonction Et Limites D'emploi
Cette table a été élaborée et vérifiée avec les plus grands soins et est basée sur les connaissances actuelles (Edition: 0219/4). Toujours observer le mode d’emploi de l’appareil ainsi que les données des fabricants de réactifs. Si vous désirez des informations sur les produits chimiques non mentionnés sur cette liste, n’hésitez pas à contacter BRAND. -
Page 70: Eléments De Commande
Tube pour dosage inversé Tube d'aspiration Capuchon à vis telescopique La clé de mon- tage se trouve dans la partie arrière du boîtier. Les caractéristiques essentielles de la burette adaptable sur flacon Titrette font l'objet ® d'une demande de bre- vet international. -
Page 71: Premiers Pas
Premiers pas Tout est-il dans l'emballage? L'emballage contient: une burette adaptable sur flacon Titrette , taille 25 ml ou 50 ml, un tube d'aspiration ® téléscopique (longueur 170 - 330 mm), un tube pour dosage inversé, 2 piles micro 1,5 V (AAA/UM4/ LR03), 4 adaptateurs en PP pour flacons (GL 45/32-33, GL 45/38, GL 45/S 40, GL 32-33/NS 29/32), 2 fenêtres colorées avec protection contre la lumière, un certificat de qualité... - Page 72 Premiers pas Mise en service (suite) Attention: Porter des vêtements de protection, protection des yeux et des mains! Suivre toutes les règles de sécurité et tenir compte des limites d'emploi et restrictions d'emploi (voir page 69). Montage du tube Régler la longueur du tube d'aspiration d'aspiration et du téléscopique en fonction de la hauteur tube pour dosage...
-
Page 73: Désaérage
Désaérage Remarque: Avant le premier emploi de l'appareil rincer l'appareil soigneuse- ment et jeter les premiers volumes distrubués. Eviter les éclabous- sures. S'assurer que le capuchon de la canule de titration est correcte- ment vissé. Tourner la soupape dans le sens de la flèche sur 'purger' (Fig. -
Page 74: Titration
Titration Que dois-je faire? Comment procéder? Quelle touche? Qu'affiche l'écran? Mise en marche Pour la mise en marche de l'appareil appuyer brièvement sur la touche marche/arrêt. Remplissage de En tournant les molettes, l'appareil remplir l'appareil doucement jusqu'à la butée supérieure. Appuyer brièvement 1x sur la touche CLEAR pour re- mettre la valeur d'affichage... -
Page 75: La Fonction Pause
La fonction pausa S'il y a formation de bulles d'air pendant la titration parce que l'appareil a été incomplètement purgé, la fonction de pause permet de verser le liquide dans un autre récipient pour le purger sans que la valeur d'affichage ne soit changée. -
Page 76: Milieux Sensibles
Milieux sensibles Remplacement de la fenêtre Pour les milieux sensibles à la lumière (par ex. solution iodée, solu- tion de permanganate de potassium et solution de nitrate d'argent) nous recommandons l'utilisation des fenêtres colorées avec protec- tion contre la lumière. Dévisser le bouchon d'aération à... -
Page 77: Limites D'erreur (Capacité, Volume Partiel)
Les limites d'erreur en comparaison: Burette adaptable Prescriptions pour bu- Burette en verre sur flacon rettes à piston conf. à classe A conf. à Titrette DIN EN ISO 8655-3 DIN EN ISO 385 ® Volume Volume partiel LE** ≤± % µl ≤... -
Page 78: Contrôle Des Volumes (Calibrage)
être adapté en fonction des exigences individuelles. Les instructions d'essai détaillées (SOP) peuvent être téléchargées sur www.brand.de. En plus de cela vous pouvez, à des intervalles plus rap- prochés, effectuer des contrôles fonctionnels, par ex. par titration par rapport à une norme. Pour l'ex- ploitation et la documentation conformément aux BPL et ISO, nous recommandons le logiciel de cali-... -
Page 79: Fonctions Additionnelles
Fonctions additionnelles Page Mode CAL Ajustage La technique Easy-Calibration permet un ajustage simple et rapide sans outil. Mode GLP (= BPL) Echéance de calibration Entrée d'une échéance de calibration prévue selon les BPL. Mode APO Auto-Power-Off Réglage de l'arrêt automatique pour des interruptions de travail prolongées. -
Page 80: Ajustage
Ajustage Mode CAL · Technique Easy Calibration Après une utilisation prolongée ou après le remplacement de l'unité de distribution, il peut être nécessaire d'effectuer un ajustage pour compenser les différences d'exactitude jusqu'à un maximum de ± 0,999 ml. La modification de l'ajustage d'usine est affichée à l'écran. Que dois-je faire? Comment procéder? Quelle touche? - Page 81 Nouvel ajustage Mode CAL · Technique Easy Calibration Le symbole CAL affiché en permanence à l'écran indique qu'un ajustage a déjà été effectué. Lorsque la nouvelle valeur d'ajustage est entrée, elle est automatiquement ajoutée à la valeur déjà existante. Que dois-je faire? Comment procéder? Quelle touche? Qu'affiche l'écran?
- Page 82 Ajustage d'usine Mode CAL · Technique Easy Calibration Le symbole CAL affiché en permanence à l'écran indique qu'un ajustage a déjà été effectué. Mais pour rétablir l'ajustage d'usine. Que dois-je faire? Comment procéder? Quelle touche? Qu'affiche l'écran? Appel du mode >...
-
Page 83: Echéance De Calibration
Réglage de l'échéance de calibration Mode GLP (= BPL) En mode GLP (Good Laboratory Practice = BPL), l'échéance du prochain calibrage peut être mémorisée. Que dois-je faire? Comment procéder? Quelle touche? Qu'affiche l'écran? Appel du mode L'appareil étant en marche, >... -
Page 84: Auto-Power-Off
Auto-Power-Off Mode APO · Réglage Le mode APO permet de régler le temps pour l'arrêt automatique entre 1 et 30 min. En réglage d'usine, l'appareil s'éteint automatiquement après 3 minutes. Plus le temps Auto-Power-Off est court, plus la durée de vie des piles augmente. Que dois-je faire? Comment procéder? Quelle touche? -
Page 85: Décimales
Modification des décimales Mode dP Le mode dP permet de régler l'affichage au choix sur 2 ou 3 décimales (réglage d'usine: 2 décimales). Note: Pour des raisons techniques, les volumes de titration supérieurs à 20,00 ml ne peuvent être affi- chés qu'avec 2 décimales. -
Page 86: Nettoyage
Nettoyage Pour assurer le fonctionnement correct de l’appareil le nettoyer: n immédiatement quand les molettes sont n avant le démontage de l'appareil plus difficiles à tourner que d'habitude n régulièrement, en cas d'utilisation n avant de changer de réactif de milieux cristallisants n avant un stockage prolongé... -
Page 87: Nettoyage Intensif
Nettoyage Desserrer le circlip de l'unité de distribution à l'aide de la clé de montage, et puis le dévisser complètement à la main. (Fig. 9). Extraire le verrouillage de la tige de piston jusqu'en butée (Fig. 10). Déplacer la partie supérieure de l'appareil complètement vers le haut en tournant les molettes, puis la retirer (Fig. -
Page 88: (Démontage De L'appareil, Remplacement De Pièces)
Nettoyage Démontage de l'appareil · Remplacement de pièces Retrait la canule de titration et nettoyage / remplacement (Observer le modification constructive de numéro de série 01K dans page 89.) a) Régler la soupape sur 'purge' et retirer le levier de soupape vers le haut (Fig. - Page 89 Nettoyage Démontage de l'appareil · Remplacement de pièces b) Nettoyer avec un chiffon doux ou remplacer le cylindre de distribution et la piston. c) Pour remplacer la piston, d'abord pousser le circlip gris clair de la tige de piston vers le haut (Fig. c), puis dévisser la piston (Fig.
- Page 90 Nettoyage Démontage de l'appareil · Remplacement de pièces Montage de la canule de titration (Observer le modification constructive de janvier 2012 dans page 89.) Montage de la nouvelle canule de titration resp. de la canule nettoyée: a) Ouvrir la canule de titration d'environ 5 mm. b) Pousser le boîtier de la canule de titration complètement vers le haut.
- Page 91 Nettoyage Démontage de l'appareil · Remplacement de pièces c) Soulever le circlip de l'unité de distribution et contrôler si la rainure et le ressort s'emboîtent. Visser ensuite le circlip à la main (Fig. c). d) Appliquer la clé de montage sur le bord droit du boîtier et serrer jusqu'au bord gauche du boîtier (Fig.
- Page 92 Nettoyage Démontage de l'appareil · Remplacement de pièces Nettoyage / remplacement de la soupape d'aspiration Effectuer systématiquement un nettoyage standard avant le démontage. a) Enlever la partie arrière du boîtier et retirer la clé de montage. b) Extraire le tube d'aspiration télescopique et le tube pour dosage inversé...
-
Page 93: Changement De Pile
Remplacement des piles Remplacement des piles Quand les piles sont épuisées, cela est indiqué par le clignotement du symbole de pile à l'écran. Les piles doivent alors être remplacées. Utiliser exclusivement le type de pile micro indiqué de 1,5 V (AAA/UM4/LR03): Les piles ne sont pas rechargeables. -
Page 94: La Canule De Titration
Données de commande · Accessoires · Pièces de rechange Titrette ® Standard Avec interface RS 232 Volume Réf. Réf. 10 ml 4760 141 4760 241 25 ml 4760 151 4760 251 50 ml 4760 161 4760 261 Adaptateur de flacon, PP. Emballage standard 1 unité. - Page 95 à piles. 2 unités standard 2 unités. par emb. standard. Réf. 8857 Réf. 7260 Pour appareils avec interface PC Câble de raccorde- Titrette software ment, RS 232 CD-ROM Longueur 2 m allemand/anglais 1 unité. 1 unité. Réf. 8850 Réf.
-
Page 96: Dérangement - Que Faire
Dérangement – que faire? Dérangement Cause possible Que faire? Liquide au-dessus Piston n'est pas étanche Effectuer le nettoyage, remplacer l'unité du piston de distribution (voir page 88). Piston grippé Unité de distribution encrassée Effectuer le nettoyage, le cas échéant, par des dépôts de cristaux ou remplacer l'unité... -
Page 97: Réparation · Adresses De Contact
– Remplir l’»Attestation de Décontamination» et la retourner avec l’appareil au fabricant ou au fournisseur. Demander le formulaire au fournisseur ou au fabri- cant ou bien en téléchargement gratuit sous www.brand.de. Aux États-Unis et au Canada: – Veuillez contacter BrandTech Scientific, Inc. pour demander les conditions de retour de l’appareil avant de le renvoyer au service après-vente. -
Page 98: Service De Calibration · Garantie · Elimination
Les instructions de contrôle détaillés sont disponibles en téléchargement gratuit sur www.brand.de ou www.brandtech.com. BRAND vous offre également la possibilité de faire calibrer vos instruments par notre service de calibration ou par le laboratoire de calibration DAkkS de BRAND. Envoyer simplement les appareils à calibrer et indiquer, quelle sorte de calibration vous désirez. - Page 99 Contenido Página Normas de seguridad Función y limitaciones de empleo Elementos de manejo Primeros pasos Puesta en servicio Pugar el aire Valoración Función de pausa Interface con un PC (opcional) Medios sensibles Cambio del visor de inspección Montaje del tubo de secado (opcional) Límites de errores (Volumen nominal, Volumen parcial) Control del volumen (Calibrar) Funciones adicionales...
-
Page 100: Normas De Seguridad
Función y limitaciones de empleo La bureta acoplable a frascos Titrette con indicación electrónica digital se emplea para valorar medios ® acuosos y no acuosos (p.ej. KOH alcohólico) hasta una concentración máx. de 1 mol/l (véase campos de aplicación recomendados en la pág. -
Page 101: Función Y Limitaciones De Empleo
Esta tabla ha sido comprobada cuidadosamente y se basa en los conocimientos actuales (Edición: 0219/4). Observar siempre las instrucciones de manejo del aparato y las indicaciones del fabricante de los reactivos. Si Ud. necesita informaciones sobre productos químicos no mencionados en esta lista, puede comunicarse con BRAND. -
Page 102: Elementos De Manejo
Tubo de aspiración Caperuza telescopico a rosca La llave de mon- taje se encuentra en la parte trase- ra de la carcasa Las características prin- cipales de la bureta aco- plable a frascos Titrette ® están registrados para patente internacional. -
Page 103: Primeros Pasos
Primeros pasos Contenido del embalaje El embalaje contiene: bureta acoplable a frascos Titrette , tamaño 25 ml o 50 ml, tubo de aspiración te- ® lescopico (longitud 170 - 330 mm), tubo para dosificación inversa, 2 microbaterías de 1,5 V (AAA/UM4/ LR03), 4 adaptadores de PP para frascos (GL 45/32-33, GL 45/38, GL 45/S 40, GL 32-33/NS 29/32), 2 visores de inspección topacios de protección contra la luz, un certificado de calidad y estas instrucciones... - Page 104 Primeros pasos Puesta en marcha (continuación) ¡Atención! Utilizar protección de los ojos, vestimenta y guantes de protección. Observar todas las reglas de seguridad así como las limitaciones de empleo y limitaciones de uso (véase pág. 101). Montaje del tubo Monte y ajuste la longitud del tubo de de aspiración y del aspiración telescópico de acuerdo con tubo de dosifica-...
-
Page 105: Pugar El Aire
Pugar el aire Nota: Antes del primer uso enjuagar cuidadosamente el aparato y des- echar las primeras dosificaciones. Evitar salpicaduras. Asegúrese de que la caperuza a rosca de la cánula de valoración esté bien apretada. Gire la válvula en la dirección 'dosificación inversa' que indica la flecha (fig. -
Page 106: Valoración
Valoración ¿Qué tengo que hacer? ¿Cómo se hace? ¿Qué tecla? ¿Qué indica la pantalla? Conectar el Para conectar, presione aparato brevemente la tecla On/Off (conectar/desconectar) Llenar el aparato Llene el aparato cuidadosa- mente hasta el tope superior girando las ruedas. Para ajustar a cero el valor indica- do, presione brevemente una vez la tecla CLEAR. -
Page 107: Función De Pausa
Función de pausa En el caso de que durante la valoración se formen burbujas de aire debido a una purga insuficiente del aparato, la función de pausa posibilita purgar líquido dentro de otro recipiente, sin alterar el valor indicado. Arrancar la fun- Presione la tecla Pause. -
Page 108: Medios Sensibles
Medios sensibles Cambio del visor de inspección Para medios sensibles a la luz (p.ej. soluciones de yodo, de perman- ganato de potasio y de nitrato de plata), recomendamos utilizar un visor de inspección topacio de protección contra la luz. Desenrosque el tapón de ventilación de forma manual o con una moneda (fig. -
Page 109: Límites De Errores (Volumen Nominal, Volumen Parcial)
Comparación de límites de errores: Bureta acoplable Requisitos para buretas Bureta de vidrio a frascos Titrette de émbolo según clase A según ® DIN EN ISO 8655-3 DIN EN ISO 385... -
Page 110: Control Del Volumen (Calibrar)
Las instrucciones detalladas de calibración (SOP) pueden descargase en www.brand.de. Puede realizar además una prueba de funcionamiento en períodos más cortos, p.ej. a través de una valoración con una solución estándar. En relación con las evaluaciones adecuadas según BPL e ISO y la documentación correspondiente, recomendamos utilizar el software de... -
Page 111: Funciones Adicionales
Funciones adicionales Página Modo CAL Ajustar La técnica Easy Calibration posibilita un sencillo y rápido ajuste del aparato sin empleo de herramientas. Modo GLP (= BPL) Fecha de calibración Posibilita la introducción de la fecha prevista para la próxima calibración según BPL. Modo APO Auto-Power-Off (Modo de ahorro de energía) -
Page 112: Ajustar
Ajustar Modo CAL · Técnica Easy Calibration Después de un uso prolongado o de cambiar la unidad dosificadora, puede resultar necesario efectuar un ajuste para compensar diferencias de exactitud hasta un máximo de ± 0,999 ml. La modificación del ajuste de fábrica se visualizará en la pantalla. ¿Qué... - Page 113 Nuevo ajuste Modo CAL · Técnica Easy Calibration Se realizó el ajuste, si el símbolo CAL se visualiza en la pantalla de forma continua. Al introducir el nuevo valor de ajuste, éste se sumará automáticamente al valor de ajuste ya existente. ¿Qué...
- Page 114 Ajuste de fábrica Modo CAL · Técnica Easy Calibration Se realizó el ajuste, si el símbolo CAL se visualiza en la pantalla de forma continua. No obstante, deberá restablecerse el ajuste de fábrica. ¿Qué tengo que hacer? ¿Cómo se hace? ¿Qué...
-
Page 115: Fecha De Calibración
Establecer la fecha de calibración Modo BPL La fecha de la próxima calibración puede almacenarse en el modo GLP (Good Laboratory Practice = Buenas prácticas de laboratorio). ¿Qué tengo que hacer? ¿Cómo se hace? ¿Qué tecla? ¿Qué indica la pantalla? Elegir el modo Al estar conectado el apa- >... -
Page 116: Auto-Power-Off
Auto-Power-Off Modo APO · Ajuste En el modo APO puede regularse el período de tiempo para desconexión automática de 1 a 30 minutos. En la regulación de fábrica, el aparato se desconecta automáticamente después de 3 minutos. Cuanto más corto sea el tiempo de Auto-Power-Off regulado, más larga será la durabilidad de las baterías. ¿Qué... -
Page 117: Cifras Decimales
Modificar las cifras decimales Modo dP En el modo dP puede ajustarse la indicación con 2 ó 3 cifras decimales a elección (regulación de fábrica con 2 cifras decimales). Nota: Por motivos técnicos, los volúmenes de valoración a partir de 20,00 ml sólo pueden visualizarse con 2 cifras decimales. -
Page 118: Limpieza
Limpieza Para garantizar el funcionamiento correcto del aparato, debe limpiarse éste en los casos siguientes: n de inmediato, si las ruedas giran con n antes de desmontar el aparato más dificultad de lo normal n regularmente si se utilizan medios n antes de cambiar el reactivo cristalizantes n antes de un almacenaje prolongado... -
Page 119: Limpieza Intensiva
Limpieza Suelte el anillo de seguridad de la unidad dosificadora con la llave de montaje, y desatornillela completamente de forma manual (fig. 9). Tire del bloqueo de varilla del émbolo hasta llegar al tope (fig. 10). Girando las ruedas mueva totalmente hacia arriba la parte superior del aparato y retírela (fig. -
Page 120: (Desmontaje Del Aparato, Cambio De Piezas)
Limpieza Desmontaje del aparato · Cambio de piezas Desmontar la cánula de valoración y limpiar / cambiar (Atender a la modificación constructiva desde número de serie 01K a page 121.) a) Coloque la válvula en la posición 'dosificación inversa' y tire de la palanca de la válvula hacia arriba (fig. - Page 121 Limpieza Desmontaje del aparato · Cambio de piezas b) Limpie el cilindro dosificador y el émbolo con un paño suave o cámbielos. c) Para cambiar el émbolo, en primer lugar empuje hacia arriba el anillo de seguridad gris claro (fig. c), y después desatornille el émbolo (fig. c'). d) Atornille un nuevo émbolo en la varilla del émbolo y apriétela.
- Page 122 Limpieza Desmontaje del aparato · Cambio de piezas Montar la cánula de valoración (Atender a la modificación constructiva desde enero 2012 a page 121.) Montaje de la cánula de valoración limpiada ó nueva: a) Introduzca la cánula de valoración aprox. 5 mm. b) Presione la carcasa de la cánula de valoración totalmen- te hacia arriba.
- Page 123 Limpieza Desmontaje del aparato · Cambio de piezas c) Eleve el anillo de seguridad de la unidad dosificadora y controle que la ranura y el muelle estén enlazados. Tras ello, apriete manualmente el anillo de seguridad con firmeza (fig. c). d) Coloque la llave de montaje en el borde derecho de la carcasa y apriete hasta el borde izquierdo de la misma con firmeza (fig.
-
Page 124: Válvula De Aspiración
Limpieza Desmontaje del aparato · Cambio de piezas Limpiar / cambiar la válvula de aspiración ¡Antes de proceder al desmontaje, realice siempre una limpieza estándar! a) Quite la parte trasera de la carcasa y retire la llave de montaje. b) Retire el tubo de aspiración telescópico y el tubo de dosificación inversa (fig. -
Page 125: Cambio De Las Baterías
Cambiar las baterías Cambio de las baterías Cuando las baterías están descargadas, el símbolo de las mismas parpadea en el visor. Cuando esto sucede deben cambiarse las baterías. Utilice sólo microbaterías de 1,5 V, tipo AAA/UM4/LR03: ¡estas baterías no son (!) recargables! Desenrosque el tapón de ventilación de forma manual o con una moneda (fig. -
Page 126: Referencias · Accesorios · Recambios
Referencias · Accesorios · Recambios Titrette ® Estándar Con interface RS 232 Volumen Ref. Ref. 10 ml 4760 141 4760 241 25 ml 4760 151 4760 251 50 ml 4760 161 4760 261 Adaptador para frasco, PP. 1 unidad por embalaje. - Page 127 2 unidades por balaje con 2 unidades. embalaje. Ref. Ref. 8857 7260 Para aparatos con interfaz con un PC Cable de conexión Titrette software RS 232 CD-ROM Longitud 2 m alemán/inglesa 1 unidad por embalaje. 1 unidad por embalaje. Ref. 8850 Ref.
-
Page 128: Qué Hacer En Caso De Avería
¿Qué hacer en caso de avería? Avería Causa probable ¿Qué hacer? Líquido está encima del Piston no es hermético Efectúe una limpieza, cambie la uni- émbolo dad dosificadora (véase pág. 120). Desplazamiento difícil Unidad dosificadora sucia o Efectúe una limpieza, cambie la uni- del émbolo dañada con depósitos de dad dosificadora... -
Page 129: Reparación · Direcciones De Contacto
– Rellenar la “Declaración sobre la ausencia de riesgos para la salud” y enviarla con el aparato al fabricante o al distribuidor. Pedir el formulario al proveedor o al fabricante, o se encuentran bajo www.brand.de para un download. En los EE.UU. y Canadá: –... -
Page 130: Servicio De Calibración · Garantía · Eliminación
(véase 'Documentos técnicos'). Además, BRAND le ofrece la posibilidad de calibrar sus instrumentos por medio del servicio de calibrado de BRAND o por el laboratorio de calibrado DAkkS. Mándenos sencillamente los instrumentos a calibrar con la informa- ción qué... - Page 131 Indice dei contenuti Pagina Norme di sicurezza Funzioni e limiti all'uso Elementi funzionali I primi passi Messa in funzione Spurgo dell'aria Titolazione La funzione di pausa Interfaccia con il PC (opzionale) Liquidi sensibili Sostituzione delle finestrelle Montaggio del tubo di essiccazione (opzionale) Limite di errore (Capacitá, Volume parziale) Verifica del volume (Calibrazione) Funzioni aggiuntive...
-
Page 132: Norme Di Sicurezza
15. Le micro-batterie da 1,5 V inserite non sono ricaricabili! Funzioni e limiti all'uso La buretta per bottiglia Titrette con display digitale può essere utilizzata per liquidi da titolare acquosi e ® non acquosi (ad esempio KOH in soluzione alcolica) fino ad una concentrazione massima di 1 mol/l (per il campo di applicazione raccomandato vedere a pag. -
Page 133: Funzioni E Limiti All'uso
* Utilizzare finestrella con filtro protettivo per la luce (vedere pag. 140). Le indicazioni riportate fanno riferimento a dei controlli effettuati prima della pubblicazione di questo catalogo (Revisione: 0219/4). Rispettare sempre le indicazioni del produttore dei reagenti. Contattarci BRAND per informazioni su prodotti chimici non compresi in questo elenco. -
Page 134: Elementi Funzionali
GL 45) Tubo per il riciclo Tubo telescopico di Tappo a vite aspirazione La chiave per il montaggio si trova nel guscio posteriore della copertura. Le caratteristiche prin- cipali della buretta per bottiglia Titrette sono ® coperte da brevetto internazionale. -
Page 135: I Primi Passi
Primi passi C'è tutto nella confezione? Nella confezione sono contenuti: la buretta per bottiglia Titrette , da 25 ml o da 50 ml, un tubo telescopico ® di aspirazione (lunghezza 170 - 330 mm), un tubo per il riciclo, 2 micro-batterie 1,5 V (AAA/UM4/LR03), 4 adattatori per bottiglia in PP (GL 45/32-33, GL 45/38, GL 45/S 40, GL 32-33/NS 29/32), 2 finestrelle colorate con filtro protettivo per la luce, un certificato di qualità... - Page 136 Primi passi Messa in funzione (continuazione) Attenzione! Indossare indumenti, occhiali e guanti protettivi. Seguire tutte le norme di sicurezza e tenere conto dei limiti all'uso e delle limitazioni all'uso (vedere pagina 133). Montare il tubo di Montare il tubo di aspirazione telescopico aspirazione e il e regolare la sua lunghezza in relazione tubo per il riciclo...
-
Page 137: Spurgo Dell'aria
Spurgo dell'aria Nota: Prima del primo utilizzo, sciacquare accuratamente lo strumento e eliminare i primi dosaggi erogati. Evitare spruzzi. Assicurarsi che il tappo a vite della cannula di titolazione sia ben avvitato. Girare la valvola in direzione della freccia su 'Riciclo' (fig. 2). Per prima cosa, spostare il pistone completamente verso il basso girando la manopola. -
Page 138: Titolazione
Titolazione Cosa devo fare? Come fare? Quale tasto? Cosa mostra il display? Accendere Per accendere premere bre- lo strumento vemente il tasto On/Off. Riempire Girare delicatamente fino al lo strumento fermo superiore la mano- pola dello strumento per riempirlo. Premere brevemente 1 volta il tasto CLEAR per azzerare il valore indicato sul display. -
Page 139: La Funzione Di Pausa
La funzione di pausa Se durante la titolazione si formano delle bolle d'aria perché lo strumento non è stato sfiatato corretta- mente, durante la funzione di pausa il liquido può essere erogato in un altro contenitore per eliminare l'aria senza che l'indicazione sul display si modifichi. Avvio della Premere il tasto Pausa. -
Page 140: Liquidi Sensibili
Liquidi sensibili Sostituzione delle finestrelle Per liquidi sensibili alla luce (ad es. iodio, permanganato di potassio e nitrato di argento in soluzione) si raccomanda di usare le finestrelle con filtro protettivo per la luce. Svitare il tappo dello sfiato a mano o con una moneta (fig. 1). Rimuovere il guscio posteriore della copertura (fig. -
Page 141: Limite Di Errore (Capacitá, Volume Parziale)
Confronto tra i limiti di errore: Buretta per bottiglia Requisiti per le burette a Buretta in vetro Titrette pistone secondo la nor- classe A secondo ® ma DIN EN ISO 8655-3 DIN EN ISO 385... -
Page 142: Verifica Del Volume (Calibrazione)
Le istruzioni dettagliate per la verifica (SOP) possono essere scaricate dal sito www.brand.de. Inoltre si può anche eseguire una prova di fun- zionamento a intervalli più brevi, ad esempio mediante la titolazione di uno standard. Per la valutazione e documentazione secondo GLP e ISO si raccomanda l'uso del software di calibrazione EASYCAL ™... -
Page 143: Funzioni Aggiuntive
Funzioni aggiuntive Pagina Modalità CAL Calibrazione La tecnica Easy Calibration consente una calibrazione facile e veloce senza strumenti. Modalità GLP Scadenziario per la taratura Inserimento della scadenza prevista per la taratura secondo GPL. Modalità APO Auto-Power-Off Impostazione dello spegnimento automatico in caso di interruzione del lavoro prolungata. -
Page 144: Calibrazione
Calibrazione Modalità CAL · Tecnica Easy Calibration Dopo un uso prolungato o dopo la sostituzione dell'unità di dosaggio può essere necessaria una calibra- zione, per compensare differenze di accuratezza fino al massimo di ± 0,999. La modifica rispetto alla calibrazione di fabbrica è segnalata sul display. Cosa devo fare? Come fare? Quale tasto? - Page 145 Ricalibrazione Modalità CAL · Tecnica Easy Calibration Il simbolo CAL sempre visibile sul display indica che la calibrazione è già stata effettuata. Se viene impostato un nuovo valore di calibrazione, questo viene automaticamente sommato al valore già memorizzato. Cosa devo fare? Come fare? Quale tasto? Cosa mostra il display?
- Page 146 Calibrazione di fabbrica Modalità CAL · Tecnica Easy Calibration Il simbolo CAL sempre visibile sul display indica che la calibrazione è già stata effettuata. Dovrebbe però essere reimpostata la calibrazione di fabbrica. Cosa devo fare? Come fare? Quale tasto? Cosa mostra il display? Richiamare >...
-
Page 147: Programma Di Calibrazione
Impostare la scadenza per la taratura Modalità GLP Nella modalità GLP (Good Laboratory Practice) è possibile salvare la scadenza per la prossima taratura. Cosa devo fare? Come fare? Quale tasto? Cosa mostra il display? Richiamare Con lo strumento acceso, > 3 s la modalità... -
Page 148: Auto-Power-Off
Auto-Power-Off Modalità APO · Regolazione La modalità APO consente di impostare il tempo per lo spegnimento automatico da 1 a 30 minuti. Con la regolazione di fabbrica lo strumento si spegne automaticamente dopo 3 minuti. Abbreviando il tempo di Auto-Power-Off si allunga la durata della batteria. Cosa devo fare? Come fare? Quale tasto? -
Page 149: Cifre Decimali
Modifica cifre decimali Modalità dP Nella modalità dP si può impostare l'indicazione a 2 o 3 cifre decimali (la regolazione di fabbrica prevede 2 cifre decimali). Nota: per motivi tecnici, i volumi di titolazione a partire da 20,00 ml possono essere visualizzati solo con due cifre decimali. -
Page 150: Pulizia
Pulizia Per assicurare un funzionamento perfetto, lo strumento deve essere pulito nei casi seguenti: n subito, se la manopola è più dura n prima dello smontaggio dello strumento del solito da girare n regolarmente nel caso di soluzioni n se si cambia reagente fortemente cristalline n prima di riporlo per un periodo n se si è... -
Page 151: Pulizia Intensiva
Pulizia Mediante la chiave per il montaggio, allentare l'anello di bloc- caggio dell'unità di dosaggio e svitarla completamente a mano (fig. 9). Estrarre fino al fermo la chiusura del gambo del pistone (fig. 10). Girando la manopola, portare completamente in alto la parte superiore dello strumento e rimuoverla (fig. -
Page 152: (Smontaggio Dello Strumento, Sostituzione Di Componenti)
Pulizia Smontaggio dello strumento · Sostituzione di componenti Rimuovere la cannula di titolazione e pulizia / sostituzione (Osservare la modifica constructiva dal numero di matricola 01K a pagina 153.) a) Posizionare la valvola su 'Riciclo' e tirare verso l'alto la levetta della valvola (fig.a). - Page 153 Pulizia Smontaggio dello strumento · Sostituzione di componenti b) Pulire il cilindro di dosaggio e il pistione con un panno morbido oppure sostituirli. c) Per sostituire il pistione prima far scorrere verso l'alto l'anello di fermo grigio chiaro del gambo del pistone (fig.
- Page 154 Pulizia Smontaggio dello strumento · Sostituzione di componenti Montare la cannula di titolazione (Osservare la modifica constructiva dal gennaio 2012 a pagina 153.) Montaggio della nuova cannula di titolazione pulita o sosti- tuita a) Estrarre la cannula di titolazione per circa 5 mm. b) Spingere completamente verso l'alto la copertura della cannula di titolazione.
- Page 155 Pulizia Smontaggio dello strumento · Sostituzione di componenti c) Rimuovere l'anello di fermo dell'unità di dosaggio e controllare che la sede e la molla ingranino. Poi serrare a mano l'anello di fermo (fig. c). d) Inserire la chiave per il montaggio nel bordo destro della copertura e serrare fino al bordo sinistro della copertura (fig.
-
Page 156: Valvola Di Aspirazione
Pulizia Smontaggio dello strumento · Sostituzione di componenti Pulizia/sostituzione della valvola di aspirazione Eseguire la pulizia standard prima dello smontaggio! a) Rimuovere il guscio posteriore della copertura ed estrar- re la chiave per il montaggio. b) Rimuovere il tubo telescopico di aspirazione e il tubo per il riciclo (fig. -
Page 157: Sostituzione Delle Batterie
Sostituzione delle batterie Sostituzione delle batterie Il simbolo della batteria lampeggiante sul display indica che le batterie sono esaurite. Le batterie devono quindi essere sostituite. Usare esclusivamente le micro-batterie indicate da 1,5 V (AAA/UM4/LR03): Le batterie non sono ricaricabili! Svitare il tappo dello sfiato a mano o con una moneta (fig. 1). Rimuovere il guscio posteriore della copertura (fig. -
Page 158: Dati Per L'ordinazione · Accessori · Parti Di Ricambio
Dati per l'ordinazione · Accessori · Parti di ricambio Titrette ® Standard con interfaccia RS 232 Volume Codice Codice 10 ml 4760 141 4760 241 25 ml 4760 151 4760 251 50 ml 4760 161 4760 261 Adattatori per bottiglia, PP, confezione da 1. - Page 159 1. cfz. da 2 pz. ciascuno. Codice 8857 Codice 7260 Per strumenti con interfaccia con il PC Cavo di collegamento Titrette software RS 232 CD-ROM Lunghezza 2 m tedesco/inglese confezione da 1. confezione da 1. Codice 8850...
-
Page 160: Individuazione E Soluzione Dei Problemi
Individuazione e soluzione dei problemi Problema Possibile causa Soluzione C'è liquido al di sopra del Pistone perde Eseguire la pulizia, sostituire l'unità di pistone dosaggio (vedere pag. 150). Il pistone è poco Unità di dosaggio imbrattata o Eseguire la pulizia, se necessario scorrevole danneggiata da deposito di sostituire l'unità... -
Page 161: Riparazione · Indirizzi Di Contatto
– Compilare la 'Dichiarazione di assenza di rischi per la salute' ed inviarla con lo strumento al distributore o al produttore. I moduli possono essere richiesti al distributore o al produttore, oppure si possono scaricare dal sito www.brand.de. Dentro di Stati Uniti e del Canada: –... -
Page 162: Servizio Calibrazione · Garanzia · Smaltimento
Inoltre, BRAND vi offre la possibilità di far tarare i vostri strumenti dal nostro Servizio calibrazione o dal Laboratorio DAkkS BRAND. Inviateci semplicemente i vostri strumenti con le indicazioni del tipo di taratura richiesta. - Page 163 目录 页码 中 安全指导 文 功能与使用限制 操作原件 第一步 开始 填液 滴定 暂停功能 计算机接口 (选配) 敏感试剂 更换观察窗 安装干燥管(可选) 误差极限 (标称体积, 部分体积) 检查体积(校准) 其他功能 校准调节 校准日程 自动关机 小数位 清洁 标准清洁 强化清洁 (拆卸仪器 · 组件更换) 外壳上部 183, 186 滴定管 184, 186 活塞/活塞腔组件 进液阀 更换电池...
-
Page 164: 功能与使用限制
拆卸! (参见第165页)!如有疑问,请联络厂方或经 销商。 14. 使用前请检查仪器有无可见损伤。如果仪器在 操作时有潜在的故障迹象(比如,活塞移动困 6. 确保操作不伤害使用者或者其他人员。 难,阀门黏住或泄漏),请立即停止滴定。咨 避免溅撒。只能使用合适的容器。 询本手册的“故障诊断”(参见192页),有必 要的话请联系供应商。 7. 滴定管盖关闭时不可以旋转滴定旋钮。 15. 随机附赠的1.5 V微电池不可充电! 8. 玻璃活塞腔灌满时决不可拆除滴定管。 9. 试剂可能会积聚在滴定管的管盖内。 因此,应该定期清理。 功能与使用限制 适用于水相或非水相介质(如乙醇氢氧化钾)滴定,最大浓度至1 mol/l 数字显示瓶口滴定器Titrette ® (参见第165页建议应用范围)。仪器附含根据ISO 8655-3计量要求的DE-M 标志质保认证。由于采用高 精度测量系统,本仪器可达到相当于A级玻璃滴定管要求的容差范围。 ,ETFE, PFA, FEP, PTFE, 铂-铱; 当正常操作时,液体只会接触以下耐腐蚀材料:硼硅玻璃,Al PP(旋盖)。仪器自带回流阀(工厂默认配置)。 标志 此标志证明本产品符合EEC指令相关要求并通过了相应的测试。... - Page 165 Tetra-n-butylammonium hydroxide sol. 盐酸 氢氧化钾溶液 四丁基氢氧化铵 Hydrochloric acid in Acetone Potassium iodate solution Triethanolamine in Acetone* 盐酸-丙酮 碘酸钾溶液 三乙醇胺-丙酮* Zinc sulfate solution Iodine solution* Potassium permanganate solution* 碘液* 高锰酸钾溶液* 硫酸锌溶液 Iodide Iodate solution* Potassium thiocyanate solution 碘化碘酸溶液* 硫氰酸钾溶液 * 使用光敏保护观察窗(参见172页)。 以上推荐均建立于已发表的实验结果之上(0219/4更新)。以上推荐均建立于已发表的实验结果之上。请始终遵守仪器的操作手册及试剂 供应商的操作规范。如您使用的试剂未列于上表,请向BRAND咨询。...
-
Page 166: 操作原件
操作原件 控制方式: 独立的On/Off开关键,Pause 暂停键,以及CLEAR清零键。 CLEAR清零键 旋钮便于快速逐滴滴定。 PC接口(选配) 数字显示屏 电池 On/Off开关键 暂停键 滴定旋钮 活塞 观察窗 分液活塞腔 安全阀 (滴定/回流) 滴定管,可垂直, 阀门模块 水平调节,整合 (瓶口螺纹规格GL45) 排液阀 回流阀 伸缩吸液管 旋盖 装卸工具,在后 仓壳内侧。 Titrette 瓶口滴定器的基 ® 本特性已注册国际专利。... -
Page 167: 第一步
第一步 所有的组件都在包装内吗? 瓶口滴定器,规格25ml或者50ml;伸缩吸液管(长度170 - 330 mm); 确认您的包装盒内有:Titrette ® 中 回流管;2 个微电池 1.5 V (AAA/UM4/LR03);4个PP材质瓶口转接头(GL45/32-33, GL 45/38, 文 GL45/S40, GL32-33/NS 29/32);2个茶色观察窗;性能证书;以及本说明书。 开始 装入电池 a) 用手或者一枚硬币旋开后通气盖 (图a)。 b) 打开后仓壳(图b)。 c) 打开电池仓盖插入电池。注意电池的 正负极方向(图c)。 d) 将电池仓盖合上关紧。小心按压仓盖 边缘确保其与电池仓之间没有缝隙。 e) 首先将前后仓顶部扣住,然后阖上前 后仓壳。 f) 旋上后通气盖。 打开/关闭电源 按On/Off键打开或关闭仪器。... - Page 168 第一步 开始(续) 注意: 请穿戴防护服,保护镜和手套。遵循所有的安全指导和操作限制 (见第165页)。 安装吸液管与回流管 根据试剂瓶高度调节吸液管,插入吸液 管。插入回流管,开口朝外(图3)。 提示: 对于易结晶的试剂,例如:乙醇KOH, 吸液管长度需要调整至距底部约 20 mm 左右。 安装对齐滴定器 将滴定器拧至瓶口(GL45螺纹),调整 滴定管与试剂瓶标签对齐。对于其他螺 口规格的试剂瓶,选择合适的接头。 滴定管可以垂直或水平调节 70 mm (图 4)。 提示: 随仪器提供的PP材质接头只能使用不攻 击PP材质的试剂(见190页“附件”)。 移动滴定器 当移动安装在瓶口的滴定器时,请按照 图示操作(图5)并始终将它放置于右上 方位置。 警告! 当设置成“滴定模式” 时,不要旋动滴定旋钮,确保滴定管盖处于 关闭状态时。 避免溅撒试剂!试剂可能从滴定管与管盖之间溢出。...
- Page 169 填液 提示: 中 在使用仪器之前,确保已经经过仔细清洗并使用一些滴定试剂进 文 行润洗。避免溅撒试剂。 确保滴定管盖完全盖上。 将阀门箭头方向指向“回流”(图2)。 首先,将旋钮向下旋到底。然后向上旋转,补液至一半体积位 置,然后再次清空(图3)。 提示: 如果无法补液,见192页“故障诊断”。 然后将旋钮上下旋动半圈,抽吸液体数次。每次排液快速一次 到底将液体清回瓶内。重复此操作5次直到没有可见的大气泡在 活塞下面。 提示: 一些小于1 mm的气泡不会影响后面使用。 旋开滴定管盖。 将回流阀调至“滴定”方向(图5)。 取一个合适的容器放在滴定口下方,旋动滴定钮将液体从滴定管 中排出,直至滴定管路中没有气泡(图6)。 除去滴定头尖部的 残液。...
- Page 170 滴定 做什么 怎么做 按键 屏幕显示 打开滴定器电源 按On/Off键打开滴定器电 源。 滴定器补液 平滑均匀地向上旋动旋钮, 填充液体。按CLEAR键一次 将显示数值清零。 滴定 取一个合适的容器放于滴定 管开口下方。向下旋动旋钮 进行滴定,直至滴定终点。 (滴定体积, 比如, 28.76 ml) 如果填充试剂不足以完成整个滴定 ,轻轻向上转动旋钮补充试剂(这个状 提示: 态下显示数值不变)。然后继续进行滴定。 滴定后补满仪器 为了减少结晶沉淀与蒸发, 滴定结束后应总是将活塞提 到最高位置使活塞腔补满 液体。 省电模式(Auto Power Off自动关闭电源) 当停止操作超过3分钟(工厂默认),滴定器会自动切换至待机模式。当时的显示数值会被储存,在再次 手工打开显示时数值会重现。自动关闭电源的时间可以调整(参见180页)。...
-
Page 171: 暂停功能
暂停功能 如果由于滴定器没有完全灌满而在滴定过程中产生气泡,可以将液体排至另外一个容器(赶走气泡)而 不会改变显示数值。 中 文 使用暂停功能 按“Pause”暂停键。 显示暂停符号闪烁。 补液或排液, (参见第169页的描述)。 等等。 停止暂停功能 再次按“Pause”暂停键 。 暂停符号消失。 继续滴定 计算机接口 (选配) 滴定器有可选的RS 232计算机接口的型号(参见订购信息)。与标准配置相比,拥有以下优点: n 连按两下清零键,滴定结果可自动传输到电脑中,从而减少原始数据发生错误的几率,并遵循了 “GLP” 规范的要求。 n 每次数据传输,滴定器会自动输送滴定体积、设备序列号、标称量程、校准体积、以及预约的下次校 准日期。这样,所有原始数据被收集传入电脑。 传输数据被识别为键盘输入的数据。这种数据传输格式应用广泛,保证滴定器与任何支持键盘输入的计 算机都相兼容。 可通过标准的USB/RS 232转接口将设备与USB接口连接。 提供计算机连接线(9针Sub-D 接口)一根,一张CD*(驱动程序及公开的RS 232通讯技术手册)。内含编 程将数据整合入数据库所需的所有信息。除此之外,这张CD还包含一个XLS格式的应用实例,一份操作 手册与一份测试指南(SOP)。 * 德语 / 英语... -
Page 172: 敏感试剂
敏感试剂 更换观察窗 对于光敏感试剂(比如,碘,高锰酸钾或硝酸银溶液),我们建议使 用光敏保护观察窗替代原有观察窗。 用手或者一枚硬币旋开旋开后通气盖(图1)。 打开后仓壳(图2)。 轻压观察窗的一侧将其推出(图3)。 将棕色观察窗曲度较小的一片装入后仓壳。 更换前观察窗,抬起观察窗的一角,可用指甲,将其拉出 (图5)。 将棕色前观察窗突出的一面向外装入前仓壳。 先对齐外壳顶部,然后轻压将前后仓壳合拢。旋上后通气盖。 安装干燥管(可选) 在使用对湿气,二氧化碳等敏感的试剂时,可能需要使用干燥管 (参见190页“附件”)。 旋下后通气盖(参见上面操作)。 在干燥管中装入合适的吸收剂(需另购),然后安装在后通气 口。 提示: 如有必要,请使用PTFE密封圈密封干燥管与滴定器以及瓶口或 瓶口转接头与滴定器的连接处。... -
Page 173: 误差极限 (标称体积, 部分体积)
误差极限 20 °C 针对本仪器的标称量程(即最大量程)的误差极限,为使用蒸馏水在稳 定的环境温度(20 °C/68 °F)下测得。操作按照DIN EN ISO 8655-6 中 的要求,完全充满仪器并均匀顺滑地进行标称体积或部分体积的排液。 文 误差极限对照: 瓶口滴定器, 玻璃滴定管,A Titrette ® 参照DIN EN ISO 8655-3 瓶口滴定器 级,参照DIN EN 标准 ISO 385标准 量程 部分体积 EL** ≤± % µl ≤ % ≤± % µl ≤ % µl... -
Page 174: 检查体积(校准)
检查体积(校准) 根据使用情况,我们建议每隔3-12个月对本仪器进行一次重力法测试。测试的时间间隔可根据各自的 情况进行调整。10 ml 型号设置到小数点后第3位进行校准(页181)。 完整的测试步骤(SOP)可以 在 www.brand.de 下载。此外,可以在较短时间间隔内进行功能测试,例如,使用标准品进行滴定。 为了符合GLP或ISO评估与记录,我们建议使用 BRAND 的 EASYCAL ™ 校准软件进行校准测试。可在 www.brand.de上下载试用版。 根据DIN EN ISO 8655-6进行重力法体积测试(测试条件,参见173页的“误差极限”) 操作如下: 准备仪器 清洁滴定器(参见182页“清洁”),使用蒸馏水进 行补液,小心充满滴定器。 检查体积 a) 向废液缸排出5滴,擦净滴定管排液头。 b) 按“CLEAR”键将显示清零。 c) 建议测试3个体积范围(100%,50%,10%), 每个体积范围测试10个排液量。 d) 使用双手不间断地旋转旋钮直到显示达到测试体 积。擦净滴定管排液头。 e) 在分析天平上称量排出液体。(请参照天平厂方的 操作手册。) f) 计算排液体积。引入包含温度因素与空气浮力的... -
Page 175: 其他功能
其他功能 中 文 页码 “CAL”模式 校准调节 Easy Calibration 易校准技术可协助无需工具, 快速简单的校准调节仪器。 “GLP”模式 校准日程 按照GLP的需要输入校准日程计划 “APO”模式 自动关闭电源 设定仪器在长时间等待之后自动关闭电源。 “dP”模式 小数位 在'20 ml'内选择显示2位或3位小数位。... -
Page 176: 校准调节
校准调节 “CAL”模式 · 易校准技术 为了抵消在相当长一段时间的使用之后或在更换活塞/活塞腔组件之后,可能的最高达0.999 ml 的偏 差,需要进行校准调节。改变出厂设置后屏幕上部会显示一个小小的"CAL"图标。 做什么 怎么做 按键 屏幕显示 计算调整值 调节值为相对标称体积值的偏离量的平均值(比如,平均体积为 50.024 ml, 标称体积为50 ml。调整值= 50.024 ml - 50.000 ml = 0.024 ml)。 如何计算平均值,参见174页"校准" 。 调出"CAL"模式 当仪器打开时,按住 > 3 s "CLEAR"超过3秒。下列模式 会一个接一个地反复显示: CAL - GLP - APO - dP 当"CAL"模式显示在屏幕上,... - Page 177 校准调节 “CAL”模式 · 易校准技术 持续显示的"CAL"图标说明原厂默认设置已经被改变。 输入新的调整数值,会自动加入已存数值。 中 文 做什么 怎么做 按键 屏幕显示 计算调整值 已经调整过的仪器出现了相对于标称量程来说新的平均偏离,例如0.017 ml。 如何计算平均值,参见174页"校准"。 调出"CAL"模式 当仪器打开时,按住 > 3 s "CLEAR"超过3秒。下列模式 会一个接一个地反复显示: CAL - GLP - APO - dP 当"CAL"模式显示在屏幕 上,释放"CLEAR"按键。 "CAL"会闪烁并且显示上次 调整的数字。 输入并调整数值 例如,调整值为 0.017 ml, 按"Pause"键与"on/off"更改数 值。(第一次按键会将显示 调为零)。...
- Page 178 工厂默认设置 "CAL"模式 · 易校准技术 持续显示的"CAL"图标说明原厂默认设置已经被改变。 如果您希望重置工厂默认设置,请按照以下指导操作。 做什么 怎么做 按键 屏幕显示 调出"CAL"模式 当仪器打开时,按住 > 3 s "CLEAR"超过3秒。下列模式 会一个接一个地反复显示: CAL - GLP - APO - dP. 当"CAL"模式显示在屏 幕上,释放"CLEAR"按 键。"CAL"会闪烁并且显示 上次调整的数字。 重置工厂默认设置 同时按"On/Off"按键与 "Pause"键删除"CAL"图标。...
-
Page 179: 校准日程
校准日程 "GLP"模式 下次校准的日程可以储存在GLP模式下(GLP = Good Laboratory Practice)。 中 文 做什么 怎么做 按键 屏幕显示 调出"GLP"模式 当仪器打开时,按住 > 3 s "CLEAR"超过3秒。下列模式 会一个接一个地反复显示: CAL - GLP - APO - dP. 当"GLP"模式显示在屏幕上, 释放"CLEAR"按键。回车符 号会闪烁并且显示"oFF"。 输入下次校准日期 一直按着"Pause"键直到 显示期望的日期。按键会 逐月向后调整校准日期。 按"On/Off"按键缩短校准时 间间隔。(下次校准日期可 – 从"oFF"到 12/2099)。 月 年... -
Page 180: 自动关机
自动关机 "APO"模式 · 设定 在"APO"模式下,自动关机的时间设置范围可从1分钟至30分钟。 工厂默认设置自动关机时间为3分钟。自动关机时间设置得越短,则电池的服务时间将会更长。 做什么 怎么做 按键 屏幕显示 调出"APO"模式 当仪器打开时,按住 > 3 s "CLEAR"超过3秒。下列模式 会一个接一个地反复显示: CAL - GLP - APO - dP. 当"APO"模式显示在屏幕 上,释放"CLEAR"按键。回 车符号会闪烁并且显示工厂 默认设置。 输入自动关机的时间 按"Pause"键或者"On/Off"键 调整数值(1 - 30分钟)。 设置为"oFF"将关闭自动关 机功能。 – 确认设置 按"CLEAR"键确认关机时间 的设置或关闭("oFF")自 动关机。 提示:... - Page 181 调整小数位设置 模式 在"dP"模式,显示小数位可设为2位或者3位(工厂默认为2位)。 提示:因为技术原因,滴定数值超过20.00后只会显示2位。 中 文 做什么 怎么做 按键 屏幕显示 调出"dP"模式 当仪器打开时,按住 > 3 s "CLEAR"超过3秒。下列模式 会一个接一个地反复显示: CAL - GLP - APO - dP. 当"dP"模式显示在屏幕上, 释放"CLEAR"按键。回车键 会闪烁并且显示工厂默认 设置。 改变小数位设置 按"Pause"键选择显示3位小 数位。 (再次按"Pause"可将显示小 数位重置为2位。) 确认设置 按"CLEAR"键确认设置的显 示小数位格式。...
-
Page 182: 标准清洁
清洁 假设在正确的使用情况下本仪器出现以下状况,说明需要进行仪器清洁 n 如果滴定旋钮变得干涩难以转动, n 打算拆卸仪器之前 请立即进行清洁 n 当使用易产生结晶的试剂时需要定 n 变换使用试剂之前 期进行清洁 n 准备长期储存之前 n 当液体积聚在滴定管的旋盖内时 玻璃活塞腔,阀门,伸缩吸液管与滴定管含有试剂! 警告! 必需遵循安全指导(参见第164页)! 标准清洁 将回流阀设在“回流”位置(图1),然后旋转旋钮清空滴定器。 将滴定器拧到一个装有去离子水的试剂瓶上,并执行完全补液与 排液数次进行清洗(图2)。 将回流阀设置到“滴定”位置,拧下旋盖,放一个合适的接收容器 在滴定口下方,执行完全补液与排液数次冲洗滴定管(图3)。 如果活塞腔内有沉淀,这个步骤可以改为使用合适的试剂重复清 洗,然后再使用去离子水清洗。 将滴定器宁在一个空试剂瓶上,将回流阀分别设置在“回流”与“ 滴定”位置,上下移动活塞数次,完全排空滴定器(图5)。 可以上下旋转各半圈旋钮来进行此操作。 使用一枚硬币打开通气盖。 打开后盖,取出安装工具。... -
Page 183: 强化清洁 (拆卸仪器 · 组件更换)
清洁 拆卸仪器 · 组件更换 使用安装工具旋松活塞/活塞腔组件的安全环, 然后用手完全旋开 (图 9)。 中 文 拉出活塞杆的锁扣(图11)。 旋转滴定旋钮将仪器上半部分推出,移开 (图11)。 去除活塞腔上部边缘可能存在的结晶,可以使用水与软瓶刷。 然后使用纤维纸吸干(图12)。 重新安装滴定器,或者如有必要,进一步拆解以便进行更加深 入的清洗。 提示: 结晶溶液,比如,氢氧化钾乙醇溶液 根据使用频率,我们建议活塞上的结晶沉淀应该约每8周定期清理。 为此,请执行标准清洁步骤 6-13。 在每次滴定完成后将活塞提到最高位置将活塞充满液体以此减少晶 体形成。 强化清洁 为防止搞混组件,不要同时拆卸多个滴定器。 拆卸或更换活塞/活塞腔组件之后必须进行校准及必要的调节。 强化清洁的准备 a) 在进一步拆解清洁之前总是执行一次完整的标准清洁。 b) 拔掉回流管与伸缩吸液管。... -
Page 184: 滴定管
清洁 拆卸仪器 · 组件更换 移去与清洁/更换滴定管 (请注意自序列号01K起,该设备的结构有所改变,参见185 页。) a) 将回流阀指向“回流”方向然后向上拔出阀门控制杆 (图a)。 b) 如图示握住滴定管。将滴定管向上抬至一个停顿点,然 后轻轻地上下运动,拉出滴定管(图b)。 c) 滴定管与整合其上的排液阀应该进行超声波清洗,或者 更换。 清洗或更换活塞/活塞腔组件 (请注意自序列号01K起,该设备的结构有所改变,参见185 页。) 活塞/活塞腔组件由活塞与一个含阀门模块的分液腔构成。如果 液体溢出活塞,则需要更换活塞。我们建议将整个活塞/活塞腔 组件一起更换。 a) 握住活塞杆慢慢将活塞拉出活塞腔(图a)。 如果活塞难以移动,使用仪器的上半部分,将 提示: 安装工具置于活塞柱与上半部(安全环)之间 (齿向上),转动旋钮,这样可将活塞完全推 出活塞腔(图a') 。... - Page 185 清洁 拆卸仪器 · 组件更换 b) 使用软布清洁活塞腔与活塞,或者更换它们。 中 c) 要更换活塞,先将灰色安全环向上拨(图c),然后旋下 文 活塞头(图c')。 d) 拧上一个新的活塞,确保其安全紧固。 e) 对齐活塞与活塞杆上的齿轮,活塞可以向后旋转最多半 个齿来进行对齐。 f) 将灰色安全环拨下。 g) 将活塞杆的锯齿条(1)对齐阀门模块的后通气口。在 滴定管连接处的另一面(3)。小心地垂直插入清洁完或 新更换的活塞并按到一半高度(图g)。 提示: 切勿损伤活塞的唇封。应避免与坚硬物体接 触! 2012 年 1 月以后的结构设计修改 滴定套管和阀块的连接在 2012 年 1 月进行了修改。 注意: 故此,在订购该备件的时候,请注意阀块上计量通道和二次计量通 道之间的距离。如果两个通道之间没有间隙,则在更换带阀块的计 量缸时,必须始终同时更换滴定套管(参见第 190 页的 '配件')。...
- Page 186 清洁 拆卸仪器 · 组件更换 安装滴定管 (请注意自序列号01K起,该设备的结构有所改变,参见185 页。) 安装清洁后或替换的滴定管 1.) 插入滴定管5 mm左右。 2.) 抓住滴定管外壳使其向上滑到底。 3.) 将滴定管完全插入。 4.) 将滴定管外壳向下滑动扣紧。 安装上部仓壳 a) 将回流阀阀门杆拨至“回流”位置,然后将阀门杆按下 加紧(图a)。 b) 检查锁扣的位置为拉出状态(图b)。 c) 装上滴定器上半部分,旋转旋钮将其套入,注意前仓壳 的缺口应紧贴滴定管嵌入。 如有必要,稍稍旋转滴定仪上半部分(图c)。 (下页继续!)...
- Page 187 清洁 拆卸仪器 · 组件更换 中 文 d) 抬起活塞/活塞腔组件的安全环,检查上半部的突起与 阀门模块的缺口是否合拢。然后,用手拧紧安全环 (图d)。 e) 将安装工具放在安全环右部边缘然后向左手方向旋转, 紧固安全环(图e)。 将安装工具放回后仓壳存放。 f) 推入活塞杆锁扣。 g) 首先将前后仓顶部扣住,然后阖上前后仓壳。旋上后通 气盖。 h) 执行功能检查与校准,进行适当的调整。...
-
Page 188: 进液阀
清洁 拆卸仪器 · 组件更换 清洁/更换进液阀 在拆卸本仪器前必须先进行标准清洗操作! a) 打开后仓壳取出安装工具。 b) 拔下伸缩吸液管与回流管(图b)。 c) 使用安装工具旋下进液阀(图c)。 d) 如果密封圈已经污染或者损坏,小心地使用弯头镊子取 出密封圈(图d)。 e) 超声波清洗进液阀与密封圈(图e)。 f) 插入经清洁或新的密封圈(参考图e)。 g) 先用手拧上进液阀(图g),然后使用安装工具将其拧紧 (多拧1/4圈已经足够)。 当活塞向上旋时仪器无法补液,但有弹性阻力存在,说 提示: 明很可能球阀堵塞。 这时,想办法推松球阀,比如,用 20 µl塑料移液器吸头 顶一下(参见右图)。... -
Page 189: 更换电池
更换电池 更换电池 中 显示屏上电池图标闪烁代表电池已经耗尽。应该更换电池。 文 请使用指定规格电池:1.5 V (AAA/UM4/LR03)。电池不可充电。 用手或一枚硬币旋下后通气盖(图1)。 移去后仓壳(图2)。 移去电池仓盖(图3)。 使用起子取出电池(图4)。 插入新的电池然后将它们按实。 注意正确的电池极性(图4)。 在电池仓上加盖电池仓盖。小心按压仓盖边缘确保其与电池仓 之间没有缝隙。 首先将前后仓顶部扣住,然后阖上前后仓壳。旋上后通气盖。 提示: 更换电池时,需一并更换电池仓盖。电池仓盖包含在更换的电池包 装内。 警告! 根据适用法规,电池必需充分放电之后才能丢弃。不要短接电池两 极进行放电——这样会有爆炸的风险!... -
Page 190: 订购信息 · 附件 · 零备件
订购信息 · 附件 · 零备件 数字瓶口滴定器 Titrette ® 标准配置 附RS 232计算机接口 量程 货号 货号 10 ml 4760 141 4760 241 25 ml 4760 151 4760 251 50 ml 4760 161 4760 261 瓶口转接头,PP材质。1个/包。 外螺纹 适配瓶口螺纹/ 货号 规格 GL 45 GL 32-33... - Page 191 观察窗,1套无色观察 货号 6659 窗及1套棕色观 察窗(光敏保护)。 货号 安装工具, 6783 1个/包。 货号 微电池,1.5 V 6784 不可重复充电 (AAA/UM4/LR03) 包 电池仓盖 含电池仓盖。 2个/包。 2个/包。 货号 8857 货号 7260 针对带PC接口的型号 软件CD-ROM RS 232连接线 Titrette ® 长度2 m 德文/英文 1个/包。 1个/包。 货号 货号 8850 7075 38...
-
Page 192: 故障诊断
故障诊断 问题 可能的原因 应对方法 液体溢出活塞 活塞磨损 清洁,更换活塞/活塞腔组件 (参见184页)。 活塞/活塞腔组件被污染或由于结 立即停止滴定,进行清洁; 活塞移动困难 晶沉淀损坏 如有必要更换活塞/活塞腔组件 (参见184页)。 无法补液 进液阀堵塞 清洁进液阀。如有堵塞可用 200 µl塑料移液器吸头顶松阀门 球(参见188页)。 无法补液/补液时液体从滴定管 清洁排液阀或更换滴定管 排液阀污染或滴定管损坏 倒吸 (参见184页)。 仪器内有气泡 补液操作过于激烈 请慢慢补液 。 吸液管松了或者损坏 上紧吸液管。如有必要,从顶部 剪去约1 cm再插入。 进液阀松了或可能没有放入密 检查是否装入密封圈,使用安装 封圈 工具上紧进液阀。 试剂瓶加液,或者调整伸缩吸管 吸液管未浸入液体 的长度。 未装回流管或者回流管安装不... -
Page 193: 维修 · 联系地址
在美国与加拿大: – 在寄回仪器之前联系BrandTech Scientific, Inc. 获取返修的授权号码。 – 仅接受寄回清洁的并去除污染的仪器,必须附上返修授权号码并粘贴在外 包装显眼的位置,寄回返修授权号码对应的地址。 联系地址 India: BRAND GMBH + CO KG Otto-Schott-Straße 25 BRAND Scientific Equipment Pvt. Ltd. 97877 Wertheim (Germany) 303, 3rd Floor, ‘C‘ Wing, Delphi Hiranandani Business Park, Powai Tel.: +49 9342 808-0... - Page 194 校准服务 ISO 9001与GLP要求定期检查体积计量仪器。我们建议每隔3-12个月进 行检查。时间间隔由使用的要求决定。如使用频繁或经常具有侵蚀性的 试剂,间隔应该短一些。具体的测试指南可在www.brand.de 或 www.brandtech.com下载。 BRAND也提供厂方的校准服务或BRAND具有的DAkkS 校准服务。 只需寄回需要校准的仪器与需要哪种校准服务的申请。您可在数日内重 新获得经过校准的仪器与相应的厂方校准证书或者是DAkkS校准 证书。需要了解更多信息,请联系您的经销商或者BRAND。 完整的订购信息可在www.brand.de下载(参见技术文档)。 担保信息 我们不能承担由于不当拿取,使用,服务,操作或未授权的仪器维修产 生的结果,我们同样不能承担由于正常易损件如活塞,密封垫圈,阀门 的磨损或者玻璃破损而产生的结果,我们也不能承担由于不按照操作手 册指导的操作而产生的结果。我们不能承担由于进行任何操作手册未描 述的操作与使用或由于非原装配件的使用而产生的结果。 美国与加拿大 担保信息请看www.brandtech.com. 丢弃 此处的标志说明储存的电池与电子设备在超出寿命之后不可 以丢弃于生活用的垃圾箱(混合有生活垃圾)。 - 根据欧洲废弃电力或电子设备委员会(WEEE)于2003年1 月27日的2002/96/EC指令,电子设备应该根据对应国家的 法律进行处置。 - 电池包含可能对于环境与人体有害的物质。因此根据欧洲废弃电池委员会 于2006年9月6日生效的2006/66/EC指令废旧电池应该根据对应国家的法 律进行处置。废旧电池只有在完全放电后才能丢弃。 警告! 不要短接电池两极进行放电 ! 涉及技术信息修改恕不另行通知。可能包含错误。...
- Page 195 DECLARATION OF CONFORMITY – China RoHS 2 BRAND GMBH + CO KG has made reasonable efforts to ensure that hazardous materials and substan- ces may not be used in BRAND products. In order to determine the concentration of hazardous substances in all homogeneous materials of the subassemblies, a “Product Conformity Assessment”...
- Page 196 (Pb), mercury (Hg), cadmium (Cd), hexavalent chromium (Cr+VI), polybrominated biphenyls (PBB), and polybrominated diphenyl ethers (PBDE). Products manufactured by BRAND may enter into further devices or can be used together with other appliances. With these third party products and appliances in particular, please note the EFUP labeled on these products.
- Page 200 9974 69 · Printed in Germany · 5/0219/11...
Need help?
Do you have a question about the Titrette and is the answer not in the manual?
Questions and answers