BRAND Titrette Operating Manual
Bottle-top burette
Hide thumbs
Also See for Titrette:
- Operating manual (200 pages) ,
- Manual (9 pages) ,
- Operating manual (15 pages)

Related Manuals for BRAND Titrette


Summary of Contents for BRAND Titrette
- Page 1 Gebrauchsanleitung | Operating manual | Instruções | Instrucciones de manejo | 操作手册 Titrette® Flaschenaufsatzbürette | Bottle-Top Burette...
- Page 2 Impressum BRAND GMBH + CO KG Otto-Schott-Str. 25 97877 Wertheim (Germany) T +49 9342 808 0 F +49 9342 808 98000 info@brand.de www.brand.de Languages Gebrauchsanleitung............2 Operating manual ............50 Instruções ................ 96 Instrucciones de manejo ..........143 操作手册 ............... 189 Technische Änderungen, Irrtum und Druckfehler vorbehalten.
-
Page 4: Table Of Contents
Inhaltsverzeichnis 1 Einleitung ........... 5 14 Kennzeichnung auf dem Produkt ...38 Lieferumfang ........15 Bestellinformationen ......39 Gebrauchsbestimmung ....16 Zubehör/Ersatzteile ......40 2 Sicherheitsbestimmungen ....6 Allgemeine Sicherheitsbestimmun- 17 Reparatur ..........45 gen ............ 17.1 Zur Reparatur einsenden ....45 Funktion..........Einsatzgrenzen ......... 18 Kalibrierservice ........47 Einsatzbeschränkungen .... -
Page 5: Einleitung
1 Einleitung 1.1 Lieferumfang Flaschenaufsatzbürette Titrette®, Größe 10 ml, 25 ml oder 50 ml, Teleskop-Ansaugrohr (Länge 170 - 330 mm), Rückdosierrohr, 2 Mikro-Batterien 1,5 V (AAA/UM4/LR03), 4 PP-Flaschenadapter (GL 45/32-33, GL 45/38, GL 45/S 40, GL 32-33/NS 29/32), 2 eingefärbte Lichtschutz-Sichtfenster, ein Quali- tätszertifikat und diese Gebrauchsanleitung. -
Page 6: Sicherheitsbestimmungen
2.1 Allgemeine Sicherheitsbestimmungen Bitte unbedingt sorgfältig durchlesen! Das Laborgerät Titrette® kann in Kombination mit gefährlichen Materialien, Arbeitsvorgängen und Ap- paraturen verwendet werden. Die Gebrauchsanleitung kann jedoch nicht alle Sicherheitsprobleme aufzeigen, die hierbei eventuell auftreten. Es liegt in der Verantwortung des Anwenders, die Einhal- tung der Sicherheits- und Gesundheitsvorschriften sicherzustellen und die entsprechenden Ein- schränkungen vor Gebrauch festzulegen. -
Page 7: Einsatzgrenzen
• Der Einsatz des Gerätes für den vorgesehenen Anwendungsfall (z.B. Spurenanalyse) ist vom An- wender sorgfältig zu prüfen. Ggf. an den Hersteller wenden. 2.5 Einsatzausschlüsse 2.5.1 Titrette Gerät niemals einsetzen für: • Flüssigkeiten, die Borosilikatglas, Al , ETFE, PFA, FEP, PTFE oder Platin-Iridium angreifen (z.B. -
Page 8: Lagerbedingungen
Diese Tabelle ist sorgfältig geprüft und basiert auf dem derzeitigen Kenntnisstand. Stets die Ge- brauchsanweisung des Gerätes sowie die Angaben der Reagenzienhersteller beachten. Sollten Sie Aussagen zu Chemikalien benötigen, die nicht in der Liste genannt sind, können Sie sich gerne an BRAND wenden. Stand: 0219/4 Gebrauchsanleitung... -
Page 9: Funktions- Und Bedienelemente
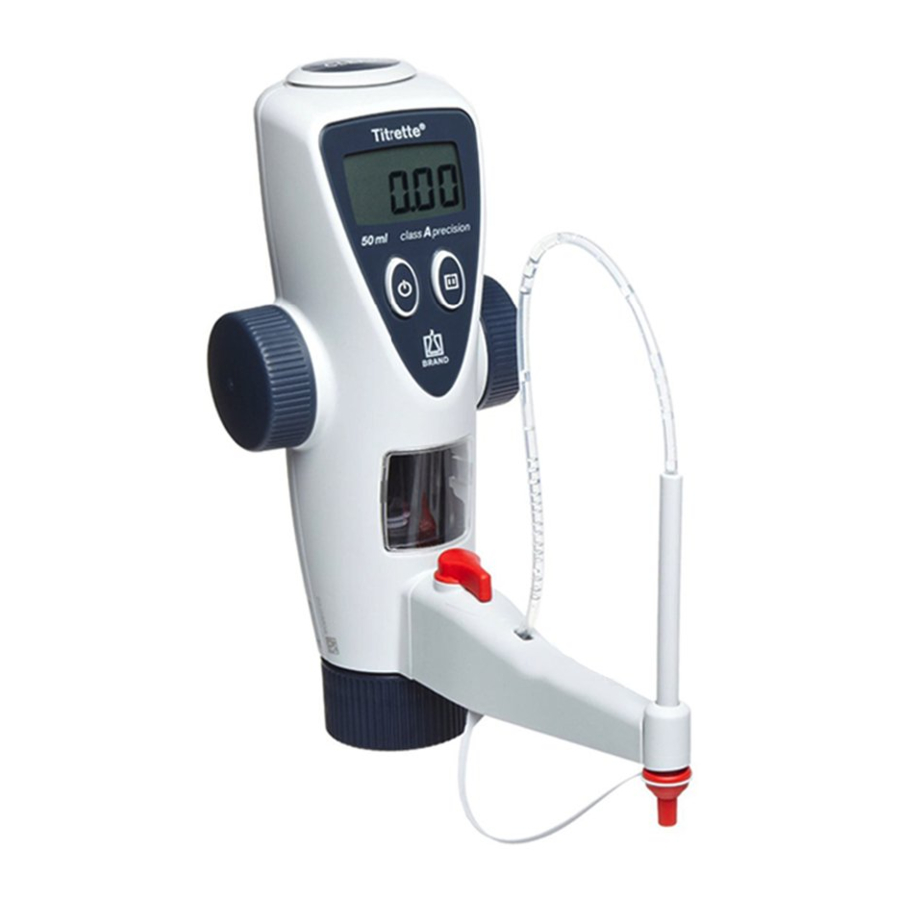
14 Schraubkappe 15 Titrierkanüle mit inte- griertem Ausstoßventil, horizontal und vertikal verstellbar. 16 Sichtfenster 17 Ein/Aus-Taste 18 Digitalanzeige Wesentliche Merkmale der Flaschenaufsatzbürette Titrette® sind international zum Patent angemel- det. Der Montageschlüssel befindet sich in der hinteren Gehäuseschale. 9974 69 Gebrauchsanleitung... -
Page 10: Inbetriebnahme
4 Inbetriebnahme 4 Inbetriebnahme 4.1 Erste Schritte 1. Batterien einsetzen Belüftungsstopfen von Hand oder mit einer Münze her- ausschrauben. Hintere Gehäuseschale entfernen. Abdeckung der Batteriefächer entfernen und Batterien einlegen. Richtung von Plus- und Minuspol beachten. Batteriefächer mit den Abdeckungen wieder dicht ver- schließen. - Page 11 4 Inbetriebnahme WARNUNG Sicherheitshinweise beachten > Schutzkleidung, Augenschutz und Schutzhandschuhe tragen! > Gerät und Flasche nur mit Schutzhandschuhen anfassen, insbesondere wenn gefähr- liche Medien eingesetzt werden. > Alle Sicherheitsbestimmungen befolgen sowie Einsatzgrenzen beachten, siehe Ein- satzgrenzen, S. 7. > Einsatzbeschränkungen beachten, siehe Einsatzbeschränkungen, S. 7. 3.
-
Page 12: Entlüften
4 Inbetriebnahme 5. Gerät transportieren Auf Reagenzflasche montiertes Gerät stets so tragen, wie in der Abbildung gezeigt! WARNUNG Verspritzen von Reagenz Mögliche Gesundheitsgefährdung, insbesonde- re bei gefährlichen Medien > Handräder nie drehen, wenn das Ventil auf 'Titrieren' steht und die Titrierkanüle mit der Schraubkappe verschlossen ist! >... - Page 13 4 Inbetriebnahme Zuerst den Kolben durch Drehen der Handräder ganz nach unten bewegen. Zum Füllen den Kolben maximal bis zur Hälfte nach oben drehen und wieder entleeren. HINWEIS Falls das Füllen nicht möglich ist, siehe Störung - Was tun?, S. 37 Danach mehrmals mit einer halben Handrad-Umdre- hung Flüssigkeit aufsaugen und in einem Zug jeweils bis zum unteren Anschlag in die Flasche entleeren.
-
Page 14: Titrieren
5 Titrieren 5 Titrieren 1. Gerät einschalten Zum Einschalten bzw. Ausschalten die Ein/Aus-Taste kurz drücken. 2. Gerät füllen Durch Drehen der Handräder das Gerät sanft bis zum oberen Anschlag füllen. CLEAR-Taste 1x kurz drücken um den Anzeigewert auf null zu stellen. 3. -
Page 15: Energiesparmodus (Auto-Power-Off)
5 Titrieren 5.1 Energiesparmodus (Auto-Power-Off) Bei Arbeitsunterbrechungen von mehr als drei Minuten (Werkseinstellung) schaltet das Gerät automa- tisch in den Standby-Modus. Dabei wird der Anzeigewert gespeichert und erscheint nach dem manu- ellen Einschalten wieder im Display. Die Zeit zum automatischen Abschalten kann variiert werden (s. Auto-Power-Off (APO-Modus), S. 27). -
Page 16: Pc-Schnittstelle (Optional)
6 PC-Schnittstelle (optional) 6 PC-Schnittstelle (optional) Das Gerät ist mit optionaler Kommunikationsschnittstelle (RS 232) erhältlich (siehe 'Bestelldaten'). Die Version mit Schnittstelle bietet gegenüber der Standardausführung folgende Vorteile: • Übertragungsfehler beim Abschreiben der Primärdaten entfallen, denn die Titrationsergebnisse werden durch Doppelklicken der CLEAR-Taste automatisch zum PC übertragen. Damit ist eine wichtige Anforderung der GLP erfüllt. -
Page 17: Empfindliche Medien (Sichtfenster Tauschen)
7 Empfindliche Medien (Sichtfenster tauschen) 7 Empfindliche Medien (Sichtfenster tauschen) Für lichtempfindliche Medien (z.B. Iod-, Kaliumpermanganat- und Silbernitratlösung) empfehlen wir, die eingefärbten Lichtschutz-Sichtfenster zu verwenden. Belüftungsstopfen von Hand oder mit einer Münze her- ausschrauben. Hintere Gehäuseschale entfernen. Clip des hinteren Sichtfensters auf einer Seite lösen und herausnehmen. -
Page 18: Trockenrohr (Optional) Montieren
8 Trockenrohr (optional) montieren 8 Trockenrohr (optional) montieren Für feuchtigkeits- oder CO -empfindliche Medien kann der Einsatz eines mit geeignetem Absorbens (nicht im Lieferum- fang enthalten) gefüllten Trockenrohres erforderlich sein. (siehe Zubehör/Ersatzteile) Das gefüllte Trockenrohr anstelle des Belüftungsstop- fens einschrauben. HINWEIS Das Gewinde des Trockenrohrs, der Flasche und/oder des Flaschenadapters ggf. -
Page 19: Fehlergrenzen
°C/68 °F) von Gerät, Umgebung und destilliertem Wasser. Die Prüfung erfolgte gemäß DIN EN ISO 8655-6 bei vollständig gefülltem Gerät und gleichmäßiger und ruckfreier Dosierung. Fehlergrenzen Flaschenaufsatz- Flaschenaufsatz- Glasbürette bürette Titrette® büretten nach Klasse A nach DIN EN ISO 8655-3 DIN EN ISO 385 Volumen Teilvolumen... -
Page 20: Volumen Kontrollieren (Kalibrieren)
Das 10 ml Gerät zur Kalibrierung auf 3 Dezimalstellen einstellen (Seite 21). Dieser Zy- klus sollte entsprechend den individuellen Anforderungen angepasst werden. Die ausführliche Prüfanweisung (SOP) steht unter www.brand.de zum Download bereit. Zusätzlich können Sie auch in kürzeren Zeitabständen eine Funktionsprüfung durchführen, z.B. durch Titration gegen einen Stan- dard. - Page 21 10 Volumen kontrollieren (Kalibrieren) 3. Berechnung = Wäge-Ergebnisse Anzahl der Wägungen Korrekturfaktor (z. B. 1,0029 ml/g bei 20 °C, 1013 hPa) ∑ – Mittelwert – x – . Z Mittleres Volumen – – . 100 Richtigkeit* R% = Nennvolumen – ∑...
-
Page 22: Zusatzfunktionen
11 Zusatzfunktionen 11 Zusatzfunktionen 11.1 CAL-Modus (Justieren) 11.1.1 Justieren Nach längerem Gebrauch oder nach dem Austausch der Dosiereinheit kann eine Justierung erforder- lich werden, um Richtigkeitsunterschiede bis maximal ± 0,999 ml auszugleichen. Die Veränderung der Werksjustierung wird im Display angezeigt. 1. Justagewert errechnen Der Justagewert ist die Abweichung des mittleren Volumens vom Nennvolumen (z.B.: Mittleres Volu- men 50,024 ml, Nennvolumen 50 ml. - Page 23 11 Zusatzfunktionen 4. Eingabe bestätigen CLEAR-Taste drücken, um die Eingabe des Justagewertes zu bestätigen. ð Die Änderung der Werksjustierung wird durch das jetzt ständig angezeigte CAL-Symbol im Dis- play deutlich gemacht. HINWEIS Wird die CLEAR-Taste nicht innerhalb von ca. 15 Sekunden gedrückt, bleibt der Ausgangszustand er- halten.
- Page 24 11 Zusatzfunktionen 3. Justagewert eingeben Der Justagewert beträgt z.B. 0,017 ml. Pause- bzw. Ein/ Aus-Taste drücken, bis der Wert erreicht ist (mit dem ersten Tastendruck wird die Anzeige auf null gesetzt). 4. Eingabe bestätigen CLEAR-Taste drücken. Alter und neuer Justagewert wer- den automatisch addiert.
-
Page 25: Kalibriertermin (Glp-Modus)
11 Zusatzfunktionen Sobald CAL im Display erscheint, die CLEAR-Taste wie- der loslassen. CAL blinkt und der Justagewert der zuvor vorgenommenen Justierung erscheint. 2. Werksjustierung wiederherstellen Ein/Aus-Taste und Pause-Taste gleichzeitig drücken, um die Werksjustierung wiederherzustellen. Das CAL-Symbol wird ausgeblendet. 11.2 Kalibriertermin (GLP-Modus) Im GLP-Modus (Good Laboratory Practice) kann der Termin für die nächste Kalibrierung gespeichert werden. - Page 26 11 Zusatzfunktionen Sobald GLP im Display steht, die CLEAR-Taste loslassen. Das Eingabesymbol blinkt und 'oFF' erscheint. 2. Kalibriertermin eingeben Pause-Taste anhaltend drücken, bis der gewünschte Termin angezeigt wird. Kurzes Drücken verlängert den Termin Monat schrittweise. Das Drücken der Ein/Aus-Taste verkürzt den Jahr Termin.
-
Page 27: Auto-Power-Off (Apo-Modus)
11 Zusatzfunktionen 11.3 Auto-Power-Off (APO-Modus) Im APO-Modus kann die Zeit für das automatische Abschalten von 1 bis 30 min eingestellt werden. In der Werkseinstellung schaltet das Gerät automatisch nach 3 Minuten ab. Je kürzer die Auto-Power-Off Zeit eingestellt ist, desto länger ist die Batterielebensdauer. 1. -
Page 28: Dezimalstellen (Dp-Modus)
11 Zusatzfunktionen 11.4 Dezimalstellen (dP-Modus) Im dP-Modus kann die Anzeige wahlweise auf 2 oder 3 Dezimalstellen eingestellt werden (Werksein- stellung 2 Dezimalstellen). HINWEIS Titriervolumina ab 20,00 ml können technisch bedingt nur mit 2 Dezimalstellen angezeigt werden. 1. dP-Modus aufrufen Bei eingeschaltetem Gerät CLEAR-Taste länger als 3 s >... -
Page 29: Reinigung
12 Reinigung 12 Reinigung Damit eine einwandfreie Funktion gewährleistet ist, muss das Gerät in folgenden Fällen gereinigt wer- den: • • sofort, wenn die Handräder sich schwerer regelmäßig bei Verwendung von kristallisie- als gewohnt drehen lassen renden Lösungen • • vor Reagenzwechsel wenn sich Flüssigkeit in der Schraubkappe der Titrierkanüle angesammelt hat... - Page 30 12 Reinigung Das Gerät auf eine leere Flasche schrauben und durch mehrmaliges Auf- und Abwärtsbewegen des Kolbens in Ventilstellung 'Rückdosieren' und 'Titrieren' vollständig entleeren. Den Kolben zuerst vollständig nach oben und dann eine halbe Handumdrehung nach unten bewegen. Belüftungsstopfen von Hand oder mit einer Münze her- ausschrauben.
-
Page 31: Intensivreinigung
12 Reinigung HINWEIS Kristallisierende Medien z.B. alkoholische KOH Je nach Gebrauchshäufigkeit empfehlen wir regelmäßig im Abstand von ca. 8 Wochen eventuelle Kris- tallablagerungen oberhalb des Kolbens zu entfernen. Dazu die Schritte f-m der Standardreinigung durchführen. Um Kristallablagerungen zu verhindern, das Gerät nach der Titration stets vollständig bis zum oberen Anschlag füllen. - Page 32 12 Reinigung Kolbenstange umfassen und den Kolben langsam aus dem Dosierzylinder ziehen (Abb. a). HINWEIS Falls sich der Kolben nur schwer bewegen lässt, Geräteober- teil aufsetzen, den Montageschlüssel (Zähne zeigen nach un- ten) zwischen Dosierzylinder und Oberteil klemmen und durch Drehen der Handräder den Kolben vollständig aus dem Dosierzylinder bewegen (Abb.
- Page 33 12 Reinigung Konstruktive Änderung ab Januar 2012 Die Verbindung der Titrierkanüle mit dem Ventilblock wurde zum Januar 2012 geändert. Bei Bestellung dieser Ersatzteile daher am Ventilblock auf den Abstand zwischen Dosierkanal und Rückdosierkanal achten. Ist zwischen den beiden Kanälen kein Spalt zu sehen, so muss bei Ersatz des Dosierzylinders mit Ventilblock auch immer gleichzeitig die Titrierkanüle ersetzt werden (Zube- hör/Ersatzteile, S. 40).
- Page 34 12 Reinigung Das Geräteoberteil aufsetzen, durch Drehen der Handräder nach unten bewegen und dabei beachten, dass sich die Aussparung der vorderen Gehäuseschale passgenau über die Titrierkanüle schiebt. Gegebenen- falls das Oberteil etwas drehen. Den Sicherungsring der Dosiereinheit anheben und kon- trollieren, dass Nut und Feder ineinandergreifen.
-
Page 35: Festsitzende Ventilkugel Lösen
12 Reinigung Falls Dichtring verschmutzt oder beschädigt, mit Hilfe einer abgewinkelten Pinzette vorsichtig entfernen. Ansaugventil und Dichtring reinigen (Ultraschallbad) bzw. austauschen. Gegebenenfalls gereinigten bzw. neuen Dichtring einle- gen. Das Ansaugventil erst von Hand einschrauben und dann mit Montageschlüssel fest anziehen (1/4 Umdrehung genügt!). - Page 36 12 Reinigung Hintere Gehäuseschale erst oben einhängen, dann zu- klappen. Belüftungsstopfen einschrauben. HINWEIS Mit den Batterien stets auch die Abdeckung der Batteriefä- cher austauschen. Diese sind im Lieferumfang der Ersatzbat- terien enthalten. WARNUNG Nur vollständig entladene Batterien entspre- chend der Batterieverordnung entsorgen. Bat- terien zum Entladen nicht kurzschließen –...
-
Page 37: Störung - Was Tun
13 Störung - Was tun? 13 Störung - Was tun? Störung Mögliche Ursache Was tun Flüssigkeit steht oberhalb des Kolbens Kolben undicht Reinigung durchführen, Do- siereinheit austauschen (sie- he Reinigung, S. 29). Kolben schwergängig Dosiereinheit durch Kristall- Reinigung durchführen, evtl. ablagerungen verunreinigt Dosiereinheit austauschen bzw. -
Page 38: Kennzeichnung Auf Dem Produkt
Zeichenfolge DE-M (DE für Deutschland), eingerahmt durch ein Rechteck, sowie die beiden letzten Ziffern des Jahres, in dem die Kennzeichnung angebracht wurde (hier: 2018). www.brand.de/ip Patentinformationen China RoHS (EFUP) EFUP definiert den Zeitraum in Jahren, in dem die in Elek- tro- und Elektronikgeräten enthaltenen gefährlichen Stoffe... -
Page 39: Bestellinformationen
15 Bestellinformationen 15 Bestellinformationen Titrette® Standard mit RS 232 Schnittstelle Volumen Best.-Nr. Best.-Nr. 10 ml 4760 141 4760 241 25 ml 4760 151 4760 251 50 ml 4760 161 4760 261 9974 69 Gebrauchsanleitung... -
Page 40: Zubehör/Ersatzteile
16 Zubehör/Ersatzteile 16 Zubehör/Ersatzteile Flaschenadapter PP, Verp.-Einh. 1 Stück Außengewinde für Flaschenge- Best.-Nr. winde/Schliff- größe GL 45 GL 32-33 7043 96 GL 45 GL 38 7043 97 GL 45 S* 40 7043 43 GL 45 S* 42 7043 49 GL 45 S* 50 7043 50 GL 32... - Page 41 16 Zubehör/Ersatzteile Flaschenhalter Beschreibung Verp.-Einheit Best. Nr. Flaschenhalter. 1 Stück 7042 75 PP. Stativstab 325 mm. Grund- platte 220 x 160 Trockenrohr Beschreibung Verp.-Einheit Best. Nr. Trockenrohr inkl. 1 Stück 7079 30 Dichtring aus PT- FE (ohne Granu- lat). Ansaugventil Beschreibung Verp.-Einheit Best.
- Page 42 16 Zubehör/Ersatzteile Kolben für Volumen Verp.-Einheit Best.-Nr. 10 ml 1 Stück 7075 31 25 ml 1 Stück 7075 30 50 ml 1 Stück 7075 32 Dosierzylinder mit Ventilblock (Konstruktive Änderungen ab 2012 beachten, siehe Intensi- vreinigung, S. 33) für Volumen Verp.-Einheit Best.-Nr. 10 ml 1 Stück 7075 33...
- Page 43 16 Zubehör/Ersatzteile Mikro-Batterien 1,5 V Beschreibung Verp.-Einheit Best. Nr. Mikro-Batterien je 2 Stück. 7260 1,5 V. nicht wie- deraufladbar (AAA/UM4/LR03). inkl. Batteriefach- Abdeckungen Belüftungsstopfen Beschreibung Verp.-Einheit Best. Nr. Belüftungsstopfen 1 Stück. 6659 Montageschlüssel Beschreibung Verp.-Einheit Best. Nr. Montageschlüssel 1 Stück. 6784 Batteriefach-Abdeckungen Beschreibung...
- Page 44 16 Zubehör/Ersatzteile Schnittstellenkabel RS 232 Beschreibung Verp.-Einheit Best. Nr. Schnittstellenka- 1 Stück. 8850 bel RS 232. Länge 2 m. Titrette Software Beschreibung Verp.-Einheit Best. Nr. Titrette Software. 1 Stück. 7075 38 CD-ROM. deutsch/ englisch Entnahmesystem Titrette® Beschreibung Verp.-Einheit Best. Nr.
-
Page 45: Reparatur
"Erklärung zur gesundheitlichen Unbedenklichkeit" ausfüllen und gemeinsam mit dem Gerät an Her- steller oder Händler senden. Vordrucke können beim Händler oder Hersteller angefordert werden, bzw. stehen unter www.brand.de zum Download bereit. Innerhalb der USA und Kanada Bitte klären Sie mit BrandTech Scientific, Inc. die Voraussetzungen für die Rücksendung bevor Sie das Gerät zum Service einschicken. - Page 46 17 Reparatur Kontaktadressen Deutschland: USA und Kanada: ® BRAND GMBH + CO KG BrandTech Scientific, Inc. Otto-Schott-Straße 25 11 Bokum Road 97877 Wertheim (Germany) Essex, CT 06426-1506 (USA) T +49 9342 808 0 T +1-860-767 2562 F +49 9342 808 98000 F +1-860-767 2563 info@brand.de...
-
Page 47: Kalibrierservice
Die ausführliche Prüfanweisung steht unter www.brand.de bzw. www.brandtech.com zum Download bereit. BRAND bietet Ihnen darüber hinaus die Möglichkeit, Ihre Geräte durch unseren Werks-Kalibrierservice oder durch das BRAND-DAkkS-Labor kalibrieren zu lassen. Schicken Sie uns einfach die zu kalibrierenden Geräte mit der Angabe, welche Art der Kalibrierung Sie wünschen. -
Page 48: 19 Mängelhaftung
19 Mängelhaftung 19 Mängelhaftung Wir haften nicht für Folgen unsachgemäßer Behandlung, Verwendung, Wartung, Bedienung oder nicht autorisierter Reparatur des Gerätes oder für Folgen normaler Abnutzung, insbesondere von Ver- schleißteilen wie z.B. Kolben, Dichtungen, Ventilen sowie bei Glasbruch. Gleiches gilt für die Nichtbe- achtung der Gebrauchsanleitung. -
Page 49: Entsorgung
20 Entsorgung 20 Entsorgung Das nebenstehende Symbol bedeutet, dass Batterien/Akkus und elektronische Geräte am Ende ihrer Lebensdauer vom Hausmüll (unsortierter Siedlungsabfall) getrennt entsorgt werden müssen. Elektronische Geräte müssen gemäß der Richtlinie 2012/09/EU des europäischen Parlaments und des Rates vom 04. Juli 2012 über Elektro- und Elektronik-Altgeräte fachgerecht entsprechend den natio- nalen Entsorgungsvorschriften entsorgt werden. - Page 50 Table of contents 1 Introduction........51 15 Ordering Information......85 Scope of delivery......51 16 Accessories/spare parts......86 Terms of use ........51 17 Repairs ..........91 2 Safety Instructions ......52 17.1 Sending for repair......91 General safety instructions....52 Function..........52 18 Calibration service........93 Limitations of Use ......
-
Page 51: Introduction
1 Introduction 1.1 Scope of delivery Bottle-top burette Titrette®, size 10 ml, 25 ml or 50 ml, telescopic filling tube (length 170 - 330 mm), re- circulation tube, 2 micro-batteries 1.5 V (AAA/UM4/LR03), 4 PP bottle-top adapters (GL 45/32-33, GL 45/38, GL 45/S 40, GL 32-33/NS 29/32), 2 tinted light-protection viewing windows, one performance certificate and this operating manual. -
Page 52: Safety Instructions
The installed 1.5 V micro-batteries are not rechargeable! 2.2 Function The Titrette® bottle-top burette with electronic digital display is used to titrate aqueous and non- aqueous titration media (e.g. alcoholic KOH) up to a concentration of max. 1 mol/l. (See Recom- mended application range, p. 54). -
Page 53: Limitations Of Use
Compatibility of the instrument for the intended application (e.g., trace analysis) must be care- fully checked by the user. Contact the manufacturer, if necessary. 2.5 Operating Exclusions 2.5.1 Titrette Never use the instrument for: • liquids that attack borosilicate glass, Al , ETFE, PFA, FEP, PTFE or platinum-iridium (e.g., hy-... -
Page 54: Storage Conditions
This table has been carefully tested and is based on the most current information available. Always observe the operating manual of the instrument and the specifications provided by the reagent manu- facturer. If you need chemical hazard statements that are not on the list, you are welcome to contact BRAND. Last updated: 0219/4 Operating manual... -
Page 55: Functional And Operating Elements
16 Inspection window 17 On/off button 18 Digital display The main features of the Titrette® bottle-top burette have been filed for international patent. The as- sembly tool is located in the rear housing section. 9974 69 Operating manual... -
Page 56: Assembly
4 Assembly 4 Assembly 4.1 First Steps 1. Inserting batteries Unscrew the air vent cap by hand or use a coin. Remove the rear housing shell. Remove the battery compartment covers and insert the batteries. Ensure that the polarity of the batteries corre- sponds to the symbols on the battery compartment. - Page 57 4 Assembly WARNING Follow the safety instructions > Wear protective clothing, eye protection and protective gloves! > Always wear protective gloves when touching the instrument or the bottle, especially when using dangerous liquids. > Follow all safety instructions and comply with the limitations of use, see Limitations of use, p. 53.
-
Page 58: Priming
4 Assembly 5. Transporting the instrument When mounted to a reagent bottle, always carry the in- strument as shown in the figure! WARNING Avoid splashing the reagent Potential health risk, especially with hazardous media > Never turn the hand wheels when the valve is set to 'Titrate' and the titrating tube is closed with the screw cap! >... - Page 59 4 Assembly NOTICE A few bubbles less than 1 mm in size are permitted. Unscrew the screw cap of the titrating tube. Turn the valve to 'Titrate'. Hold a suitable receiving vessel under the opening of the titrating tube and dispense liquid to deaerate the titrating tube until it is bubble-free.
-
Page 60: Titrating
5 Titrating 5 Titrating 1. Switching on the instrument To switch the instrument on or off, briefly press the ON/ OFF button. 2. Filling the instrument Fill the instrument up to the upper stop position by gen- tly turning the hand wheels. Briefly press the CLEAR button one time to set the dis- play value to zero. -
Page 61: Energy-Saver Mode (Auto Power Off)
5 Titrating 5.1 Energy-saver mode (Auto power off) If work is interrupted for more than three minutes (factory setting), the instrument automatically switches into standby mode. The display value is saved and reappears in the display after switching back on manually. The user can adjust the amount of idle time before automatically switching off (see Auto power off (APO mode), p. 73). -
Page 62: Pc Interface (Optional)
6 PC interface (optional) 6 PC interface (optional) The instrument is available with an optional communication port (RS 232) (see 'Ordering informa- tion'). The model with the port provides the following advantages over the standard model: • Transcription errors are eliminated when copying the primary data because the titration results are automatically transmitted to the PC by double-clicking on the CLEAR button. -
Page 63: Sensitive Media (Replacing The Inspection Window)
7 Sensitive media (replacing the inspection window) 7 Sensitive media (replacing the inspection window) For light-sensitive media (e.g., iodine, potassium permanganate and silver nitrate solutions), we rec- ommend using the colored light shield inspection window. Unscrew the air vent cap by hand or use a coin. Remove the rear housing shell. -
Page 64: Installing A Drying Tube (Optional)
8 Installing a drying tube (optional) 8 Installing a drying tube (optional) Use of a drying tube, filled with a suitable absorbent (pur- chased separately), might be necessary for moisture- and - sensitive media. (See Accessories/spare parts) Screw in the filled drying tube in place of the air vent cap. -
Page 65: Error Limits
6 with a completely filled instrument and with uniform and smooth dispensing. Error limits Bottle-top Bottle-top Glass burettes burette Titrette® burettes in accor- Class A in accor- dance with dance with DIN EN ISO 8655- 3 DIN EN ISO 385... -
Page 66: Checking The Volume (Calibration)
The complete testing procedure (SOP) can be downloaded at www.brand.de. You can also carry out a functional test at more frequent intervals, e.g., by titrating against a standard solution. For GLP- and ISO-compliant evaluations and documentation, we recommend the EASYCAL™... - Page 67 10 Checking the Volume (Calibration) 3. Calculation = Weighing results Number of weighings Correction factor (e.g. 1.0029 ml/g at 20 °C, 1013 hPa) ∑ – Mean – x – . Z Mean volume – – . 100 Accuracy* A% = Nominal volume –...
-
Page 68: Additional Functions
11 Additional functions 11 Additional functions 11.1 CAL mode (adjustment) 11.1.1 Adjustment After a long period of usage or following the replacement of the dispensing unit, an adjustment may be necessary to balance out differences in accuracy up to a maximum of ± 0.999 ml. The change from the factory setting is shown in the display. - Page 69 11 Additional functions 4. Confirming input Press the CLEAR button to confirm the input of the adjustment value. ð The change from the factory setting is indicated by the CAL symbol, which is now continuously shown in the display. NOTICE If the CLEAR button is not pressed within approx.
- Page 70 11 Additional functions 3. Entering the adjustment value The adjustment value is 0.017 ml, for example. Press the Pause or On/Off button until the value has been reached (the first press of a button sets the display to zero). 4. Confirming input Press the CLEAR button.
-
Page 71: Calibration Date (Glp Mode)
11 Additional functions When CAL appears in the display, release the CLEAR button. CAL blinks and the adjustment value of the pre- vious adjustment appears. 2. Restoring the factory default setting Press the On/Off button and the Pause button at the same time to restore the factory default setting. - Page 72 11 Additional functions When GLP appears in the display, release the CLEAR button. The input symbol blinks and 'oFF' appears. 2. Entering the calibration date Press and hold the Pause button until the desired date is dis- played. Pressing briefly gradually extends the time until the Month calibration date.
-
Page 73: Auto Power Off (Apo Mode)
11 Additional functions 11.3 Auto power off (APO mode) In APO mode, the time for automatic power off can be set from 1 to 30 minutes. The factory default setting for automatic power off is 3 minutes. The shorter the auto power off time setting, the longer the batteries will last. -
Page 74: Decimal Places (Dp Mode)
11 Additional functions 11.4 Decimal places (dP mode) In dP mode, the display can be set to show 2 or 3 decimal places (factory default setting is 2 decimal places). NOTICE For technical reasons, titration volumes over 20.00 ml can only be displayed with 2 decimal places. 1. -
Page 75: Cleaning
12 Cleaning 12 Cleaning The instrument must be cleaned in the following situations to assure correct operation: • • Immediately when the hand wheels are regularly when using crystallizing solutions more difficult to turn than usual • when liquids accumulate in the screw cap •... - Page 76 12 Cleaning Screw the instrument onto an empty bottle and empty the piston completely by executing several up and down piston movements in the 'Recirculation' and 'Titration' valve setting. First move the piston all the way up and then down by a half-rotation of the hand wheel.
-
Page 77: Intensive Cleaning
12 Cleaning 12.2 Intensive cleaning To avoid mixing up components, do not dismantle several instruments at the same time. Calibration and, if applicable, an adjustment must always be carried out after dismantling or replacing a dispens- ing unit. 1. Preparing for intensive cleaning Always perform a complete standard cleaning before further dismantling the instrument. - Page 78 12 Cleaning NOTICE If it is difficult to move the piston, open the top of the instru- ment, clamp the assembly tool (teeth pointing downward) between the dispensing cylinder and the top and turn the hand wheel to move the piston completely out of the dis- pensing cylinder (Fig.
- Page 79 12 Cleaning Design change from January 2012 The connection between the titrating tube and the valve block was changed as of January 2012. Therefore, when ordering these replacement parts, note the distance between the dispensing duct and recirculation duct on the valve block. If there is no gap between the two ducts, always replace the titrating tube at the same time the dis- pensing cylinder with valve block is replaced (Accessories/ spare parts, p. 86).
- Page 80 12 Cleaning Attach the top part of the instrument and rotate the hand wheels to move it down while being careful that the recess of the front housing shell slides snugly over the titrating tube. Slightly rotate the top part, if neces- sary.
-
Page 81: Dislodging A Stick Valve Ball
12 Cleaning If the sealing ring is contaminated or damaged, care- fully remove it using a pair of angled tweezers. Clean the filling valve and sealing ring (ultrasonic bath) or replace them. Insert the cleaned or new sealing ring, if necessary. Screw in the filling valve first by hand and then tighten it with the assembly tool (1/4 turn is sufficient!). - Page 82 12 Cleaning Screw in the air vent cap. NOTICE Always replace the battery compartment covers when re- placing the batteries. These are included with the replace- ment batteries. WARNING Dispose of fully discharged batteries only in compliance with the Battery Directive. Do not discharge the battery by short-circuiting –...
-
Page 83: Troubleshooting
13 Troubleshooting 13 Troubleshooting Problem Possible cause What to do Liquid is above the piston Piston leaky Perform cleaning, replace dispensing cartridge (see Cleaning, p. 75). Piston sluggish Dispensing cartridge contam- Perform cleaning, possibly inated or damaged by crystal replace dispensing cartridge, deposits see Cleaning, p. 75). -
Page 84: Product Markings
DE-M (DE for Germany), framed by a rectangle, as well as the two last digits of the year the marking was affixed (here: 2018). www.brand.de/ip Patent information China RoHS (EFUP) EFUP defines the time period in years, in which the haz-... -
Page 85: Ordering Information
15 Ordering Information 15 Ordering Information Titrette® Standard with RS 232 port Volume Order no. Order no. 10 ml 4760 141 4760 241 25 ml 4760 151 4760 251 50 ml 4760 161 4760 261 9974 69 Operating manual... -
Page 86: Accessories/Spare Parts
16 Accessories/spare parts 16 Accessories/spare parts Bottle adapter PP, pkg unit Pack of 1 External thread for bottle Order no. thread/ground joint GL 45 GL 32-33 7043 96 GL 45 GL 38 7043 97 GL 45 S* 40 7043 43 GL 45 S* 42 7043 49... - Page 87 16 Accessories/spare parts Bottle stand Description Pkg unit Order No. Bottle stand PP. Pack of 1 7042 75 Support rod 325 mm. Base plate 220 x 160 mm Drying tube Description Pkg unit Order No. Drying tube Incl. Pack of 1 7079 30 PTFE sealing ring (without drying...
- Page 88 16 Accessories/spare parts Piston For volumes Pkg unit Order no. 10 ml Pack of 1 7075 31 25 ml Pack of 1 7075 30 50 ml Pack of 1 7075 32 Dispensing cylinder with valve block (Note the design changes from 2012, see Intensive clean- ing, p. 79) For volumes Pkg unit...
- Page 89 16 Accessories/spare parts Micro-batteries, 1.5 V Description Pkg unit Order No. Micro-batteries, Pack of 2 each. 7260 1.5 V. Not rechargeable (AAA/UM4/LR03). Incl. battery com- partment covers Venting stopper Description Pkg unit Order No. Venting stopper Pack of 1. 6659 Assembly tool Description Pkg unit...
- Page 90 Length 2 m. Titrette software Description Pkg unit Order No. Titrette software. Pack of 1. 7075 38 CD-ROM. German/ English Titrette® extraction system Description Pkg unit Order No. Titrette® extrac- Pack of 1 7075 50 tion system Operating manual 9974 69...
-
Page 91: Repairs
Complete the “Declaration on Absence of Health Hazards” and send the instrument to the manufac- turer or supplier. Ask your supplier or manufacturer for the form. The form can also be downloaded from www.brand.de. Within USA and Canada Please clarify the requirements for the return delivery with BrandTech Scientific, Inc before sending the instrument in for service. - Page 92 17 Repairs Contact addresses Germany: USA and Canada: ® BRAND GMBH + CO KG BrandTech Scientific, Inc. Otto-Schott-Str. 25 11 Bokum Road 97877 Wertheim (Germany) Essex, CT 06426-1506 (USA) T +49 9342 808 0 T +1-860-767 2562 F +49 9342 808 98000 F +1-860-767 2563 info@brand.de...
-
Page 93: Calibration Service
For customers outside Germany If you would like to use our calibration service, please contact one of our service partners in your re- gion. If a factory calibration is requested, the service partner can forward the instrument to BRAND. 9974 69... -
Page 94: Warranty
19 Warranty 19 Warranty We shall not be liable for the consequences of improper handling, use, servicing, operating or unau- thorized repairs of the device or for the consequences of normal wear and tear, especially of wearing parts such as pistons, seals, valves and the breakage of glass. The same applies for failure to follow the instructions of the operating manual. -
Page 95: Disposal
20 Disposal 20 Disposal This symbol means that at the end of their service life, batter- ies/accumulators and electronic devices must be disposed of separately from household waste (unsorted municipal waste). Electronic devices must be disposed of in accordance with Directive 2012/09/ EU of the European Par- liament and of the Council from July 04, 2012 on waste from electrical and electronic equipment and in compliance with national disposal regulations. - Page 96 Índice remissivo 1 Introdução .......... 97 15 Informações de encomenda ....132 Inclui ..........97 16 Acessórios/Peças de substituição ... 133 Regras de utilização ......97 17 Reparação..........138 2 Normas de segurança......98 17.1 Enviar para reparação....... 1 38 Normas gerais de segurança ...
-
Page 97: Introdução
1 Introdução 1.1 Inclui Bureta de adaptador de frascos Titrette®, tamanho 10 ml, 25 ml ou 50 ml, tubo de admissão telescópico (comprimento 170 - 330 mm), tubo doseador de retorno, 2 micro-pilhas 1,5 V (AAA/UM4/ LR03), 4 adaptadores de frascos PP (GL 45/32-33, GL 45/38, GL 45/S 40, GL 32-33/NS 29/32), 2 janelas de visualização de cor com proteção contra luz, um certificado de qualidade e este manual de... -
Page 98: Normas De Segurança
As micro-pilhas de 1,5 V montadas não são recarregáveis! 2.2 Função A bureta do adaptador de frascos Titrette® com visor digital eletrónico serve para titular fluidos de titulação aquosos e não aquosos (p. ex. KOH alcoólico) até uma concentração máx. de 1 mol/l. (ver Área de aplicação recomendada, p. 100). -
Page 99: Limites De Aplicação
A aplicação do aparelho no caso previsto (p. ex., análise de análise de elementos vestigiais) deve ser cuidadosamente verificada pelo utilizador Se necessário, dirija-se ao fabricante. 2.5 Exclusões de aplicação 2.5.1 Titrette Nunca utilizar o aparelho para: • líquidos agressivos para vidro de borossilicato, Al , ETFE, PFA, FEP, PTFE ou platina/irídio (p. -
Page 100: Condições De Armazenamento
Esta tabela foi cuidadosamente verificada e baseia-se nos conhecimentos mais atuais. Observe sempre as instruções de utilização do aparelho, bem como as indicações do fabricante do reagente. Se precisar de informações sobre os produtos químicos, que não estão mencionados na lista, pode dirigir-se a BRAND. Data: 0219/4 Instruções... -
Page 101: Elementos De Funções E De Comando
16 Janela de visualização 17 Tecla Ligar/Desligar 18 Indicação digital As características essenciais da bureta de adaptador de frascos Titrette® estão internacionalmente registadas em patente. A chave de montagem encontra-se na tampa traseira da caixa. 9974 69 Instruções... -
Page 102: Colocação Em Funcionamento
4 Colocação em funcionamento 4 Colocação em funcionamento 4.1 Primeiros passos 1. Colocar as pilhas Desaparafuse o obturador de ventilação com a mão ou com uma moeda. Retirar a tampa traseira da caixa. Retirar a tampa dos compartimentos das pilhas e colocar as pilhas. - Page 103 4 Colocação em funcionamento ATENÇÃO! Respeitar as instruções de segurança > Usar roupa de proteção, proteção nos olhos e luvas de proteção! > Pegar no aparelho e no frasco apenas com luvas de proteção, sobretudo quando se utilizam fluidos perigosos. >...
-
Page 104: Purgar
4 Colocação em funcionamento 5. Transportar aparelho Transportar o aparelho montado no frasco de reagentes sempre da forma ilustrada! ATENÇÃO! Projeção de reagentes Possíveis riscos para a saúde, nomeadamente no caso de fluidos perigosos > Nunca rode os volantes quando a válvula se encontrar em 'Titulação' e a cânula de titulação estiver fechada com a tampa roscada! - Page 105 4 Colocação em funcionamento AVISO São toleradas poucas bolhas até 1 mm. Desenroscar a tampa roscada da cânula de titulação. Rodar a válvula para ‘Titulação'. Manter um recipiente de recolha adequado por baixo da abertura da cânula de titulação e dosear até a cânula de titulação estar purgada.
-
Page 106: Titulação
5 Titulação 5 Titulação 1. Ligar o aparelho Premir a tecla Ligar/Desligar para ligar ou desligar. 2. Encher o aparelho Rodar suavemente os volantes para subir o aparelho até ao batente superior. Premir a tecla CLEAR 1x para colocar o valor indicativo em zero. -
Page 107: Modo De Poupança De Energia (Auto-Power-Off)
5 Titulação 5.1 Modo de poupança de energia (Auto-Power-Off) No caso de interrupções dos trabalhos superiores a três minutos (definição de fábrica), o aparelho entra automaticamente em modo Standby. O valor da indicação é guardado e volta a aparecer no visor após a reativação manual. -
Page 108: Interface Pc (Opcional)
6 Interface PC (opcional) 6 Interface PC (opcional) O aparelho está disponível com uma interface de comunicação opcional (RS 232) (ver 'Dados de encomenda'). Em relação à versão padrão, a versão com interface oferece as seguintes vantagens: • São suprimidos erros de transferência ao substituir os dados primários, dado que os resultados da titulação são transferidos automaticamente para o PC através de duplo clique na tecla CLEAR. -
Page 109: Fluidos Sensíveis (Substituir Janela De Proteção)
7 Fluidos sensíveis (substituir janela de proteção) 7 Fluidos sensíveis (substituir janela de proteção) Para fluidos sensíveis à luz (p. ex., soluções de iodo, de permanganato de potássio de e nitrato de prata), recomendamos o uso da janelas de proteção da luz colorida. Desaparafuse o obturador de ventilação com a mão ou com uma moeda. -
Page 110: Montar O Tubo Seco (Opcional)
8 Montar o tubo seco (opcional) 8 Montar o tubo seco (opcional) No caso de fluidos húmidos ou sensíveis a CO , pode ser necessário usar um tubo seco cheio com um absorvente adequado (não incluído). (ver Acessórios/Peças de substituição) Aparafusar o tubo seco cheio em vez do obturador de ventilação. -
Page 111: Limites De Erro
Limites de erro Bureta de Bureta de adaptador Bureta de vidro adaptador de Classe A segundo frascos Titrette® frascos conforme DIN EN ISO 385 DIN EN ISO 8655-3 Volume Volume parcial VK* % FG** ±... -
Page 112: Controlar Volume (Calibrar)
Pode ainda ser realizado um controlo adicional em intervalos mais pequenos, p. ex. por titulação contra um padrão. Para a avaliação conforme GLP e ISO e a documentação, recomendamos o software de calibração EASYCAL™ da BRAND. Há uma versão de demonstração disponível em www.brand.de para download. - Page 113 10 Controlar volume (calibrar) 3. Cálculo = Resultados de pesagem Quantidade de pesagens Fator de correção (p. ex. 1,0029 ml/g a 20 °C, 1013 hPa) ∑ – Valor médio – x – . Z Volume médio – – . 100 Precisão* R% = Volume nominal...
-
Page 114: Funções Adicionais
11 Funções adicionais 11 Funções adicionais 11.1 Modo CAL (ajuste) 11.1.1 Ajustar Após um longo período de uso ou após a substituição da unidade de dosagem, pode ser necessário um ajuste para compensar as diferenças na precisão até um máximo de ± 0,999 ml. A alteração do ajuste de fábrica é... - Page 115 11 Funções adicionais 4. Confirmar introdução Premir a tecla CLEAR para confirmar a introdução do valor de ajuste. ð A alteração do ajuste de fábrica é clarificada agora pelo símbolo CAL apresentado no visor de forma permanente. AVISO Se a tecla CLEAR não for premida dentro de aprox. 15 segundos, o estado inicial é mantido. 11.1.2 Novo ajuste O símbolo CAL permanentemente apresentado no visor indica um ajuste já...
- Page 116 11 Funções adicionais 3. Introduzir o valor de ajuste O valor de ajuste é, p. ex. 0,017 ml. Premir a tecla Pausa ou Ligar/desligar até atingir o valor (a indicação é reposta a zeros ao premir a tecla pela primeira vez). 4.
-
Page 117: Prazo De Calibração (Modo Glp)
11 Funções adicionais Assim que CAL aparecer no visor, soltar a tecla CLEAR. CAL pisca e é apresentado o valor de ajuste do ajuste realizado anteriormente. 2. Repor o ajuste de fábrica Premir as teclas Ligar/desligar e Pausa em simultâneo para repor o ajuste de fábrica. - Page 118 11 Funções adicionais Assim que GLP aparecer no visor, soltar a tecla CLEAR. O símbolo de introdução pisca e aparece 'oFF'. 2. Introduzir o prazo de calibração Manter premida a tecla Pausa até que seja apresentado o prazo pretendido. Uma pressão breve aumenta Mês progressivamente o prazo.
-
Page 119: Auto-Power-Off (Modo Apo)
11 Funções adicionais 11.3 Auto-Power-Off (Modo APO) No modo APO, é possível definir o tempo para a desativação automática, de 1 a 30 minutos. Nas definições de fábrica, o aparelho desliga automaticamente após 3 minutos. Quanto menor for o tempo de Auto-Power-Off definido, maior será a vida útil das pilhas. 1. -
Page 120: Casas Decimais (Modo Dp)
11 Funções adicionais 11.4 Casas decimais (modo dP) No modo dP, é possível definir a apresentação de 2 ou 3 casas decimais (definições de fábrica: 2 casas decimais). AVISO Por motivos de ordem técnica, os volumes de titulação superiores a 20,00 ml podem ser apresentados apenas com 2 casas decimais. - Page 121 11 Funções adicionais 3. Confirmar introdução Premir a tecla CLEAR para confirmar a introdução da apresentação de casas decimais pretendida. 9974 69 Instruções...
-
Page 122: Limpeza
12 Limpeza 12 Limpeza Para assegurar um funcionamento perfeito, o aparelho deve ser cuidadosamente limpo nas seguintes condições: • • assim que o movimento dos volantes for regularmente, em caso de utilização de mais pesado que o habitual soluções cristalizantes •... - Page 123 12 Limpeza Enroscar o aparelho num frasco vazio e esvaziar completamente com movimentos ascendentes e descendentes do êmbolo na posição da válvula 'Dosagem de retorno' e 'Titulação'. Em primeiro lugar, mover o êmbolo completamente para cima e, depois, meia rotação da mão para baixo. Desaparafuse o obturador de ventilação com a mão ou com uma moeda.
-
Page 124: Limpeza Intensiva
12 Limpeza 12.2 Limpeza intensiva Para evitar confundir os componentes do aparelho, não desmontar vários aparelhos ao mesmo tempo. Após desmontar ou trocar a unidade de dosagem, é sempre necessário realizar uma calibração ou ajuste, se necessário! 1. Preparação para a limpeza intensiva Antes de continuar a desmontar, realizar uma limpeza padrão completa. - Page 125 12 Limpeza AVISO Se for difícil mover o êmbolo, colocar na parte superior do aparelho, prender a chave de montagem (dentes para baixo) entre o cilindro de dosagem e a parte superior e mover o êmbolo completamente para fora do cilindro de dosagem rodando os volantes (Fig.
- Page 126 12 Limpeza Alteração construtiva a partir de janeiro de 2012 A ligação da cânula de titulação ao bloco de válvulas foi alterada em janeiro de 2012. Por isso, ao encomendar esta peça sobresselente, prestar atenção à distância entre o canal de dosagem e o canal de dosagem de retorno no bloco de válvulas.
- Page 127 12 Limpeza Colocar a parte superior do aparelho, mover para baixo rodando os volantes e atentar para que o entalhe da tampa dianteira da caixa deslize com exatidão sobre a cânula de titulação. Se necessário, rodar ligeiramente a parte superior. Levantar o anel de fixação da unidade de dosagem e verificar se o entalhe e a mola encaixam.
-
Page 128: Soltar Esfera Da Válvula Fixa
12 Limpeza Se o anel de vedação estiver sujo ou danificado, retirar com a ajuda de uma pinça angulada. Limpar a válvula de admissão e o anel de vedação (banho de ultrassons) ou substituir. Se necessário, colocar um anel de vedação limpo ou novo. - Page 129 12 Limpeza Fechar bem as tampas dos compartimentos das pilhas. Premir com cuidado os rebordos da tampa, de modo a que esta assente firmemente e não reste qualquer folga entre esta e os compartimentos das pilhas. Em primeiro lugar, pendure a tampa traseira da caixa em cima e, em seguida, feche-a.
-
Page 130: Avaria - O Que Fazer
13 Avaria - O que fazer? 13 Avaria - O que fazer? Avaria Causa possível O que fazer O líquido está acima do Êmbolo não estanque Limpar, trocar unidade de dosagem êmbolo (ver Limpeza, p. 122). Êmbolo emperrado Unidade de dosagem sujo ou Limpar, eventual trocar unidade de danificado por depósitos de dosagem, ver Limpeza, p. 122). -
Page 131: Identificação No Produto
Sequência de símbolos DE-M (DE para Alemanha), emoldurados num retângulo, bem como os dois últimos números do ano, onde a identificação foi colocada (aqui: 2018). www.brand.de/ip Informações de patente China RoHS (EFUP) EFUP, o EFUP define o período em anos em que as substâncias perigosas contidas em equipamentos elétricos... -
Page 132: Informações De Encomenda
15 Informações de encomenda 15 Informações de encomenda Titrette® Padrão com interface RS 232 Volume N.º Enc. N.º Enc. 10 ml 4760 141 4760 241 25 ml 4760 151 4760 251 50 ml 4760 161 4760 261 Instruções 9974 69... -
Page 133: Acessórios/Peças De Substituição
16 Acessórios/Peças de substituição 16 Acessórios/Peças de substituição Adaptador de frasco PP, Un. emb. 1 unid. Rosca exterior para rosca de N.º Enc. frasco/tamanho do polimento GL 45 GL 32-33 7043 96 GL 45 GL 38 7043 97 GL 45 S* 40 7043 43 GL 45... - Page 134 16 Acessórios/Peças de substituição Suporte de frascos Descrição Unid. emb. N.º Enc. Suporte para 1 unid. 7042 75 frascos. PP. Tripé 325 mm. Placa base 220 x 160 Tubo seco Descrição Unid. emb. N.º Enc. Tubo seco incl. 1 unid. 7079 30 anel de vedação em PTFE (sem...
- Page 135 16 Acessórios/Peças de substituição Êmbolo para volumes Unid. emb. N.º Enc. 10 ml 1 unid. 7075 31 25 ml 1 unid. 7075 30 50 ml 1 unid. 7075 32 Cilindro de dosagem com bloco de válvulas (Observar as alterações construtivas a partir de 2012, ver Limpeza intensiva, p. 126) para volumes Unid.
- Page 136 16 Acessórios/Peças de substituição Pilhas micro 1,5 V Descrição Unid. emb. N.º Enc. Pilhas micro 1,5 2 unidades cada. 7260 V., não recarregáveis, (AAA/UM4/LR03). inc. coberturas do compartimento das pilhas Obturador de ventilação Descrição Unid. emb. N.º Enc. Obturador de 1 unid.
- Page 137 RS 232. Comprimento 2 Software Titrette Descrição Unid. emb. N.º Enc. Software Titrette. 1 unid. 7075 38 CD-ROM. alemão/ inglês Sistema de recolha Titrette® Descrição Unid. emb. N.º Enc. Sistema de 1 unid. 7075 50 recolha Titrette® 9974 69 Instruções...
-
Page 138: Reparação
Preencher a "Declaração relativa à segurança sanitária" e enviá-la juntamente com o aparelho ao fabricante ou distribuidor. Os formulários podem ser solicitados ao distribuidor ou fabricante ou podem ser descarregados em www.brand.de. Dentro dos EUA e do Canadá Esclareça com a BrandTech Scientific, Inc. os requisitos para a devolução antes de enviar o aparelho à... - Page 139 17 Reparação Endereço de contacto Alemanha: EUA e Canadá: ® BRAND GMBH + CO KG BrandTech Scientific, Inc. Otto-Schott-Straße 25 11 Bokum Road 97877 Wertheim (Alemanha) Essex, CT 06426-1506 (EUA) T +49 9342 808 0 T +1-860-767 2562 F +49 9342 808 98000 F +1-860-767 2563 info@brand.de...
-
Page 140: Serviço De Calibração
As instruções pormenorizadas de controlo estão disponíveis em www.brand.de para download. A BRAND oferece-lhe ainda a possibilidade de você poder calibrar os seus aparelhos através do nosso serviço de calibração de fábrica ou através do laboratório BRAND-DAkkS. -
Page 141: Responsabilidade Por Defeitos
19 Responsabilidade por defeitos 19 Responsabilidade por defeitos Não assumimos responsabilidade pelas consequências de manuseamento, utilização, manutenção, operação incorretos ou reparação não autorizada do aparelho, nem pelas consequências do desgaste normal, especialmente de peças de desgaste como, por ex., êmbolos, vedantes, válvulas, assim como em caso de quebra de vidro. -
Page 142: Eliminação
20 Eliminação 20 Eliminação O símbolo adjacente significa que as pilhas/baterias e aparelhos eletrónicos no final da sua vida útil devem ser eliminados separadamente do lixo doméstico (resíduos urbanos não separados). Conforme a diretiva 2012/09/UE do Parlamento Europeu e do Conselho de 04 de julho de 2012 relativa a aparelhos elétricos e eletrónicos usados, os aparelhos eletrónicos devem ser eliminados corretamente de acordo com as normas nacionais de eliminação. - Page 143 Índice 1 Introducción ........144 13 ¿Qué hacer en caso de avería?....176 Contenido de la entrega ....144 14 Marcado en el producto ......177 Información general sobre las ins- trucciones de uso ......144 15 Información para pedidos...... 178 2 Normas de seguridad ......145 16 Accesorios/piezas de recambio ....
-
Page 144: Introducción
1 Introducción 1.1 Contenido de la entrega Bureta acoplable a frascos Titrette®, tamaño 10 ml, 25 ml o 50 ml, tubo de aspiración telescópico (lon- gitud 170 - 330 mm), tubo de dosificación inversa, 2 microbaterías 1,5 V (AAA/UM4/LR03), 4 adaptado- res para frascos PP (GL 45/32-33, GL 45/38, GL 45/S 40, GL 32-33/NS 29/32), 2 visores protectores para la luz coloreados, un certificado de calidad y este manual de instrucciones. -
Page 145: Normas De Seguridad
¡Las microbaterías incluidas de 1,5 V no son recargables! 2.2 Función La bureta acoplable a frascos Titrette® con pantalla digital electrónica se emplea para la valoración de medios acuosos o no acuosos (por ej., KOH alcohólico) hasta una concentración máx. de 1 mol/l. (véa- se Campos de aplicación recomendados, p. 147). -
Page 146: Limitaciones De Uso
El usuario debe comprobar con cuidado la idoneidad del aparato para el caso de aplicación pre- visto (por ej., el análisis de trazas). De ser necesario, contactar con el fabricante. 2.5 Excepciones de uso 2.5.1 Titrette No utilizar nunca el aparato con las siguientes sustancias: •... -
Page 147: Condiciones De Almacenamiento
En caso de que necesite información sobre químicos que no se encuentren mencionados en la lis- ta, puede ponerse en contacto con BRAND. Versión: 0219/4... -
Page 148: Elementos De Mando Y Funcionamiento
3 Elementos de mando y funcionamiento 3 Elementos de mando y funcionamiento Elementos de mando: Teclas individuales para Conectar/Desconectar, tecla Pausa y tecla CLEAR para borrar lo que se muestra en la pantalla. Rueda con ranuras de agarre para una valoración rápida o go- ta a gota. -
Page 149: Puesta En Marcha
4 Puesta en marcha 4 Puesta en marcha 4.1 Primeros pasos 1. Colocación de las baterías Desenroscar el tapón de ventilación con la mano o con una moneda. Retirar la parte trasera de la carcasa. Retirar las cubiertas de los compartimientos para bate- rías y colocar las baterías. - Page 150 4 Puesta en marcha ADVERTENCIA Contemplar las indicaciones de seguridad > ¡Utilizar vestimenta de protección, gafas protectoras y guantes de protección! > Manipular el aparato y el frasco únicamente con guantes de protección, en especial, al emplear medios peligrosos. > Respetar todas las normas de seguridad y contemplar las limitaciones de uso, véase Limitaciones de uso, p. 146.
-
Page 151: Purga
4 Puesta en marcha 5. Transporte del aparato ¡Transportar siempre el aparato montado sobre el fras- co de reactivo de la forma que se muestra en la figura! ADVERTENCIA Salpicaduras de reactivo Posibles riesgos para la salud, en especial, al emplear medios peligrosos >... - Page 152 4 Puesta en marcha Desenroscar la caperuza a rosca de la cánula de valora- ción. Girar la válvula a la posición «Valoración». Colocar un recipiente adecuado bajo el extremo de la cánula de valoración y dosificar hasta que la cánula no contenga más burbujas de aire.
-
Page 153: Valoración
5 Valoración 5 Valoración 1. Encendido del aparato Presionar brevemente el botón de Encendido/Apagado para encender o apagar el aparato. 2. Llenado del aparato Llenar el aparato suavemente hasta el tope superior gi- rando las ruedas. Presionar el botón CLEAR brevemente una vez para co- locar el valor indicado en cero. -
Page 154: Modo De Ahorro De Energía (Apagado Automático)
5 Valoración 5.1 Modo de ahorro de energía (apagado automático) En caso de interrumpir el trabajo por más de tres minutos (ajuste de fábrica), el aparato pasa automá- ticamente a modo de suspensión. En este caso, el valor indicado se guarda y vuelve a aparecer en la pantalla tras el encendido manual. -
Page 155: Interfaz Del Ordenador (Opcional)
6 Interfaz del ordenador (opcional) 6 Interfaz del ordenador (opcional) El aparato está disponible con una interfaz de comunicación opcional (RS 232) (véanse los «Datos de pedido»). En comparación con la versión estándar, la versión con interfaz ofrece las siguientes ventajas: •... -
Page 156: Medios Sensibles (Cambio Del Visor)
7 Medios sensibles (cambio del visor) 7 Medios sensibles (cambio del visor) Recomendamos utilizar un visor de protección lumínica tintado para los medios sensibles a la luz (por ej., solución de permanganato de potasio y de nitrato de plata). Desenroscar el tapón de ventilación con la mano o con una moneda. -
Page 157: Montaje Del Tubo De Secado (Opcional)
8 Montaje del tubo de secado (opcional) 8 Montaje del tubo de secado (opcional) Con medios sensibles a la humedad o al CO , puede ser nece- sario utilizar un tubo de secado con un medio absorbente adecuado (no incluido en el contenido de la entrega). (véase Accesorios/piezas de recambio) Enroscar el tubo de secado lleno en lugar del tapón de ventilación. -
Page 158: Límites De Errores
8655-6, con el aparato completamente lleno y una dosifica- ción uniforme y sin sacudidas. Límites de errores Bureta acoplable a Buretas Bureta de vidrio frascos acoplables a frascos Clase A según Titrette® según la norma norma DIN EN ISO 8655-3 DIN EN ISO 385 Volumen Volumen par- CV* % LE** cial ±... -
Page 159: Control Del Volumen (Calibración)
Para la documentación y evaluación adecuadas según las Buenas Prácticas de Laboratorio y las normas ISO, se recomienda utilizar el software de calibración EASYCAL™ de BRAND. En www.brand.de/es, se encuentra disponible una versión de demostración del programa para des- cargar. - Page 160 10 Control del volumen (calibración) 3. Cálculo = Resultados del pesaje Cantidad de pesajes Factor de corrección (por ej., 1,0029 ml/g a 20 °C, 1013 hPa) ∑ – Valor medio – x – . Z Volumen medio – – . 100 Exactitud* E % = Volumen nominal –...
-
Page 161: Funciones Adicionales
11 Funciones adicionales 11 Funciones adicionales 11.1 Modo CAL (ajuste) 11.1.1 Ajuste Tras un largo período de uso o después de sustituir la unidad de dosificación, puede ser necesario rea- lizar un ajuste para compensar diferencias de precisión de hasta, máximo, ± 0,999 ml. La modificación del ajuste de fábrica se muestra en la pantalla. - Page 162 11 Funciones adicionales 3. Introducción del valor de ajuste El valor de ajuste es, por ej., 0,024 ml. Presionar los bo- tones de Encendido/Apagado o Pausa hasta alcanzar el valor. 4. Confirmación de la entrada Presionar el botón CLEAR para confirmar la entrada del valor de ajuste. ð...
- Page 163 11 Funciones adicionales Soltar el botón CLEAR cuando aparezca la inscripción CAL en la pantalla. CAL parpadea y aparece el valor del ajuste realizado anteriormente. 3. Introducción del valor de ajuste El valor de ajuste es, por ej., 0,017 ml. Presionar los bo- tones de Encendido/Apagado o Pausa hasta alcanzar el valor (al presionar el botón por primera vez, el indica- dor se pone en cero).
- Page 164 11 Funciones adicionales 11.1.3 Ajuste de fábrica El símbolo CAL que aparece constantemente en la pantalla indica que ya se ha realizado un ajuste. No obstante, se debe restablecer el ajuste de fábrica. 1. Acceso al modo CAL Con el aparato encendido, mantener presionado el bo- >...
-
Page 165: Fecha De Calibración (Modo Glp)
11 Funciones adicionales 11.2 Fecha de calibración (modo GLP) En el modo GLP («Good Laboratory Practice»), es posible guardar la fecha de la siguiente calibración. 1. Acceso al modo GLP Con el aparato encendido, mantener presionado el bo- > 3 s tón CLEAR por más de 3 segundos, hasta que en la pan- talla se muestren los siguientes modos uno tras otro: CAL —... -
Page 166: Apagado Automático (Modo Apo, "Auto-Power-Off")
11 Funciones adicionales 11.3 Apagado automático (Modo APO, «Auto-Power-Off») En el modo APO, es posible ajustar el tiempo para el apagado automático de 1 a 30 min. En los ajustes de fábrica, el aparato se apaga automáticamente después de 3 minutos. Cuanto más breve sea el tiempo de apagado automático, más prolongada será... -
Page 167: Decimales (Modo Dp)
11 Funciones adicionales 11.4 Decimales (modo dP) En el modo dP, es posible ajustar el indicador, de manera opcional, en 2 o 3 decimales (ajuste de fábri- ca: 2 decimales). AVISO Los volúmenes de valoración a partir de 20,00 ml solo se podrán mostrar, por limitaciones técnicas, con 2 decimales. -
Page 168: Limpieza
12 Limpieza 12 Limpieza Para garantizar el funcionamiento correcto del aparato, deberá limpiarse en los siguientes casos: • • de inmediato, cuando las ruedas giren con de manera periódica, si se utilizan medios más dificultad que lo habitual cristalizantes • •... - Page 169 12 Limpieza Enroscar el aparato en un frasco vacío y vaciarlo por completo mediante varios movimientos del émbolo ha- cia arriba y hacia abajo, con la válvula en las posiciones «Dosificación inversa» y «Valoración». Mover el émbolo por completo hacia arriba y, a conti- nuación, hacia abajo dando una media vuelta con la mano.
-
Page 170: Limpieza Intensiva
12 Limpieza AVISO Medios cristalizantes, por ej., KOH alcohólico Según la frecuencia de uso, recomendamos retirar eventuales sedimentos de cristales sobre el émbo- lo de manera regular, en períodos de aprox. 8 semanas. Para esto, realizar los pasos f-m de la limpieza estándar. - Page 171 12 Limpieza Tomar el vástago del émbolo y retirar lentamente el émbolo del cilindro dosificador (imagen a). AVISO Si el émbolo no se mueve fácilmente, colocar la parte supe- rior del aparato, colocar la llave de montaje (dientes hacia abajo) entre el cilindro dosificador y la parte superior y sacar por completo el émbolo del cilindro dosificador girando las ruedas (imagen a').
- Page 172 12 Limpieza Modificación constructiva a partir de enero de 2012 A partir de enero de 2012, se modificó la conexión de la cánu- la de valoración con el bloque de válvulas. Por este motivo, tener en cuenta la distancia entre el canal de dosificación y el canal de dosificación inversa en el bloque de válvulas al solicitar estas piezas de recambio.
- Page 173 12 Limpieza Colocar la parte superior del aparato, desplazarlo hacia abajo girando las ruedas y, al hacerlo, asegurarse de que el hueco de la parte delantera de la carcasa se des- place de forma exacta sobre la cánula de valoración. De ser necesario, girar un poco la parte superior.
-
Page 174: Desajustar La Bola De La Válvula Atascada
12 Limpieza En caso de que la junta anular esté sucia o dañada, reti- rarla cuidadosamente con una pinza acodada. Limpiar la válvula de aspiración y la junta anular (baño ultrasónico), o bien, cambiarlas. Colocar la junta anular limpia o nueva. Colocar la válvula de aspiración primero de forma ma- nual y, a continuación, apretarla con la llave de montaje (¡1/4 de giro es suficiente!). - Page 175 12 Limpieza Volver a cerrar herméticamente los compartimientos para baterías con las cubiertas. Presionar con cuidado los bordes de las cubiertas, de modo que encajen firme- mente en todo el contorno y no quede ninguna ranura con respecto a los compartimientos para baterías. Insertar primero la parte superior de la parte trasera de la carcasa y, a continuación, cerrarla.
-
Page 176: Qué Hacer En Caso De Avería
13 ¿Qué hacer en caso de avería? 13 ¿Qué hacer en caso de avería? Avería Posible causa ¿Qué hacer? El líquido se encuentra por en- Émbolo no estanco Realizar una limpieza, cambiar la uni- cima del émbolo dad de dosificación (véase el apartado Limpieza, p. 168). -
Page 177: Marcado En El Producto
Cuenta con la secuencia de caracteres DE-M («DE» en refe- rencia a Alemania) enmarcada en un rectángulo, así como las últimas dos cifras del año en el que se realizó la identifi- cación (en este caso: 2018). https://www.brand.de/es/sobre-noso- Información sobre patentes tros/conformidad-normativa/ip/ China RoHS (EFUP) El período de uso respetuoso con el medio ambiente (EFUP,... -
Page 178: Información Para Pedidos
15 Información para pedidos 15 Información para pedidos Titrette® estándar con interfaz RS Volumen N.° de pedido N.° de pedido 10 ml 4760 141 4760 241 25 ml 4760 151 4760 251 50 ml 4760 161 4760 261 Instrucciones de manejo... -
Page 179: Accesorios/Piezas De Recambio
16 Accesorios/piezas de recambio 16 Accesorios/piezas de recambio Adaptadores para frascos PP, unidad de embalaje 1 unidad Rosca exterior Para rosca de N.° de pedido frasco/ esmeri- lado GL 45 GL 32-33 7043 96 GL 45 GL 38 7043 97 GL 45 S* 40 7043 43... - Page 180 16 Accesorios/piezas de recambio Soporte para frascos Descripción Unidad de em- N.° de pedido balaje Soporte para fras- 1 unidad 7042 75 cos. PP. Varilla de soporte 325 mm. Placa base 220 x 160 mm Tubo de secado Descripción Unidad de em- N.° de pedido balaje Tubo de secado 1 unidad...
- Page 181 16 Accesorios/piezas de recambio Tubo de dosificación inversa Descripción Unidad de em- N.° de pedido balaje Tubo de dosifica- 1 unidad 8317 ción inversa Émbolo para volumen Unidad de em- N.° de pedido balaje 10 ml 1 unidad 7075 31 25 ml 1 unidad 7075 30...
- Page 182 16 Accesorios/piezas de recambio Microbaterías de 1,5 V Descripción Unidad de em- N.° de pedido balaje Microbaterías de 2 unidades de ca- 7260 1,5 V (AAA/UM4/ da una. LR03) no recarga- bles con las cu- biertas del com- partimiento para baterías Tapones de ventilación Descripción Unidad de em- N.°...
- Page 183 Descripción Unidad de em- N.° de pedido balaje Software Titrette. 1 unidad. 7075 38 CD-ROM. alemán/ inglés Sistema de extracción Titrette® Descripción Unidad de em- N.° de pedido balaje Sistema de extrac- 1 unidad 7075 50 ción Titrette® 9974 69...
-
Page 184: Reparación
Completar la «Declaración sobre la ausencia de riesgos para la salud» y enviarla junto con el equipo al fabricante o al distribuidor. El formulario se puede pedir al proveedor o al fabricante, o bien, se puede descargar en el sitio web www.brand.de/es. Dentro de EE. UU. y Canadá... - Page 185 17 Reparación Direcciones de contacto Alemania: EE. UU. y Canadá: ® BRAND GMBH + CO KG BrandTech Scientific, Inc. Otto-Schott-Straße 25 11 Bokum Road 97877 Wertheim (Germany) Essex, CT 06426-1506 (USA) Tel.: +49 9342 808 0 Tel.: +1-860-767 2562 Fax: +49 9342 808 98000 Fax: +1-860-767 2563 info@brand.de...
-
Page 186: Servicio De Calibración
Para clientes fuera de Alemania Para utilizar nuestro servicio de calibrado, se ruega contactar con uno de nuestros representantes de la región correspondiente. Ellos podrán enviar los equipos a BRAND en caso de que se desee un cali- brado en fábrica. -
Page 187: Responsabilidad Por Defectos
19 Responsabilidad por defectos 19 Responsabilidad por defectos No seremos responsables de las consecuencias derivadas del trato, manejo, mantenimiento, uso in- correcto o reparación no autorizada del aparato, ni de las consecuencias derivadas del desgaste nor- mal, en especial de partes susceptibles de abrasión, tales como émbolos, juntas herméticas, válvulas, ni de la rotura de partes de vidrio o del incumplimiento de las instrucciones de manejo. -
Page 188: Eliminación
20 Eliminación 20 Eliminación El símbolo que puede verse al costado significa que las pilas/ baterías y los equipos electrónicos deben desecharse por se- parado de los residuos domésticos (residuos municipales sin separar) al finalizar su vida útil. De acuerdo con la directiva 2012/09/UE del Parlamento Europeo y del Consejo de 04 de julio de 2012 sobre residuos de aparatos eléctricos y electrónicos (RAEE), los equipos electrónicos deben desechar- se de forma apropiada en función de las normas nacionales de eliminación de residuos. - Page 189 目录 1 引言 ......190 16 附件/备件 ......224 供货范围 .....190 17 维修 ....... 229 使用规定 .....190 17.1 送修 ......2 29 2 安全规定 ......191 18 校准服务 ......230 常规安全规定 ....191 功能 ......191 19 缺陷责任 ......231 使用限制 .....192 20 废弃处理...
-
Page 190: 供货范围
1 引言 1.1 供货范围 瓶口滴定管 Titrette®,规格 10 ml、25 ml 或 50 ml,伸缩式吸液管(长度 170 - 330 mm)、 回流管,2 个 1.5 V 微型电池 (AAA/UM4/LR03),4 个 PP 瓶口适配器 (GL 45/32-33, GL 45/38, GL 45/S 40, GL 32-33/NS 29/32)、2 个彩色遮光观察窗、一份质量认证证书及本使用说 明书。 1.2 使用规定 •... -
Page 191: 安全规定
决不可握着外壳移动安装于试剂瓶上的仪器。仪器从试剂瓶上断裂或脱落可能会导致受 伤。 使用该仪器时请不要过度用力。 仅使用原厂附件与备件。请勿对本仪器进行任何技术变更。不得违背使用说明书的说明进 一步拆解仪器! 使用前请检查本仪器的状态是否正常。如果未充分清洁或检测仪器,可能会导致用户与介 质发生接触。如果仪器在操作时有潜在的故障迹象(如活塞不灵活,阀门粘结或泄漏), 请立即停止滴定,并遵循 故障——如何处理?, 页 221 一章中的说明。必要时请联系制造 商。 内置的 1.5 V 微型电池不能反复充电! 2.2 功能 Titrette® 瓶口滴定管配备电子数字指示器,用于滴定浓度不超过 1 mol/l 的水性和非水性滴定 介质(如 KOH 乙醇溶液)。(参见 推荐应用范围, 页 193)。通过使用高度精密的测量系统,甚 至可以遵守玻璃滴定管的 A 级严格公差。该仪器带有 DE-M 标识。 2.2.1 处理 正确操作仪器时,移取的试剂仅会与以下耐化学腐蚀的材料发生接触: 硼硅酸盐玻璃、Al 、ETFE、PFA、FEP、PTFE、铂铱合金、PP(旋盖)。该仪器默认配备有一个 安全回流阀。 9974 69 操作手册... -
Page 192: 使用限制
• 粘度最大 500 mm • 高度:最高海拔 3000 m • 相对空气湿度:20 % 至 90 % 2.4 使用限制 • 氯化和氟化碳氢化合物或形成沉淀物的化合物会导致活塞不灵活或咬死。 如果是待结晶介质,请遵守清洁说明书(参见 清洁)。 • • 用户必须仔细检查仪器是否用于规定的用途(如微量分析)。必要时请联系制造商。 2.5 禁止操作 2.5.1 Titrette 滴定器 切勿将该仪器用于: 可以腐蚀硼硅玻璃、Al 、ETFE、PFA、FEP、PTFE 或铂铱的液体(例如:氢氟酸)。 • • 悬液(例如:炭悬液),其中的固体颗粒可能会堵塞或损坏该仪器 浓酸和浓碱、以及对塑料有强烈膨胀作用的非极性溶剂(例如:甲苯、苯); • • 二硫化碳,因为这种勿直很容易点燃。 • 本仪器不允许高温高压灭菌! •... -
Page 193: 推荐应用范围
冰醋酸中的高氯酸 氯化钡溶液 碘酸钾溶液 硝酸 溴化物溴酸盐溶液 高锰酸钾溶液* 盐酸 硫酸铈 (IV) 溶液 硫氰酸钾溶液 丙酮中的盐酸 乙二胺四乙酸溶液 亚砷酸钠溶液 硫酸 硫酸铁 (II) 溶液 碳酸钠溶液 硝酸银溶液* 醋酸 氯化钠溶液 四正丁基氢氧化铵溶液 碘溶液* 亚硝酸钠溶液 丙酮中的三乙醇胺* 碘化物溶液* 硫代硫酸钠溶液 硫酸锌溶液 苛性钾溶液 烧碱溶液 *使用防光观察窗(参见 敏感介质(更换观察窗口), 页 202)。 该表格已经过认真检查,以最新知识水平为基础制定而成。务必始终注意仪器使用说明书以及试 剂制造商的信息。如果您需要清单中未提及的化学品信息,请联系 BRAND。 版本:0219/4 9974 69 操作手册... -
Page 194: 功能和操作元件
2 PC 接口(选装) 3 电池 4 暂停键 5 手轮 6 活塞 7 移液腔 8 阀门(滴定/回流) 9 阀块 10 阀块适配器(瓶口螺纹 GL 45) 11 回流管 12 伸缩式吸液管 13 安装扳手 14 旋盖 15 集成有排液阀的滴定管 可水平和垂直调节。 16 观察窗 17 开/关键 18 数字指示器 Titrette® 瓶口滴定管的主要特性已申请国际专利。安装扳手位于后分离式护壳中。 9974 69 操作手册... -
Page 195: 第一步
4 调试 4 调试 4.1 第一步 1.放入蓄电池 用手或用硬币拧开排气塞。 移除后分离式护壳。 移除蓄电池仓盖,放入蓄电池。注意正负极的方向。 用盖子将蓄电池仓封住。小心地压下盖子边缘,使其 全部紧密贴合,以确保蓄电池仓不留缝隙。 先挂入后分离式护壳,然后再折合。 拧入排气塞。 2.接通和关断仪器 短按接通/关断按钮接通和关断。 9974 69 操作手册... - Page 196 4 调试 警告 注意安全提示 > 请穿着防护服并佩戴防护手套和防护镜! > 接触该仪器或试剂瓶时,特别是使用有害介质(如氢氟酸)时,请始终佩戴防护 手套。 > 遵循所有安全规定,并注意使用限制,参见使用限制, 页 192。 > 注意使用限制,参见使用限制, 页 192。 3.安装吸液管/回流管 根据试剂瓶高度调整伸缩式吸液管的长度,并进行安 a./b. 装。小心地将吸管(直径较小的一侧)插在中心位 置,以免损坏橄榄型管嘴。 将回流管开口朝外插入。 注意 如果是含酒精的 KOH 之类待强结晶介质,调整伸缩吸管的 长度,使其与瓶底保持约 20mm 的距离。 4.将仪器安装在瓶口上,并对齐 注意 包含在交货范围内的适配器由聚丙烯 (PP) 制成,只能用于不会腐蚀 PP 的介质 (附件/备 件, 页 224)。 在试剂瓶上拧紧仪器(螺纹 GL 45),并根据试剂瓶 上的标签调整滴定管。为此,需将阀块连同滴定管一 起转动。 请为其它螺纹规格的试剂瓶选择合适的适配器。...
- Page 197 4 调试 5.运输仪器 若该仪器已安装于试剂瓶上,移动时应始终按图中所 示的姿势持握该仪器! 警告 试剂飞溅 可能对健康造成危害,特别是在有危险介质 时 > 当阀切换为滴定',以及用旋盖封住了滴 定管'时,切勿转动手轮! > 防止试剂飞溅!试剂可能会从滴定管和旋 盖中滴出。 4.2 排气 注意 首次使用前: 最终生产检查时,仪器中可能仍存在甘油和乙醇残留物。为防止介质与残留物混合,首次使用前 应彻底冲洗仪器,并丢弃第一批计量。避免飞溅。 确保滴定管的旋盖已旋紧。 将阀按箭头方向转至'回流'位置。 首先通过转动手轮将活塞完全下移。填充时,将活塞 上转不超过一半,然后再排空。 注意 如果无法填充,请参见 故障——如何处理?, 页 221? 然后将手轮转半圈吸起液体数次,然后一次性向下挤 压到底,将液体清空到瓶中。重复此过程 5 次左 右,直到活塞不再有大气泡。 注意 允许有几个大小不超过 1mm 的气泡。 9974 69 操作手册...
- Page 198 4 调试 拧下滴定管的旋盖。 将阀转至'滴定'位置。 在滴定管下放一个合适的收集容器,并进行移液,直 到滴定管中排气到无气泡为止。擦去滴定管口上所有 残留的液滴。 9974 69 操作手册...
- Page 199 5 滴定 5 滴定 1.接通仪器 短按接通/关断按钮接通和关断。 2.填充仪器 转动手轮,轻轻将仪器加注到上止点。 短按一次 CLEAR 按钮,将显示值置零。 3.滴定 在滴定管下放一个合适的收集容器。 通过转动手轮将液体移液到过渡点。 注意 如果充填量不足以满足完整滴定的需要,请轻轻将手轮转 回上止点进行充填(显示值不变)。然后继续滴定。 4.滴定后填充仪器。 为了减少晶体的沉积和蒸发,滴定后务必将仪器完全加满至上止点。 9974 69 操作手册...
-
Page 200: 节能模式(自动关机
5 滴定 5.1 节能模式(自动关机) 如果工作中断超过三分钟(出厂设置),仪器将自动切换到待机模式。这时候将保存显示值,并 在手动接通后重新弹出在显示屏上。可以更改自动关断的时间(参见 自动关断(APO 模 式), 页 212)。 5.2 暂停功能 如果仪器未完全排气,则在滴定过程中,滴定管中会出现气泡。为了在滴定过程中为仪器脱气, 可以使用暂停功能将液体移液到另一个容器中,而不改变显示值。 按暂停按键 1 次。 暂停 ð 暂停信号闪烁。 给仪器排气、移液等。参见 排气, 页 197。 请再次按下暂停按钮结束暂停功能。 ð 暂停信号再次消失。 继续滴定 9974 69 操作手册... -
Page 201: Pc 接口(选装
6 PC 接口(选装) 6 PC 接口(选装) 有带可选通信接口 (RS 232) 的仪器可供选购(见'订购数据')。 与标准规格相比,带接口的规格具有以下优势。 • 由于可以通过双击 CLEAR 键将滴定结果自动传递给电脑,因此不会出现抄录原始数据时的 传递错误。这满足了一项重要的 GLP 要求。 所有的原始数据都同时记录。每次传输数据时,滴定管都会发送滴定体积、仪器序列号、额 • 定体积、调整值和下次校准日期。 电脑对仪器发送的数据与键盘输入内容进行相同的处理。这种通用的输入形式保证仪器可以与所 有接收键盘输入的电脑应用程序一起工作。 连接一个 USB 接口时,请使用市售的 USB/RS 232 适配器。 供货范围包括一条接口电缆(Sub-D 9 针连接)和一张光盘(德语/英语,驱动软件和 RS 232 开 源通信协议)。这意味着程序员拥有了整合到现有数据库所需的所有信息。此外,光盘中还包含 一个 xls 格式的应用程序示例,以及 pdf 格式的用户手册和测试说明。 9974 69 操作手册... -
Page 202: 敏感介质(更换观察窗口
7 敏感介质(更换观察窗口) 7 敏感介质(更换观察窗口) 如果是光敏性介质(例如:碘酒、高锰酸钾和硝酸银溶液),我们建议使用有色防光观察窗。 用手或用硬币拧开排气塞。 移除后分离式护壳。 将后分离式护壳的夹子从一侧松开并取下。 将弧度较小的有色观察窗插入后分离式护壳中。 若要更换前部观察窗,可用指甲抬起观察窗的一角, 然后取下观察窗。 将弧度较大的有色观察窗插入前分离式护壳中。 首先钩住后分离式护壳,合上后拧上排气塞以固定 好。 9974 69 操作手册... -
Page 203: 安装干燥管(可选
8 安装干燥管(可选) 8 安装干燥管(可选) 对于对湿气和 CO 敏感的介质,有必要使用装有合适吸收 剂(不在供货范围内包含)的干燥管。 (参见 附件/备件) 拧入已填充的干燥管,而不是排气塞。 注意 请使用 PTFE 胶带密封干燥管螺纹、试剂瓶和/或瓶口适配 器。 9974 69 操作手册... -
Page 204: 误差极限
相对于仪器上标明的标称量程(= 仪器的最大量程),在 20 °C 仪器、环境和蒸馏水温度 (20 °C/68 °F) 相同的条件下 确定误差极限。按照 DIN EN ISO 8655-6 的要求,在仪器 已完全填充且均匀和稳定移液的情形下进行测试。 误差极限 瓶口式 符合 玻璃滴定管 滴定管 Titrette® DIN EN ISO 8655-3 标 A 级,符合 准的瓶口 DIN EN ISO 385 滴定管 量程 子量程 VK* % FG** ±... -
Page 205: 测试体积(校准
10 测试体积(校准) 10 测试体积(校准) 我们建议根据具体使用情况,每 3-12 个月采用重量分析法检查仪器的量程。校准时将 10 ml 的 仪器设为小数点后 3 位(第 21 页)。 检查周期可根据情况自行调整。详细的检查指南请在 www.brand.de 主页下载。此外,您还可以以较短的时间间隔进行功能检查,例如通过按照标准进 行滴定。对于符合 GLP 和 ISO 标准的分析和记录,我们建议采用 BRAND 的校准软件 EASYCAL™。www.brand.de 提供了演示版本下载。 符合 DIN EN ISO 8655-6 标准的重力法量程检查(测量条件参见Fehlergrenzen, 页 204)以如下 步骤进行: 1.准备仪器 清洁仪器 (清洁),填充蒸馏水,并仔细排气。 2.检查量程 将 5 滴移液到单独的容器中,擦拭滴定管头。... - Page 206 10 测试体积(校准) 3.计算 = 称量结果 称量次数 校正系数 (如 20 °C、1013 hPa 时为 1.0029 ml/g) ∑ – 平均值 – x – . Z 平均体积 – – . 100 R% = 准确度* 标称量程 – ∑ – 标准偏差* – 1 100 s 变化系数* VK% = –...
-
Page 207: 附加功能
11 附加功能 11 附加功能 11.1 CAL 模式(调整) 11.1.1 调整 在长时间使用后或更换移液单元后,可能需要进行调整,以补偿精度的差异,最大可达到 ±0.999 ml。出厂调整更改将显示在显示屏上。 1.计算调整值 调整值是指平均量与额定量的偏差(例如:平均容积 50.024 ml,额定容积 50 ml。调整值 = 50.024 ml - 50.000 ml = 0.024 ml)。计算平均体积参见 测试体积(校准), 页 205。 2.调用 CAL 模式 如果是已经接通的仪器,长按 CLEAR 按键 3 秒以 > 3 s 上,直到显示屏连续重复显示以下模式: CAL — GLP — APO — dP 当... - Page 208 11 附加功能 3.输入调整值 调整值为例如 0.024 ml。按暂停键或接通/关闭按 键,直至达到该值。 4.确认输入 按下 CLEAR 按键,确认调整值输入。 ð 出厂调整更改将通过现在持续显示的 CAL 符号清楚地显示在显示屏上。 注意 如果在约 15 秒内未按 CLEAR 键,则保留初始状态。 11.1.2 重新调整 显示屏中持续显示的 CAL 符号代表已经进行了调整。如果您输入新调整值,其将自动添加到现有 调整值中。 1.计算调整值 已经调整好的仪器显示平均体积与额定体积的新偏差,例如 0.017 ml。计算平均体积参见 测试 体积(校准), 页 205。 2.调用 CAL 模式 如果是已经接通的仪器,长按 CLEAR 按键 3 秒以 >...
- Page 209 11 附加功能 当 CAL 弹出在显示屏上时,立即松开 CLEAR 按键。 CAL 闪烁,且弹出上次调整的调整值。 3.输入调整值 调整值为例如 0.017 ml。按暂停键或接通/关闭按 键,直至达到该值(第一次按下会将显示置零)。 4.确认输入 按下 CLEAR 按键。新旧调整值自动相加。 ð 调整更改通过 CAL 符号表示。 注意 极少数情况下,输入新调整值时调整值之和可能等于零。这种情况下,将恢复出厂调整,CAL 从 显示屏上消失。 9974 69 操作手册...
- Page 210 11 附加功能 11.1.3 出厂调整 显示屏中持续显示的 CAL 符号代表已经进行了调整。但需要恢复出厂调整。 1.调用 CAL 模式 如果是已经接通的仪器,长按 CLEAR 按键 3 秒以 > 3 s 上,直到显示屏连续重复显示以下模式: CAL — GLP — APO — dP 当 CAL 弹出在显示屏上时,立即松开 CLEAR 按键。 CAL 闪烁,且弹出上次调整的调整值。 2.恢复出厂调整。 同时按下接通/关闭按键和暂停按键,以恢复出厂调整。 CAL 符号已隐藏。 9974 69 操作手册...
-
Page 211: 校准日期(Glp 模式
11 附加功能 11.2 校准日期(GLP 模式) 在 GLP 模式 (Good Laboratory Practice) 中,您可以保存下一次校准的日期。 1.调用 GLP 模式 如果是已经接通的仪器,长按 CLEAR 按键 3 秒以 > 3 s 上,直到显示屏连续重复显示以下模式: CAL — GLP — APO — dP 当 GLP 弹出在显示屏上时,立即松开 CLEAR 键。输 入符号闪烁,并弹出 'oFF'。 2.输入校准日期 按住暂停键,直到显示出所需的日期。短按可分步延长日 期。按接通/关闭键可以缩短时间。(日期从... -
Page 212: 自动关断(Apo 模式
11 附加功能 11.3 自动关断(APO 模式) 在 APO 模式下,自动关闭电源的时间可以设置为 1 至 30 分钟。出厂设置下,仪器会在 3 分钟 后自动关闭。自动关机时间设得越短,则蓄电池寿命越长。 1.调用 APO 模式 如果是已经接通的仪器,长按 CLEAR 按键 3 秒以 > 3 s 上,直到显示屏连续重复显示以下模式: CAL — GLP — APO — dP 一旦 APO 弹出在显示屏上,松开 CLEAR 按键。输入 符号将闪烁,并显示出厂设置。 2.输入自动关断时间... -
Page 213: 小数位(Dp 模式
11 附加功能 11.4 小数位(dP 模式) 在 dP 模式下,显示可以设置为小数点后 2 位或 3 位(出厂设置为小数点后 2 位)。 注意 由于技术原因,20.00ml 以上的滴定体积只能用 2 位小数来显示。 1. 调用 dP 模式 如果是已经接通的仪器,长按 CLEAR 按键 3 秒以 > 3 s 上,直到显示屏连续重复显示以下模式: CAL — GLP — APO — dP 当显示屏中弹出 dP 时,立即松开 CLEAR 键。输入 符号闪烁,弹出出厂设置。... -
Page 214: 标准清洁
12 清洁 12 清洁 下列情况下必须清洁该仪器,以确保仪器能够正常工作: • 如果手轮比正常更难转动,请立即检查 • 使用待结晶溶液时,定期进行 • 更换试剂之前 • 液体在滴定管旋盖内积聚时需要清洁 • 长期保存之前 拆解仪器之前 • 警告 玻璃活塞腔、阀、伸缩式吸液管和移液管内填充有试剂!遵守安全规定(参见 安全 规定, 页 191)! 12.1 标准清洁 将阀设置为'回流',通过转动手轮将仪器完全排空。 将仪器拧到装有去离子水的瓶子上,数次完全装满并 清空仪器,以便冲洗(图 2)。 将阀设置为'滴定',拧开滴定管的旋盖,在滴定管下 放一个合适的收集容器,并多次将仪器完全装满和排 空,以冲洗滴定管(图 3)。 如果移液腔内有沉淀物,请用合适的清洁剂重复此步 骤,然后用去离子水再次冲洗。 9974 69 操作手册... - Page 215 12 清洁 将仪器拧到空瓶上,通过在阀位置'回流'和'滴定'多 次上下移动活塞,将其完全排空。 先将活塞完全上移,然后将手向下转半圈。 用手或用硬币拧开排气塞。 拆下后分离式护壳,取出安装扳手。 用安装扳手松开移液单元的锁紧圈,用手完全拧下。 将活塞杆的扣板向外拉到底(图 10)。 通过转动手轮将仪器上半部分完全上移,并将其取出 (图 11)。 例如用水和软瓶刷清除移液腔上边缘的任何晶体沉积 物,然后用纤维布擦干(图 12)。 重新安装仪器上半部分,或在必要时,进一步拆解仪 器以便强化清洁。 注意 结晶介质,如含酒精的 KOH。 根据使用频率而定,我们建议每隔约 8 周定期清除一次活塞上方的晶体沉积物。为此,请执行标 准清洁程序的 f-m 步骤。 为防止晶体沉淀,滴定后务必将仪器完全加满至上止点。 9974 69 操作手册...
-
Page 216: 强化清洁
12 清洁 12.2 强化清洁 为了避免仪器部件弄混,不要同时拆解多个仪器。拆解或更换移液单元后,必须始终进行校准, 如有必要,还必须进行调整! 1.强化清洁的准备工作 进一步拆解之前,一定要进行标准的彻底清洁。 拉出回流管和伸缩式吸液管。 取下 2 个滴定管,并清洁/更换。 (请注意 2012 年之后和从序列号 01K 开始的结构设计更 改,请参见 强化清洁, 页 218)。 将阀调至'回流',并向上拉动阀杆(图 a)。 如图所示抓住滴定管。为解锁外壳,将滴定管向上压 至挡块处,并在轻轻上下移动的同时向前拉(图 b)。 使用集成式排液阀清洁滴定管(超声波浴)或进行更 换。 3.清洁/更换移液单元 (请注意 2012 年之后和从序列号 01K 开始的结构设计更改,参见 强化清洁, 页 218)。移液单 元由活塞和带阀块的移液腔构成。如果活塞上半部分有液体,则须更换。我方建议更换整个移液 单元。 抓住活塞杆,慢慢地将活塞从移液腔中拉出(图 a)。 9974 69 操作手册... - Page 217 12 清洁 注意 如果活塞难以移动,请装上仪器上半部分,将安装扳手 (齿朝下)夹在移液单元和上半部分之间,通过转动手轮 将活塞完全移出移液腔(图 a')。 用软布清洁或更换移液腔和活塞。 更换活塞时,首先将活塞杆的浅灰色锁紧圈向上推 (图 c),然后拧下活塞(图 c')。 将新活塞拧到活塞杆上并拧紧。 通过将活塞向后转动最多半个齿,来对齐活塞和活塞 杆的齿轮。 再将活塞杆的锁紧圈向下推。 将活塞杆的齿条 (1) 对准阀块的排气口 (2) 方向。 这与滴定管接口 (3) 相对。小心地 (!) 将活塞垂直 插入清洁过的或新的移液腔中,并将其压入约一半 (图 g)。 注意 不得损坏活塞的密封唇。避免和硬质物品发生接触! 9974 69 操作手册...
- Page 218 12 清洁 2012 年 1 月以后的产品在结构设计方面的更改 2012 年 1 月前,滴定管与阀块的连接已更改。 因此,订购这些备件时要注意阀块上移液管和回流管之间 的距离。如果两条管之间没有间隙,则必须在更换带移液 腔和阀块的同时,随时更换滴定管 (附件/备件, 页 224)。 4.安装滴定管。 (请注意 2012 年之后的结构设计更改,参见 强化清 洁, 页 218)。安装已清洁或更换的新滴定管: 将滴定管向上推约 5mm。 将滴定管的外壳完全向上推。 然后将滴定管推至挡块处。 将滴定管的外壳向下推,以将其锁定。 将阀杆放到'回流'位置,并将其紧紧按入。 5.安装外壳上半部分 检查活塞杆的扣板是否拉出。 放上仪器上半部分,通过转动手轮将其向下移动,并 确保前分离式护壳的凹槽正好贴合在滴定管上。如有 必要,可稍稍转动上半部分。 抬起移液单元的锁紧圈,检查凹槽和弹簧是否啮合。 然后用手拧紧锁紧圈。 9974 69 操作手册...
-
Page 219: 松开咬死的阀球
12 清洁 将安装扳手放在外壳的右侧边缘,并将其拧紧到外壳 的左侧边缘。然后将安装扳手重新放入后分离式护壳 内。 将活塞杆的扣板向内推,直到达到挡块位置。 首先挂入后分离式护壳,合上后拧上排气塞。 进行功能检查和校准,必要时进行调整。 6.清洁/更换吸液阀 拆下后分离式护壳,取出安装扳手。 拉出伸缩式吸液管和回流管。 使用安装扳手拧出吸液阀。 如果密封圈脏污或损坏,请用倾斜的镊子小心取出。 清洁或更换吸气阀和密封圈(超声波清洁池)。 如有必要,可插入清洁过的或新的密封圈。 首先用手旋入吸液阀,然后使用安装扳手拧紧(1/4 圈便足够!)。 12.3 松开咬死的阀球 若仪器不能吸液,且在向上拉动活塞时感到到有明显的弹 性阻力,则可能是阀球咬死。 这种情况下,请利用较轻的压力松开阀球,如利用 200 µl 塑料滴定头。 若仪器不能吸液,且在向上转动活塞时感到有明显的弹性 阻力,则可能是阀球咬死。 这种情况下,请利用较轻的压力松开阀球,如利用 200 µl 塑料滴定头。 9974 69 操作手册... -
Page 220: 更换蓄电池
12 清洁 12.4 更换蓄电池 如果蓄电池电量耗尽,显示屏上的蓄电池符号会闪烁显示。那么必须更换蓄电池。 只能使用指定的蓄电池类型 1.5 V 微型蓄电池 (AAA/UM4/LR03):电池不能反复充电! 用手或用硬币拧开排气塞。 移除后分离式护壳。 移除蓄电池仓盖 借助螺丝刀拧出用过的蓄电池。 放入新蓄电池并将其牢牢压入蓄电池座。注意正负极 的方向。 用盖子将蓄电池仓封住。小心地压下盖子边缘,使其 全部紧密贴合,以确保蓄电池仓不留缝隙。 先挂入后分离式护壳,然后再折合。 拧入排气塞。 注意 务必将蓄电池仓盖与蓄电池一起更换。这些都包括在备用 蓄电池中。 警告 废弃处理时必须根据蓄电池法规将蓄电池完 全放电。请勿将蓄电池短路放电——爆炸危 险! 9974 69 操作手册... -
Page 221: 故障--如何处理
13 故障——如何处理? 13 故障——如何处理? 故障 可能的原因 如何处理 液体位于活塞上部 活塞不密封 执行清洁,更换移液单元 (参见 清洁, 页 214)。 活塞不灵活 移液单元被结晶污染或损坏 执行清洁,必要时更换移液 单元(参见 清 洁, 页 214)。 无法进液 进液阀粘结 清洁进液阀,必要时松开有 200 µl 塑料滴定头的固定 的阀球(参见 松开咬死的 阀球, 页 219)。 无法填充/填充时液体返回到滴定管中 排液阀脏污,或滴定管损坏 清洁排液阀,或更换滴定管 (参见 清洁, 页 214)。 吸入气泡 仪器填充过快 缓慢填充仪器 吸液管松动或损坏 牢固插上伸缩式吸液管,必 要时可将距离顶部约 1 cm 的吸液管剪断或进行更换。... -
Page 222: 产品上的标识
14 产品上的标识 14 产品上的标识 标志或编号 含义 常规警告标识 注意使用说明书 佩戴护目镜 佩戴手套 使用防护服 XXZXXXXX 序列号 我方通过此标志确认产品符合 EC 指令的要求,并且已采 用指定的检查方法。 本仪器依照德国《测量和校准法》以及《测量和校准条 例》进行标识。 带一个矩形框的字符串 DE-M(DE 表示德国),以及年份 的后两个数字(此处:2018)。 www.brand.de/ip 版权信息 中国 RoHS (EFUP) EFUP 确定 了电气或电子设备中所含有的危险材料在正常 运行条件下不会泄露或者改变。在用户正常使用时,此类 (此处:40 年) 电气和电子产品不会导致严重的环境污染、不会对用户造 成严重的人身伤害或者财物损失。 不得将电气设备与生活垃圾一起清理。 9974 69 操作手册... -
Page 223: 订购信息
15 订购信息 15 订购信息 Titrette® 标准 带 RS 232 接口 体积 订购号 订购号 10 ml 4760 141 4760 241 25 ml 4760 151 4760 251 50 ml 4760 161 4760 261 9974 69 操作手册... -
Page 224: 附件/备件
16 附件/备件 16 附件/备件 瓶口适配器 PP、包装单位1 件 外螺纹 用于瓶口螺纹/ 订购号 开槽尺寸 GL 45 GL 32-33 7043 96 GL 45 GL 38 7043 97 GL 45 S* 40 7043 43 GL 45 S* 42 7043 49 GL 45 S* 50 7043 50 GL 32 NS 24/29 7044 24... - Page 225 16 附件/备件 试剂瓶架 产品描述 包装单位 订购号 1 件 7042 75 试剂瓶架。PP。 三脚架 325 mm。 底板 220 x 160 干燥管 产品描述 包装单位 订购号 干燥管,包含 1 件 7079 30 PTFE 材质的密封 圈(不含颗粒材 料)。 吸液阀 产品描述 包装单位 订购号 带橄榄型管嘴和 1 件 6636 密封圈的吸液 阀。...
- Page 226 16 附件/备件 活塞 针对体积 包装单位 订购号 10 ml 1 件 7075 31 25 ml 1 件 7075 30 50 ml 1 件 7075 32 带阀块的移液腔 (请注意 2012 年之后的结构设计更改,参见 强化清 洁, 页 218) 针对体积 包装单位 订购号 10 ml 1 件 7075 33 25 ml 1 件...
- Page 227 16 附件/备件 微型蓄电池 1.5 V 产品描述 包装单位 订购号 微型蓄电池 1.5 各 2 件。 7260 V 不可重复充电 (AAA/UM4/ LR03)。包括蓄电 池盒盖 排气塞 产品描述 包装单位 订购号 排气塞 1 件。 6659 安装扳手 产品描述 包装单位 订购号 安装扳手 1 件。 6784 蓄电池仓盖 产品描述 包装单位 订购号 蓄电池仓盖 2 件。...
- Page 228 16 附件/备件 接口电缆 RS 232 产品描述 包装单位 订购号 接口电缆 RS 1 件。 8850 232。长度 2 m。 Titrette 软件 产品描述 包装单位 订购号 Titrette 软件。 1 件。 7075 38 德语/英文版 CD Titrette® 提取系统 产品描述 包装单位 订购号 Titrette® 提取 1 件 7075 50 系统...
- Page 229 造商索要表格,也可以从 www.brand.de 主页下载。 在美国和加拿大以内 在返修仪器之前,请联系 BrandTech Scientific, Inc. 确认寄回仪器需满足的各项前提。 只接受已清洁并已去除污染物的仪器,将和返修授权码一同告知您地址。将返修授权码标在包装 外侧的显眼位置。 联系地址 德国: 美国和加拿大: BRAND GMBH + CO KG BrandTech ® Scientific, Inc. Otto-Schott-Straße 25 11 Bokum Road 97877 Wertheim (Germany) Essex, CT 06426-1506 (USA) 电话 +49 9342 808 0 电话...
-
Page 230: 校准服务
18 校准服务 18 校准服务 ISO 9001 和 GLP 指令要求对您的体积测量设备进行定期检查。我们建议每 3-12 个月进行一次 体积检查。周期取决于设备的个性化要求。对于高频率使用或使用腐蚀性介质的情形,应更频繁 地进行检查。 可从 www.brand.de 或 www.brandtech.com 下载详细的检查说明。 此外,BRAND 还为您提供下列方案:通过我方工厂校准服务或者由 BRAND-DAkkS 实验室对您的仪 器进行校准。 您只需向我们寄送需要校准的仪器和所需的校准类型。在数日后您将收到仪器和检查报告(工厂 校准)/DAkkS 校准单。有关更多信息请直接联系您的经销商或 BRAND。 订购表格可从 www.brand.de 下载(参见技术文档)。 对于德国以外的客户 如果您需要我们的校准服务,请在您所在地区联系我们的一家服务合作伙伴。如果需要工厂校 准,他们可以将仪器转寄至 BRAND。 9974 69 操作手册... -
Page 231: 缺陷责任
19 缺陷责任 19 缺陷责任 我们不承担由于不当拿取,使用,服务,操作或未授权的仪器维修产生的 结果,我们同样不承担 由于正常易损件如活塞,密封垫圈,阀门的磨损或 者玻璃破损而产生的结果。我们也不承担由于 不按照操作手册/使用说明指 导的操作而产生的结果。我们不承担由于进行任何操作手册未描述 的拆卸 或由于非原装配件的使用而产生的结果。 美国和加拿大: 有关保修责任的 信息 请参见 www.brandtech.com。 9974 69 操作手册... -
Page 232: 废弃处理
20 废弃处理 20 废弃处理 相邻图标表示,必须在电池 / 蓄电池和电子设备使用寿命 结束时将其与生活垃圾(未分类的城市垃圾)分开清理。 根据欧洲议会和理事会 2012.7.04 关于废弃电气和电子设备的 2012/09/EC 指令,必须按照国家 废物处理法规专业处理废弃电子设备。 蓄电池含有可能对环境和人类健康造成危害的物质。根据欧洲议会和理事会 2006.9.6 关于电池 和蓄电池的 2006/66/EC 指令,必须根据国家废弃处理法专业处理废弃电池和蓄电池。废弃处理 时必须将电池和蓄电池完全放电。 保留进行技术变更、出错和打印错误的权利。 9974 69 操作手册... - Page 233 9974 69 | Printed in Germany | 6-0321-12...
Need help?
Do you have a question about the Titrette and is the answer not in the manual?
Questions and answers