
Related Manuals for TA Q Series


Summary of Contents for TA Q Series
- Page 1 Thermomechanical Analyzer Q Series Getting Started Guide Revision D Issued November 2006 TMA Q Series Getting Started Guide...
- Page 2 TA Instruments. Each licensed program shall remain the exclusive property of TA Instruments, and no rights or licenses are granted to the purchaser other than as specified above.
-
Page 3: Important: Ta Instruments Manual Supplement
Please click on the links below to access important information supplemental to this Getting Started Guide: • TA Instruments Trademarks • TA Instruments Patents • Other Trademarks • TA Instruments End-User License Agreement • TA Instruments Offices TMA Q Series Getting Started Guide... -
Page 4: Table Of Contents
Table of Contents Important: TA Instruments Manual Supplement ......................3 Table of Contents ................................4 Notes, Cautions, and Warnings ............................ 6 Regulatory Compliance ..............................7 Safety Standards ..............................7 Electromagnetic Compatibility Standards ......................7 Safety ....................................8 Instrument Symbols ..............................8 Electrical Safety ................................ - Page 5 Replacing the Thermocouple ..........................45 Removing the Existing Thermocouple ......................45 Installing a New Thermocouple ........................45 Replacing Fuses ..............................47 Replacing the TMA Fuses ..........................47 Replacement Parts ................................. 48 Index ....................................51 TMA Q Series Getting Started Guide...
-
Page 6: Notes, Cautions, And Warnings
A CAUTION emphasizes a procedure that may damage equipment or cause loss of data if not followed correctly. A WARNING indicates a procedure that may be hazardous to the operator or to the environment if not followed correctly. TMA Q Series Getting Started Guide... -
Page 7: Regulatory Compliance
(Table 3). Immunity: Meets performance criteria B for non-continuous operation, minimum requirements (Table 1). For the United States: CFR Title 47 Telecommunication Chapter I Federal Communications Commission, Part 15 Radio frequency devices (FCC regulation pertaining to radiofrequency emissions). TMA Q Series Getting Started Guide... -
Page 8: Safety
WARNING: High voltages are present in this instrument. Maintenance and repair of internal parts must be performed only by TA Instruments or other qualified service personnel. WARNING: After transport or storage in humid conditions, this equipment could fail to meet certain aspects of the safety requirements of the safety standards indicated. -
Page 9: Sample Decomposition
The purity of liquid nitrogen decreases when exposed to air. If the liquid in a container has been open to the atmosphere for a prolonged period, analyze the remaining liquid before using it for any purpose where high oxygen content could be dangerous. TMA Q Series Getting Started Guide... -
Page 10: Thermal Safety
See Chapter 3 for recommended cleaning and maintenance of the TMA instrument. CAUTION: Before using any cleaning or decontamination method except those recommended by TA Instruments, please check with TA Instruments to make sure that the proposed method will not damage the equipment. -
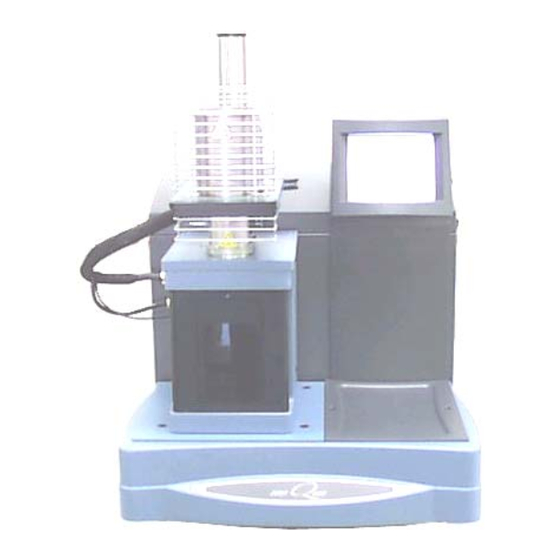
Page 11: Chapter 1: Introducing The Tma
Weight Tray Door • The furnace assembly surrounds the stage to heat the sample; it contains the integral cooling container, the furnace monitor thermocouple, and the sample purge line. TMA Q Series Getting Started Guide... -
Page 12: Standard Accessories
The weight tray, located behind the weight tray door, holds the weights to exert an additional known force on the sample. • The CHROMEL®*/ALUMEL®* sample thermocouple senses the temperature of the sample. The TMA was developed by TA Instruments with the following features: • Operates over a temperature range of –150 C to 1000... -
Page 13: The Qtma Touch Screen With Qnx/Platinum
Items can be selected from the icons or from the drop-down menu. Select Apply to initiate the command. See the next page for more details on this screen. (table continued) TMA Q Series Getting Started Guide... -
Page 14: Qnx/Platinum Control Menu
LVDT coil to their maximum upward position. If the probe is moving down and PROBE UP is pushed, the probe will stop and reverse its direction. (table continued) TMA Q Series Getting Started Guide... - Page 15 AIR COOL Toggles the air cool function on or off. This is the same function as Air Cool on the instrument control software. RESET SAVED PARAMETERS Resets the saved instrument parameters and resets the instrument. TMA Q Series Getting Started Guide...
-
Page 16: Qnx/Platinum Display Touch Screen Options
Displays a time-based plot of data as it is received from the instrument during experiments. SCREEN SAVER Allows you to choose a screen saver for the touch screen. HOME Returns to the opening window. TMA Q Series Getting Started Guide... -
Page 17: Qnx/Platinum Calibration Options
(up to 100 grams is allowed). For example, you can use 10 grams for force calibration if only low forces will be used in subsequent experiments. This calibration should be performed periodically (approximately once a month). TMA Q Series Getting Started Guide... -
Page 18: The Tma Touch Screen (Original)
Displays the Control Menu touch screen keys. These are used to control certain instrument actions. Accesses the Display Menu screen, which is used to select the desired display option. TMA Q Series Getting Started Guide... -
Page 19: Tma Control Menu Keys
When the key is pressed a second time, mechanical action occurs, centering the LVDT coil. If the probe is moving up and PROBE DOWN is pushed, the probe will stop and reverse its direction. TMA Q Series Getting Started Guide... -
Page 20: Display Menu Keys
Ensures proper shutdown of the instrument before turning off the power. Beeps the controller that is connected to the instrument. Returns to the opening window. TMA Q Series Getting Started Guide... -
Page 21: Options And Accessories
Options and Accessories Several optional probes and a cooling accessory are available from TA Instruments to be used with the TMA. A brief description of each one follows. For more information refer to the online documentation. Probes • Film/Fiber Probe: The TMA film/fiber accessory can be used to measure the physical properties of fibers or films as a function of force, temperature, or time. -
Page 22: Instrument Specifications
120 Vac, 47–63 Hz, 1.44 kVA standard 230 Vac, 47–63 Hz, 1.44 kVA if configured with a step-down transformer Accessory Outlets Power: 120 V, 47–63 Hz, 400 VA each (used with TA accessories only) Operating Environment Temperature: 15–30 °C Conditions Relative Humidity: 5–80 % (non-condensing) -
Page 23: Chapter 2: Installing The Tma
• Connecting cables and gas lines. It is recommended that you have your TMA installed by a TA Instruments Service Representative, call for an installation appointment when you receive your instrument. CAUTION: To avoid mistakes, read this entire chapter before you begin installation. -
Page 24: Choosing A Location
It is important to be certain that the instrument ground is adequately connected to the facilities ground for safe operation. Run the following method to dry out the TMA: 1 Ramp at 10°C/min to 400°C 2 Isothermal for 30 min. TMA Q Series Getting Started Guide... -
Page 25: Voltage Configuration Unit
Discard the 10 amp fuses. See the figure below. Power Control Unit Power Entry Module Fuse Fuse Holder Fuse Captive Fasteners Voltage Configuration Unit Replace Fuses for 230 Vac Only TMA Q Series Getting Started Guide... -
Page 26: Connecting Cables And Lines
Capable of the following functions: general purpose relay contact closure, or general purpose input 4 – 24 Vdc for external syncing. This port is not used for standard operation. 24 VDC output This port is not used with the TMA. (table continued) TMA Q Series Getting Started Guide... -
Page 27: Purge Line
Teflon® TFE tubing is recommended and is supplied in the instrument shipping accessory kit. The flow rate is controlled through the Mass Flow Controller settings chosen using the instrument control software. Port Not Used Gas 1 TMA Q Series Getting Started Guide... -
Page 28: Connecting The Cooling Gas Line
Make sure your compressed air source is dry, filtered, and regulated to between 170 and 830 kPa gauge (25 and 120 psig). Connect the compressed air line to the Cooling Gas Fitting Cooling Gas fitting. TMA Q Series Getting Started Guide... -
Page 29: Installing The Stage
12. Install one of the probes as directed in the next section. (Refer to Chapter 3 for guidelines to use when selecting a probe.) Thermocouple 13. Rotate the furnace into position over the stage. TMA Q Series Getting Started Guide... -
Page 30: Installing The Expansion/Penetration Probes
Unscrew the locking lever by turning it counterclockwise approximately one turn. Raise the probe gently and twist slightly to aid its removal from the stage opening. TMA Q Series Getting Started Guide... -
Page 31: Ethernet Switch Setup
Computer flashing yellow light will appear at the port. Ethernet Port Follow the directions in the next section to connect the controller to a LAN for net- working capabilities. TMA Q Series Getting Started Guide... -
Page 32: Connecting The Controller To A Lan
Check the Ethernet port on the rear of the computer. If communication between the computer and the LAN has been properly established, a solid green light and flashing yellow light will appear at the port. Ethernet Connection TMA Q Series Getting Started Guide... -
Page 33: Power Switch
CAUTION: Before plugging the TMA power cable into the wall outlet, make sure the instrument is compatible with the line voltage. Check the label on the voltage con- figuration unit panel to verify the voltage. Plug the power cable into the wall outlet. TMA Q Series Getting Started Guide... -
Page 34: Starting The Tma
Set the instrument power switch to the ON (1) position. After the proper power up sequence, the TA Instruments logo will be displayed on the touch screen, this indi- cates that the instrument is ready for use. NOTE: Allow the TMA to warm up for at least 30 minutes before performing an experiment. -
Page 35: Chapter 3: Use, Maintenance, & Diagnostics
• Calibrating the instrument • Selecting, calibrating, and zeroing the probe • Selecting the desired mode (standard or calibration) through the TA instrument control software • Preparing and loading the sample • Adjusting the thermocouple position and closing the furnace •... -
Page 36: Calibrating The Tma
It corrects for any difference in the different probes used on the TMA and should be done every time you change a probe on the TMA. This calibration can be performed from the TA instrument control program or the instrument's touch screen. -
Page 37: Cell Constant
Using the default cell constant value of 1.000 is usually adequate; however, for greatest accuracy, calibration should be performed. It is recommended that you follow the procedures of ASTM Standard Test Method E831 to perform the cell constant calibration. TMA Q Series Getting Started Guide... -
Page 38: Running A Tma Experiment
2.54 (0.100) 1.9 kPa Expansion coefficient Compression modulus Tensile modulus Glass transition Macro Expansion 6.07 (0.239) 0.34 kPa Expansion coefficient Compression modulus Tensile modulus Glass transition Film/Fiber Tensile stress Not applicable Not applicable (table continued) TMA Q Series Getting Started Guide... -
Page 39: Zeroing The Auto Measure System
This procedure is used to initialize the auto-length measure system. It should be performed before each experiment to ensure accurate sample length measurements. To zero the TMA auto measure system, simply press the ZERO LENGTH key on the touch screen. TMA Q Series Getting Started Guide... -
Page 40: Guidelines For Handling Samples
To do this, simply press the MEASURE key on the instrument touch screen. This automatically applies the preload force that you have specified through the instrument control program, then measures and stores the sample length. TMA Q Series Getting Started Guide... -
Page 41: Starting An Experiment
Another function that stops the experiment is REJECT. However, the Reject function discards all of the data from the experiment while the Stop function saves any data collected up to the point at which the experiment was stopped. TMA Q Series Getting Started Guide... -
Page 42: Maintaining The Instrument
The primary maintenance procedures described in this section are the customer’s responsibility. Any further maintenance should be performed by a representative of TA Instruments or other qualified service personnel. Consult the online documentation installed with the instrument control software for further information. -
Page 43: Cleaning The Stage
The stage may also be cleaned in a nitric acid solution. 10. Reassemble the stage, stage shield, etc. by reversing steps 6 through 2. TMA Q Series Getting Started Guide... -
Page 44: Cleaning The Thermocouple
It should be close to, but not touching the sample as seen in the figure here. Note that a sharp bend could damage the thermo- couple. 6. Replace the spring clip to hold the thermocouple in place. 7. Replace the stage shield. TMA Q Series Getting Started Guide... -
Page 45: Replacements
Occasionally, you may need to replace a broken or worn-out part of the TMA. Any replacements needed, other than those discussed in this manual, must be supplied and installed by qualified TA Instruments service personnel. Call (302) 427-4050 for service. - Page 46 It should be close to, but not touching the sample. 7. Replace the spring clip to hold the thermocouple in place. 8. Place the stage shield on the stage, aligning the slot in the bottom over the thermocouple wire. Threading the Thermocouple TMA Q Series Getting Started Guide...
-
Page 47: Replacing Fuses
Replacing the TMA Fuses The TMA contains internal fuses that are not user serviceable. If any of the internal fuses blows, a hazard may exist. Call your TA Instruments service representative. The only fuses that you can replace yourself are the fuses located Power in the power entry module located at the rear of the instrument. -
Page 48: Replacement Parts
Replacement Parts Replacement parts for the TMA that are available from TA Instruments. See the table below when ordering parts. Part Number Description 944200.901 Standard TMA Accessory Kit consisting of: 944122.901 Expansion Probe Assembly 944126.901 Penetration Probe Assembly 944123.901 Macro-Expansion Probe Assembly 944120.901... - Page 49 Hemispherical Probe Assembly 945025.901 Heater Assembly for use with the TMA Q400 205221.001 6.3 A Fuse 205221.002 10 A Fuse 944341.901 Protective Quartz Wafers for the TMA Stage 944073.001 Washer disc silicon 944072.001 Reservoir mass aluminum TMA Q Series Getting Started Guide...
- Page 50 TMA Q Series Getting Started Guide...
-
Page 51: Index
Calibrate key 14 calibration 37 cell constant 37 force 36 probe 30, 36 zero force 36 calibration weights 36 cell constant calibration 37 cleaning probe assembly 42 stage 43 thermocouple 44 touch screen 42 components 11 TMA Q Series Getting Started Guide... - Page 52 Ethernet hub connecting to controller 31 connecting to instrument 31 Ethernet port 26 Event port 26 experiment basic steps 35 procedure 38 rejecting 41 starting 41 stopping 41 film/fiber probe 21 fitting cooling gas 28 TMA Q Series Getting Started Guide...
- Page 53 23 to 33 lifting 9 maintenance 42 ports 26 repacking 23 replacement parts 48 shutting down 34 technical specifications 22 unpacking 23 LAN 32 liquid nitrogen safety 10 location of instrument 24 maintenance 42 TMA Q Series Getting Started Guide...
- Page 54 18 probe cleaning 42 hemispherical 21 installation 29, 30 removal 30 selection 30, 38 standard 12, 30 types 38 probe assembly description 11 probe setup hemispherical 21 Probe, standard removal 30 probe types 38 TMA Q Series Getting Started Guide...
- Page 55 Safety Standards 7 sample loading 40 preparation 40 sample thermocouple function 12 samples decomposition 9 SHUTDOWN key 15 shutting down instrument 34 specifications 22 spring clip installation 29 stage 11 cleaning 43 installation 29 TMA Q Series Getting Started Guide...
- Page 56 Calibration Options - QNX/Platinum 17 cleaning 42 Control Menu 19 Control Menu - QNX/Platinum 14 Display Menu 20 Display Menu - QNX/Platinum 16 primary function keys 18 primary function keys - QNX/Platinum 13 QNX/Platinum 13 TMA Q Series Getting Started Guide...
- Page 57 23 voltage configuration unit installing 25 weight tray function 12 Zero Length key 39 TMA Q Series Getting Started Guide...
- Page 58 TMA Q Series Getting Started Guide...
Need help?
Do you have a question about the Q Series and is the answer not in the manual?
Questions and answers