
Subscribe to Our Youtube Channel
Related Manuals for Ashcroft Digital Test Gauge


Summary of Contents for Ashcroft Digital Test Gauge
- Page 1 Digital Test Gauge Operating Instructions © Ashcroft Inc. 2013 I&M008-10080-10/13 Rev. E GBE...
- Page 2 – 2 –...
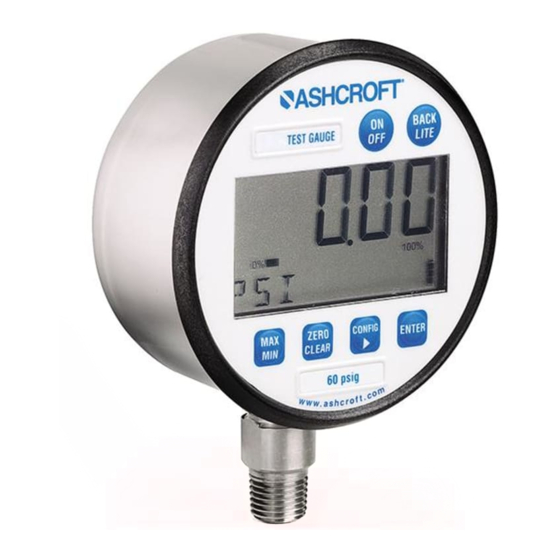
- Page 3 Congratulations on your purchase of the Ashcroft ® digital test gauge with total error band full-scale accuracy and the largest display readout in the industry of .66˝ high. Other industry-leading fea- tures include twelve selectable engineering units, seven languages, and password-protected disable and calibration functions.
- Page 4 – 4 –...
-
Page 5: Table Of Contents
TABLE OF CONTENTS Page Quick Reference Guide Keypad Functions • ON/OFF KEY • BACKLITE KEY • MIN/MAX KEY • ZERO/CLEAR KEY • ENTER KEY • CONFIG KEY Configurable Functions (CONFIG Mode) • Units (Engineering) • Update Rate 9-10 • Auto Off •... -
Page 6: Units (Engineering)
QUICK REFE .66˝ high display, 5 digit Bar graph % of full scale Flashing display when unit pressured below zero Press to indicate minimum or maximum pressure gauge has measured Press again to return to pressure units While in max or min mode, press to clear minimum or maximum displayed values UNITS (Pressure) -
Page 7: Contrast
ERENCE Press to turn unit on or off Press to turn backlite on or off Flashing display when unit pressured beyond full-scale This bar graph indicates battery level; the more segments, the closer the battery is to full charge Range on keypad; complies with ASME B40.7 While in unit of measurement mode (eg: psi), press the ZERO CLEAR button to rezero the... - Page 8 KEYPAD FUNCTIONS Turns the gauge on and off. When pressing the ON/OFF key while in the off position, gauge start- ON/OFF up display first indicates the software version followed by the model number and gauge pres- sure range. The gauge will then display indicated pressure and be ready for use.
- Page 9 KEYPAD FUNCTIONS UNITS: 12 units of measurement are available, both English and metric, by cycling through the UNITS key; psi, ˝Hg, ˝H O (with three temperature options, 60°F, 4°C and 20°C), ftSw, Bar, mBar, kPa, mPa, mmHg, cmH O, mmH O, kg/cm Step 1: Press the CONFIG key until the word UNITS appears.
-
Page 10: Auto Off
KEYPAD FUNCTIONS To use the AUTO OFF option: Step 1: Press the CONFIG key until the word AUTO OFF appears. Step 2: Press the ENTER key. Step 3: Press the CONFIG key to select the desired AUTO OFF rate. Step 4 Press the ENTER key to finalize the AUTO OFF rate. - Page 11 KEYPAD FUNCTIONS DAMPING: with six different options, this mode allows for taking process pressure readings and averaging them. This option is particularly useful when there is pulsation in the process. The options are NONE*, AVG 2, 4, 6 or 8. Step 1: Press the CONFIG key until the word DAMPING appears.
-
Page 12: Default Password
KEYPAD FUNCTIONS To access the factory default password: Step 1: Press the CONFIG key until the word CALIBRAT appears. Step 2: Press the ENTER key. Step 3: The letters/asterisks… PW***** appear. Step 4: Press the CONFIG key. An Ø appears in the first position. -
Page 13: Zero Calibration
KEYPAD FUNCTIONS Zero Calibration: Step 14: Press the CONFIG key once and the word CALIBRA appears. Press ENTER. (This mode allows for 0 and full- scale adjust- ment of span.) The gauge will now dis- play 0.00. Ensure the gauge is not pres- surized, then press ENTER to zero the gauge. -
Page 14: Zero Disable
KEYPAD FUNCTIONS Step 1: Press the CONFIG key until the word ZERO SP appears. Step 2: Press ENTER. Step 3: Enter user five digit password (PW). This is the same password established to access the CONFIG mode in the menu. Step 4: Press the CONFIG key to select the desired option. -
Page 15: Disable
KEYPAD FUNCTIONS If the user password is lost or stolen, contact Ashcroft Inc., customer service at (203) 378- 8281 for a new factory password that will allow the user to establish a new user password. DISABLE: allows “lockout” of individual CONFIG options. - Page 16 DIGITAL TEST GAUGE RANGES bar/kb/cm (Gauge) (Compound) (Absolute) (Gauge) (Compound) vac. –15/+15 –1/0 –15/+30 –1/1 –1/2 –1/3 –1/30 1000 1500 2000 2500 3000 5000 7000 mBar/cmH (Gauge) (Gauge) (Gauge) (Gauge) 3000 5000 10,000 1000 1600 2000 2500 1000 4000 5000...
-
Page 17: Specifications
SPECIFICATIONS Type 2089 (0.05% accuracy), 2086 (0.10% accuracy), 2084 (0.25% accuracy) Accuracy 0.05%, 0.10%, 0.25% all Full Scale Terminal Point Total Error Band (TEB) Accuracy Including Hysteresis, Linearity, Repeatablilty & Temperature (–18/65°C) (0/150°F) Dial Size 3" Case Material 300 Series SS Case Finish Electropolished Case Enclosure Rating Weatherproof, IP65... - Page 18 SPECIFICATIONS Enter Selects Items In CONFIG Menu Config Mode Allows Scrolling Through CONFIG Menus Engineering Units Psi, ˝Hg, ˝H O (with three temperature options, 60°F, 4°C and 20°C), ft.SW, bar, mbar, kPa, mPa, mmHg, cmH O, kg/cm Update Rate 4 Options: 10x/sec, 5x/sec, 2x/sec, 1x/sec Auto Off 6 Options: Never, 2 Min., 5 Min., 15 Min., 30 Min., Dampening 6 Options: None, Average 2, 4, 6, 8 x update rate...
- Page 19 Gauge Installation: Pipe Mount – The Ashcroft digital test gauge comes standard with ⁄ NPT connection. Good piping practices recommend using teflon tape or a pipe sealant on the gauge threads. Utilize a ⁄ ˝ wrench on the wrench flat of the gauge to tighten the gauge to the process.
- Page 20 Ashcroft Inc. 250 Main Street Stratford, CT 06614-5145 Tel: (203) 378-8281 Fax: (203) 385-0602 e-mail: info@ashcroft.com www ashcroft com © Ashcroft Inc. 2013 I&M008-10080-10/13 Rev. E GBE...
Need help?
Do you have a question about the Digital Test Gauge and is the answer not in the manual?
Questions and answers