Table of Contents

Subscribe to Our Youtube Channel
Related Manuals for HTC Vive Pre


Summary of Contents for HTC Vive Pre
- Page 1 Vive PRE User Guide...
-
Page 2: Table Of Contents
Contents Contents Unboxing About Vive Vive headset Putting the headset on Connecting a USB device to the headset Unplugging the headset cables Cleaning the headset Headset status light Link box Connecting the headset to your computer Vive controllers Charging the controllers Turning the controllers on or off Pairing the controllers with the headset Attaching the lanyards to the controllers... - Page 3 About this guide About this guide In this user guide, we use the following symbols to indicate useful and important information: This is a note. A note often gives additional information, such as what happens when you choose to do or not to do a certain action. A note also provides information that may only be applicable to some situations.
-
Page 4: Unboxing
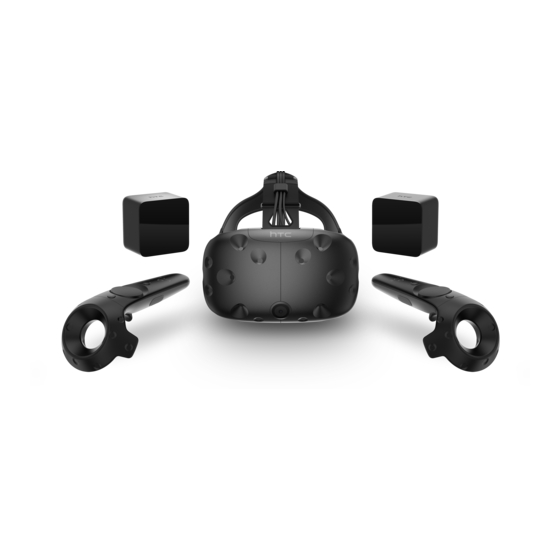
About Vive PRE Vive PRE includes the headset, controllers, and base stations that you need to start creating interactive VR experiences. Do not disassemble any of the hardware as it could injure you or damage the product. -
Page 5: Vive Headset
Unboxing Vive headset The headset is your window to the VR environment. The headset has sensors that are tracked by the base stations. The sensors on the headset are sensitive. Do not cover or scratch the sensor lenses, including the proximity sensor. Camera lens Tracking sensor Headset button... -
Page 6: Putting The Headset On
Unboxing IPD (interpupillary distance) knob Face cushion Lenses Proximity sensor Microphone Nose piece Lens distance knobs Putting the headset on Pull the headset down over your eyes. Slide the straps around the back of your head, and adjust them so that the headset fits snugly and comfortably. - Page 7 Unboxing Adjusting the lens distance on the headset If you wear large prescription glasses or have long eyelashes, you may need to increase the lens distance further from your face. Only increase this distance as necessary, as the closer the lenses are to your eyes, the better your field of view will be while wearing the headset.
- Page 8 Unboxing Using the IPD knob on the headset Interpupillary distance (IPD) is the distance between the center of the pupils in your eyes. A quick way to get an estimate is by facing a mirror and holding a millimeter ruler against your brow. Use this measurement as a guide to adjust the distance between the lenses of the headset so that you'll have a better viewing experience.
-
Page 9: Connecting A Usb Device To The Headset
Unboxing Connecting a USB device to the headset Plug in the USB 3.0 cable to the headset for using a compatible third-party device with Vive. Push open the compartment cover to access the connector slots on the headset. Plug in the USB cable to its corresponding slot. Connect the third-party device to the USB cable end. -
Page 10: Unplugging The Headset Cables
Unboxing Unplugging the headset cables When you need to, carefully unplug the cables from the headset. Push open the compartment cover to access the connector slots on the headset. To prevent damage to the cable tips, unplug the cables one by one following this sequence: power cable, USB cable, and HDMI cable. -
Page 11: Cleaning The Headset
Unboxing Cleaning the headset Dampen the cleaning cloth provided in the box with water to wipe the headset and sensor lenses clean. Using any other liquid may cause damage. Cleaning or replacing the face cushion Remove the face cushion to clean it. If the attached face cushion is too wide for your head, replace it with the smaller-sized option that comes in the box. - Page 12 Unboxing Caring for the headset lenses Use the cleaning cloth provided in the box to wipe the lenses. Moisten the cleaning cloth with alcohol or lens cleaner. Wipe in a circular motion from the center to the outer edges of the lenses. While cleaning the lenses, do not scratch the lenses nor disassemble other parts of the headset.
-
Page 13: Headset Status Light
Unboxing Headset status light The status light shows: § White when the headset is active § Slowly blinking white when the headset is on standby § Red when an error is encountered (with cables, display, or the like) Link box Use the link box to connect the headset to your computer. - Page 14 Unboxing Insert the USB cable on the USB port on the link box, and then insert the opposite end on your computer's USB port. Connect the 3-in-1 headset (HDMI, USB, and power) cables on the side with matching orange trims on the link box.
-
Page 15: Vive Controllers
Unboxing Vive controllers Use the controllers to interact with objects in the VR world. The controllers have sensors that are tracked by the base stations. § The sensors on the controllers are sensitive. Do not cover or scratch the sensor lenses. §... -
Page 16: Turning The Controllers On Or Off
Unboxing Turning the controllers on or off To turn the controller on, press the System button until you hear a beeping sound. § § To turn the controller off, press and hold the System button until you hear a beeping sound. -
Page 17: Controller Status Light
Unboxing Controller status light The status light shows: § White when the controller is active § Blinking red when battery is low § Blinking blue when the controller is pairing with the headset. For details, see Pairing the controllers with the headset on page 16. -
Page 18: Installing The Base Stations
Unboxing § Do not attempt to pry open the base stations as doing so could injure you or damage the product. § If the LED lens are cracked or damaged, stop using the base stations. Installing the base stations The placement of the base stations will affect the play area. Before installing the base stations, you should have decided whether your play area will be room-scale or seated/standing-only. -
Page 19: Base Station Status Light
Unboxing Attach the power cables to the base stations, and then plug them each into a power outlet to turn them on.The status lights should show as white. Connect the base stations and set the channels. Without the Press the Channel buttons at the back of the base stations so that sync cable one base station is set to channel “b”, while the other is set to channel “c”. -
Page 20: Getting Started
Getting started Getting started Setting up Vive for the first time Before you can use Vive, you’ll need to complete the setup process, which includes defining your play area. To begin, download and install the Steam app from http://store.steampowered.com/about/. You will need to create a Steam account. -
Page 21: What Is The Play Area
Getting started What is the play area? The play area sets the virtual boundaries of Vive. Your interaction with VR objects happen within the play area. Choosing the play area Find a space that you will designate as the play area. For best results, do the following: §... -
Page 22: Setting Up The Play Area
Getting started Setting up the play area After setting up the hardware and installing Steam software, you’ll need to set up the play area. Before choosing your setup, make sure that you comply with the following space requirements: Room-scale setup A minimum play area of 5 x 6.5 feet (1.5 x 2 meters) is required. - Page 23 Getting started Setting up a standing-only play area Choose this option if you only want to experience VR in a seated or standing position. From your computer, open the SteamVR app, and then click Select Run Room Setup > Standing only. Review the prompts and follow the on-screen instructions to complete the process.
-
Page 24: Exploring Vive
Getting started Exploring Vive Once you've completed the Vive setup process, you can now wear the headset and hold the controllers. While you're in the play area, the headset and the controllers should remain at least .5 meters and no further than 5 meters away from a base station. This will ensure that the devices are properly tracked within the base station’s 120 degree field of view. -
Page 25: Troubleshooting And Faqs
Troubleshooting and FAQs Troubleshooting and FAQs General Can anyone use Vive? Consult your doctor before using the product if you have pre-existing serious medical conditions (such as a heart ailment), conditions that affect your ability to safely perform physical activities, psychiatric conditions (such as anxiety disorders or post-traumatic stress disorder), or if you are pregnant or elderly. -
Page 26: Tracking
Troubleshooting and FAQs Tracking One or more Vive hardware are not tracked. What should I do? Make sure that the hardware are placed inside the play area. You can also turn the hardware off and on again to reactivate the tracking. If you're having an issue with the headset, you can try to disconnect and reconnect the HDMI cable to the HDMI port on your computer's graphic card. - Page 27 Press the Channel buttons on the back of the base stations so that one base station is set to channel "A" and the other is set to channel "b". Where can I get more help? For additional information about Vive PRE setup and troubleshooting, go to steamvr.steampowered.com.
-
Page 28: Trademarks And Copyrights
© 2016 HTC Corporation. All Rights Reserved. HTC, the HTC logo, Vive, the Vive logo, and all other HTC product and services names are the trademarks or registered trademarks of HTC Corporation and its affiliates in the U.S. and other countries.
Need help?
Do you have a question about the Vive Pre and is the answer not in the manual?
Questions and answers