
Related Manuals for Leica RM2145


Summary of Contents for Leica RM2145
- Page 1 Leica RM2145 Rotary Microtome Instruction Manual Leica RM2145 V3.2 English – 02/2002 Always keep this manual near the instrument! Read carefully prior to operating the instrument!
-
Page 3: Important Information
These are determined only by the contract provisions agreed between our- selves and our customers. Leica reserves the right to change technical specifi- cations as well as manufacturing processes without prior notice. Only in this way is it possible to continu- ously improve the technology and manufacturing tech- niques used in our products. -
Page 4: Table Of Contents
Technical data ..............................9 General description ............................10 Product description ..............................10 Standard delivery ..............................10 Leica RM 2145 - overall view of the instrument ....................11 Unpacking and installation ......................... 12 Unpacking .................................. 12 Assembling the handwheel ............................ 14 Site requirements .............................. -
Page 5: Safety Instructions For Handling The Instrument
• To activate, pull the locking lever (1) to the front (G). The handwheel is mechanically blocked and cannot be turned. • To deactivate, push the locking lever (1) to the rear (❍). The handwheel can then be rotated again. Leica RM 2145 – Rotary Microtome... - Page 6 Safety instructions for handling the instrument 3.1.2 Knife guard on the knife holder Before manipulating knife or specimen / be- fore changing specimens and during breaks: always lock the handwheel and cover the knife edge with the knife guard! All knife holders are equipped with a permanent, mov- able knife guard (1) which allows to cover the entire cutting edge with the knife clamped in any position.
- Page 7 • Do not operate the instrument in rooms with explosion hazard! • The safety devices on the instrument must neither be removed nor modified in any way! Leica RM 2145 – Rotary Microtome...
- Page 8 • Before exchanging the carrier fuses, switch off the lamp with the mains switch and pull the mains plug of the carrier! • Only authorized Leica service engineers may open the instrument for maintenance • Only use replacement fuses with the same...
-
Page 9: Technical Data
Working height (level of knife edge) 100 mm Weight (w/o accessories) 38 kg Control panel Width 140 mm Depth 240 mm Height 95 mm Height (in inclined position) 125 mm Weight (net) 2.4 kg Leica RM 2145 – Rotary Microtome... -
Page 10: General Description
5. General description Product description Standard delivery The Leica RM 2145 is a semi-motorized rotary micro- The Leica RM 2145 basic instrument is delivered with- tome. out accessories in the following configuration: The specimen feed system with zero-backlash and - 1 fixture for specimen clamps, orienting,... -
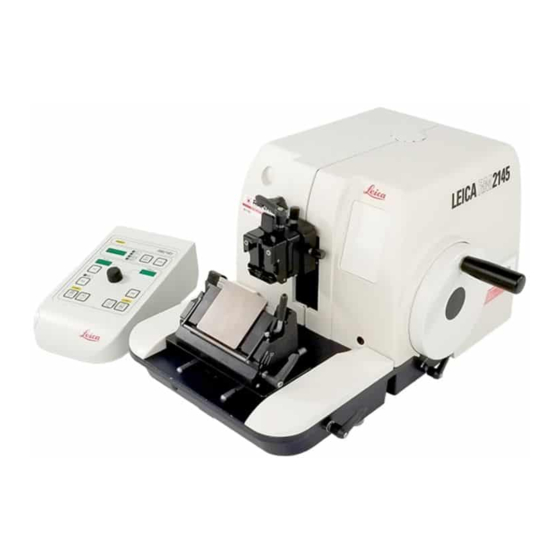
Page 11: Leica Rm 2145 - Overall View Of The Instrument
General description Leica RM 2145 - overall view of the instrument Cover cap, access to the internal fitting device for mounting the combined carrier * for magnifier / illuminations or the microscope carrier * Control panel Handwheel T-piece for clamping... -
Page 12: Unpacking And Installation
Unpacking and installation Unpacking Upon arrival of the box, please check the Tip’n Tell indicators on the outside of the box. If the tip of the arrow is blue, the shipment was handled improperly. In that case, please make a corresponding note on the shipping documents and check the contents for damage. - Page 13 • To move the instrument, slightly lift it at the front of the base plate and slide it to the desired location on the slide faces. Fig. 13 Leica RM 2145 – Rotary Microtome...
-
Page 14: Assembling The Handwheel
Unpacking and installation Assembling the handwheel Before the instrument can be used, the handwheel has to be assembled to the main body. All required parts and tools are con- tained in the shipping crate. The feather key (5) is loosely placed in the handwheel shaft (1) and secured during transport with a tie-rap. -
Page 15: Setting Up The Instrument
If the voltage shown in the indication window does not correspond to your local mains supply, the voltage se- lector setting MUST be changed prior to connecting the instrument to the mains supply. Leica RM 2145 – Rotary Microtome... - Page 16 Setting up the instrument 7.1.2 Changing the voltage selector setting Do not change the voltage selector setting, with the instrument being connected to the mains. • Place the tip of the smaller one of the two screw- drivers into the small recess (4) of cover (5) and push very carefully, using the screwdriver as a lever, to remove the housing.
- Page 17 2 hours before switching on the in- strument to allow it to adapt to the local am- bient temperature. Failure to allow for the re- quired waiting time may cause severe dam- age to the instrument! Leica RM 2145 – Rotary Microtome...
-
Page 18: Installing The Arm Rests
Setting up the instrument Installing the arm rests • Insert the pins on the underside of the arm rests (6) into the corresponding holes (7) of the microtome base plate as shown. Fig. 18 Switching on the instrument • Switch on the mains switch at the rear of the in- strument. -
Page 19: Control Panel Functions
Coarse feed Coarse feed Coarse feed mode backward, backward, forward, slow forward, fast slow fast Trimming Multiple trim Single trim Single trim Multiple trim mode step step step forward step forward backward backward Fig. 19 Leica RM 2145 – Rotary Microtome... - Page 20 Setting up the instrument ‘Retract’ indication RETRACT (yellow) is illuminated with specimen retrac- tion is ‘ON’, while the specimen is in the actual retrac- RM 2145 tion phase. 4-digit LED display The display mode of the 4-digit display can be selected as required.
- Page 21 SECT/µm and TRIM/µm. The sectioning indication SECT/µm always displays the section thickness in a range between 0.25 and 60 µm, the trimming indication TRIM/µm displays the trimming thickness between 1.0 and 600 µm. Leica RM 2145 – Rotary Microtome...
- Page 22 Setting up the instrument Selecting the section thickness Setting range: 0.25 - 60 µm Selectable values: 0.25 µm, 0.50 µm, 01.0 µm, 01.5 µm, 1 µm increments from 2 to 20 µm, 5 µm increments from 20 to 60 µm. Turn the adjusting knob (1) to select a value within the setting range.
- Page 23 • To activate the saved horizontal stop position, press POS twice within a short period of time. The 4-digit LED reads “PoS”. The specimen is then moved to the desired position. Leica RM 2145 – Rotary Microtome...
- Page 24 Setting up the instrument Coarse feed functions The motorized two-speed coarse feed serves to quickly move the specimen towards and away from the knife. When pressing the double-arrow buttons, the coarse backward, backward, forward, forward, feed speed is 900 µm/s; the single-arrow buttons acti- fast slow slow...
- Page 25 • To deactivate the rocking mode, press ‘ROCK’ again. The ‘ROCK’ LED will be extinguished. The instrument can then again be used in the conven- tional full-rotation mode. Leica RM 2145 – Rotary Microtome...
- Page 26 Setting up the instrument Specimen retraction The specimen retraction protects both knife edge and specimen while the specimen is in the return motion to the upper starting position. The retraction value can be set in 5 µm increments between 5 and 100 µm. It can also be deactivated, if necessary.
- Page 27 MODE until the LED of the desired display mode is illuminated. When retraction is deactivated, there will be no retrac- tion movement of the specimen after the sectioning stroke and the yellow ‘RETRACT‘ LED will be extin- guished. Leica RM 2145 – Rotary Microtome...
- Page 28 Setting up the instrument Remaining horizontal feed indication A visual and audible remaining horizontal feed indica- tion feature adverts the user during trimming and sec- tioning that a horizontal feed range of about 1 mm re- mains before the front limit stop will be reached. STOP (yellow) will be illuminated when reaching the Remaining feed...
-
Page 29: Daily Routine Operation
(Fig. 29.3). • Place the specimen clamp on the fixture as shown (Fig. 29.4) and fix it with the two corresponding screws. Fig. 29.4 Leica RM 2145 – Rotary Microtome... -
Page 30: Clamping The Specimen
Daily routine operation Clamping the specimen Always clamp the specimen before clamping the knife! Before manipulating knife or specimen/before changing specimens: always lock the handwheel! • Rotate the handwheel to move the specimen clamp to the top of the cutting stroke. •... -
Page 31: Inserting The Knife Or Disposable Blade
(recommended clearance angle adjustment for knife holder E: 1 - 3 °). • Hold the knife holder firmly in the selected position and lock it by turning lever (1) clockwise. Fig. 31.2 Leica RM 2145 – Rotary Microtome... -
Page 32: Orienting The Specimen (Only With Orienting Specimen Clamp Fixture)
Daily routine operation Orienting the specimen (only with orienting specimen clamp fixture) The specimen orientation allows a simple correction of the position of the specimen surface while the speci- men remains fixed in the specimen clamp. • Use the coarse feed buttons to move the specimen to the rear limit (HOME) position.. -
Page 33: Trimming
• Select conventional sectioning or rocking mode ing level of the specimen. (‘ROCK’). • To section, rotate the handwheel evenly in a clock- wise direction or (in rocking mode) back and forth. • Prepare the sections. Leica RM 2145 – Rotary Microtome... -
Page 34: Changing Specimens And/Or Pausing
Daily routine operation 8.11 Changing specimens and/or pausing 8.12 Finishing daily routine Before manipulating knife or specimen /be- Before manipulating knife or specimen / be- fore changing specimens and during breaks: fore changing specimens and during breaks: always lock the handwheel and cover the always lock the handwheel! knife edge with the knife guard! •... -
Page 35: Trouble Shooting
9.1.2 HOME and STOP are illuminated simultaneously This indicates a failure to detect the limit positions HOME and STOP. This problem can only be corrected by Leica Techni- cal Service.. Leica RM 2145 – Rotary Microtome... -
Page 36: Potential Sources Of Errors - Elimination
Trouble shooting Potential sources of errors - elimination Problem Cause Corrective action Thick/thin sections - Insufficient knife inclination; - Systematically try several The section thickness varies from consequently the clearance clearance angle adjustments, one section to another. In extreme angle is too small. until the optimum angle is found. -
Page 37: Malfunctions - Sources And Elimination
‘SECT/ /µm’ display reading; feed buttons. move specimen backwards with coarse feed button. HOME and STOP are illuminated 1. Instrument fails to recognize 1. Call Technical Service simultaneously. limit stop positions. Leica RM 2145 – Rotary Microtome... -
Page 38: Cleaning
Cleaning Before cleaning, lock the handwheel, switch the instrument off and pull the mains plug! Only use mild household cleaners / soap for cleaning. The varnish paint coat of the instrument is not resistant to acetone or xylene! Make sure that no liquids get into the interior of the instrument while cleaning! •... -
Page 39: Maintenance
Maintenance 11.1 General maintenance instructions Only authorized Leica service engineers may open the instrument for maintenance and re- pair work! The microtome is virtually maintenance-free. However, to ensure smooth and trouble-free operation of the in- strument over a long period of time, we recommend the following preventive maintenance steps: •... -
Page 40: Adjusting The Spring Lever System
Maintenance 11.2 Adjusting the spring lever system When using different specimen clamps and samples of various sizes and weights, it may be necessary to readjust the spring lever system accordingly. How to check correct adjustment • Fix the specimen clamp with the sample. •... -
Page 41: Replacing The Fuses
(5) in the voltage selector housing. • Reinsert the housing together with the fuses into the instrument, push lightly to lock it in place. • Check again whether the correct voltage shows in window (5). Leica RM 2145 – Rotary Microtome... -
Page 42: Optional Accessories
Optional accessories 12.1 Specimen clamps and holders All specimen clamps can be used in combi- nation with both the orienting and non-orient- 12.1.1 Standard specimen clamp ing specimen clamping system. The standard specimen clamp is available in two sizes: 40 x 40 mm and 50 x 55 mm. It is designed for direct clamping of rectangular blocks. - Page 43 (4). • Insert the foil clamp in the standard specimen clamp as shown. • Turn the knurled knob (1) clockwise to securely clamp the foil clamp in the standard specimen clamp. Fig. 43.2 Leica RM 2145 – Rotary Microtome...
- Page 44 Optional accessories 12.1.5 Foil clamp - Type 2 This foil clamp is appropriate for large foil ribbons and is mounted in the standard specimen clamp. • To open the jaws (3) and (4) lightly loosen the 3 screws (5) with an Allen key size 4 (6). •...
- Page 45 • To open, turn the knurled knob (2) counterclock- wise. • Introduce the pin (3) of the EM specimen holder (4) in the hole (5). • Turn the knurled knob (2) clockwise to clamp the EM specimen holder. Fig. 45.2 Leica RM 2145 – Rotary Microtome...
- Page 46 Optional accessories 12.2 Universal knife holder bases Both universal knife holder bases are avail- able in two versions. The version with short clamping levers is used with the two arm rests. The version with long clamping levers is used in combination with the handrest (see 12.8). 12.2.1 Knife holder base without lateral displacement The universal knife holder base without lateral dis-...
- Page 47 Fig. 47 • Reposition the knife holder together with the knife holder base sideways as required. • To secure, turn the clamping lever (2) counterclock- wise. Leica RM 2145 – Rotary Microtome...
-
Page 48: Knife Holders
Optional accessories 12.3 Knife holders 12.3.1 Knife holder N This knife holder is designed for standard steel and tungsten carbide knives, profile c and d, up to 16 cm long. In addition, it is appropriate for various blade rails for disposable blades, which are inserted in the holder like a knife. - Page 49 • Push the knife (4) to the left or right as required. • To clamp the knife (4), always tighten the clamping screw (2) first which is located on the side to which the knife has been repositioned by turning it clock- wise. Leica RM 2145 – Rotary Microtome...
- Page 50 Optional accessories 12.3.3 Knife holder E The knife holder E is can be used with conventional disposable blades of all popular brands. It is available in two versions, the difference being in the back pressure plate (5), one model being delivered with pressure plate for low profile blades, the other one with pressure plate for high profile blades.
- Page 51 • Reattach the pressure plate (7). Reinsert the clamp- To unlock, push the lever upward - to clamp, ing lever (2) in the corresponding opening and tilt it downward. tighten slightly. Leica RM 2145 – Rotary Microtome...
- Page 52 Optional accessories 12.3.4 Knife holder E-TC The knife holder E-TC is designed for the Leica TC-65 tungsten carbide blades. Inserting the blade • Push the knife guard (1) to the middle. • To insert the blade, relocate the clamping lever (2) down.
-
Page 53: Section Waste Tray
Optional accessories 12.4 Section waste tray • Insert the section waste tray from the front under- neath the microtome base plate. Fig. 53 Leica RM 2145 – Rotary Microtome... -
Page 54: Combined Carrier With Magnifier And Illumination
If the instrument is not equipped with such a priate. It is possible to slew the entire carrier to the fitting device, please contact you local Leica side. service department. - Page 55 Lamp type: Osram DULUX 7 W. • Lightly push the new lamp into the holder until it locks in place. • Reconnect the carrier to the mains power supply. • Turn on with the mains switch. Leica RM 2145 – Rotary Microtome...
- Page 56 Optional accessories Fuse replacement Prior to replacing the fuses, turn the illumina- tion off with the mains switch (8) and discon- nect the carrier from the mains power supply! The fuses are located in the voltage selector housing (3). • Place the tip of a small screw driver into the small recess of the cover and push carefully to remove.
-
Page 57: Microscope Carrier
Leica CLS series. The carrier can be If the instrument is not equipped with such a slewn to the side if required. To focus the microscope, fitting device, please contact you local Leica the carrier can be adjusted in height. - Page 58 Optional accessories Carrier adjustments • The carrier (2) can be repositioned back and forth on the microtome housing. • It also may be slewn to the side if required. To do so, slightly lift the carrier at front and move as desired.
-
Page 59: Hand Rest
• Introduce the longer clamping lever (4) on the left and the shorter clamping lever (5) on the right through the holes of the hand rest in the holes of the knife holder base and turn them to the required direction to clamp. Leica RM 2145 – Rotary Microtome... - Page 60 Optional accessories 12.7.2 Installing the knife holder • Turn the clamping lever (1) counterclockwise to re- lease the clamping. • Slide the knife holder (2) onto the T-piece (3) of the knife holder base. • To lock, turn the clamping lever (1) clockwise. 12.7.3 Adjusting the clearance angle The scale for the clearance angle adjustment (0°, 5°...
- Page 61 • Reposition the knife holder base together with the hand rest and knife holder sideways as appropri- ate. • To clamp, turn the clamping lever (2) counterclock- wise. Fig. 61.2 Leica RM 2145 – Rotary Microtome...
-
Page 62: Exchanging The Fixture For Specimen Clamps
Optional accessories 12.8 Exchanging the fixture for specimen clamps Depending on your individual order, the instru- ment is delivered with either the orienting or the non-orienting fixture for specimen clamps. Both fixtures are interchangeable. 12.8.1 Disassembling the orienting fixture for specimen clamps (Fig. -
Page 63: Appendix
Segment arc, with adapter, for EM specimen holder ..................0502 29969 Universal specimen holder (EM) ..........................0356 10868 Flat specimen holder (EM) ............................0355 10405 Special wrench for EM specimen holders ......................0356 10869 Leica RM 2145 – Rotary Microtome... - Page 64 Microscope carrier including stereo-zoom microscope, eye pieces, microscope adapter and fiber optical light guide w/o cold light source ............0502 29366 Leica CLS 100 cold light source - 100 V, 50/60 Hz .....................0502 29364 - 120 V, 50/60 Hz .....................0502 29971 - 230 V, 50/60 Hz .....................0502 29972...
-
Page 65: Product Changes
If you require technical service or replacement parts on the Leica in-house testing standards, and that the under warranty, please contact your Leica Sales Rep- product is faultless and complies with all technical resentative or Dealer from whom the instrument was specifications and/or characteristics warranted. - Page 66 Notes Instruction manual V3.2 – 02/2002...
Need help?
Do you have a question about the RM2145 and is the answer not in the manual?
Questions and answers