Advertisement
Available languages
Available languages
Quick Links
Download this manual
See also:
User Manual
1
step
st
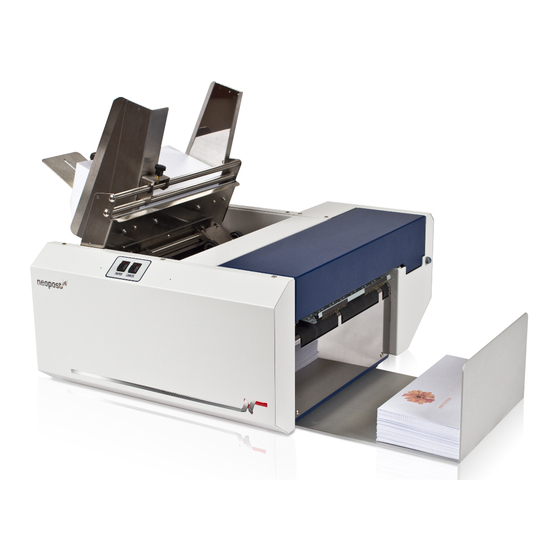
Unpacking & set-up:
- Unpack your printer:
- Remove the printer and accesso-
ries from the packaging.
- Store the packing material in a
safe place.
- In the printer box, you should find the
following:
- 1 print-carriage cover
- 2 side guides
- 1 paper feed ramp
- 1 power cable
- 1 USB cable
- 5 HP cartridges
- 2 CD boxes (user guides + sof-
tware and driver)
- Set the printer onto a level, stable
surface at least 20 cm from any walls
Quick Start Guide for the Printer AS-520C
2
step
nd
Assemble the printer:
- Install the Fixed Side Guide using the
two screws [1] provided
- Install the Adjustable Side guide using
the two screws [2] provided.
- Attach the Rear Paper Support using
the two knobs [3] provided.
- Install the Rear Paper Guide using the
thumbscrew and washer [4] provided.
3
step
rd
Install the inkjet car-
tridges
The printer uses two ink cartridges,
the C6657 Color cartridge and the
C6656 Black cartridge or C6658 Photo
cartridge.
Installing and replacing the cartridge is
done in the following manner:
4
step
th
Set up the feed on the
printer
- Adjust the sheet separation as needed
- Adjust the media side guides as
needed
- Adjust the rear media guide as needed
Please refer to the user guide for more
details.
5
step
th
Connect power to the prin-
ter
- Make sure that the main power switch
is in the OFF position.
- Plug the power cord into the receptacle
on the printer, located below the main
power switch.
- Plug the other end of the power cord
into a 220-230V/50 Hz grounded outlet
with a high quality surge protector.
Do not turn the power switch on at
that time.
01/02/2015 - A0001014/B
Advertisement

Related Manuals for Neopost AS-520C


Summary of Contents for Neopost AS-520C
- Page 1 Quick Start Guide for the Printer AS-520C step step step step step Unpacking & set-up: Assemble the printer: Install the inkjet car- Set up the feed on the Connect power to the prin- tridges printer - Unpack your printer: - Install the Fixed Side Guide using the...
-
Page 2: Connect The Printer To The Computer
step step Connect the printer to the Installing printer drivers computer The Printer has both a USB [2] and a Place the “Printer Drivers" CD into your Parallel Port [1] connection. The two CD-ROM drive. ports are located one above the other When the “Driver Installation CD”... - Page 3 Kurzanleitung für den Drucker AS-520C Schritt Schritt Schritt Schritt Schritt Montieren des Druckers: Auspacken und Vorbe- Einsetzen der Befestigen der Zuführung Anschließen des Druc- reiten: Tintenkartuschen am Drucker kers an die Stromversor- - B e f e s t i g e n S i e d i e f e s t e...
- Page 4 Schritt Schritt Anschließen des Druc- Installieren der Drucker- kers an den Computer treiber Der Drucker verfügt über einen USB- Legen Sie die CD „Printer Drivers“ in Anschluss [2] und einen Parallelans- das CD-ROM-Laufwerk ein. chluss [1]. Die beiden Anschlüsse W e n n d a s S t a r t m e n ü „ D r i v e r liegen übereinander (siehe Abbildung).
- Page 5 Guía de inicio rápido para la impresora AS-520C 1.º paso 2.º paso 3.º paso 4.º paso 5.º paso Montaje de la impresora: Desembalaje e instala- Instalación de cartuchos Instalación del alimenta- Conexión de la impresora ción: de inyección de tinta dor de la impresora - Instale la guía lateral fija mediante...
- Page 6 6.º paso 7.º paso Conexión de la impresora Instalación de los contro- al ordenador ladores de la impresora La impresora cuenta con una co- Coloque el CD “Printer Drivers" en la nexión de puerto USB [2] y otra de unidad de CD-ROM. puerto paralelo [1].
- Page 7 Guide de démarrage rapide pour l'imprimante AS-520C étape étape étape étape étape Déballer et installer Assembler l'imprimante Connecter l'imprimante à Installer les cartouches à Installer le système d'ali- jet d’encre mentation de l'imprimante une source d'alimentation - Déballez votre imprimante : - Installez le guide latéral fixe à l'aide...
- Page 8 étape étape Connecter l'imprimante à Installer les pilotes de l'ordinateur l'imprimante L'imprimante permet aussi bien une I n s é r e z l e C D - R O M « P r i n t e r connexion par port USB [2] que pa- Drivers »...
- Page 9 Guida d'avvio rapido per la stampante AS-520C ° ° ° ° ° passaggio passaggio passaggio passaggio passaggio A s s e m b l a g g i o d e l l a Disimballaggio e configu- Installazione delle Configurazione del cari-...
-
Page 10: Installazione Dei Driver
° ° passaggio passaggio Collegamento della stam- Installazione dei driver pante al computer della stampante La stampante dispone sia di una porta I n s e r i r e i l C D “ P r i n t e r D r i v e r s " USB [2] che di una porta parallela nell'unità... - Page 11 Beknopte handleiding voor printer AS-520C stap stap stap stap stap De printer monteren: Uitpakken & installatie: De inkjetcartridges De papiertoevoer instal- Netspanning aansluiten installeren leren op de printer op de printer - Installeer de vaste zijgeleider met - Uw printer uitpakken: - Pas het papierscheidingsmechanisme de twee bijgeleverde schroeven [1].
- Page 12 stap stap De printer aansluiten op Printerstuurprogramma's de computer installeren De printer heeft een USB-aansluiting [2] Plaats de cd ´Printer Drivers´ in uw en een parallelle poort [1]. De twee cd-station. poorten bevinden zich bovenelkaar, Z o d r a h e t s t a r t m e n u v a n d e als weergegeven hieronder.
Need help?
Do you have a question about the AS-520C and is the answer not in the manual?
Questions and answers