Table of Contents

Subscribe to Our Youtube Channel
Related Manuals for Avol A3ET47100UM


Summary of Contents for Avol A3ET47100UM
- Page 1 47” Full HD 100/120Hz Multi System LED TV Model No.: A3ET47100UM Attention ; Please kindly refer to "TV Broadcasting system" (Page 10 of User's manual) for choosing suitable TV broadcasting system as per your living area when you use this unit firstly.
-
Page 3: Table Of Contents
Contents Contents Caution Safety Information Accessories Technical Specification Product Introduction Front View Wall Mounting Connections Remote Control First Time Installation Basic Operation OSD Menu 9-14 1. Channel menu 9-10 2. Picture menu 3. Sound menu 4. Time menu 5. Option menu Multimedia Operation 15-18 3D Imaging... -
Page 4: Caution
Caution Caution The lightning flash with arrowhead symbol, within an equilateral triangle is intended to alert the user to the presence of un-insulated “dangerous voltage” within the products enclosure that may be of sufficient magnitude to constitute a risk of electric shock to the persons. The exclamation point within an equilateral triangle is intend to alert the user to the presence of important operating and maintenance (servicing) instructions in the literature accompanying the appliance. -
Page 5: Safety Information
Safety Information Safety Information To ensure reliable and safe operation of this equipment, please read carefully all the instructions in this user guide, especially the safety information below . Electrical safety To prevent overload, don't share the same mains supply socket with too many other items of equipment. -
Page 6: Accessories
Accessories & Technical Specification Accessories SOURCE 4 x 3D glasses Converter cable for Din to F PICTURE SOUND SLEEP DISPLAY (Model No.: AGL2P) YPbPr video Connector VOL+ MUTE VOL- EXIT MENU CAPTURE GOTO ZOOM REPEAT ROOT TEXT HOLD NICAM/A2 SUBPAGE INDEX SIZE REVEAL... -
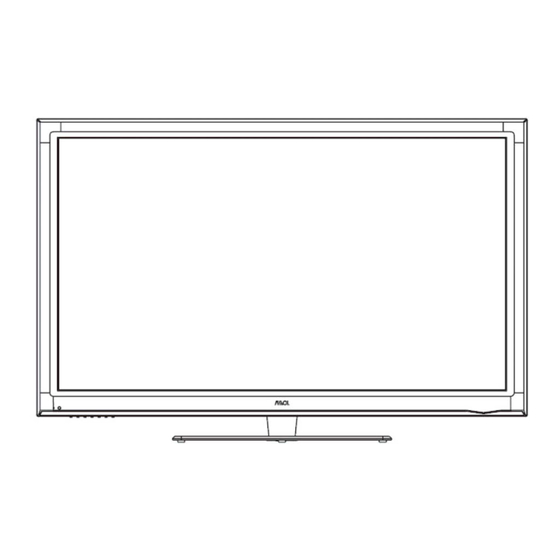
Page 7: Product Introduction
Product Introduction Product Introduction Front View SOURCE: MENU: CH+/-: Press to scan through channels. VOL+/-: LED Indicator POWER: POWER VOL- VOL+ MENU SOURCE Remote Control window (Keep clear) POWER to turn on and off. Indicator on(Green) Power on mode Wall Mounting The TV is provided with mounting holes 400x400mm for a VESA approved wallmounting bracket (NOT SUPPLIED). -
Page 8: Connections
Connections Connections AC POWER IN HDMI1 HDMI2 HDMI3 SCART AC POWER IN : Connect to an earth 100-240V~ 50/60Hz outlet with the Power Cable. HDMI1/2/3: Connect it to the HDMI output of the external devices. SCART Connect to the scart input / output of external devices. VGA: For PC display. -
Page 9: Remote Control
Remote Control Remote Control The remote control is using Infra-Red(IR). Point it towards the front of the TV. The remote control may not work correctly if it is operated out of range or out of angle. SOURCE POWER(red button): Turn the TV on/standby. SOURCE : Press to display the input source menu. -
Page 10: First Time Installation
Remote Control Remote Control SOURCE PICTURE SOUND SLEEP DISPLAY CAPTURE : Press to display the closed caption. : Play/Pause program VOL+ MUTE : Stop program GOTO : Play your favorite title/chapter/track. ZOOM: Adjust picture size except USB mode. VOL- REPEAT : Repeat playing the title or chapter. EXIT MENU A-B: Select and play the preferable paragraph of USB... -
Page 11: Basic Operation
Basic Operation Basic Operation Power on/off 1. Connect to the power supply with the power cord. 2. -To turn on the TV Press POWER button on the TV or remote control. -To turn off the TV Press POWER button on the TV or remote control. Input Source select Press SOURCE button on the TV set or remote control to display input source menu, and use... -
Page 12: Osd Menu
OSD Menu OSD Menu 1. CHANNEL menu See [Basic Operation] for using the menu system. Auto Tuning Press OK button to start Auto Tuning. You could press MENU/EXIT button to exit the process of tuning, there will be a hint on the screen, and you should press <... - Page 13 OSD Menu OSD Menu Programme Edit Press OK button to enter the Program Edit menu. Delete: Highlight a channel and press the RED button, a red X will appear on the right of the program edit menu next to the channel you have chosen, then press RED button again, the program will be deleted.
-
Page 14: Picture Menu
OSD Menu OSD Menu 2. PICTURE menu See [Basic Operation] for using the menu system. Picture Mode: Choose from Dynamic,Standard,Mild and User, Set this to your preference using the<>buttons. Press OK to memorise. Note: Contrast, Brightness, Color and sharpness can be adjusted in the User mode only. Contrast: Controls the difference between the brightest and darkest regions of the picture. -
Page 15: Sound Menu
OSD Menu OSD Menu 3. SOUND menu See [Basic Operation] for using the menu system. Sound Mode: Allows you to select among: Standard, Music, Movie, Sports and User. Set this to your prefered setting. Treble(Could be adjusted when the sound mode is User): Controls the relative intensity of higher pitched sounds. -
Page 16: Time Menu
OSD Menu OSD Menu 4. TIME menu See [Basic Operation] for using the menu system. Sleep Timer: Allows you to set the sleep timer to: 10min, 20min, 30min, 60min, 90min, 120min,180min, 240min and off. When the set time has elapsed,the TV will switch off. Auto Sleep: Press OK to enter this sub menu, then use the V and buttons to select the time. -
Page 17: Option Menu
OSD Menu OSD Menu 5. OPTION menu See [Basic Operation] for using the menu system. OSD Language: Allows you to select menu language. TT Language: Seclet the Teletext language. Aspect Ratio: Choose from 4:3, 16:9, Zoom1, Zoom2 and Panorama. Blue Screen: Turn on/off the blue screen function when there’s no signal. Key Lock: Turn on the function, and the buttons on the TV will be invalid. -
Page 18: Multimedia Operation
Multimedia Operation Multimedia Operation Basic Operation 1). Press the SOURCE button on the remote control to display the input source menu, select Media using the </>/ buttons, and press OK to enter the Multimedia menu seen below. 2). Insert USB device, you will see the name of the device displayed on the screen. USB device list MAIN MENU PHOTO MUSIC MOVIE TEXT... - Page 19 Multimedia Operation Multimedia Operation 1. Photo Play the photo PICTURE.JPEG Press "DISPLAY" button for displaying "Toolbar". and Press "EXIT" button to exit "Toolbar". (Note) Some function may not work after choosing button on RC if toolbar will not be displayed. Press button to select an option on the menu, and press OK button to select it.
- Page 20 Multimedia Operation Multimedia Operation 3. Movie Play the movie Press "DISPLAY" button for displaying "Toolbar". and Press "EXIT" button to exit "Toolbar". (Note) Some function may not work after choosing button on RC if toolbar will not be displayed. Press button to select the option on the menu, and press OK button to change.
- Page 21 Multimedia Operation Multimedia Operation USB MULTIMEDIA PLAYBACK FORMAT File Codec Media Remark Ext. Video Audio Max Resolution And Frame Rate: MJPEG 640×480@30fps Max Data Rate: 10 Mbps .avi Xvid, MPEG-2, MPEG-4, H.264 MPEG-2, MPEG-4, MP3, WMA, AAC .mp4 H.264 MP2, PCM Max Resolution And Frame Rate: .ts/ 1920×1080@30fps...
-
Page 22: Imaging
3D Imaging 3D Imaging 3D Technology This TV can display in 3D via 3D broadcasting or when the TV is connected to a compatible device, such as a Blu-ray 3D Player. You need such a device to watch the TV in 3D. The 3D TV displays two separate pictures formatted for each eye. - Page 23 3D Imaging 3D Imaging Additional 3D glasses are sold separately. Please contact AVL@avl21c.com. 3D Imaging Viewing Range TV size angle & ces may distance and angle vie . Top V 10° 35° 10° 35° Watching 3D TV 3D Customised Setting 3D Type 3D Type PICTURE...
- Page 24 3D Imaging 3D Imaging 3D Customised Setting Press the Menu button and then press the buttons to select the PICTURE menu and then press buttons to select 3D Setting items , and press OK or buttons to setup. Press the buttons to choose a suitable 3D playback mode by matching the format of your 3D video to the available choice: Side by Side / Top Bottom / Frame Packing / Line by Line3D off.
-
Page 25: D Imaging
3D Imaging 3D Imaging Display Methods for 3D and 2D Images Display method Example display Side by Side Top and Bottom Frame packing Line by Line * FHD3D frame will be transmitted at 24fps with a resolution of 1920×2205. -
Page 26: Simple Trouble Shooting
Simple Trouble Shooting Simple Trouble Shooting If the display fails or performance dramatically deteriorates check the Display in accordance with the following instructions.Remember to check the peripherals topinpiont the source of the failure. If the display still fails to perform as expected,connect your helpline for assistance. No power - Check all connections to the TV.
Need help?
Do you have a question about the A3ET47100UM and is the answer not in the manual?
Questions and answers