Table of Contents
Advertisement
Quick Links
Advertisement
Table of Contents

Subscribe to Our Youtube Channel
Related Manuals for Avol AET55400UWD


Summary of Contents for Avol AET55400UWD
- Page 1 55" Full HD 100/120Hz DVB-T /ATSC/ Multi System LED TV Model No.:AET55400UWD...
-
Page 2: Table Of Contents
Contents Caution Safety Information Accessories Technical Specification Product Introduction Front View Wall Mounting Connections Remote Control OSD MENU for Europe Basic Operation OSD MENU for EU-TV 11-17 1. Picture menu 2. Sound menu 3. Channel menu 13-14 4. Feature menu 15-16 5. -
Page 3: Caution
Caution The lightning flash with arrowhead symbol, within an equilateral triangle is intended to alert the user to the presence of un-insulated “dangerous voltage” within the products enclosure that may be of sufficient magnitude to constitute a risk of electric shock to the persons. The exclamation point within an equilateral triangle is intend to alert the user to the presence of important operating and maintenance (servicing) instructions in the literature accompanying the appliance. -
Page 4: Safety Information
Safety Information To ensure reliable and safe operation of this equipment, please read carefully all the instructions in this user guide, especially the safety information below . Electrical safety • To prevent overload, don't share the same mains supply socket with too many other items of equipment. -
Page 5: Accessories
Accessories Batteries Mini AV Cable Mini YPbPr Cable 220V Power Socket Stand Installation User’s Manua Remote control Guide * Note: The configuration of the components may look different from the following illustration Technical Specification - DTV System DVB-T (EU DTV) / ATSC (US DTV) - ATV System PAL/SECAM(EU ATV) / NTSC(US TV) - Screen Size... -
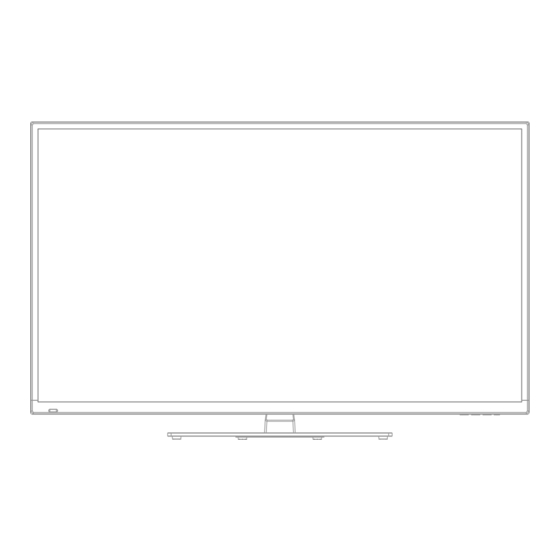
Page 6: Product Introduction
Product Introduction Front View INPUT: MENU: CH+/-: Press to scan through channels. VOL+/-: POWER: Led Indicator Remote Control window (Keep clear) POWER to turn on and off. Indicator on(Green) Power on mode Wall Mounting The TV is provided with mounting holes 200x200mm for a VESA approved wallmounting bracket (NOT SUPPLIED). -
Page 7: Connections
Connections AC POWER IN SCART EU TV HDMI1 HDMI2 AC POWER IN : Connect to an earth 100-240V~ 50/60Hz outlet with the Power Cable. HDMI1/2: Connect it to the HDMI output of the external devices. SCART: Connect to the scart input / output of external devices. EU TV: Connect antenna or cable 75 Ohm coaxial to receive EU-TV signal. -
Page 8: Remote Control
Remote Control The remote control is using Infra-Red(IR). Point it towards the front of the TV. The remote control may not work correctly if it is operated out of range or out of angle. Universal buttons for Europe and USA POWER MUTE POWER: Turn the TV on/standby. - Page 9 Remote Control Exclusive buttons for Europe POWER POWER MUTE MUTE MENU-EURO TV1/TV2 TV1/TV2 MENU-EURO: Display the OSD menu of Europe. SUBTITLE: Turn on/off the subtitle display in DTV. PICTURE PICTURE SOUND SOUND ASPECT ASPECT SLEEP SLEEP SUBTITLE CH.LIST CH.LIST F F V Teletext buttons Colour buttons: Short cuts-follow the coloured links in the text.
-
Page 10: Osd Menu For Europe
OSD MENU for Europe When you initially turn on the TV you will see the first time installation menu EU-TV as below: Setup 1:Set up the Country Setup 2:Set up the Language Setup 3:Set up the Auto Power Off... -
Page 11: Osd Menu For Europe
OSD MENU for Europe Setup 4: Set up the Auto Search EU-TV EU-ATV EU-DTV... -
Page 12: Basic Operation
Basic Operation Power on/off 1. Connect to the power supply with the power code. 2. -To turn on the TV EU-DTV Press POWER button on the TV or remote control. -To turn off the TV EU-ATV Press POWER button on the TV or remote control. Input Source select SCART Press INPUT button on the EU-TV set or remote control to display the... -
Page 13: Osd Menu For Eu-Tv
OSD MENU for EU-TV 1. Picture menu Description Picture Mode: Select your desired picture mode from Dynamic, Standard, Mild and User. Brightness: Adjust image black level. Contrast: Adjust image contrast. Sharpness: Adjust the sharpness(for EU-DTV,EU-ATV, YPbPr AV Scart). Colour: Adjust image colour from black and white. Tint: Control the tint. -
Page 14: Sound Menu
OSD MENU for EU-TV 2. Sound menu Description Sound Mode: Select your desired sound mode from Standard, Movie, Music, Speech and User. Bass: Adjust the level of the lower-pitched sounds. Treble: Adjust the level of the higherpitched sounds. Balance: Adjust the audio output between left and right speakers. Surround: Turn on/off the surround sound function. -
Page 15: Channel Menu
OSD MENU for EU-TV 3. Channel menu(In EU-ATV/ EU-DTV mode) Description Channel Management: Enter the Channel management menu to edit the channels. Note: You have to enter the Password (Lock Password in Feature menu) if you want to edit the channels. Press RED button to sign the channels you want to delete, it will hint you when you exit. - Page 16 OSD MENU for EU-TV Country: Select the country. When the Child Lock is on, please enter the Password (Lock Password in Feature menu) to start Auto and Manual Search. None of TV Broadcasting system in manual. Auto Search: Press OK button to enter the Auto Search menu, select search mode, and press OK button to start auto search.
-
Page 17: Feature Menu
OSD MENU for EU-TV 4. Feature menu Description Lock: This menu allows you to lock certain features of the television so that they can not be used or viewed. For example if you don’t want certain channels viewed by children or if the television is to be used in a hotel and you want certain channels be locked. - Page 18 OSD MENU for EU-TV Language: Lets you adjust the different language options available. Clock: Allows you to set the clock (as default the information is taken automatically from the digital signal). Sleep Timer: Lets you set the sleep timer so the television automatically switches off after a certain amount of time.
-
Page 19: Setup Menu
OSD MENU for EU-TV 5. SETUP menu Description OSD Timer: Lets you adjust the amount of time the On Screen Menu stays on the screen before disappearing. Auto SCART: The TV will be changed to SCART source automatically when you connect the TV to the SCART device. -
Page 20: Osd Menu For Us-Tv
OSD MENU for US-TV Enter the USA signal source Press INPUT button on the TV set or remote control to display the input source menu, and use CH+/- button on the TV set or button on remote control to select the US-TV input source, press OK button on the remote control to enter the USA signal source. -
Page 21: Basic Operations For Osd Menu
OSD MENU for US-TV Basic operations for OSD menu Press MENU-US button on the remote control to display the USA OSD menu. Main menu Time Setup Lock Channel Submenu (Picture menu for example) Hint---you should operate the OSD menu according to the hint. button to change the main menu;... -
Page 22: Time Menu
OSD MENU for US-TV 1. Time menu Description Time zone: Select between Pacific, Alaska, Hawaii, Eastern, Central and Mountain. Daylight Saving Time (Could only be activated in DTV mode): Select between On and Off. -
Page 23: Setup Menu
OSD MENU for US-TV 2. Setup menu Description Menu Language: Select OSD menu language. Closed Caption: CC Mode: Allow you to select the CC Mode among: On, Off and CC on Mute. Basic Selection: Allow you to select the basic selection among: CC1, CC2, CC3, CC4, Text1, Text2, Text3 and Text4. -
Page 24: Lock Menu
OSD MENU for US-TV 3. Lock menu You must enter the password to gain access to the Lock menu. The default password is 0000. You may modify the following options: Description Change password: Change the password, you must enter the new password twice to confirm it. Note: Do not forget the password. -
Page 25: Channel Menu
OSD MENU for US-TV 4. Channel menu Description Air/Cable: Allow you to select antenna between Air and Cable. If you selet “Cable”, the following items(Favorite, Show/Hide, Channel NO, Channel Label and DTV Signal) are unable to use. Auto Scan: Enter the Auto Scan menu to Auto scan. If you select “Cable”... -
Page 26: Osd Menu For Us-Tv
OSD MENU for US-TV Show/Hide: Allow you to show or hide the channels. button to highlight the desired item, then press OK button to show or hide the highlighted channel. Channel No.: Show and select the channel. Channel Label: Allow you to setup a label for the channel. Press button to select the position of the table, and press button to select the... -
Page 27: Simple Troubleshooting
Simple Troubleshooting If the display fails or performance dramatically deteriorates check the Display in accordance with the following instructions.Remember to check the peripherals topinpiont the source of the failure. If the display still fails to perform as expected,connect your helpline for assistance. No power - Check all connections to the TV. -
Page 28: Limited Warranty
WARRANTY PERIOD MODEL# LABOR PARTS AET55400UWD 90 Days 1 Year No other express warranty is applicable to this product. The duration of any implied warranties, including the implied warranty of merchantablility, is limited to the duration of the express warranty herein.
Need help?
Do you have a question about the AET55400UWD and is the answer not in the manual?
Questions and answers