Table of Contents
Advertisement
Quick Links
Advertisement
Table of Contents

Subscribe to Our Youtube Channel
Related Manuals for HIKVISION DS-6601HCI


Summary of Contents for HIKVISION DS-6601HCI
- Page 1 DS-6600 Series Audio / Video Encoder Server Quick Operation Guide V1.2.0...
-
Page 2: Installation
User Manual of DS-6600 Audio/Video Encoder Server Installation Verify Contents Verify that the package contents are correct by checking the items against the packing list. ContentsConten... - Page 3 User Manual of DS-6600 Audio/Video Encoder Server Step3: Take out the HDD data line from the accessories box. Plug one end of the data line to the circuit board and the other end to the data line port of HDD. Step4: Connect the power cord to HDD.
-
Page 4: Installation Of Ds-6600Hfi-Jx
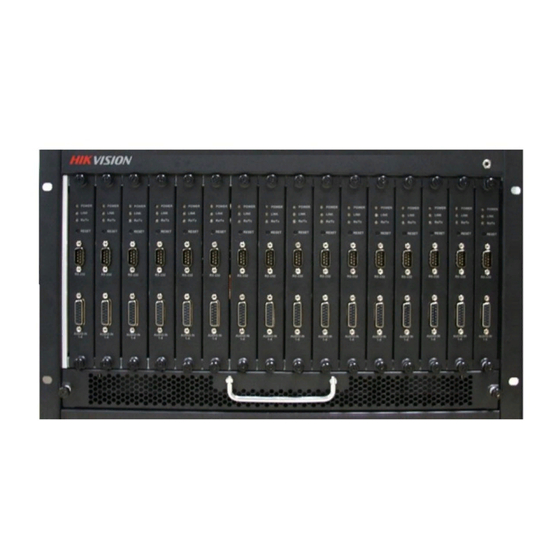
DS-6600 Series DVS Quick Operation Guide Installation of DS-6600HFI-JX Note: Please install the rear interface panel first before installing the functional modules so as to avoid the mounting pins of the modules being bent or damaged. Step1: Secure the rear interface panel to the chassis, and then tighten the mounting screws. Step2: Insert the functional module along the slot till it has fully seated in the chassis, and then secure it by tightening the screws. -
Page 5: Front Panel
DS-6600 Series DVS Quick Operation Guide Front Panel DS-6600HCI / HFI-SATA: LED Indicators: Power LED indicator: 1. Lights in red when the device is working; 2. Does not light when the device is powered off. HDD LED indicator: 1. Blinks in red when data is being read from or written to HDD; 2. Normally lights in red when HDD is error;... - Page 6 DS-6600 Series DVS Quick Operation Guide DS-6600HFI-JX: LED Indicators: Power LED indicator: 1. Lights in red when the device is working; 2. Does not light when the device is powered off. LINK LED indicator: 1. Normally lights in green when the network connection is functioning properly; 2. Does not light when the network connection is abnormal.
-
Page 7: Rear Panel
DS-6600 Series DVS Quick Operation Guide Rear Panel DS-6600HCI / HFI-SATA: Interface Connection DC12V 12V DC power supply. RS-485 RS-485 serial interface for connection to pan/tilt unit, speed dome, etc. ALARM OUT Relay alarm output. ALARM IN Relay alarm input. RESET Restore the factory default settings by holding the RESET button for 15 seconds after power is turned on. - Page 8 DS-6600 Series DVS Quick Operation Guide DS-6600HCI / HFI: Interface Connections Grounding. DC12V 12V DC power supply RS-485 RS-485 serial interface for connection to pan/tilt unit, speed dome, etc. ALARM OUT Relay alarm output. ALARM IN Relay alarm input. RESET Restore the factory default settings by holding the RESET button for 15 seconds after power is turned on.
- Page 9 DS-6600 Series DVS Quick Operation Guide DS-6600HFI-JX: Interface Connections VIDEO IN BNC connectors for video input. 10M/100Mbps self-adaptive UTP Ethernet interface. ALARM IN Relay alarm input. ALARM OUT Relay alarm output. RS-485 RS-485 half-duplex interface. LINE IN 3.5mm two-way audio input interface for connection to active pick-up, microphone, etc.
-
Page 10: Specifications
DS-6600 Series DVS Quick Operation Guide Specifications DS-6600HCI Model DS-6601HCI DS-6602HCI DS-6604HCI Video H.264 Compression 1-ch, BNC 2-ch, BNC 4-ch, BNC Video input (1.0 Vp-p, 75 Ω) (1.0 Vp-p, 75 Ω) (1.0 Vp-p, 75 Ω) Video/ Audio Audio G.711 Compression... - Page 11 DS-6600 Series DVS Quick Operation Guide DS-6600HCI-SATA Model DS-6601HCI-SATA DS-6602HCI-SATA DS-6604HCI-SATA Video H.264 Compression 1-ch, BNC 2-ch, BNC 4-ch, BNC Video input (1.0 Vp-p, 75 Ω) (1.0 Vp-p, 75 Ω) (1.0 Vp-p, 75 Ω) Video/ Audio Audio G.711 Compression input...
- Page 12 DS-6600 Series DVS Quick Operation Guide DS-6600HFI Model DS-6601HFI DS-6602HFI DS-6604HFI Video H.264 Compression 1-ch, BNC 2-ch, BNC 4-ch, BNC Video input (1.0 Vp-p, 75 Ω) (1.0 Vp-p, 75 Ω) (1.0 Vp-p, 75 Ω) Video/ Audio Audio G.711 Compression input 1-ch, BNC 2-ch, BNC 4-ch, BNC...
- Page 13 DS-6600 Series DVS Quick Operation Guide DS-6600HFI-SATA Model DS-6601HFI-SATA DS-6602HFI-SATA DS-6604HFI-SATA Video H.264 Compression 1-ch, BNC 2-ch, BNC 4-ch, BNC Video input (1.0 Vp-p, 75 Ω) (1.0 Vp-p, 75 Ω) (1.0 Vp-p, 75 Ω) Video/ Audio Audio G.711 Compression input 1-ch, BNC 2-ch, BNC 4-ch, BNC...
- Page 14 DS-6600 Series DVS Quick Operation Guide DS-6600HFI-JX Model DS-6600HFI-JX Chassis Chassis with power adapter Chassis Component Slot 16 slots available for audio/video output modules (DS-6604HFI-B) Video H.264 Compression Video/ 4-ch, BNC (1.0 Vp-p, 75 Ω) Audio Video input Input Audio G.711 (DS-6604H Compression...
-
Page 15: Access To Ds-6600 By Client Software
DS-6600 Series DVS Quick Operation Guide Access to DS-6600 by Client Software Click “Start””All Programs”“iVMS-4200 Client” to start the client software. After successful login, user can enter the following main interface of the client software. Adding Device Steps: Click Control Panel > Device Management to enter the Device Management page: Click the Add button to enter the Add Device interface: Edit a nickname for the device and input the IP address, port number (default: 8000), login user name (default: admin) and password (default: 12345) of the device. -
Page 16: Starting Live View
DS-6600 Series DVS Quick Operation Guide Starting Live View Click Control Panel > Main View to enter the Live View page: You can click the buttons on the toolbar to operate in the live view mode, e.g., capture picture, start/stop recording, two-way audio, PTZ control (with PTZ camera connected to the encoder), digital zoom, open/close audio, play back video files, etc. -
Page 17: Access To Ds-6600 By Web Browser
DS-6600 Series DVS Quick Operation Guide Access to DS-6600 by Web Browser Open WEB browser, input the IP address of DS-6600 (e.g., http://192.0.0.64) and then press the Enter key on PC. The system then will display the login interface: Input the user name (default: admin) and password (default: 12345) to log into the system. Note: You should download and install the plug-in for the first time to use. -
Page 18: Operating Ptz Control
DS-6600 Series DVS Quick Operation Guide Note: Before using two-way audio function or recording with audio, please select the Stream Type to Video & Audio under Remote Configuration > Camera Settings >Video Settings. Full-screen Mode You can double click on the live video to switch to the full-screen view mode. To switch back to the normal mode, double click on the live video again. - Page 19 DS-6600 Series DVS Quick Operation Guide Recording Before you start Make sure the Encoder is connected with HDD (for DS-6600HFI/HCI-SATA) or network disk, and the HDD or network disk has been initialized for the first time to use. Two recording types can be configured: Manual and Scheduled. The following section introduces the configuration of scheduled recording.
- Page 20 DS-6600 Series DVS Quick Operation Guide Time and End Time. The time of each segment can’t be overlapped. Up to 8 segments can be configured. Note: Select a Record Type. The record type can be Normal, Motion, Alarm, Motion & Alarm, and Motion | Alarm.
- Page 21 DS-6600 Series DVS Quick Operation Guide Use the buttons on the toolbar to operate in playback mode Button Operation Button Operation Play Stop all channels from playing Stop Capture pictures in playback mode Slow forward Start/Stop clipping video files Fast forward Audio on/off Play by single frame You can also drag the progress bar with the mouse to locate the exact playback point.
- Page 22 DS-6600 Series DVS Quick Operation Guide The matched log files will be displayed on the list shown below. Note: Up to 100 log files can be displayed each time. You can click the button to save the searched log files to local directory.
Need help?
Do you have a question about the DS-6601HCI and is the answer not in the manual?
Questions and answers