Moxa Technologies AWK-3121 Quick Installation Manual
Access point/bridge/ap client
Hide thumbs
Also See for AWK-3121:
- User manual (90 pages) ,
- Quick installation manual (16 pages) ,
- User manual (75 pages)

Subscribe to Our Youtube Channel
Related Manuals for Moxa Technologies AWK-3121


Summary of Contents for Moxa Technologies AWK-3121
-
Page 1: Quick Installation Guide
AWK-3121 Quick Installation Guide Moxa AirWorks Fourth Edition, December 2010 2010 Moxa Inc. All rights reserved. Reproduction without permission is prohibited. P/N: 1802031210013... -
Page 2: Package Checklist
Step 1: Select the power source The AWK-3121 can be powered by a DC power input or PoE (Power over Ethernet). The AWK-3121 will use whichever power source you choose. Step 2: Connect the AWK-3121 to a notebook or PC... - Page 3 Step 6: Test communications We will describe two test methods. Use the first method if you are using only one AWK-3121, and use the second method if you are using two or more AWK-3121s. Testing method for one AWK-3121 If you are only using one AWK-3121, you will need a second notebook computer (B) equipped with a WLAN card.
-
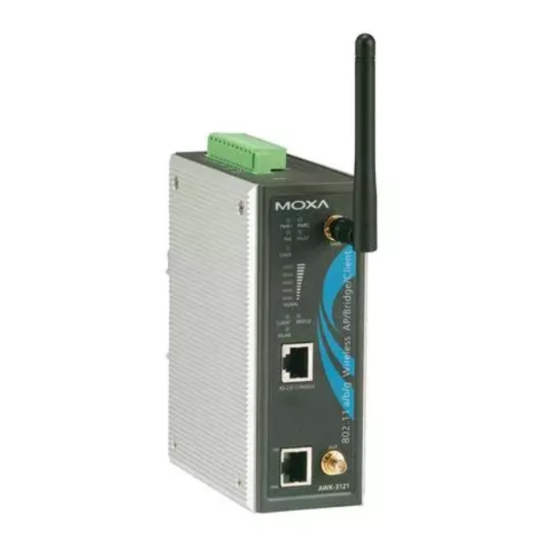
Page 4: Panel Layout Of The Awk-3121
AWK-3121 connected to notebook A, and change the second or third AWK-3121 connected to notebook B to Client mode and then configure the notebooks and AWK-3121s properly. After setting up the testing environment, open a DOS window on notebook B. -
Page 5: Mounting Dimensions (Unit = Mm)
DIN-Rail Mounting The aluminum DIN-Rail attachment plate should be fixed to the back panel of the AWK-3121 when you take it out of the box. If you need to reattach the DIN-Rail attachment plate to the AWK-3121, make sure the stiff metal spring is situated towards the top, as shown in the figures below. -
Page 6: Wall Mounting (Optional)
STEP 2: 6.0 mm Mounting the AWK-3121 to a wall requires 4 screws. Use the AWK-3121 device, with wall mount plates attached, as a guide to mark the correct locations of the 4 screws. The heads of the screws should be less 3.5 mm... -
Page 7: Grounding The Moxa Awk-3121
Grounding the Moxa AWK-3121 Grounding and wire routing help limit the effects of noise due to electromagnetic interference (EMI). Run the ground connection from the ground screw to the grounding surface prior to connecting devices. -
Page 8: Wiring The Redundant Power Inputs
Wiring the Redundant Power Inputs The top two pairs of contacts of the 10-contact terminal block connector on the AWK-3121’s top panel are used for the AWK-3121’s two DC inputs. Top and front views of the terminal block connector is shown here. -
Page 9: Cable Holder Installation (Optional)
Cable Holder Installation (Optional) You can attach the cable holder to the bottom of the AWK-3121. This helps to keep cabling neat and avoid accidents that result from untidy cables. STEP 1: Screw the cable holder onto the bottom of the AWK-3121. -
Page 10: Atex Information
The AWK-3121 has one RS-232 (8-pin RJ45) console port located on the front panel. Use either an RJ45-to-DB9 or RJ45-to-DB25 cable to connect the Moxa AWK-3121’s console port to your PC’s COM port. You may then use a console terminal program to access the AWK-3121 for console configuration. -
Page 11: Led Indicators
LED Indicators The front panel of the Moxa AWK-3121 contains several LED indicators. The function of each LED is described in the table below. Color State Description Front Panel LED Indicators (System) Power is being supplied from power input 1. -
Page 12: Specifications
Specifications WLAN Standards IEEE 802.11a/b/g for Wireless LAN IEEE 802.3u 10/100BaseT(X) for Ethernet LAN IEEE 802.3af for Power-over-Ethernet IEEE 802.1D/w STP/RSTP Spread Spectrum and DSSS with DBPSK, DQPSK, CCK Modulation OFDM with BPSK, QPSK, 16QAM, 64QAM Operating Channels 2.412 to 2.462 GHz (11 channels) (Central Frequency) 5.18 to 5.24 GHz (4 channels) 2.412 to 2.472 GHz (13 channels) - Page 13 RX Sensitivity (for hardware revision 1.0 and 1.1): 802.11b: -92 dBm @ 1 Mbps, -90 dBm @ 2 Mbps, -88 dBm @ 5.5 Mbps, -84 dBm @ 11 Mbps 802.11g: -87 dBm @ 6 Mbps, -86 dBm @ 9 Mbps, -85 dBm @ 12 Mbps, -82 dBm @ 18 Mbps, -80 dBm @ 24 Mbps, -76 dBm @ 36 Mbps, -72 dBm @ 48 Mbps, -70 dBm @ 54 Mbps...
- Page 14 ATTENTION The AWK-3121 is NOT a portable mobile device and should be located at least 20 cm away from the human body. The AWK-3121 is NOT designed for the general public. To deploy AWK-3121s and establish a wireless network safely, a well-trained technician is required for installation.
Need help?
Do you have a question about the AWK-3121 and is the answer not in the manual?
Questions and answers