Table of Contents
Advertisement
Quick Links
Advertisement
Table of Contents

Related Manuals for Decon wheel e-drive plus


Summary of Contents for Decon wheel e-drive plus
- Page 1 User manual E-Drive plus Decon Wheel AB 2015 Version 1.0...
- Page 2 EC Declaration of Conformity on of Conformity ng the following manufacturer: Decon Wheel AB Org.no.: 556618-9006 Södra Ekeryd 115, 31422 HYLTEBRUK SWEDEN Herewith declares that the product E-Drive part no series: MED216 MEDL216 MED224 MEDL224 Is in confo ve, including all applicable amendments:...
- Page 3 Important information Responsibility Decon Wheel cannot be held responsible for product changes made by unauthorized people. We reserve the rights to make any changes to equipment and/or specifications. Serialnumbers Serial numbers are located inside the battery box. Within the rims there is a registration number with production year and month.
-
Page 4: Table Of Contents
Table of Contents 1. Please Read Before Use 1.1. Foreword 1.2. Symbols Used in This Manual 1.3. Operation Diagnosis Check 1.4. Assistive Operation Diagnosis Check 1.5. Warnings and Notes for the Operation 1.6. Warning Label Location Diagram 2. Names of Parts E-Drive 2.1. - Page 5 5. After You are Finished Riding the Wheelchair 49 5.1. Getting Out of the Wheelchair 5.2. Removing the Battery 6. How to Use the Assistant Controller 6.1. Getting in the Wheelchair 6.2. Starting Assistant Travel Mode 6.3. After Assistant Operations are Finished 7.
- Page 6 10. Wheelchair Transporting and Storing Instructions 79 10.1. Loading the Wheelchair in a Car 10.2. Unloading the Wheelchair from a Car 10.3. Storing the Wheelchair 10.4. Boarding an Airplane 11. Using the Wheelchair more Comfortably 84 11.1. Removing and Installing the Unit 11.2.
- Page 7 Introduction This is a manual for the “E-Drive” electric power unit for wheelchairs. Before you read this manual, check which product you are using. This product consists of the left and right drive units, the joystick-equipped controller, the bat- tery, optional battery bag, the battery charger, and the optional assistant controller. These com- ponents, except for the battery and charger, are already installed to the wheelchair frame.
-
Page 8: Please Read Before Use
Please Read Before Use Caution: Federal law restricts this device to sale by or on the order of a practitioner licensed by the law of the State in which he/she practices. 1.1. Foreword Thank you for purchasing the E-Drive. Generally speaking, riding in a wheelchair incurs the possible risk of personal injury or damage to the wheelchair from improper use. -
Page 9: Operation Diagnosis Check
1.3. Operation Diagnosis Check Depending on the extent of your disabilities, it may be dangerous to travel unaccompanied. Use this diagnosis check as a guide to determine whether or not you can travel unaccompanied. Diagnosis Check 1 A r e y o u a b l e t o Are you able to cor- move the joystick rectly perceive visu-... -
Page 10: Assistive Operation Diagnosis Check
WARNING Before using the wheelchair, be sure to assess your competence and determine whether or not you need an assistant. Moreover, in determining the necessity of an Expert assistant, consult expert opinions as a point of reference. If your judgment is based solely on your own opinion, you or other people around you may get injured. -
Page 11: Warnings And Notes For The Operation
WARNING If an assistant is to accompany you and oper- ate the wheelchair, be sure to assess his or her competence. Moreover, when assessing the assistant’s com- Expert petence, consult expert opinions as a point of reference. If your judgment is based solely on your own opinion, you or other people around you may get injured. - Page 12 1.5.2. Before Use Every Day WARNING Perform the daily checks before use every day. Make a habit out of inspecting the wheelchair. Continued use of the wheel- chair with a problem in the wheelchair body or the wheels may cause damage to the wheelchair while traveling, and may result in a rollover or fall.
- Page 13 1.5.3. Handling the Wheelchair WARNING Modifying the unit or its mounting may ad- versely affect its performance and safety. Never make any modifications. If the wheelchair has parts that are foldable or detachable, do not operate the wheelchair with those parts folded or removed. When lifting the wheelchair, do not hold movable parts.
- Page 14 WARNING Do not hang anything on the joystick on the controller. It may get in the way of your operation, or the weight of the object may prevent the joystick from returning to its original position, even after your hand has released it.
- Page 15 WARNING Removing the battery while traveling causes the brakes to be applied to the rear tires, and may cause you or other people around you to get injured. Turning off the power switch while travel- ing causes the brakes to be applied to the rear tires, and you or other people around you may get injured.
- Page 16 1.5.4. Getting In /Out of the Wheelchair, Seating WARNING When getting in the wheelchair by yourself or when the assistant has the user of the wheelchair get in the wheelchair, ensure that the wheelchair is on a level ground. If the user attempts to get in the wheelchair on an incline, he or she may lose balance and fall off the wheelchair.
- Page 17 WARNING Never operate the wheelchair after con- suming alcohol or taking medicine that causes drowsiness. Never operate the wheelchair while holding an umbrella or other items. Never tow the wheelchair. Do not use the wheelchair to tow or pull anything. If you want to use a portable phone, etc., stop the wheelchair at a safe place and turn off the wheelchair.
- Page 18 WARNING Do not turn the power switch off while traveling. It causes the brakes to be applied to the rear wheels in some cases and may cause you to fall down from the wheelchair. Do not use the wheelchair for trans- porting luggage or for any other pur- pose than to provide assistance to a disabled person.
- Page 19 In the following environments and situations, you may need an assistant to accompany you and to operate the wheelchair for you. In such cases, have an assistant accompany you. Traveling alone in these situations may lead to injury. Moreover, check to see if any dangers such as those shown below exist in the roads you use on a daily basis.
- Page 20 WARNING Be careful not to travel too close to the edge when traveling on an embankment, etc., of a road. Depending on the condition of the shoulder of the road, you could accidentally move off the road. When traveling on a sidewalk that does not have a guardrail, there is a risk of falling into the street side.
- Page 21 WARNING If it is raining or snowing, do not operate the wheelchair outdoors. Automobiles and other vehicles may collide into you if they cannot recognize you. If it starts to rain or snow while you are outdoors, move indoors as soon as possible.
- Page 22 WARNING Do not abruptly turn on a downhill slope. In addition, do not traverse horizontally or diagonally across a steep slope. You could easily lose balance and tip over. In the areas where the wheelchair leans sharply to the left or right, the wheelchair may tip over sideway.
- Page 23 WARNING When going up /down a curb for the first time, have an assistant accompany you instead of traveling alone. When traveling over a curb, be careful not to lose your balance. When traveling over a curb, proceed at a right angle to the curb.
- Page 24 WARNING When descending from a curb with the assistant operations, descend in reverse. If the assistant moves the wheelchair for- ward when descending, the passenger may plunge forward and fall off the wheelchair. When going up /down a curb with the as- sistant operations, the safety wheels of the anti-tip device may be raised or folded temporarily depending on the height of the...
- Page 25 WARNING Before crossing a road, be sure to check to the left and right for safety. Do not cross a road if it is dangerous to do so, such as if an automobile is approach- ing. When crossing a road, proceed as close as possible at a right angle to the road.
- Page 26 WARNING At intersections where there are no traffic lights or crosswalks, stop in the follow- ing three stages. 1. Stop before entering the road. 2. Stop where you can be seen by automobiles. 3. Stop where you have a good view of the road. 1.5.10.
- Page 27 1.5.11. Poor Road Conditions WARNING The wheelchairs equipped with the E-Drive or the are built to be lighter com-pared to other electric wheelchairs that use a general lead battery. For this reason, when a person sits in it, the overall center of gravity shifts higher. Therefore, caution is necessary when traveling on a curb.
- Page 28 1.5.12. Parking Lots WARNING Do not travel directly behind or in front of automobiles in parking lots. Drivers may not be able to see you if you are directly behind or in front of their automobiles. Do not travel between automobiles in park- ing lots.
- Page 29 WARNING When getting on /off a bus or train, always have an assistant accompany you to en- sure safety. Whenever you get off a bus, a taxi, or a train, be sure that the safety wheels on the anti-tip device are in the correct position before getting in the wheelchair.
- Page 30 1.5.15. Transporting and Storing the Wheelchair WARNING When lifting a wheelchair with tilt-up arm support, never lift it by the arm support. Otherwise, the arm support may come off and cause an injury or damage to the equipment. When lifting a wheelchair, never lift it by the battery, cable, or controller.
- Page 31 WARNING Be sure to remove the battery when not in use, so that its power will not turn on unex- pectedly in storage or during transport. Be sure to store the disconnected battery with the protective cap on it. Exposed con- tacts can cause short circuits and lead to a fire or battery rupture.
- Page 32 WARNING Do not wash by directly hosing it down with water. Also, do not wash with using steam. The electronic devices can get dam- aged, which may lead to malfunction. Do not clean with solvents such as gaso- line or paint thinner. This may damage the painting and plastic parts.
-
Page 33: Warning Label Location Diagram
1.6. Warning Label Location Diagram • Power Unit and Controller (Battery seat side surface) (E-Drive 16") (Battery seat back surface) (E-Drive16") (E-Drive 16") (E-Drive 16") • Lithium Ion Battery and Charger (Back side) • Nickel Metal Hydride Battery and Charger... -
Page 34: Names Of Parts
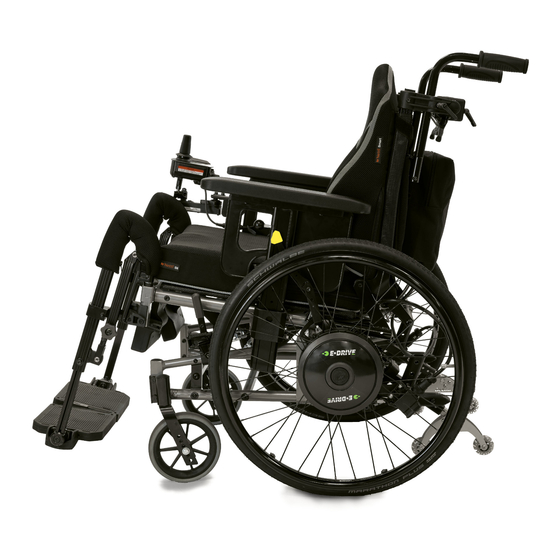
Names of Parts 2.1. E-Drive 24" Controller (Pages 29, 42, 44, 45) Rear tire (Page 35) Clutch lever (Pages 40, 51, 82, 84) Drive unit (AC servo motor) Upper holder Lower holder Upper holder lock lever Assistant controller (Optional) (Pages 29 and 51–54) Brake lever (Optional) Battery... -
Page 35: E-Drive
2.2. E-Drive 16" Controller (Pages 29, 42, 44, 45) Rear tire (Page 35) Drive unit (AC servo motor) Upper holder Under holder Upper holder lock lever Assistant controller (Optional) (Pages 29 and 51–54) Brake lever Battery (Pages 30, 32, 55–77) Tipping plate Anti-tip device (Page 34) -
Page 36: Controller
2.3. Controller (Pages 36, 42–45) Joystick (Page 42) USB Power port Battery residual capacity indicator (Pages 42–45) Movement possible lamp Speed indicator (Page 44) Retracted anti-tip device warning lamp Power switch Speed selector (Page 42) switch (Page 44) Horn switch (Page 45) NOTICE The USB power port is used only to supply power. -
Page 37: Nickel Metal Hydride Battery (Jwb2)
2.5. Nickel Metal Hydride Battery (JWB2) Indicator switch Grip (Handle) (Pages 38, 59, 62, 64) Release button (Yellow) (Page 50) Capacity indicator lamp (Pages 38, 59, 62 and 64) Battery fuse (Yellow 20 A) Contacts (Page 38) A code indicating the model (JWB2) and the manufactured lot is printed. -
Page 38: Nickel Metal Hydride Battery Charger (Jwc-2)
2.6. Nickel Metal Hydride Battery Charger (JWC-2) Intake vent Contacts (4 locations) Power cord (Page 63) Battery insertion slot (Page 63) Charge lamp (Green) (Pages 63 and 68) TYPE:JWC-2 Refresh lamp (Orange) For indoor use only (Pages 63, 66, 68) CHARGING REFRESH The label on the reverse... -
Page 39: Lithium Ion Battery (Esb1)
2.7. Lithium Ion Battery (ESB1) Grip (Handle) Indicator switch Capacity indicator lamp (Pages 38, 69, 74, 76) (Pages 38, 69, 72, 74, 76) Contacts (Page 38) Connector cover (Pages 74 and 75) Connector for charger (Pages 74 and 75) Manufactured date displayed (Bottom) (Page 73) Shows the model. -
Page 40: Lithium Ion Battery Charger (Esc1)
2.8. Lithium Ion Battery Charger (ESC1) Handle Power plug Charger plug (Pages 74 and 75) (Pages 74 and 75) Charge lamp (Page 78) The model (ESC1) is shown on the label on reverse side. -
Page 41: Before Sitting In The Wheelchair
Before Sitting in the Wheelchair 3.1. Inspecting the Wheelchair Inspect the wheelchair. If you detect any problem, contact your dealership. Anti-tip device Check the anti-tip device to ensure that it is not deformed or greatly damaged. Check the safety wheels of the anti-tip device to ensure that they are in the correct position for operation. - Page 42 WARNING The wheelchair may tip over if operated when the anti-tip device is removed or the safety wheels are not in the correct position. Do not operate the wheelchair when the safety wheels are not in the correct position. Only have the safety wheels folded or facing upwards when going over bumps with the assistant operations and other such situations.
- Page 43 Wheels Check the wheels to ensure that they are not deformed or damaged. Check the area where the wheel Wheel meets the frame to ensure that Wheel Caster Spokes it does not wobble. Caster fork Check the spokes to ensure that they are not broken.
-
Page 44: Checking Your Clothing
Assistant controller (optional) Check the assistant controller to ensure that it is Assistant controller firmly secured to the wheelchair. (Try shaking and rocking the assistant controller.) Controller Check the switches to ensure that it is in an easy- to-operate position. (8) Battery bag (optional) Make sure that the left and right cable connectors are securely connected. -
Page 45: Checking The Residual Capacity Of The Battery And Installing The Battery On The Wheelchair
3.3. Checking the Residual Capacity of the Battery and Installing the Battery on the Wheelchair Press the indicator switch to check the residual capac- ity of the battery. The residual capacity of the battery will be displayed on the capacity indicator lamps. Check the contacts to ensure that they are not dirty or rusted. - Page 46 WARNING When handling the lithium ion battery, ensure that you do not pinch your finger with the grip. Doing so may injure your finger. NOTICE Do not replace the battery when the power is turned on. Doing so may damage the battery terminals and cause a malfunction.
-
Page 47: Riding The Wheelchair
Riding the Wheelchair 4.1. Sitting in the Wheelchair Place the wheelchair in a level and stable location and turn off the power switch (yellow) . Put the clutch levers of the left and right power units in the power drive position. 1 Power drive ... - Page 48 If the controller is in the way when you get in the wheelchair or sit at a table in the wheelchair: JW Active PLUS E-Drive PLUS Push the knob forward to turn the controller. Lift the arm support. Remove the controller and stow it on the lower holder.
-
Page 49: Moving The Wheelchair
4.2. Moving the Wheelchair Turn on the power switch (yellow). When the power to the wheelchair is turned on, all the lamps on the controller illuminate. Then, after 1 second, the “retracted anti-tip device” warning lamp turns off, and the bat- tery residual capacity indicator indicates the battery level. - Page 50 If the power does not turn on Is the power for the assistant controller turned on? If the power for the assistant controller is turned on, the power for the controller will not turn on. In this case, turn off the power switches on both controllers, and turn on the power for the controller.
-
Page 51: Adjusting And Confirming The Maximum Speed
4.3. Adjusting and Confirming the Maximum Speed With the speed selector switch, you can adjust and confirm the maximum speed. Move the switch up to increase the speed, and down to decrease it. Perform the following steps to adjust the maximum speed. Move the speed selector switch to change Speed selector... -
Page 52: Checking The Residual Capacity Of The Battery During Operation
4.4. Checking the Residual Capacity of the Battery during Operation You can always check the residual capacity of the battery with the LCD of the controller. Battery residual capacity indication Battery residual capacity indication The battery residual capacity indication varies according to the battery. type. -
Page 53: Other Functions
4.5. Other Functions Using the horn When you push the horn switch on the controller, the horn sounds. Auto power off function With the power turned on, if the joystick is not operated for 10 minutes, the power turns off automatically. To resume operation, turn the power switch off and then back on. -
Page 54: Practicing Basic Operations
4.6. Practicing Basic Operations Practice the basic operations on a safe, large, level ground. Basic Operations 1 1 In the beginning, adjust the maximum speed to a slow speed and learn how to use the joystick. • Tilt the joystick in the direction you want to go. •... - Page 55 Practice in an actual location where you intend to use the wheelchair. Basic Operations 2 1 Sidewalk • Be careful not to bump into pedestrians and obstructions. • Adjust your operation to suit the road surface conditions. 2 Up and down a level difference •...
-
Page 56: After You Are Finished Riding The Wheelchair
After You are Finished Riding the Wheelchair 5.1. Getting Out of the Wheelchair Park the wheelchair on a flat location. Turn off the power switch. Apply the parking brakes. (The left and right clutch levers should be in the power drive position.) Get off the wheelchair onto a bed, etc. -
Page 57: Removing The Battery
5.2. Removing the Battery Disconnect the battery from the wheelchair. Store the battery with the protective cap on it. < How to remove a nickel metal hydride (Ni-MH) battery> Disconnect the battery by Store the battery with the Turn off the pulling it straight outwards while protective cap on it. -
Page 58: How To Use The Assistant Controller
How to Use the Assistant Controller Even if you are using the wheelchair with assistive operation, read “3. Before Sitting in the Wheel- chair”, “4. Riding the Wheelchair”, “5. After You are Finished Riding the Wheelchair”. 6.1. Getting in the Wheelchair Have the user get in the wheelchair according to “4.1. - Page 59 Adjust the speed as necessary. Turn the speed adjustment dial clockwise to increase speed, and counterclockwise to decrease speed. In the beginning, adjust it to a low speed. Gradually adjust the Slow Fast speed after you become accustomed to the operation. The speed can be adjusted steplessly within the range of 1.1 to 4.9 km/h forward and 0.4 to 1.9 km/h backward.
- Page 60 If the power does not turn on Is the power for the controller turned on? If the power for the controller is turned on, the power for the assistant controller will not turn on. In this case, turn off the power switches on both controllers, and turn on the power for the assistant controller.
-
Page 61: After Assistant Operations Are Finished
6.3. After Assistant Operations are Finished Park the wheelchair on a flat location. Turn off the power switch. Power switch Apply the parking brakes. Set the left and right clutch levers in the power drive position. Have the user get off the wheelchair. Disconnect the battery from the wheelchair. -
Page 62: Handling The Batteries And Chargers
Handling the Batteries and Chargers 7.1. Types of Batteries There are two types of batteries you can use for E-Drive. • Nickel metal hydride battery (JWB2) • Lithium ion battery (ESB1) Both types of batteries are sealed dry-cell batteries with a built-in microcomputer. Since the bat- teries differ in characteristics and charging method, first check the battery type you want to use. - Page 63 WARNING If you mishandle either of these batteries or their chargers, it may result in heat generation, rupture, electric shock, or injury. Be sure to adhere to the items below. Do not recharge the battery using a charger other than the designated charger, or use the bat- tery on anything other than the specified wheel-...
- Page 64 WARNING If you mishandle either of these batteries or their chargers, it may result in heat generation, rupture, electric shock, or injury. Be sure to adhere to the items below. Do not store the bat- tery in a place where children or pets could come near it.
- Page 65 WARNING If you mishandle either of these batteries or their chargers, it may result in heat generation, rupture, electric shock, or injury. Be sure to adhere to the items below. Do not use a damaged cord. Do not place the char- ger in water, or splash water on it.
-
Page 66: Nickel Metal Hydride Battery And Charger
Nickel Metal Hydride Battery and Charger 8.1. Features of the Nickel Metal Hydride Battery (JWB2) • Equipped with Battery Management Control System (BMC). (built-in microprocessor) This is a system that uses a computer to track charge/discharge status, operating conditions, and temperature. •... - Page 67 (3) Storing the battery Store batteries in a cool, dry area. (A location with a temperature between 10°C – 25°C is op- timal for storing.) Fully charge the battery that you do not plan to use for a long period of time (30 days or more). If you intend to store the battery for more than 3 months without using it, fully charge the battery every 3 months.
-
Page 68: Characteristics And Handling Of The Nickel Metal Hydride Battery (Jwb2)
8.3. Characteristics and Handling of the Nickel Metal Hydride Battery (JWB2) Ambient temperatures Depending on the ambient temperature, the distance that can be traveled be- comes shortened. In order to maximize the battery’s performance, it is recommended that you use the battery under the following conditions. - Page 69 (3) Battery’s deterioration characteristics All batteries are consumables. A battery gradually deteriorates and its capacity decreases over time and with use. The extent to which the capacity decreases by deterioration depends on the use conditions. For a nickel metal hydride battery, its capacity will decrease to approximately 60% of that of a new battery after 300 charge/discharge cycles, under normal use.
-
Page 70: How To Charge The Nickel Metal Hydride Battery (Jwb2)
8.4. How to Charge the Nickel Metal Hydride Battery (JWB2) Charging time Charging time: 2.5 – 3 hours (when charging the battery from an empty state) Refresh charging time: 3 – 13 hours (the actual time varies depending on the residual ca- pacity of the battery) Charging 1 Insert the charger plug into the dedicat-... - Page 71 Assuming the charging process started from an empty state, the time it takes from start to completion of the charging process is typically 2.5 to 3 hours. If charging in a location with a high temperature or if charging a brand new battery, this may take longer.
- Page 72 WARNING Be sure to store the disconnected battery with the protective cap on it. Exposed contacts can cause short circuits and lead to a fire or battery rupture. If you are unable to charge the battery Refer to “14. Troubleshooting”. (3) Suitable temperature for charging Charge the battery in an environment with a temperature of 10 to 25°C.
-
Page 73: Refresh Charging The Nickel Metal Hydride Battery (Jwb2)
8.5. Refresh Charging the Nickel Metal Hydride Battery (JWB2) A refresh charging is required on a nickel metal hydride battery to eliminate the memory effect. When the battery is inserted to the charger, if the refresh lamp (orange) on the charger flashes, press the refresh switch to perform a refresh charge cycle. - Page 74 Tips on charging • It is recommended that you charge the battery while you are sleeping. • Since the refresh charging process recharges after discharging all of its remain- ing electricity, it will take a long time if you perform it on a battery with a high residual capacity.
-
Page 75: Charger (Jwc-2) Indicator Lamps
8.6. Charger (JWC-2) Indicator Lamps The charger (JWC-2) for the nickel metal hydride battery has two types of lamps: the charge lamp (green) and refresh lamp (orange). Each lamp comes on or flashes to indicate the battery and charging conditions. The lamp indications are explained in the following table. -
Page 76: Lithium Ion Battery And Charger
Lithium Ion Battery and Charger 9.1. Features of the Lithium Ion Battery (ESB1) • Has a higher energy capacity compared to the nickel metal hydride battery. • Equipped with Battery Management Control System (BMC). (built-in microproces- sor) This is a system that uses a computer to track charge/discharge status, oper- ating conditions, and temperature. - Page 77 (3) Storing the battery Store batteries in a cool, dry area. (A location with a temperature between 10°C – 25°C is optimal for storing.) If you are not planning on using the battery for a long period of time (30 days or more), charge it so that 3 of the capacity indicator lamps light up, and then store it.
-
Page 78: Characteristics And Handling Of The Lithium Ion Battery (Esb1)
9.3. Characteristics and Handling of the Lithium Ion Battery (ESB1) Ambient temperatures Depending on the ambient temperature, the distance that can be traveled be- comes shortened. In order to maximize the battery’s performance, it is recommended that you use the battery under the following conditions. When in use on the wheelchair: Temperature range between 0 to 35°C When removed from wheelchair and stored:... - Page 79 Battery’s deterioration characteristics All batteries are consumables. A battery gradually deteriorates and its capacity decreases over time and with use. The extent to which the capacity decreases by deterioration depends on the use conditions. For a lithium ion battery, its capacity will decrease to approximately 60% of that of a new battery after 700 charge cycles, under normal use.
- Page 80 If you forget the date you started to use the lithium ion battery. The battery’s manufactured date is printed on its bottom. Use it as a reference. 140610 Manufactured June (6) 10, 2014 • The start date of battery usage is defined as the date the user charged the battery for the first time after shipment from the factory.
-
Page 81: How To Charge The Lithium Ion Battery (Esb1)
9.4. How to Charge the Lithium Ion Battery (ESB1) There are two ways to charge the battery; by removing it from the wheelchair (tabletop charging), or while it is still attached to the wheelchair (on-vehicle charging). Charging time Charging time: Approx. 4.5 hours (when charging the battery from an empty state) Charging the battery out of the unit (tabletop charging) 1 Check that the protective cap is on the battery. - Page 82 7 After charging has completed, un- Charger plug plug the charger plug and the power plug, then securely close the bat- tery’s connector cover. Connector cover Power plug NOTICE Do not pull on the power cord. This can cause the wires to break. (3) Charging the battery attached to the wheelchair (on-vehicle charging) 1 Prepare for charging.
- Page 83 5 Check that the charge lamp (green) on the charger turns on. If the charge lamp does not light green, see “9.6. Charge Lamp Indi- cation”. Charge lamp 6 While charging, you can check the charge status using the capacity indicator lamps on the battery.
-
Page 84: The Temperature Of The Lithium Ion Battery (Esb1) During Charging
9.5. The Temperature of the Lithium Ion Battery (ESB1) during Charging Charge the battery in an environment with a temperature of 10 to 25°C. • To protect the battery, if the internal temperature of the battery is under 0°C or over 40°C, charging does not start. Instead, it enters a standby mode. -
Page 85: Charge Lamp Indication
9.6. Charge Lamp Indication The charger (ESC1) for the lithium ion battery has a charge lamp to indicate the battery and charg- ing conditions according to the lamp’s color and whether it is on or flashing. The lamp indications are explained in the following table. -
Page 86: Wheelchair Transporting And Storing Instructions
10. Wheelchair Transporting and Storing Instructions Please refer to the Warnings in “1.5.15. Transporting and Storing the Wheelchair” on page 23 to 25. 10.1. Loading the Wheelchair in a Car Turn off the power of the wheelchair. Remove the battery. Be sure to remove the battery from the wheelchair so that its power will not turn on unexpectedly during transport. - Page 87 WARNING Be sure to store the disconnected battery with the protective cap on it. Exposed contacts can cause short circuits and lead to a fire or bat- tery rupture. Protective cap Load the wheelchair into the car. Gently load the wheelchair by holding the frame portion with both hands.
-
Page 88: Unloading The Wheelchair From A Car
10.2. Unloading the Wheelchair from a Car Unload the wheelchair from the car. Reattach the removed parts, detached units back to their original places, and unfold the wheelchair. Check that the parking brakes are applied. Check that the anti-tip device is in the correct position. When unloading: •... -
Page 89: Storing The Wheelchair
10.3. Storing the Wheelchair Apply the parking brakes and set the left and right clutch levers in the power drive position. Turn off the power and remove the battery. Store the wheelchair indoors where there is less humidity. To wipe off dirt or spots before storing, use a tightly wrung-out towel. -
Page 90: Boarding An Airplane
10.4. Boarding an Airplane Once your plane trip has been determined, inform your airline company in advance, that you will be using an electric wheelchair, and follow their instructions. At this time, provide the airline company with details of your wheelchair. In particular, see the specifications for the battery you are using, below: Nickel metal hydride battery (shown as “Ni–MH”... -
Page 91: Using The Wheelchair More Comfortably
11. Using the Wheelchair more Comfortably The E-Drive has a variety of features to improve its controllability. Use these features according to your purposes. For information on the wheelchair frame to which E-Drive is attached, see the owner’s manual from the frame manufacturer. 11.1. - Page 92 4 Attach the cap to prevent dirt or water from entering the connec- tor. Connector 5 Place the wheelchair so that it will not become unstable when the power units are removed. (For example, as shown in the figure.) 6 Release the parking brakes. 7 While holding the hub with both hands and pushing the middle of the center cap “a”...
- Page 93 4 Push in each power unit completely. Check to ensure that the two balls “a” on the end of the axle can be seen completely. 5 Pull each power unit to ensure that it will not come off. 6 Place the power units in their normal position, and then apply the parking brakes.
-
Page 94: Anti-Tip Device
: Install the battery. Click! WARNING When a person is sitting in the wheelchair, do not remove or install the wheels. The person riding in the wheelchair or people around the wheelchair may get injured. After the power units are installed to the frame, be sure to check that the balls on the end of each axle can be seen, and that the units will not come off if pulled. - Page 95 Returning the retracted anti-tip device to its original position Turn the anti-tip device outward without touching the lock lever until you hear a click. Make sure that the anti-lock device is locked in position. WARNING Operating the wheelchair when the anti-tip device is removed or not in the correct position may cause a rollover.
-
Page 96: Controller
11.3. Controller Retracting the controller The controller can be retracted. Retract the control- ler to move close to a table or desk. 1 JW Active PLUS Horizontal type controller holders Turn off the power switch. Turn the controller while the lock lever of the holder is pushed forward. - Page 97 Insert the controller into the lower holder. To return the controller to its original posi- Lower holder tion, reverse the procedure. WARNING Do not remove the controller from the upper holder with the power on, and do not turn on the power after removing it.
-
Page 98: Adjusting The Angle
2 Adjusting the angle You can adjust the forward, backward, left and right tilt and the direction of the controller. (3) Adjusting the heaviness of the joystick on the controller The heaviness of joystick can be adjusted. Request this adjustment to your dealer. The operation load when the unit was shipped from the factory is 2.0 Nm (0.2 kg). - Page 99 Retracting the controller with the horizontal-type holders. The controller can be retracted. Retract the controller to move close to a table or desk. Turn off the power switch. Turn the controller while the lock lever of the holder is pushed forward. Lock lever To return the controller to its original position, reverse the procedure.
-
Page 100: Assistant Controller (Optional)
11.4. Assistant Controller (Optional) The mounting angle of the assistant controller can be adjusted. Consult with your dealer on this adjustment. 3-step adjustment You can adjust the angle in the direction of the arrow. 11.5. Clutch Levers The mounting angle of the clutch levers can be adjusted. Consult with your dealer on this adjustment. - Page 101 2 Buzzer sound This function is for sounding a buzzer when the power is turned on, or when an error such as disengaged clutches occurs. Setting 1 ..The buzzer sound is enabled. (Default setting) Setting 2 ..The buzzer does not sound when the power is turned on, the maximum speed is adjusted, the controller is operated with the clutch levers in the manual position, etc.
-
Page 102: Smart Tune Settings
11.7. Smart Tune Settings The settings of the features and characteristics of E-Drive can be changed to fit your us- age. These changes are performed by changing the “parameter settings” with using PC and the Smart Tune software. Consult with your dealer on changing the parameter settings. There are two parameter settings: “Functional Parameters”... - Page 103 Driving Parameters You can adjust settings such as speed, acceleration, and joystick sensitivity. 1 Preset mode Select from 3 preset modes. Setting 1 ....Soft mode Setting 2 ....Normal mode (Default setting) Setting 3 ....Sports mode 2 Free mode You can fine-adjust such settings as the speed, acceleration, motor torque.
-
Page 104: Maintenance, Daily Check, Periodic Inspection
12. Maintenance, Daily Check, Periodic Inspection It is recommended that the E-Drive be inspected periodically at the dealer. (Inspection is fee- based) To ensure long-term durability, we recommend that your perform regular inspections every 6 months after initial use. Inspection area Sample Inspection Form Date of... -
Page 105: Maintenance
Date of Corrective Inspection Item Inspec- Inspection Area Checked Measure tion Deformation, damage, bolt looseness, harmful damage, burrs, sharp points, and so on Frame Folding function (example) or Creaking sound (reference) Footrest looseness Parking brake effectiveness, wear Air pressure (for pneumatic tires) Casters Wear, cracks (example) or... - Page 106 When disinfecting the wheelchair, remove the E-Drive from the frame, and then disin-fect only the frame. Have the dealer remove the E-Drive from the frame. To disinfect the E- Drive, do not heat, pressurize, depressurize, supply electricity, irradiate with electromagnetic waves, immerse in a liquid, or apply a liquid cleaner or spray. Instead, wipe the E-Drive using a towel and alcohol.
-
Page 107: Daily Checks
12.2. Daily Checks Perform the following checks every day before operating the wheelchair. For details, refer to “3.1. Inspecting the Wheelchair”. Visually check the components and ensure that they are Exterior not damaged. Make that the anti-tip device is in the correct position and Anti-tip device locked in place. -
Page 108: Dimensions And Specifications
13. Dimensions and Specifications Electric Power Unit for Wheelchairs Model E-Drive 24" E-Drive 16" Nickel metal 18 kg 17 kg hydride battery Total Weight with battery (without assistant Lithium ion 19 kg 18 kg controller) battery without battery 15 kg 14 kg Right unit 7.5 kg... - Page 109 Battery and Charger Nickel-Metal Hydride Lithium-ion Model JWB2 ESB1 Rechargeable Dry Battery Type with built in microprocessor Battery Nominal output voltage 24 V 25 V Rated output (5-hour rate) 6.7 Ah (160.8 Wh) 11.8 Ah (280 Wh) Model JWC-2 ESC1 Automatic Charging Charging method controlled by the microprocessor...
-
Page 110: Troubleshooting
14. Troubleshooting If you have flat tires, contact your dealer. The tire structure of E-Drive is same to bicycle tires. Most of cycle shops can repair the flat tires. 14.1. Before Requesting Repairs Check the following troubleshooting tables. Flashing When Operating the Wheelchair Problem LCD Indication Buzzer... - Page 111 Problem LCD Indication Buzzer Check Point What to Do Beeps (Pi —) It will stop beeping once the load is Is there a large load being applied? repeatedly reduced. Is there a large load being applied, Lighten the load so that the motor will causing the motor to overheat? not overheat.
- Page 112 Charger LED Battery LED Problem Check Point What to Do Indication Indication R e sidual capac - Is the bat ter y te mperature ap - Wait until the battery reaches an Flashing green ity indicator lamps propriate? appropriate temperature. are lit Prolonged Charge the battery in an environment...
-
Page 113: Requesting Repairs And Inspections
14.2. Requesting Repairs and Inspections For your inspection, repair, and service needs, contact the dealer from which you purchased E-Drive. When contacting the dealer, your product serial number may be required. Refer to below to check the serial number, and provide it to the dealer. Sales dealer: 14.3. - Page 115 Decon Wheel AB Södra Ekeryd 115 SE-31493 Hyltebruk, Sweden +46-345-40880 www.decon.se...
Need help?
Do you have a question about the e-drive plus and is the answer not in the manual?
Questions and answers