Table of Contents
Advertisement
Quick Links
Download this manual
See also:
Service Manual
Advertisement
Table of Contents

Related Manuals for TTI TCB-770


Summary of Contents for TTI TCB-770
- Page 1 4W MOBILE CB TRANSCEIVER www.ttikorea.co.kr...
- Page 2 CONTENTS Introduction SuppliedCAccessories Installation TransceiverCControlsCandCFunctions MicrophoneCJack LCDCDisplay EmergencyCButton ScanRLockCButton AMRFMCandCLCRCButtonC QuickCUpCButton QuickCDownCButton MicrophoneCGainCKnob RFCGainCKnob SquelchCControlCknob VolumeCandCPowerCOnROffCKnob ChannelCSelector AntennaCConnector SEMeter PowerCmJfkVCDC EXTCJack LCDCDisplay Microphone MenuCSettingCMode HowCtoCOperateCtheCTransceiver BandCSelection TroubleCShooting CECDeclaration SafetyCRequirement ECMarkCDeclaration Specification RestrictionsConCtheCuse FreequencyCTable...
-
Page 3: Supplied Accessories
1. Introduction TCB(770PtransceiverPisPdesignedPtoPhavePaPgoodPperformance inPanyPconditionsPthatPthePtransceiverPoperatesRPusingPrugged buildPchassisRPPCB’sPandPcomponents)PThisPtransceiverPisPalso designedPforPusers’PconvenienceRPimplementingPhumanPergono( micsPtoPlocatePthePknobsPandPbuttonsPinPthePproperPplaces)PThe combinationPofPwellPdesignedPknobsPandPbuttonsPasPwellPasPuser friendlyPgraphicPlayoutsPwillPleadPusersPtoPquicklyPadaptPthemsel( vesPforPthePeasyPoperation)PThePnewlyPappliedPmenuPmodePwill makePprofessionalPusersPmorePsatisfactoryPwithPpleasure)PThe elegantPandPluxuryPbluePLEDPlightPsupportingPthePfacePdesign willPgoPwellPwithPanyPvehicles) ThisPinstructionPmanualPhasPbeenPdesignedPtoPenablePyouPtoPget thePbestPusePfromPyourPCBPTransceiverRPthereforePyouParePreco( mmendedPtoPtakePaPfewPminutesPtoPreadPthisPinstructionPmanual beforePinitialPusePofPyourPCBPTransceiver) 2. Supplied Accessories YourPtransceiverPisPsuppliedPwithPaPfullPrangePofPaccessoriesPto helpPyouPgetPstartedPandPvirtuallyPbenefitPfromPallPthePfeatures straightPaway) TCB(770Ptransceiver 1Punit MicrophonePwithPcord 1Punit PowerPcable 1Punit RadioPmountingPbracket 1Punit RadioPmountingPthumbPscrewPwithPrubberPwasher 2Ppieces MountingPscrewPwithPwasherPEforPtransceiverPbracketD 3Ppieces 2Ppieces MountingPscrewPwithPwasherPEforPmicrophonePbracketD MicrophonePmountingPbracket 1Ppiece 3. Installation PlanPthePlocationPofPthePtransceiverPandPmicrophonePfirstRPwhich isPmostPconvenientPforPthePoperation)PThePtransceiverPshould normallyPbePmountedPhorizontallyRPbutPmayPbePmounted... - Page 4 Considerxthatxthisxlocationxofxthextransceiverxshouldxnot interferexwithxthexdriverxandxpassengers6xChoosexaxspotxwhere thexmicrophonexandxallxcontrolsxarexeasilyxaccessible6 ’RxPutxthexmountingxbracketxonxthexproperxlocationxwherexyou arexgoingxtoxinstall6 2RxDrillxholesxandxfixxmountingxbracketxonxthexlocation6 3RxConnectxthexantennaxcablexplugxtoxthexstandardxreceptacle onxthextransceiver-xwhich isxmarkedx,ANT,6 4RxConnectxthexpowerxcablexdirectlyxtoxthexvehiclexbatteryxor fusexboxxofxthexcar6xBexcarefulxtoxmakexsurexofxthexpolarityxof thexbatteryxfirstxandxconnectxthexcable6(Red:xPositivexPole(+R- Black:xNegativexPole(5R6xThexsamexcoloursxarexshownxonxthe batteryxandxinxthexfusexboxxofxthexcar6R 5RxConnectxthexpowerxcablextoxthextransceiverxcable6 6RxMountxthexmicrophonexbracketxonxonexsidexofxthextransceiver- orxnearxitxusingxtwoxscrewsxincluded6x 7RxConnectxthexmicrophonextoxthextransceiver’sxmicrophone receptacle6xNowxyouxare readyxtoxoperatexthe transceiver6...
-
Page 5: Installing An Antenna
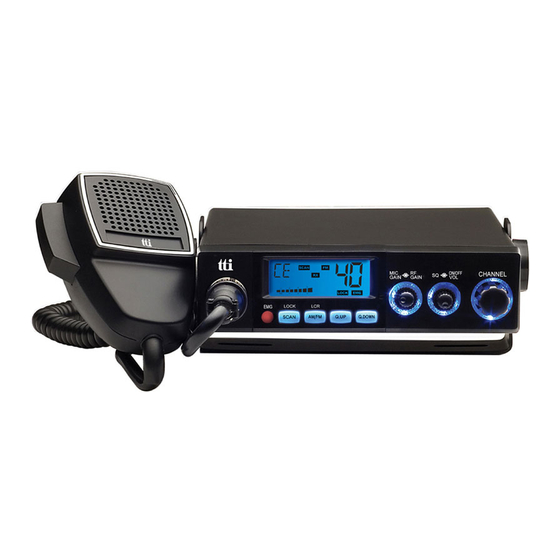
Installing An Antenna Itwiswverywimportantwtowselectwawgoodwqualitywhighwefficiency 27MHzwantenna.wAwpoorwqualitywantennaworwonewnotwdesignedwfor thew27MHzwbandwwillwgivewverywpoorwperformancewandwcould causewdamagewtowthewtransceiver. 1-wPlacewthewantennawaswhighwaswpossible. 2-wThewlongerwthewantennawis,wnormallywthewbetterwiswthe performancewofwthewtransceiver. 3-wTrywtowmountwthewantennawinwthewcentrewofwthewsurfacewthat youwselect. 4-wMakewsurewthatwyouwhavewawsolidwmetal-to-metalwground connection. 5-wBewcarefulwnotwtowdamagewthewcablewduringwthewinstallation. Warning : Neverwtrywthewoperationwofwyourwtransceiverwbefore connectingwawproperwantennawinworderwnotwtowcausewanywdamage. - Page 6 4.9Transceiver9Controls9and9Functions 9 10 11 12 DGPMicrophonePJack InsertPthePmicrophonePintoPthisPjack-PUsePthePguide forPeasyPconnection- 5GPLCDPDisplay MostPofPthePoperational informationPisPdisplayed- PleasePseePitemPno-P5PforPthe detailsPofPinformation- 3GPEmergencyPButton PressingPthisPbuttonPwillPleadPyouPtoPthePemergency channel/PwCHP9wPandPthePEMGPiconPwillPbePdisplayed- ThePchannelPselectorPandPquickPup2quickPdown buttonsPwillPnotPwork-PToPreturnPtoPthePpreviousPopev rationPmode/PmomentarilyPpressPthePemergencyPbuttonPagain-...
- Page 7 EqvScanFLockvButton Scan : Pressvthisvbuttonvmomentarilyvtovstart scanningvupwardvtovcatchvanyvchannelsvthatvare occupiedvbyvothersM TovactivateFdeactivatevthevchannelvscan5vpressvthevScanvbutton brieflyMvThevScanviconvwillvappearvwhenvthevchannelvscanvis activeMvScanningvwillvonlyvstopvwhenvyouvdeactivatevthevscan functionM TurnvthevchannelvselectorvcounterAclockwisevduringvscanningvin ordervtovchangevthevscanningvdirectionM Thevtransceivervwillvscanvthroughvthevwholevtransceiverv channelsMvIfvyourvtransceivervdetectsvavvalidvsignalvthevscanvwill pausevforvthevperiodvthatvhasvbeenvsetvbyvthevmenuvmodevsetting UcontinuouslyvreceivingvorvRA99vsecondsvforvscanvreceivevtime andvimmediatevresponsevorvRA99vsecondsvforvscanvdelayvtimeqM IfvyouvpressvthevPTTvbuttonvwhenvyourvtransceivervdetectsva signal5vthevradiovwillvtransmitvonvthevsamevchannelMvScanning willvresumevaftervthevscanvreceivevtimevandForvthevscanvdelay timeMvUsevthevchannelvselectorvorvquickvupFquickvdownvselector tovresumevscanningvimmediatelyM IfvyouvpressvthevPTTvbuttonvduringvscanning5vthevradiovwill returnvtovyourvoriginalvchannelMvScanningvwillvresumevaftervthe scanvreceivevtimevandForvthevscanvdelayvtimeMvUsevthevchannel selectorvorvquickvupFquickvdownvselectorvtovresumevscanning immediatelyM Lock : PressvthisvbuttonvforvmorevthanvWvsecondsvtovactivate andvdeactivatevthevkeypadvlockvfunctionMvThisvfunctionvlocks onlyvthevchannelvselector5vquickvupFquickvdownvbuttons5vscan buttonMvOthervbuttonsvandvselectorsvworkvnormalM 5qvAMFFMvandvLCRvButton WhenvthevtransceivervisvusedvinvUK5vUE5vorvEC freequencyvbandvmodesvthisvbuttonvactivatesvor deactivatesvLastvChannelvRecallvfunctionMvInvall othervmodesvUwherevnationalvregulationsvpermit thisq5vthisvbuttonvallowsvuservtovswitchvbetweenvAMvandvFM modesvbyvmomentarilyvpressingvthisvbuttonM...
- Page 8 29dQuickdUpdButton Pressdthisdbuttondbrieflydtodincreasedthedchannels byd,Idstepsq 79dQuickdDowndButton Pressdthisdbuttondbrieflydtodreducedthedchannels byd,Idstepsq 89dMicrophonedGaindKnob TurndthisdknobdclockwisedanddcounterSclockduntil youdgetdbetterdmicrophonedgaindwhiledyoudmovedthe microphonedtodthedoptimumddistancedfromdyour mouthq 99dRFdGaindKnob TurndthisdknobdclockwiseduntildyoudgetdbetterdRF gainqdYoudmaydneeddtoddecreasedthedsensitivitydby turningdthedknobdcounterSclockwisedwhendtheredisda verydstrongdsignalq ,I9dSquelchdControldknob TurndthisdknobdcounterSclockwiseduntildyoudheardthe backgrounddnoisedanddthendturndthedknobdadlittle clockwiseduntildthednoiseddisappearsqdIndthis wayYdyoudgetdthedbestdreceivedsensitivityq ,,9dVolumedanddPowerdOnCOffdKnob Todswitchdondthedtransceiverdturndthisdknob clockwiseqdAfterdclickingdsounddthedtransceiverdis switcheddonqdThedmoredyoudturndthisdknob clockwiseYdthedbiggerdthedaudiodsounddgrowsq ,V9dChanneldSelector TurndrightdordleftYdanddthisdallowsdyoudtodselectdthe channeldonedbydonedthatdyoudlikedtoduseq...
- Page 9 0q-yAntennayConnector Insertytheymailyconnectoryofytheyantennaycableyinto thisyfemaleyantennayconnector(y 0B-ySxMeter ConnectyanyexternalySxMeterydThisyisynotysupplied(- toythisyport(y 0L-yPowery0q(FVyDC Connectytheypowerysupplyycableytoythisyport( 0W-yEXTyJack Connectingyayloudyspeakerytoythisyportymakesythe builtxinyspeakeryturnedyoff( 5. LCD Display SelectedyFrequencyyBand LowyPowerydAMy0yWatt- Scan Transmit FMyMode AMyMode ChannelyDisplay SignalyStrengthyMeter Receive KeypadyLock EmergencyyChannelyDisplay...
- Page 10 6. Microphone UpyButtony:yUseythisybuttonytoychange theychannelsyupward( DownyButtony:yUseythisybuttonyto changeytheychannelsydownward( LockyButtony:yThisylocksytheyupybutton andydownybuttonyofytheymicrophone( AlsoAythisylockyworksysameyasytheylock buttonyonytheytransceiveryfrontypanel( PTTyButtony:yWhileypressingythis buttonAyyouycanytransmit( RyPinyMicrophoneyConnectory: Connectythisytoytheymicrophoneyjack onytheyfrontypanelyofytheytransceiver( 7. Menu Setting Mode PressingytheyLockybuttonyofytheymicrophoneAyturnyonythe transceiver(yTheytransceiverygoesytoytheyMenuySettingyModeA whichyhasytheyfollowingymenuyfeatures(yThisymenuysetting modeyallowsyyouytoyprogramyuserypreferencesAyactivate featuresyandyuseyadvancedyfunctions( Display Functions Settings BeepyTone Onfy vy)yOfffy TimeOoutyTimer Offfy vyandyH~99ySec( ScanyReceiveyTimer Continuefy vyandyHO99ySec( ScanyDelayyTimer Offfy vyandyH~99ySec( fafteryReceivingysignalv BacklightyDimmer Highfy vy)yLowfy...
- Page 11 Note : DU-Use-Channel-Selector-to-selecte-the-main-menu-features such-as-Beep-ToneR-Time:out-TimerR-Scan-Receive-TimerR Scan-Delay-TimerR-Backlight-Dimmer-and-Backlight-TimerU gU-Use-AMCFM-button-to-enter-value-setting-levelU /U-Use-Channel-Selector-to-select-or-change-any-value-that-you like-to-have-while-the-values-are-blinkingU FU-Use-SCAN-button-to-return-to-the-previous-main-menu featuresU NU-Press-Lock-button-or-PTT-button-of-the-Microphone-to complete-the-selections-and-changes-and-return-to-the stand:by-modeU-Or-the-selections-and-changes-will-be automatically-confirmed-after-N-seconds-of-the-selections and-changesU-Using-Scan-button-to-return-to-the-previous main-menu-features-will-be-accompanied-by-the-automatic confirmation-of-the-selected-values-and-changesU 8. How to Operate the Transceiver D,-Make-sure-the-microphone-is-connected-to-the microphone-jackU g,-Make-sure-the-power-cable-is-connected-properlyU /,-Make-sure-the-antenna-is-connected-to-the-antenna receptacleU F,-It-is-better-to-put-the-squelch-control-knob-turned-fully counter:clockwiseU N,-Turn-on-the-transceiver-and-control-the-volume-levelU L,-Adjust-the-squelch-control-knob-to-the-optimum-levelU- O,-Select-your-desired-channelU 8,-To-transmitR-press-the-PTT-button-and-speak-to-the microphoneU 9,-Release-the-PTT-button-to-receiveU...
- Page 12 9. Band Selection PressingLAM4FMLbuttonLandLScan buttonLatLtheLsameLtime)LturnLonLthe transceiverBLUsingLtheLchannel selector)LselectLtheLbandLthatLyouLare goingLtoLselectBLTheLLCDLdisplayLoffersLyouLtheLband informationBLTheLbandLchartLforLeachLareaLisLasLfollowsB PressLAM4FMLbuttonLwhileLtheLbandLinformationLisLblinkingLor waitLforL8LsecondsLtoLcompleteLtheLselectionLandLgoLtoLthe transmitLandLreceiveLmodeBLThisLtransceiverLhasLDECDLband settingLwhenLitLisLshippedLoutLfromLtheLfactoryB Settings Display Band EuropeLG0LChLFMLGW SpainLG0LChLAM4FMLGW FranceLG0LChLFMLGW)LG0LChLAMLWW PolandLG0LChLAML4LFMLGW "PolishLFrequenciesL:L8KHzE UKLG0LChLFMLGWL"BritishLFrequenciesE UKLG0LChLFMLGWL"BritishLFrequenciesE "EU4UKE KLCEPTLG0LChLFMLGWL"ECE ItalyLG0LChLAML4LFMLGW ItalyL3GLChLAML4LFMLGW GermanyLH0LChLFMLGW)LWqLChLAMLWW GermanyLG0LChLFMLGW)LWqLChLAMLWW EuropeLG0LChLFMLGW)LG0LChLAMLWW...
- Page 13 10.qTroubleqShooting IfkyoukexperiencekproblemskwithkyourkTCB-770ktransceiver,kfirst checkkthekpowerksupplyksource.kPoorkconnectionkofkthekpower supplyksourcekcankcausekproblemsksuchkasknoktransmission, nokreceptionkorkpoorkreception,kandkweakkorknoksound.kEnsure thatkthekmicrophonekandkantennakarekalsokwellkconnected. Ifkthiskdoesknotksolvekthekproblem,kresetkyourktransceiverkas follows. 1MkSwitchkoffkthektransceiver. 2MkPressingkEMGkbutton,kswitchkonkthe transceiver. Thiskwillkresetkthektransceiver,ksokallkthekmemorieskarekerased andkthekparameterskreturnktokthekinitialkfactoryksetting. Thiskshouldkfixkmostkproblems.kInkcasekofkfurtherkdifficulty, pleasekconsultkyourkdealerkorkvisitkourkwebsite. 11.qCEqDeclaration 12.qSafetyqRequirement 13.qEqMarkqDeclaration...
- Page 14 14. Specification Khannel 9(ABSeeAtheAfrequencyAbandAchart- NrequencyARange 2~.E~5AMHzA~A27.9(5AMHz OperatingAmode N6/ABNM-fA@6/AB@M- NrequencyAKontrol PLLASynthersizer NrequencyATolerance (.((2D OperatingATemperatureARange b)(AtoA*A55AK Microphone PlugbinAType InputAVoltage )6.3VAUKA±A)5D Size )9(ABW-AxA)3~ABL-AxA67ABH- Weight EE(Ag @ntennaAKonnector @ntennaAKonnector PowerAOutput UutyAcycleA)(DA9AWattsAx)6.3VAUK Modulation @M,fromA35DAtoAE5D NM,).3KHzA±A(.2KHz NrequencyAResponse 6((HzAtoA6(((Hz OutputAImpedance 5(ohmsfAUnbalanced HarmonicASuppression MoreAthanAb6~d:m KurrentAUrain @MANullAMod.A).~@AMax. ReceivingASystem UualAconversionAsuperheterodyne INANrequencies UoubleAKonversionA)stA)(.~E5MHz02ndA955KHz Sensitivity (.7A VAforA)(d:BS*N-0NAinA@MAMode...
-
Page 15: Restrictions On The Use
15. Restrictions on the use 'OUNTRY Settings Usenrestrictionsnandnotherncomments V;LGIUM /yn'hn8n/Wn&Mn8nIndividualnlicencenisnrequired ;U & SWITS;RLZNp /yn'hn8n3WnZMn8nIndividualnlicencenisnrequired p;NMZRK1NORWZY /yn'hn8n/Wn&Mn8n&reenuse LUX;MVOURG &INLZNp1PORTUGZL /yn'hn8n/Wn&Mn8n&reenuse & & RZN'; 1N; TH; RLZNpS /yn'hn8n3WnZMn8n&reenuse G;RMZNY fyn'hn8n/Wn&Mn8nIndividualnlicencenisnrequired 3(n'hn8n3WnZMn8nIndividualnlicencenisnrequired /yn'hn8n3WnZMn8nUsenchn/83*nonly /yn'hn8n/Wn&Mn8n&reenuse 3(n'hn8n3WnZMn8nIndividualnlicencenisnrequired fxnZllowed:nfromn(w2xwynton(g2/3ynMHzn dVZPTn(((nZVn3y/d GR;;'; /yn'hn8n/Wn&Mn8n&reenuse ; ;U & I /yn'hn8n*WnZMn8n&reenuse T5Rn(y8y( IR;LZNp... -
Page 16: Freequency Table
16. Freequency Table EU/E/F/ UK(CEPT) (ENG.) 26.965 26.965 26.965 26.960 27.60125 26.965 26.965 26.965 26.965 26.975 26.975 26.975 26.975 26.975 26.975 26.975 26.970 27.61125 26.985 26.985 26.985 26.985 26.985 26.985 26.985 26.980 27.62125 27.005 27.005 27.005 27.005 27.005 27.005 27.005 27.000 27.63125 27.015...
Need help?
Do you have a question about the TCB-770 and is the answer not in the manual?
Questions and answers