Leckey Mygo Max User Instructions
Chair with tilt-in-space facility
Hide thumbs
Also See for Mygo Max:
- User instructions (292 pages) ,
- User manual (45 pages) ,
- User instructions (248 pages)
Table of Contents
Advertisement
Quick Links
Download this manual
See also:
Instructions for Using
Advertisement
Table of Contents

Related Manuals for Leckey Mygo Max


Summary of Contents for Leckey Mygo Max
- Page 1 Mygo Max User Instructions...
-
Page 2: Table Of Contents
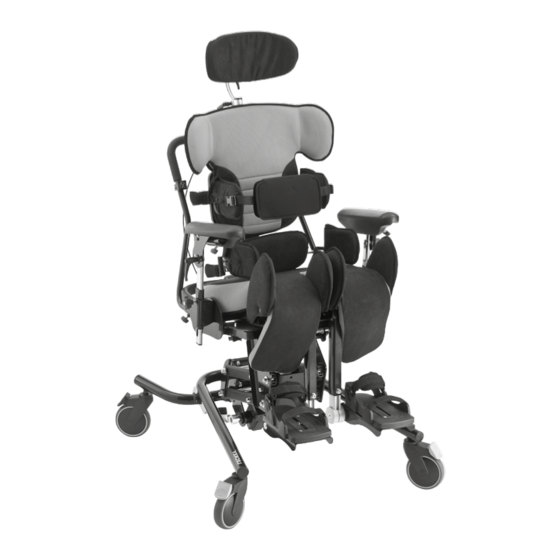
The Mygo Max has been designed to offer a high level of postural positioning while enabling function and mobility. This manual shows how you can quickly, easily and safely make use of all of the functions. The instructions on safety and maintenance will ensure that you will enjoy the use of the product for a long time. -
Page 3: Intended Use
(Parents, Teachers & Carers) use. chassis please ensure that the height The Mygo Max is an activity chair which Your Leckey product is a prescribed Class has been designed for children and young adjustment pedal and tilt in space lever... -
Page 4: How To Unpack And Assemble
How to unpack and 6.15 Clean the product regularly. Do not use abrasive cleaners. Carry out maintenence checks on a regular basis to ensure your product is in good assemble working condition. 6.16 The product is designed for the seating indoor use and when not in use should be stored in a dry place that is not subjected to extremes of temperature. - Page 5 (A), shown, and set to maximum to reduce risk of back strain while Mygo Max System. All of the parts will be base you have purchased. the maximum width. Open the socket caps attaching the seat unit.
- Page 6 7.3 Attaching the 7.4 Attaching the 7.5 Attaching the push handle headrest lateral supports Once the front of the seat is lowered fully, The push handle is attached to the seatbase To attach the head support slide the stem While holding the components together, release the handle and push it forward to by inserting the two lower stems into the into the receiving bracket.
- Page 7 7.6 Attaching the 7.7 Attaching the sandals 7.8 Attaching the 7.9 Attaching the Tray Leeway Pelvic Cradle armrests Fasten the front buckle and side.Velcro tabs If sandals are required they can be attached Slide the armrest into the receiving bracket. The tray is attached to the seat by inserting of the Leeway Pelvic Cradle.
- Page 8 7.10 Attaching the 7.11 Attaching the 7.12 Attaching the Hip Laterals ankle huggers protraction pads To attach the hip laterals to the sacral Slide the webbing through the slot in the To attach the protraction pads, remove support, loosen screw (a) and insert the bar sandal.
- Page 9 Fitting 8.1 Femoral cushions 8.2 Seat base cushion Slide a femoral cushion onto each of the The seat base cushion can be attached by femoral supports and secure them by simply setting it in place and securing the pressing down on the poppers on either side. two popper tabs (a) at the back of the seat base.
- Page 10 8.3 Backrest Cushion 8.4 Leeway Pelvic Cradle 8.5 Sacral Cushion 8.6 Hip Laterals First of all loosen the shoulder support Fasten the Leeway Pelvic Cradle and place Fit the sacral cushion over the hardware and Slide the cushion covers over the hip lateral laterals with the allen key provided.
- Page 11 8.7 Trunk Harness 8.8 Lateral Supports 8.9 Chest Harness 8.10 Headrest cushion Slide each of the four straps (b) through Slide the cushion covers over the lateral The chest harness can be attached by Place the cushion onto the head support. each of the camlock brackets and secure support with the open zip on the outside.
-
Page 12: Clinical Setup For Postural Management
Clinical 8.11 Padded Tray Insert Setup for Slide the tray into the padded tray insert and secure the six snap fasteners. Two at the top, two at the bottom and two at the sides. Postural Management... - Page 13 (b) on the hinge of the hip lateral. Mygo Max. All four side and starps should be Loosen the screws (a) at the back of the Adjust to the required angle and retighten already attached to the seat.
- Page 14 9.3 Backrest Height 9.4 Backrest Angle 9.5 Adjusting the upper 9.6 Adjusting the leg supports femoral guides To adjust the overall height of the backrest To change the angle loosen the screw at the The upper leg supports will be set at the To adjust the width of the femoral guides.
- Page 15 9.7 Footsupport Height 9.8 Calf Support 9.9 Foot Support Angle 9.10 Sandals To raise or lower the height of the To adjust the calf support angle, loosen the To set the angle to accommodate To position the sandals simply loosen the footsupport, loosen screw (a) adjust to the screw (b) at the top of the calf support, move plantarflexion or dorsiflexion, simply loosen...
-
Page 16: Lateral Supports
9.11 Adjusting the 9.12 Lateral Supports Sacral Support Standard Sacral Support Standard laterals The complex laterals can also be angled to To adjust the height, depth or angle of the Loosen the bolts (a) to adjust the width, allow the pad to contour to the user’s shape. standard sacral support, loosen the two height and angle of the lateral supports To adjust loosen the bolt (a) at the centre... - Page 17 9.13 Chest Harness 9.14 Trunk Harness 9.15 Shoulder Support 9.16 Head support To change the width of the chest harness, lift The trunk harness will be open but remain To adjust the angle of the shoulder support To adjust the height, depth and angle of the the front cover, adjust the Velcro straps to attached by the clip (a).
-
Page 18: Frequent Adjustments For Daily Use
6 by a technically and clinically competent person who has been trained in the use of the product. Leckey recommend that a written record is maintained of all parent and carers who have been trained in the use of this product. - Page 19 Before transferring the child into the seat The correct positioning and tensioning To tension the Leeway Pelvic Cradle use the The Mygo Max is designed to fit onto a carry out the daily product inspection as of the Leeway Pelvic Cradle is key to a 4 side straps (c) and the velcro tabs (d).
- Page 20 10.4 Powered height 10.5 Charging the 10.6 Height Adjustment adjustment battery – Hi-low Chassis The powered chassis can be easily adjusted The control box checks the battery level Repeated runs at a high rate with heavy You can carry out this adjustment with the with the push button control handset.
-
Page 21: Tilt In Space
10.7 Tilt in space 10.8 Chest and Trunk Harness Adjustment Always keep the locking pin engaged The tilt in space can be angled while the If the child requires chest support as part Please refer to section 9.14 for specific when you are not adjusting the chassis. -
Page 22: Armrest Adjustment
10.9 Sandals 10.10 Tray Adjustment 10.11 Armrest adjustment To position the user’s feet in the sandals The activity tray can be used for a range of To adjust the height of the armrest loosen secure the Velcro straps provided so the foot functions and its position can be fine tuned the hand knob (b) set to the desired height is held in place. -
Page 23: Daily Product Inspections
If in any doubt to the continued safe Mineral Spirit. A half cup of household bleach use of your Leckey product or if any to 5 litres of water can also be used as a parts should fail, please cease using useful disinfectant. -
Page 24: Annual Product Inspections
If in any doubt to the continued safe 2.Check all ratchet handles, knobs, nuts, be carried out. use of your Leckey product or if any bolts and plastic buckles are in place, parts should fail, please cease using replacing any missing items. Paying... -
Page 25: Technical Information
15 Technical Information Mygo seat dimensions Product and Accessory Codes Size Size 3 161-600 Mygo Max Seat Shell 161-900-02 Seat Cushion Pack - Orange 12 - 18 161-900-03 Seat Cushion Pack - Blue 161-900-04 Seat Cushion Pack - Pink Max User Weight... - Page 26 Actuator specification- 500055+493312- Handset – C3REMOX incl. foil Rated IP51 020000 Control Ambient temp +5deg to +40deg C Rated IP66 Duty Cycle Max 10% or 2 min continuous Battery Charger – C3CHAR use followed by 18 min not in use. Power supply: 110-240V AC Operation temperature -5degC to +70degC, Charging time: 5-8 hours...
- Page 27 Leckey T: 028 9260 0750 19 Ballinderry Road F: 028 9260 0799 Lisburn E: info@leckey.com BT28 2SA W: www.leckey.com Northern Ireland United Kingdom Stephen 24 hour postural care for babies, kids & adults. Sleeping, Sitting, Standing, Walking, Moving, Bathing, Toileting.
Need help?
Do you have a question about the Mygo Max and is the answer not in the manual?
Questions and answers