Table of Contents
Advertisement
Assembly, CARE & USE MANUAL
Masterbuilt Manufacturing, Inc.
WARNING & SAFETY INFORMATION
1 Masterbuilt Ct.
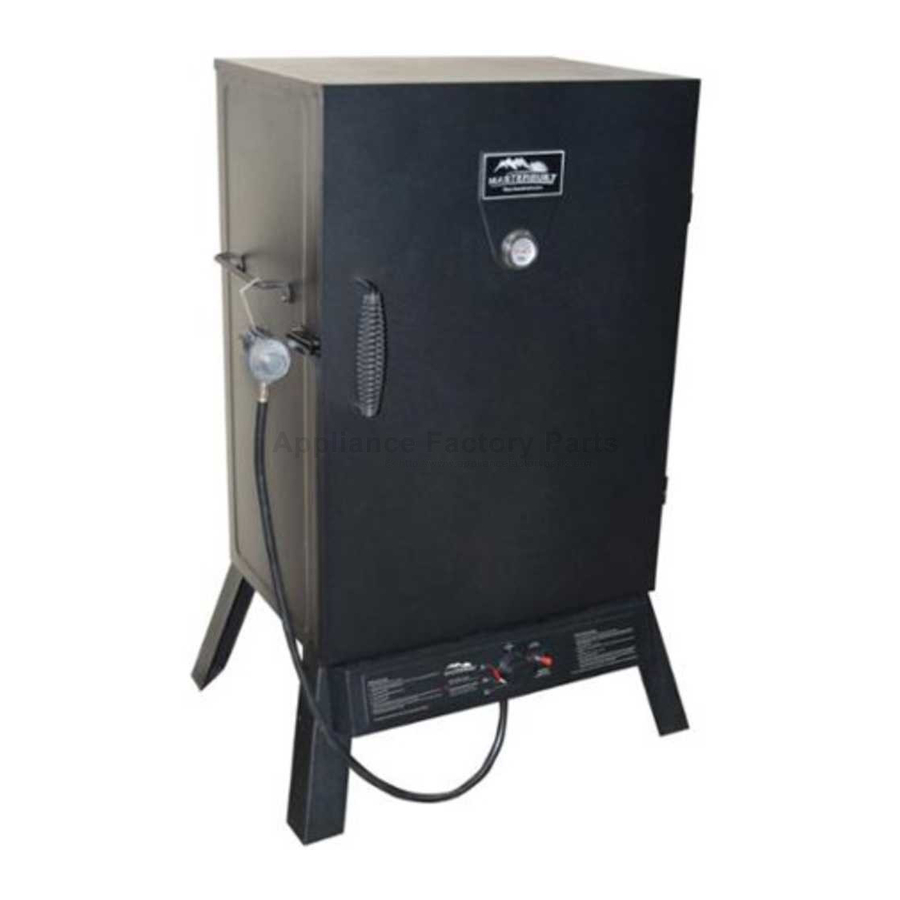
LARGE PROPANE SMOKER MODEL 20051313
Columbus, GA 31907
THIS PRODUCT IS FOR OUTDOOR USE ONLY
Service à la clientèle 1-800-489-1581
www.masterbuilt.com
*Actual product may differ from picture shown
Tools needed for assembly: Adjustable Wrench, Phillips Head Screwdriver
CARBON MONOXIDE HAZARD
WARNING
This manual contains important
Burning wood chips gives off carbon
information necessary for the proper assembly
monoxide, which has no odor and can cause death.
and safe use of the appliance.
DO NOT burn wood chips inside homes,
Read and follow all warnings and
vehicles, tents, garages or any enclosed areas.
instructions before assembling and using
the appliance.
Use only outdoors where it is
well ventilated.
Follow all warnings and instructions when
using the appliance.
Keep this manual for future reference.
Failure to follow these warnings and instructions properly could result in fi re or explosion, which
could cause property damage, personal injury, or death.
Advertisement
Table of Contents

Subscribe to Our Youtube Channel
Related Manuals for Masterbuilt sportsman elite 20051313


Summary of Contents for Masterbuilt sportsman elite 20051313
- Page 1 ASSEMBLY, CARE & USE MANUAL Masterbuilt Manufacturing, Inc. WARNING & SAFETY INFORMATION 1 Masterbuilt Ct. LARGE PROPANE SMOKER MODEL 20051313 Columbus, GA 31907 THIS PRODUCT IS FOR OUTDOOR USE ONLY Service à la clientèle 1-800-489-1581 www.masterbuilt.com *Actual product may differ from picture shown...
- Page 2 à un usage particulier. Ni Masterbuilt ni le magasin de détail qui vend ce produit ne sont autorisés à offrir des garanties ou à promettre quoi READ ALL INSTRUCTIONS que ce soit qui dépasse ou qui contredise ce qui fi...
- Page 3 MADERA SUGERIDA PARA EL AHUMADO: • Regulator and hose assembly supplied with unit MUST be used. For replacement parts, if needed, contact Masterbuilt Customer Service at 1-800-489-1581. Copeaux de caryer • When lighting burner remove all smoker parts to prevent explosion from gas build up.
- Page 4 MADERA SUGERIDA PARA EL AHUMADO: tout avec la sauce à l’érable. La température interne MASTERBUILT CUSTOMER SERVICE @ 1-800-489-1581. du jambon doit atteindre 130 °F (de 54 à 60 °C) lorsqu’il est cuit de part en part.
- Page 5 TABLEAU DE FUMAISON WARNING CHARBON DE COPEAUX DE TEMPS DE VIANDE TAILLE TEMP. TEMP. INTERNE PERFORM “SOAPY WATER TEST” BEFORE EACH USE. SEE “SOAPY WATER TEST” SECTION IN BOIS BOIS CUISSON MANUAL. EXTINGUISH ALL OPEN FLAMES BEFORE CONNECTING REGULATOR TO GAS BŒUF CYLINDER.
- Page 6 DO NOT RETURN TO RETAILER For Assembly Assistance, Missing or Damaged Parts FONCTIONNEMENT DU FUMOIR Call: MASTERBUILT Customer Service at 1-800-489-1581. STOP! Please have Model Number and Serial Number available when calling. 1. Faites tremper au préalable les copeaux de bois pendant au moins 30 minutes.
- Page 7 DO NOT RETURN TO RETAILER For Assembly Assistance, Missing or Damaged Parts • Traitez régulièrement votre fumoir par la chaleur afi n d'éviter un excès de rouille. Call: MASTERBUILT Customer Service at 1-800-489-1581. STOP! Please have Model Number and Serial Number available when calling.
- Page 8 ASSEMBLY ASSEMBLAGE ÉTAPE 11 • BEFORE ASSEMBLY READ ALL INSTRUCTIONS CAREFULLY. • ASSEMBLE UNIT ON A CLEAN, FLAT SURFACE. Insérez le petit crochet à l'extrémité de la pince à graisse (18) • TOOLS NEEDED: ADJUSTABLE WRENCH, PHILLIPS HEAD SCREWDRIVER complètement dans le grand trou sous le fumoir (1), tournez la pince Carefully position grill as shown.
- Page 9 ASSEMBLAGE ASSEMBLY ÉTAPE 9 STEP 3 Faites glisser les grilles (12) sur les supports de la grille de cuisson (21). Position burner box (6) over center hole in bottom of smoker body, carefully aligning venturi over valve orifi ce as shown. Attach burner box to smoker body using phillips screws (A).
- Page 10 ASSEMBLAGE ASSEMBLY ÉTAPE 7 Insérez le thermomètre avec STEP 5 l’anneau (13) dans la porte du Mount body handle (8) to smoker fumoir (2). Fixez le tout à l’aide de body (1) using phillips screws (A). l’écrou à oreilles (D). STEP 6 Insert door handle (7) into smoker ÉTAPE 8...
- Page 11 ASSEMBLAGE ASSEMBLY ÉTAPE 5 STEP 7 Installez la poignée de la structure (8) sur la structure du fumoir (1) au Insert temperature gauge (13) into moyen de vis cruciformes (A). smoker door (2). Secure in place with wing nut (D). STEP 8 ÉTAPE 6 Insert cooking grate supports (21)
- Page 12 ASSEMBLY ASSEMBLAGE STEP 9 ÉTAPE 3 Slide cooking grates (12), onto Placez l'assemblage du brûleur (6) au cooking grate supports (21). centre du trou sous la structure du fumoir en alignant minutieusement les trous de valve tel qu'indiqué. Fixez l'assemblage du brûleur à la structure du fumoir à...
- Page 13 ASSEMBLAGE ASSEMBLY STEP 11 • AVANT DE PROCÉDER À L'ASSEMBLAGE, LISEZ ATTENTIVEMENT LES INSTRUCTIONS. Insert small hook end of grease • ASSEMBLEZ L'APPAREIL SUR UNE SURFACE PROPRE ET PLATE. clip (18) all of the way up through • OUTILS REQUIS POUR L'ASSEMBLAGE : CLÉ À MOLETTE, TOURNEVIS CRUCIFORME. large hole in bottom of smoker body (1), turn grease clip clock- wise/counter-clockwise so that it is...
- Page 14 ARRÊT appelez le service à la clientèle de MASTERBUILT au 1-800-489-1581. Veuillez avoir le numéro de modèle et numéro de série à portée de main pendant l'appel. Ces numéros sont situés sur l'étiquette argentée à l'arrière de l'appareil.
- Page 15 ARRÊT appelez le service à la clientèle de MASTERBUILT au 1-800-489-1581. 1. Pre-soak wood chips in water for at least 30 minutes. Veuillez avoir le numéro de modèle et numéro de série à portée de main pendant l'appel.
- Page 16 SMOKING CHART MISE EN GARDE EFFECTUEZ LE « TEST D'ÉTANCHÉITÉ À L'EAU SAVONNEUSE » AVANT CHAQUE UTILISATION. ITEM SIZE TEMP WOOD CHIPS COOK TIME INTERNAL TEMP CONSULTEZ LA SECTION « TEST D'ÉTANCHÉITÉ À L'EAU SAVONNEUSE » DU MANUEL. ÉTEIGNEZ TOUTE FLAMME NUE AVANT DE CONNECTER LE RÉGULATEUR AU RÉSERVOIR DE GAZ. FERMEZ BEEF L'ALIMENTATION EN GAZ APRÈS CHAQUE USAGE.
- Page 17 ARRÊTEZ. N'UTILISEZ PLUS VOTRE APPAREIL ET APPELEZ VOTRE DISTRIBUTEUR DE GAZ PROPANE OU LE SERVICE À LA CLIENTÈLE DE MASTERBUILT AU 1-800-489-1581. Remarque : Utilisez uniquement un réservoir de gaz de 20 lb (9 kg) muni d'un collet de protection avec cet appareil.
- Page 18 Internal Hickory or Mesquite Chips temperature of ham should be at 130°F to 140°F (54-60°C) when heated thru. BE A PART OF OUR “DADGUM GOOD” COMMUNITY ONLINE: www.masterbuilt.com | www.dadgumthatsgood.com | www.facebook.com/masterbuilt Twitter @Masterbuilt @JohnMcLemore @DadgumTh atsGood...
- Page 19 This expressed warranty is the sole warranty given by Masterbuilt and is in lieu of all other warranties, expressed or implied including implied warranty, merchantability, or fi tness for a particular purpose.
- Page 20 MANUEL D'ASSEMBLAGE, D'ENTRETIEN ET D'UTILISATION Masterbuilt Manufacturing, Inc. FUMOIR AU PROPANE MODÈLE 20051313 1 Masterbuilt Ct. CE PRODUIT EST CONÇU POUR UN USAGE À L'EXTÉRIEUR SEULEMENT Columbus, GA 31907 Customer Service 1-800-489-1581 www.masterbuilt.com *Le produit réel peut différer de l’image montrée Outils requis pour l'assemblage : clé...
- Page 21 MANUAL DE ARMADO, USO Y MANTENIMIENTO Masterbuilt Manufacturing, Inc. ADVERTENCIAS E INFORMACIÓN DE SEGURIDAD 1 Masterbuilt Ct. AHUMADOR DE PROPANO MODELO 20051313 Columbus, GA 31907 ESTE PRODUCTO ES ÚNICAMENTE PARA USAR AL AIRE LIBRE Customer Service 1-800-489-1581 www.masterbuilt.com *El producto real puede diferir de la imagen que se muestra Herramientas necesarias para el armado: llave inglesa, destornillador Phillips PELIGRO DE EMISIÓN DE MONÓXIDO...
- Page 22 Si siente olor a gas: 1. Nunca deje desatendido el aparato mientras esté armen, se usen y se cuiden correctamente y como se indica. La garantía de Masterbuilt no ampara la pintura de 1. Cierre el paso de gas al aparato.
- Page 23 • Se DEBE usar la unidad de regulador y manguera suministrada con la unidad. Llame al Servicio de atención al cliente de Masterbuilt por el 1-800-489-1581 para pedir piezas de repuesto. • Cuando encienda el quemador, retire todas las piezas del ahumador para evitar explosiones ocasionadas por la acumulación de gas.
- Page 24 LA UNIDAD. COMUNÍQUESE CON EL DISTRIBUIDOR DE PROPANO DE SU ZONA O CON EL SERVICIO DE ATENCIÓN AL CLIENTE DE MASTERBUILT, AL 1-800-489-1581. Nota: Con esta unidad, utilice un tanque de gas de 20 lb. (9 kg) que tenga un collar protector.
- Page 25 TABLA DE AHUMADO ADVERTENCIA TROCITOS DE TIEMPO DE COC- OBJETO TAMAÑO TEMP. TEMP. INTERNA EFECTÚE LA "PRUEBA CON AGUA JABONOSA" ANTES DE CADA USO. LEA LA SECCIÓN DE "PRUEBA MADERA CIÓN CON AGUA JABONOSA" DEL MANUAL. APAGUE TODAS LAS LLAMAS ANTES DE CONECTAR EL CARNE DE RES REGULADOR AL TANQUE DE GAS.
- Page 26 FUNCIONAMIENTO DEL AHUMADOR ¡ALTO! de atención al cliente de MASTERBUILT, al 1-800-489-1581. 1. Remoje los trocitos de madera en agua, durante al menos unos 30 minutos. Cuando llame, tenga a mano el número de modelo y el número de serie.
- Page 27 ¡ALTO! EL AHUMADOR AHORA ESTÁ LISTO PARA SU USO de atención al cliente de MASTERBUILT, al 1-800-489-1581. Cuando llame, tenga a mano el número de modelo y el número de serie. Estos números fi guran en una etiqueta plateada ubicada en la parte trasera de la unidad.
- Page 28 ARMADO ARMADO • ANTES DE ARMARLA, LEA DETENIDAMENTE TODAS LAS INSTRUCCIONES. PASO 11 • ARME LA UNIDAD EN UNA SUPERFICIE LIMPIA Y PLANA. Inserte el pequeño extremo del • HERRAMIENTAS NECESARIAS PARA EL ARMADO: LLAVE INGLESA, DESTORNILLADOR PHILLIPS gancho del clip de la grasa (18) Hacia arriba por el hoyo grande en el fondo del cuerpo del fumador (1), Coloque la parrilla con cuidado,...
- Page 29 ARMADO ARMADO PASO 9 PASO 3 Deslice las rejillas de cocción Posicione la caja de quemador (6) (12), sobre los apoyos de las sobre hoyo central en el fondo del rejillas (21). cuerpo de fumador, alineando con cuidado difusor sobre orifi cio de válvula como mostrado.
- Page 30 ARMADO ARMADO PASO 5 PASO 7 Fije la manilla (8) al cuerpo del Inserte el indicador de temperatura ahumador (1) con los tornillos (A). (13) en la puerta del fumador (2). Asegure en su lugar con la tuerca de mariposa (D). PASO 6 PASO 8 Inserte la manilla de la puerta (7)
Need help?
Do you have a question about the sportsman elite 20051313 and is the answer not in the manual?
Questions and answers