Table of Contents
Advertisement
Advertisement
Table of Contents

Related Manuals for Ronco CHEF N GO


Summary of Contents for Ronco CHEF N GO
- Page 1 Instructional Guide with Recipes...
- Page 2 Welcome to Your New CHEF N GO Components How to Clean and Maintain Your CHEF N GO Getting to Know Your CHEF N GO: The Control Panel Using the CHEF N GO and Cooking Functions: What makes this a Set it and Forget it Kitchen Wonder (Your Guide to Mastering the Multiple Uses of this Machine) ¥...
- Page 3 At Ronco our goal is to improve the quality of your life, and the CHEF N GO was carefully designed to make everyday more enjoyable for you.
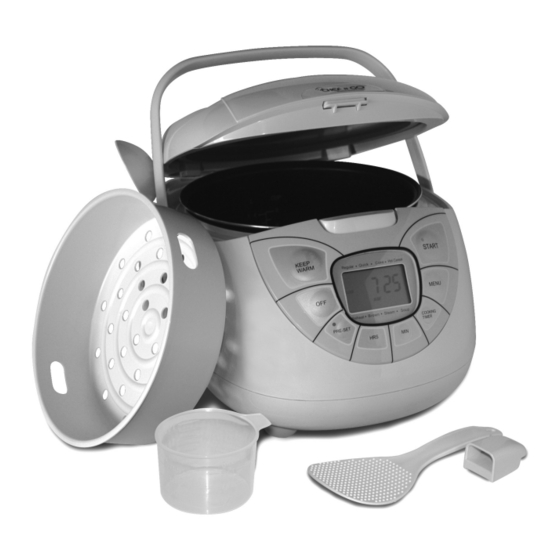
- Page 4 OMPONENTS Steam valve Slide fastener Steam lid Outer lid Steam seal Aluminum inner lid Base Buckle Steam vent Rubber sealing ring Spatula holder: To attach Inner pot and detach this part, follow the diagrams below. Steam tray Attach Open button Groove Spatula Control panel...
-
Page 5: The Accessories
LEAN AND AINTAIN After cooking, it is advisable to clean the CHEF N GO as well as the spatula and spoon to remove leftover food and odors. Always remember to unplug the CHEF N GO before cleaning. Use a damp sponge (non-abrasive) and a mild dish washing soap. - Page 6 After cooking, baking, steaming or reheating, be sure Inner upper lid to wipe the CHEF N GO clean with a damp cloth. Open lid. With two hands press the 2 tabs at the bot- Aluminum lid tom of metal disc, and lift up to remove aluminum lid.
- Page 7 CHEF N GO: T ETTING TO NOW YOUR ONTROL ANEL Release latch for cooker lid (push down to open) “Keep Warm” button START button MENU button button PRE-SET COOKING TIMER button button HOUR and MINUTE buttons LCD Screen When unplugged, the screen will display the current time only.
-
Page 8: Setting The Clock
ONTROL ANEL The HOUR (HRS) and MINUTE (MIN) buttons are used HOUR and MINUTE to adjust the CHEF N GO’s clock as well as the PRE-SET buttons and COOKING TIMER settings. (To set or adjust the clock see instructions below). - Page 9 CHEF N GO: T SING THE OOKING UNCTIONS Press this button to activate a selected function or mode. • START Press this button to select a cooking mode. • MENU Press this button to add additional cooking time. • COOKING TIMER Press these buttons to: Set the Clock, adjust the COOKING •...
- Page 10 When the “Start” button light is flashing press the “Menu” button until “Brown” mode is indicated-then press the “Start” button. Brown beef using the “Brown” function in the CHEF N GO until it is to your liking (approx. 10 minutes). Place potatoes, carrots and onions over the meat.
- Page 11 Water Beef of choice Place all of the ingredients into the CHEF N GO. When you see the “Start” light flashing, press the “Menu” button until “Regular” function is indicated. Then press the “Start” button: “Just Set it and Forget it”. The CHEF N’ GO will sense the cooking time, temperature and automatically switch to the “Keep Warm”...
- Page 12 Return meatballs to The CHEF N GO. Finally, take some hot cooked noodles or prepackaged cooked noodles and place 1/2 cup noodles in steamer bowl and place inside the CHEF N GO above the meatballs and switch mode to "Quick". Press the “Start” button.
- Page 13 CHEF N GO: Cake mode SING THE Baking Cakes, Muffins and more The CHEF N GO bakes moist cakes, brownies, muffins, desserts and cornbread. Spray the inner pot with a cooking spray or lightly coat with oil or butter. (Optional) Prepare the ingredients and add to the inner pot, close the lid and click shut.
- Page 14 CHEF N GO: Cake mode SING THE Ronco CHEF N GO Grandma’s Carrot Cake Eggs 2 cups Sugar 1 cup Corn oil 3 cups Flour 2 tsp. Baking soda 3 tsp. Baking powder 1 tsp. Salt 5 large Carrots 1 tsp.
- Page 15 3 tbsp. Orange juice concentrate Wash and core the apples, but don't peel them. Using the CHEF N GO Inner Bowl, butter the bottom or use a non-stick cooking spray-if preferred. Next, place the apples so they are standing up. Fill the core cavities with the brown sugar, raisins and orange peel.
- Page 16 Eggs, separated Cinnamon Put rice inside the CHEF N GO inner pot and add enough water just to cover rice, and then add salt. When the “Start” light is flashing, press the “Menu” button until you see “Cake” mode indicated, then press “Start”. Check the CHEF N GO period- ically by opening it up to see when the rice mixture reaches the boiling point.
- Page 17 Banana-mashed not chopped 1/2 cup Water Simply place ingredients in the CHEF N GO all at once. Once you see the "Start" light flashing press the "Menu" button until "Hot Cereal" mode is indicated, then press the “Start” button. Close the lid and allow to cook thoroughly (approximately 10 minutes).
- Page 18 “Soup” mode is indicated, then press the “Start” button. Check occasionally for desired tenderness. Cooking will be complete in 1-1/2 to 2 hours and the CHEF N GO will switch to the “Keep Warm” function. When complete pour over rice. (For rice recipe, see below.)
- Page 19 Paprika Salt and freshly ground black pepper to taste. First, place 1 tbsp. of oil and the brisket in the CHEF N GO and switch the "Menu" function to "Brown" mode, then press the “Start” button. Brown the brisket well on all sides. Set meat aside. Add onions and continue to brown until soft about 4 minutes.
- Page 20 In another mixing bowl, combine barbecue sauce and brown sugar and add the mixture to the CHEF N GO by pouring over pork mixture. Next press the "Menu" button until "Soup" cooking mode is indicated. Press the “Start” button then press the "Cooking Timer"...
- Page 21 "Quick" button. After 10 minutes, place manicotti shells inside inner pot for 7 minutes. Drain with Steamer Basket provided with the CHEF N GO cooker. Set aside. After emptying inner pot, select "Regular" Mode and place 1/3 of the spaghetti sauce into the CHEF N GO.
- Page 22 Add the meat to be Browned. (No additional fat or Oil is required) Press the “Start” button. When finished Browning your meat, the CHEF N GO will beep for 10 seconds, it will then stop the “Brown” cooking mode. Add all additional ingredients to the meat, then press the “Menu”...
- Page 23 After you have chopped all vegetables, place the chicken quarters and onion quarters into the CHEF N GO and add oil (If desired, no oil is necessary with the CHEF N GO). When the "Start" light is flashing, press the "Menu" button until the "Brown"...
- Page 24 1 jar Cocktail sauce Fill up the CHEF N GO with can of chicken broth and 1 cup of water. Rinse shrimp and place cleaned shrimp inside steamer basket. When the "Start" light is flashing press the "Menu" button until you see the "Steam" mode. Press the “Start” button.
- Page 25 5 minutes on the "Brown" mode (No oil necessary). Next press the “Off” button. Scramble the eggs with a fork (in another bowl) and add to the CHEF N GO where the onions, peppers and garlic have browned. Next, add the tomatoes and avocado and press the “Menu”...
- Page 26 CHEF N GO by pouring over pork mixture. Press the "Menu" button until “Soup” is indicated, then press the "Cooking Timer" button to set the cooking time for 4 hours.
- Page 27 SING THE Reheating Leftovers or Second Helpings Reheating Leftovers The CHEF N GO not only cooks food but can also reheat leftovers to make a whole new meal. Note: Place Leftovers in the inner pot and stir up to loosen (Leftovers The cooker has that are not stirred may burn).
- Page 28 2. Main circuit board failure. matically Note: Never attempt to repair the cooker by yourself. If problems occur that you cannot understand or resolve, call customer service at 1-800-486-1806 (Monday to Friday 6:00 am to 5:00 pm Pacific Time) or email customerservice@ronco.com.
-
Page 29: Safety Precautions
Do not plug the CHEF N GO into an electrical outlet that is running another electrical appliance. Do not keep the CHEF N GO in a damp place or place it near a fire or heat source. Also, do not store it or use it on an unstable surface.
Need help?
Do you have a question about the CHEF N GO and is the answer not in the manual?
Questions and answers