Table of Contents
Advertisement
Advertisement
Table of Contents

Related Manuals for Ronco Electric Pasta Maker


Summary of Contents for Ronco Electric Pasta Maker
- Page 1 Pasta Maker Instructions & Recipes...
-
Page 2: Table Of Contents
ElECTriC Pasta Maker Table of Contents Meaning of the Symbols Used ............ Safety Instructions ..............Intended Use ................. Danger of Injury ..............Notes on Health ..............Danger of Electric Shock ............Set-up and Connection ............Notes on Use ................. Items Included ................Device Overview ................ -
Page 3: Meaning Of The Symbols Used
Dear Customer, We are delighted that you have chosen this Ronco Pasta Maker. This electrical pasta machine will make the heart of every pasta lover beat faster. The Pasta Maker takes care of the laborious task of kneading dough for you, and with the five different attachments you can make almost any type of pasta in your own kitchen at home. -
Page 4: Danger Of Injury
• The device must only be used as described in the operating instructions. Any other use is deemed to be improper. Danger of injury • Please keep the device and packaging material out of the reach of children and pets. •... -
Page 5: Notes On Use
cable. Do not allow the cable to hang over the edge of tables or kitchen counters. Others may become caught and pull the device down. • Position the cable in such a way that it does not become squashed or bent and does not come into contact with hot surfaces. -
Page 6: Items Included
– before changing any accessories, – if you are not going to use the device over a lengthy period of time, – if a fault occurs during operation, – before a thunderstorm, – before you clean it. • Always pull the plug and never the cable! items included •... -
Page 7: Device Overview
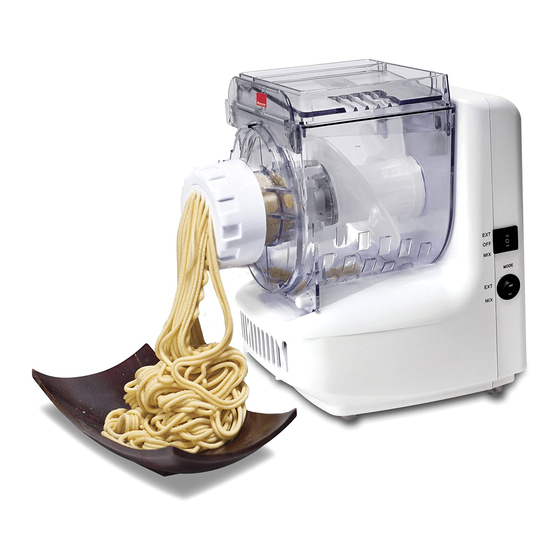
Device Overview ------------------ 1 10 ------------------ ------------------ 2 9 ------------------ 8 ---------------- ----------------------------- 3 7 ---------- -------------- 4 6 ----------------------------- -------------- 5 1. Mixing container lid 2. Motor unit 3. Kneading spiral and dough screw conveyor with drive shaft (inside the mixing container) 4. -
Page 8: Before Initial Use
Before initial Use Before you can use the device, you must: • unpack the items supplied, • clean the device and accessories. Unpacking CAUTION! • Keep children and animals away from the packaging material. There is a danger of suffocation! Unpack all parts and check the items supplied to make sure they are complete (see the “Items Supplied”... -
Page 9: How To Assemble
How to Assemble Make sure your machine is unplugged before assembly. Mixing Bin SQUArE BUTTON: Base EXT (Extrude) means pushing mix through the die. MIX on your switch means to blend together. OFF on your switch means off. Place mixing bin all the way onto the base. rOUND BUTTON tells you what MODE the device The machine will not work if the mixing bin is not is in. - Page 10 How to Assemble (cont.) Hole in Base Locked Insert the mixing assembly loosely into the mixing Line up the face plate dots (position 1), push the bin, with the shaft going into the hole in the base. mixing assembly fully in, and turn the face plate to the right (position 2), matching up both lower dots.
-
Page 11: Using The Pasta Maker
The device has a safety switch. This is located inside the motor unit and is activated by a pin on the mixing container lid. The device can only be switch on using the On/Off switch if the mixing container lid is placed on correctly and the pin activates the safety switch! If the device won’t turn on, push the front of the bin and double check the lid to make sure it is snapped in place and secured. -
Page 12: Setup And Connection
in the mixing container lid using your fingers or an object to try to clear the reason for the blockage. Always pull the plug out and then open the mixing container lid to find out what the reason is for the blockage (e.g. dough too dry). - Page 13 13. Lay the pasta out on a floured surface so that it can start to dry or use the Ronco Pasta Drying Rack. 14. To get all of the pasta dough out of the mixing...
-
Page 14: Tips For Optimum Pasta
Tips for Optimum Pasta The dough should be evenly kneaded, and slightly moist to form a soft malleable dough. The dough should have the consistency which is not too dry or too moist. • The dough is too dry if it has a powdery, grainy consistency and breaks into small chunks. -
Page 15: Make Fresh Sausage
Make Fresh Sausage 1. Select Horn Select a sausage horn, put it in the locking ring and attach to your Pasta/Sausage Maker. Secure with locking ring. Slide a length of casing (up to 3 feet) over the horn, leaving about 2 inches at the end hanging. 2. -
Page 16: Pasta Recipes
Pasta recipes CORN PASTA Replace 1/4 of your flour mixture with finely ground corn meal or corn flour. MIX before adding the liquid ingredients. Use egg, oil and water for pasta. Use one of the large dies like fettuccine or rigatoni for extruding your pasta. GLUTEN-FREE PASTA Making Gluten-Free Pasta is easy. - Page 17 Pasta recipes GARLIC PASTA Add 2 cloves of garlic (crushed or pureed) to the liquid in a full load of pasta. Cook and serve with sauce and cheese. TwO-MINUTE CLAM SAUCE FOR LINGUINE Pasta: Linguine or Spaghetti 3 Tbsp. Olive oil 2 Tbsp.
- Page 18 Pasta recipes SPINACH FETTUCCINE IN CREAMy DILL SAUCE Pasta: Fettuccine, Linguine or Rigatoni Great with any pasta, but this is very tasty with spinach pasta! Make your liquid for the pasta with fresh spinach juice or mix spinach with a small amount of water in a blender and strain before adding to the egg and oil mixture.
- Page 19 Pasta recipes BASIC PASTA wITH FRESH TOMATOES Pasta: Any of your favorites 6 Tbsp. Olive oil 2 Tbsp. Garlic - minced 2 Tbsp. Basil - fresh, minced 1 cup Ripe tomatoes - diced Salt & pepper to taste Parmesan cheese Saute garlic.
- Page 20 Pasta recipes To make Lemon Pepper Pasta, add 1 tablespoon lemon juice, 1 teaspoon lemon zest and 1 tablespoon black or white pepper to one load of basic pasta. (For best results, add these to your liquid measure.) Saute garlic and oregano in olive oil. Add shrimp and saute until done. Add pepper, prepared pasta sauce and wine.
- Page 21 Pasta recipes Melt butter in olive oil. Saute leeks with garlic, red peppers, salt and pepper. Add chicken pieces. Saute until chicken is done (about 10 minutes). Reduce heat, add sun dried tomatoes and half-and-half. Pour over pasta. Top with Parmesan cheese and garnish with parsley.
- Page 22 Pasta recipes SPICy CAjUN PASTA To your flour mixture, add 1 teaspoon red chili powder, 1 teaspoon onion powder and 1 teaspoon paprika. FRENCH CHAMPAGNE PASTA Simply use champagne instead of water when adding the liquid to the mixture. Can also be made with port wine for a stronger taste. SOUR CREAM &...
- Page 23 Pasta recipes through liquid slot by teaspoonful. EXT and cook 1 to 2 minutes. Serve warm and top with any combination of the following: chocolate syrup, fresh strawberries and cream, coconut, raspberry syrup, marshmallow cream or chopped nuts. SUMMER FRUIT PASTA In a blender, liquefy or juice fresh fruit such as strawberries, lemon, peaches (peeled) or blackberries.
-
Page 24: Sausage Recipes
Sausage recipes COUNTRy FARM SAUSAGE 1-3/4 lb. Medium ground pork 1/4 lb. Medium ground bacon 1-1/2 tsp. Salt 1/2 tsp. Freshly ground black pepper 1/2 tsp. Chili powder 1/2 tsp. Marjoram 1/4 tsp. Thyme 1/4 tsp. Coriander 2 cloves Garlic - pressed 1/2 cup Cold water Add meat and remaining ingredients to the mixing bin and MIX until... - Page 25 Sausage recipes MIX until thoroughly blended. EXT the mixture into the casings and twist off into 4-inch links. Refrigerate and use within 3 days. Freeze, dry or smoke. APPLE CHICkEN SAUSAGE A real crowd-pleaser and a tasty alternative to pork or beef-based sausages. 3/4 cup Apple cider 2 lb.
- Page 26 Sausage recipes SHRIMP SAUSAGE Serve this unusual sausage with a fresh mixed green salad and crispy french bread for a wonderful light lunch. 1 lb. Shrimp - peeled and deveined (can also use salmon, tuna, red snapper) 1 Tbsp. Fennel seed 1 tsp.
-
Page 27: Notes
Notes... -
Page 28: Cleaning And Storage
Cleaning and Storage CAUTION! • Remove the plug from the mains socket before cleaning the device. • Never immerse the motor unit in water or other liquids! • Do not use corrosive or abrasive cleaning agents to clean the device. These could damage the surface. -
Page 29: Cleaning
Cleaning Helpful Tip: To clean the pasta dies and other stubborn areas, allow the remnants of dough to dry for 1-2 hours before cleaning, they will then be easier to remove. • All accessories (apart from the motor unit!) are dishwasher-safe. •... -
Page 30: Troubleshooting
Troubleshooting Avoid problems with your Pasta Maker, read all the Instructions and Safety Instructions in this booklet. If the device should stop working properly, first check whether you are able to correct the problem yourself. If not, contact customer service. Do not try to repair a faulty device yourself! Here are the solutions to common problems: Machine stops while mixing (MIX) Can’t remove locking ring... -
Page 31: One-Year Limited Warranty
One-Year limited Warranty Ronco Holdings, Inc. warrants to the original owner of this product that it is free from defects in material and workmanship for a period of one year from date of purchase to be provided on the Owner Registration Card to be completed and returned to Ronco Holdings, Inc. - Page 32 DO NOT IMMERSE IN wATER. wARNING: TO PREVENT ELECTRIC SHOCk, UNPLUG BEFORE CLEANING. 120V 60Hz 180W Max Copyright © 2014 by Ronco Holdings, Inc. All Rights Reserved. U.S. and foreign patents pending. 7,153,120 6,743,007 RE36,147 5,731,012 5,421,713 5,324,185 PM1305WHGEN 11.13...
Need help?
Do you have a question about the Electric Pasta Maker and is the answer not in the manual?
Questions and answers