Table of Contents
Advertisement
P IMPORTANT INFORMATION P KEEP FOR OPERATOR P IMPORTANT INFORMATION P
OPERATOR MANUAL
Part Number 121023 - Revision A
MODELS:
HFP/2E, HFP/2,
Braising Pans
Stainless Steel
Manual Tilting
Gas Heated
THIS MANUAL MUST BE RETAINED FOR FUTURE REFERENCE. READ,
UNDERSTAND AND FOLLOW THE INSTRUCTIONS AND WARNINGS CONTAINED
IN THIS MANUAL.
DO NOT STORE OR USE GASOLINE OR OTHER FLAMMABLE VAPORS AND
LIQUIDS IN THE VICINITY OF THIS OR ANY OTHER APPLIANCE.
INSTRUCTIONS TO BE FOLLOWED IN THE EVENT USER SMELLS GAS. THIS
INFORMATION SHALL BE OBTAINED BY CONSULTING YOUR LOCAL GAS
SUPPLIER. AS A MINIMUM, TURN OFF THE GAS AND CALL YOUR GAS COMPANY
AND YOUR AUTHORIZED SERVICE AGENT. EVACUATE ALL PERSONNEL FROM
THE AREA.
IMPROPER
INSTALLATION,
MAINTENANCE CAN CAUSE PROPERTY DAMAGE, INJURY OR DEATH. READ THE
INSTALLATION, OPERATING AND MAINTENANCE INSTRUCTIONS THOROUGHLY
BEFORE INSTALLING OR SERVICING THIS EQUIPMENT.
.
WARNING
POST IN A PROMINENT LOCATION
WARNING
ADJUSTMENT,
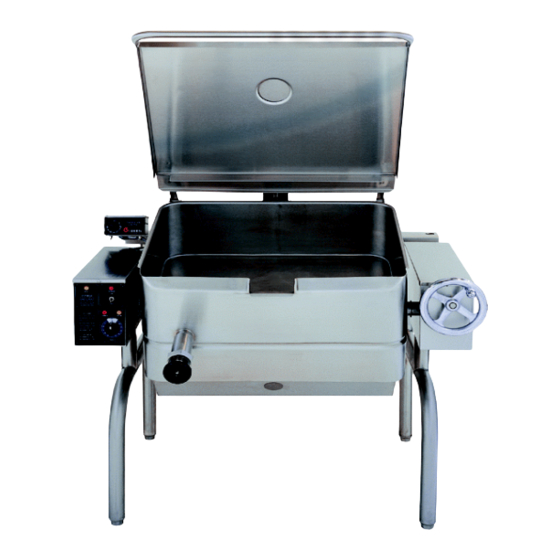
Model HFP/2E Shown
ALTERATION,
OM-HFP
DOMESTIC
SERVICE
OR
Advertisement
Table of Contents

Related Manuals for Groen HFP/2E


Summary of Contents for Groen HFP/2E
- Page 1 HFP/2E, HFP/2, Braising Pans Stainless Steel Manual Tilting Gas Heated Model HFP/2E Shown THIS MANUAL MUST BE RETAINED FOR FUTURE REFERENCE. READ, UNDERSTAND AND FOLLOW THE INSTRUCTIONS AND WARNINGS CONTAINED IN THIS MANUAL. WARNING DO NOT STORE OR USE GASOLINE OR OTHER FLAMMABLE VAPORS AND LIQUIDS IN THE VICINITY OF THIS OR ANY OTHER APPLIANCE.
-
Page 2: Important Operator Warnings (Read First)
SUPPLY AND CLOSE THE MAIN GAS COCK. ALLOW FIVE MINUTES FOR UNBURNED GAS TO VENT. CAUTION: USE OF ANY REPLACEMENT PARTS OTHER THAN THOSE SUPPLIED BY GROEN OR AUTHORIZED DISTRIBUTORS CAN CAUSE INJURY TO THE OPERATOR AND DAMAGE TO THE EQUIPMENT AND WILL VOID ALL WARRANTIES. -
Page 3: Table Of Contents
OM-HFP Table of Contents IMPORTANT OPERATOR WARNINGS (READ FIRST) ........2 REFERENCES . -
Page 4: Equipment Description
The cover opens to the back and is hinged to the frame, so it moves independently of the pan body. Optional Tangent Draw-Off Performance Data Models HFP/2E, and HFP/2 are mounted on an open-leg frame fabricated from tubular stainless steel. MODELS FIRING RATE... -
Page 5: Inspection And Unpacking
OM-HFP Inspection and Unpacking The unit will arrive completely assembled, Cut the straps holding the unit on the skid, and wrapped in protective plastic on a heavy skid, in lift the unit straight up off the skid. a heavy cardboard carton. Immediately upon receipt, inspect the carton for damage. -
Page 6: Installation
OM-HFP Installation Install the Braising Pan in a well ventilated room WARNING for efficient performance. Remove any items ELECTRICALLY GROUND THE UNIT AT THE which might obstruct or restrict the flow of air for TERMINAL PROVIDED. FAILURE combustion and ventilation. Clear all combustible GROUND UNIT COULD... -
Page 7: Initial Start-Up
If the unit functions as described above, it is ready thermostat setting of 235 F. At this setting, for use. If it does not, contact your local Groen heating should continue until the water boils. Authorized Service Agency. Operation A. - Page 8 OM-HFP (5) Rotate the thermostat dial until the Heat (f) Turn the knob counterclockwise to Light comes on. (It lights when the main "ON". burner is on). (3) Turn the thermostat dial to the desired b. To Turn Off Pan temperature.
-
Page 9: Sequence Of Operation
Check the gas supply valves and wait five minutes before trying again by switching power on. If there is still no pilot flame in four tries, close all valves, turn off the power, and contact an authorized Groen Service Agency. -
Page 10: Cleaning
OM-HFP B. Models with Optional Standing Pilot Ignition thermopile begins to provide electric current at 750 millivolts. Electricity from the thermopile powers the control circuit and the Combination 1. When the operator presses down the knob on the Gas Control Valve. When the thermopile begins Combination Gas Control Valve and turns it to “Pilot”, gas is admitted to the pilot burner. -
Page 11: Maintenance
Each time Service personnel should check the unit at least service is performed on your Groen equipment, enter once a year. This periodic maintenance should the date on which the work was done, what was include inspecting electrical wires and connections, done, and who did it. -
Page 12: Troubleshooting
Troubleshooting Your Groen Braising Pan will operate smoothly and efficiently if properly maintained. However, the following is a list of checks to make in the event of a problem. If the actions suggested do not solve the problem, call your qualified Groen Service Representative. - Page 13 OM-HFP Important: Service performed by other than factory authorized personnel will void all warranties. WHAT TO CHECK SYMPTOM X indicates items which must be performed by an authorized technician. Spark is present but the pilot Auth Service a. That the pilot valve is securely connected to terminals. X will not light.
- Page 14 OM-HFP Important: Service performed by other than factory authorized personnel will void all warranties. WHAT TO CHECK SYMPTOM X indicates items which must be performed by an authorized technician. Pan will not heat, and pilot User a. Is the Combination Gas Control Valve knob turned ON? light is out b.
-
Page 15: Parts List
OM-HFP Parts List - HFP/2E & HFP/2 To order parts, contact your authorized Groen Service Agency. Supply the model designation, part description, part number, quantity, and, where applicable, voltage and phase. Description Part No. Description Part No. Gear Carrier Assembly (Casting) - Page 16 OM-HFP Parts List - HFP/2E & HFP/2...
- Page 17 Parts List Pan Sub-Assembly, HFP/2E Description Part No. Description Part No. Pan Sub-Assembly HFP/2-4 127652 Nipple, ½" NPT x 2" long, HFP/2E-4, -2 005551 Pan Sub-Assembly HFP/2-3 127582 Nipple, ½" NPT x 2" close, HFP/2E-3 008877 Pan Sub-Assembly HFP/2-2 127763 Tee, ½"...
- Page 18 OM-HFP Parts List Combustion Chamber & Burner Assembly, HFP/2E-4 Description Part No. Description Part No. Combustion Chamber assy, HFP/2E-4 119409 Ignition Tube Assy, size 4, (natural gas) 127621 Burner Tube 051619 Screw, #10-32 x 1" hex, slotted head cap 093478...
- Page 19 OM-HFP Parts List Combustion Chamber & Burner Assembly, HFP/2E-3, -2 Description Part No. Description Part No. Combustion Chamber assy, HFP/2E-3 119426 Ignition Tube Assy, size 3, (natural gas) 127620 Burner Tube 051619 Screw, #10-32 x 1" hex, slotted head cap...
- Page 20 OM-HFP Parts List Control Console Assembly, HFP Description Part No. Description Part No. Control Console Shell Assembly 127546 Nut, dome, high profile ¼ - 20 090567 Knob, thermostat 128525 Screw, hex head cap #10-32 x 3/8" 128757 Bracket, Control Console mounting 122175 Screw, rd.
- Page 21 OM-HFP Parts List Ignition Control Cabinet Assembly, HFP Description Part No. Description Part No. Cover, Ignition Control Cabinet 119441 Label, “Single Phase” 008118K Side panel, Ignition Control Cabinet 119440 Label, “115 Volts” 008118B Weldment, Ignition Control Cabinet 127508 Label, “208 Volts” 008118D Screw, pan head 8-32 x 3/8"...
- Page 22 OM-HFP Parts List Electrical Panel Assembly Assembly, HFP Description Part No. Description Part No. Spark Ignition Module 085153 Lug, Ground 14-6 AWG 119829 Transformer 75A, 24V Sec/120V Pri or 106233 Screw, round head, 8-32 x 1¼” long 005056 Transformer 75A, 24V Sec/208-240V P 106234 Label, “Earth Ground”...
- Page 23 OM-HFP Parts List - Fuel Gas Conversion (For conversion of a natural gas unit to propane or a propane model to natual gas) Model: HFP/2E and HFP/2 HFP/2E WITH ELECTRONIC IGNITION HFP/2 WITH STANDING PILOT DESCRIPTION NAT GAS LP GAS...
-
Page 24: Diagrams & Schematics
OM-HFP Diagrams and Schematics Electronic Ignition System HFP/2E Models... - Page 25 OM-HFP Diagrams and Schematics Standing Pilot Ignition System HFP/2 Models Only...
-
Page 26: Maintenance Log
OM-HFP Service Log Model No. ______________________________ Purchased From _________________________ Serial No. ______________________________ Location _______________________________ Date Purchased _________________________ Date Installed ___________________________ Purchase Order No. ______________________ For Service Call _________________________ Date Maintenance Performed Performed by... -
Page 27: Warranty
Groen Foodservice Equipment ("Groen Equipment") has been skillfully manufactured, carefully inspected and packaged to meet rigid standards of excellence. Groen warrants its Equipment to be free from defects in material and workmanship for (12) twelve months with the following conditions and subject to the following limitations. - Page 28 1055 Mendell Davis Drive OM-HFP (Revised 9/99) Jackson, MS 39212 Part Number 121023 - Revision A Telephone 601 372-3903 FAX 601 373-9587...
Need help?
Do you have a question about the HFP/2E and is the answer not in the manual?
Questions and answers