Table of Contents
Advertisement
Quick Links
Advertisement
Table of Contents
Troubleshooting

Related Manuals for Swisscom ATON CL401


Summary of Contents for Swisscom ATON CL401
- Page 1 Aton CL401 ISDN Bedienungsanleitung Mode d’emploi Istruzioni per l’uso...
-
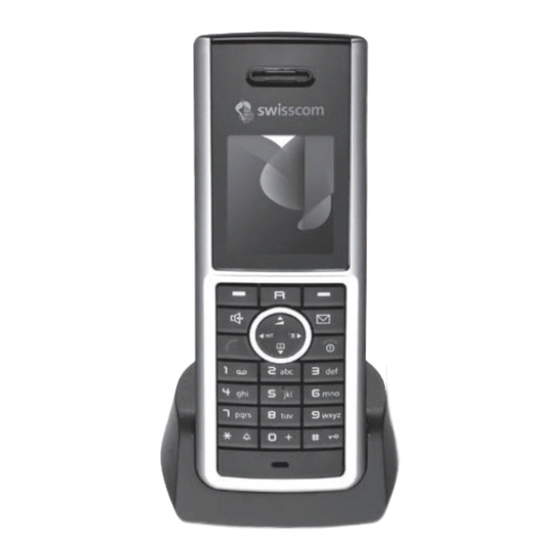
Page 2: The Handset At A Glance
The handset at a glance 1 Display (screen) in idle status 2 Charge status of the batteries = e V U (flat to full) flashes: batteries almost flat e V U flashes: batteries charging 3 Display keys (page 11) 4 Recall key - Consultation call (flash) - Insert a dialling pause (press and hold) 5 Message key... -
Page 3: The Base Station At A Glance
The base station at a glance Registration/paging key (page 39) -
Page 4: Table Of Contents
Setting SMS centres ....36 "Swisscom Hotline" ....13 SMS on a PABX ....36 Correcting incorrect entries . - Page 5 Contents Setting the display backlight ..45 Appendix ....60 Activating/deactivating auto answer . 45 Care ......60 Changing the handsfree/ Contact with liquid .
-
Page 6: Safety Precautions
Safety precautions Warning: Read the safety precautions and the user guide before use. Explain their contents and the potential hazards associated with using the telephone to your children. Only use the mains adapter supplied, as indicated on the underside of the base station or charging cradle. - Page 7 Information about disposal At the end of its service life, this product must not be disposed of with normal household waste, but must be handed in at the place of purchase or at a collec- tion point for recycling electrical and electronic devices in accordance with the ordinance governing the return, acceptance and disposal of electrical and elec- tronic equipment (VREG).
-
Page 8: Aton Cl401Isdn - More Than Just A Telephone
Aton CL401ISDN – more than just a telephone ISDN Aton CL401 – First steps more than just a telephone Pack contents Your ISDN connection offers you two tele- ISDN phone lines simultaneously. Your phone, One Aton CL base station with... -
Page 9: Setting Up The Handset For Use
First steps Setting up the handset for use Reception strength: The display shows the quality of the radio The display is protected contact between the base station and by a plastic film. handset: Please remove the pro- Good to poor: Ð i Ñ Ò tective film! No reception: | flashes Inserting the batteries... - Page 10 First steps Attaching the belt clip Should you have any questions and prob- lems see page 60. There are notches for attaching the belt clip on the side of the handset at the same Headset socket height as the display. ¤...
- Page 11 You can change the name of the handset (page 41). Display in idle status Once the phone is registered and the time set, the idle status is shown as in this example: Ð Swisscom 15.11.07 07:15 Hotline...
-
Page 12: Operating The Handset
First steps Operating the handset In the main menu and in input fields You can use the control key to move the cursor up t, down s, right v or left Activating/deactivating the handset In lists and submenus In idle status, press and hold the end call key (confirmation t / s Scroll up/down line by line. -
Page 13: Reverting To Idle Status
First steps Delete key: deletes one char- Submenus acter at a time from right to The functions in the submenus are dis- left. played as lists. Î Go back one menu level or To access a function: cancel operation. ¤ Scroll to the function with the control Œ... -
Page 14: Swisscom Hotline
Please note: Select Hotline. You will be directly con- – Activating eco range reduces the range of nected to the Swisscom Contact Centre. the base station. – Eco range and any repeater support (see The access number is pre-programmed as page 57) cancel each other out, i.e. -
Page 15: Launching The Installation Assistant And Making The Base Station Settings
First steps Launching the installation Your telephone uses the MSN entirely as you require. The following differentiation assistant and making the base is made: station settings Receive MSN: numbers you can be called on. You can assign the receive ¢ ¢... - Page 16 First steps Entering own numbers (MSNs) manually Repeat the process for all terminals regis- tered to your telephone. and entering names for the MSNs Enter own numbers (MSNs)? Setting the send MSN Press to confirm. §Yes§ Each internal subscriber or terminal can be Enter MSN.
-
Page 17: Menu Tree
Data Transfer 4-4-2 Bluetooth (page 51) 4-4-3 Directory (page 25) Call Charges 4-5-1 Overview (page 30) 4-5-2 Settings (page 30) Missed Alarms (page 51) ì (page 49) Alarm Clock ç (page 50) Calendar * Currently not supported on the Swisscom network. - Page 18 Ï Resource Dir. Screensavers (page 48) Caller Pictures (page 48) Sounds (page 48) Capacity (page 48) Ð Settings Date/Time (page 10) Audio Settings 8-2-1 Handset Volume (page 46) 8-2-2 Ringer Settings (page 46) 8-2-3 Advisory Tones (page 49) Display 8-3-1 Screen Saver (page 45) 8-3-2...
-
Page 19: Making Calls
Making calls Accepting a call The handset indicates an incoming call in three ways: by ringing, by a display on Making an external call the screen and by the flashing handsfree key d. External calls are calls using the public tel- You can accept the call by: ephone network. -
Page 20: Calling Line Identification
Withheld, if the caller has withheld Call- You can turn the hold music on and off ing Line Identification. (page 57). Unavailable, if the caller has not arranged Calling Line Identification. In the Swisscom ISDN network, CLIP is transmitted automatically. -
Page 21: Defining The Settings For The Next Call
Defining the settings for Ringback when the number is the next call busy (CCBS)/ when there is no reply (CCNR) Depending on your network provider, you can make the following settings for the If the person you are calling does not next call: answer or their line is busy, you can initi- Withhold the number (CLIR), provided... -
Page 22: Identify Caller
Accepting a ringback Setting up the identify caller function The handset is ringing and the screen dis- If you have requested the identify caller plays the ringback number. function, increase the time until the con- nection is terminated: ¢ Establishing a connection N 5 O 4 Press the talk key. -
Page 23: Functions During A Call
Functions during a call The consultation call participant does not answer Press the display key. You §End§ return to the first participant. Making calls to several participants Consultation call participant's line is busy You will hear the busy tone. You can initi- If you wish to call several participants, ate ringback (page 20). -
Page 24: Transferring Calls
Dealing with a waiting external Conference call call – CW (Call Waiting) You speak with two participants at the same time. You can establish a conference call as follows: Precondition: Call waiting has been set up (page 55). With two external participants or You will hear the call waiting tone (short one internal participant and one exter- beep) if you receive an external call during... -
Page 25: Using The Directory And Lists
Using the directory and Storing a number in the directory ¢ New Entry lists ¤ Change multiple line input: First Name / Surname: The options are: Enter a name in at least one of the Directory fields. Last number redial list Phone (Home) / Phone (Office) / Phone (Mobile) SMS list Enter a number in at least one of the... - Page 26 Selecting a directory entry VIP Entry (directory only) Mark a directory entry as a VIP (Very s / C Opening a directory. Important Person) and assign a specific You have the following options: ringer to it. You can then recognise Use s to scroll through the entries important calls from the ringer.
- Page 27 Copying a displayed number to the A successful transfer is confirmed by a message and confirmation tone on the directory receiving handset. Numbers displayed in a list, e.g. the calls list or the last number redial list, in an SMS Please note: or during a call can be copied to the direc- You can also send the complete directory via...
-
Page 28: Last Number Redial List
¤ Last number redial list Save changes: (page 65). Please note: The last number redial list contains the A time must be specified for reminder calls. If twenty numbers last dialled with the you select a visual signal, a time is not required handset (max. -
Page 29: Opening Lists With The Message Key
Opening lists with the If only one list contains entries, no list selection is offered and the relevant list is message key displayed immediately. You can use the message key f to open Incoming SMS message list the following list selection: All received SMS messages are saved in SMS list the incoming message list, page 34. - Page 30 List entry Checking receive MSN New messages are displayed at the top. You can have the receive MSN displayed for every call. Example of list entries: ¤ Select entry. All Calls Open menu. §Options§ Susi Sorglos ‰ Select and press Called MSN §OK§...
-
Page 31: Making Cost-Effective Calls
Making cost-effective calls Displaying/deleting call charges ¢ ¢ ¢ í (system PIN Call Charges ¢ After making a call, you can view the costs if required) Overview on the handset. You can view the duration charges for all calls on all Total all Calls of your calls (in minutes) or display the MSNs from the... -
Page 32: Sms (Text Messages)
4 SMS messages with 153 characters each). Please note: When supplied, the access number Please note: (062 210 00 0) for the Swisscom SMS centre is pre-programmed. From a handset, you can only access (read/edit/delete) SMS messages that Preconditions: have been received or sent from an Calling Line Identification is enabled for MSN set up for the handset. - Page 33 Press the display key. The SMS Reading/deleting status report/saving §Send§ is sent. number to directory ¤ Open the incoming message list Please note: (page 34) and then: – If you are interrupted by an external call Select SMS with State OK while writing an SMS, the text is automati- State not OK status.
-
Page 34: Receiving An Sms
MSNs, a notification to this effect will appear on the display. Dependent on the provider; currently Dependent on the provider; currently not supported on the Swisscom net- not supported on the Swisscom net- work. work. - Page 35 Incoming message list Deleting the incoming message list All new and old SMS messages in the list The incoming message list contains: are deleted. ¤ All SMS messages with an MSN that Open the incoming message list. matches a send or receive MSN for your Open menu.
-
Page 36: Sms With Vcard
To return to the SMS text: Press the talk key to dial the Press briefly. number. Saving a number If you wish to use the number to send an Different numbers in a vCard can be saved SMS: ¤ individually one after another. Save the number with the local area ¤... -
Page 37: Setting Sms Centres
You can only receive an SMS when the When supplied, the access number (062 210 Calling Line Identification is for- 00 0) for the Swisscom SMS centre is pre-pro- warded to the extension of the PABX grammed. (CLIP). The CLIP evaluation of the... -
Page 38: Sms Troubleshooting
N 5 O 2 L You have stopped receiving SMS messages. Enter the digits. Call diversion is activated with When: All Calls Deactivate SMS function. §OK§ or call diversion for is activated for All Calls the network mailbox. ¥ Change the call diversion. Activate SMS function (default §OK§... -
Page 39: Using The Network Mailbox
Using the network mailbox Calling the network mailbox Press and hold. You are con- nected straight to the network The network mailbox is your network pro- mailbox. vider's answer machine within the net- Press handsfree key d if work. You cannot use the network mail- required. -
Page 40: Using Several Handsets
MSN is used as a send MSN for this Deregistering handsets handset. ISDN You can deregister any registered handset Manual registration to Aton CL401 using any other registered handset. You must activate manual registration of Open list of internal parties. the handset on both the handset and the The handset you are currently base station. -
Page 41: Changing The Base Station
Changing the base station Transferring a call to another handset You can transfer an external call to If your handset is registered to more than another handset (connect). one base station, you can set it to a partic- Open the list of handsets. ular base station or to the base station The external participant hears that has the best reception... -
Page 42: Changing The Name Of A Handset
Changing the name of a handset If the internal participant answers, either: The names "INT 1", "INT 2" etc. are Press the display key. §Options§ assigned automatically at registration. End Active Call You can change these names. The name Select and confirm. must be no more than 10 characters. -
Page 43: Using A Handset As A Room Monitor
Using a handset as a Warning! room monitor – Please note that the "room monitor" does not function in certain situations, e.g. if the mobile phone number specified by If the room monitor is activated, a previ- the user is busy or has no reception, if ously saved destination number is called the mains power supply fails or if batter- as soon as a set noise level is reached. -
Page 44: Handset Settings
í Room Monitor The default setting of the left display key is Scroll to the line. Call to: preset with the Swisscom (Con- §§§§Hotline§§§§ §Delete§ tact Centre). The phone number 0800 800 Delete existing number. 800 cannot be changed. You can dial the ¤... -
Page 45: Changing The Display Language
Changing key assignments Hotline Swisscom Contact Centre phone number 0800 800 800. Display key ¤ Press and hold the right display key. ¤ Internal calls (see page 40). Press and hold the left display key, as long as is not assigned. -
Page 46: Setting The Display
Setting the display Changing the screensaver ¢ ¢ ¢ Ð Display Screen Saver You have a choice of four colour schemes Scroll to the line. Selection and several different contrasts. ¢ ¢ Ð Press the display key. The §View§ Display active screensaver is dis- Colour Scheme played. -
Page 47: Changing The Handsfree/ Earpiece Volume
Changing the handsfree/ Changing ringer tones earpiece volume Volume: You can choose between five volumes You can set the loudspeaker volume for (1–5; e.g. volume 2 = ˆ) and handsfree talking to five different levels the "crescendo" ring (6; volume and the earpiece volume to three different increases with each ring = levels. -
Page 48: Activating/Deactivating Muting For The First Ringer Tone
Settings for internal calls Reactivating the ringer Press and hold the star key. Set the volume and melody depending on the type of signalling required. Deactivating the ringer for the current call In idle status: Press the display key. §Silence§ ¢... -
Page 49: My Stuff
My stuff If you have saved a picture in an invalid data format, you will see an error message after selecting the entry. Cancel the oper- My stuff on the handset manages sounds ation with Î. Delete the picture that you can use as ringers, and pictures with §Delete§... -
Page 50: Activating/Deactivating Advisory Tones
Activating/deactivating advisory Setting the alarm clock tones Precondition: The date and time have already been set (page 10). Your handset uses advisory tones to tell you about different activities and statuses. Activating/deactivating the alarm The following advisory tones can be acti- clock and setting the wake-up time vated/deactivated independently of each ¢... -
Page 51: Setting An Appointment (Calendar)
Setting an appointment During a call, the appointment reminder is signalled by a short tone. (calendar) Managing appointments You can have your handset remind you of ¢ ç up to 30 appointments (volume and mel- ody, see page 46). Select the day in the graphical calendar and press . -
Page 52: Displaying Missed Appointments And Anniversaries
Displaying missed Using Bluetooth devices appointments Your Aton CLx308 handset can communi- and anniversaries cate wirelessly via Bluetooth™ with other devices that use this technology. Missed appointments/anniversaries Before you can use your Bluetooth (page 26) are displayed in the Missed devices, you must first activate Bluetooth Alarms list if:... -
Page 53: Registering Bluetooth Devices
Registering Bluetooth devices Editing the list of known (trusted) devices The distance between the handset in Blue- tooth mode and the activated Bluetooth Open list device (headset or data device) should be ¢ ¢ ¢ í Data Transfer Bluetooth no more than 10 m. ¢... -
Page 54: Your Own Area Code Setting
Your own area code setting Rejecting/accepting an unregistered Bluetooth device In order to transfer phone numbers (e.g. If a Bluetooth device that is not registered in vCards), it is essential that your area in the list of known devices tries to con- code (international and local area code) is nect with the handset, you will be saved on the phone. -
Page 55: Making Isdn Settings
Making ISDN settings Press the display key. §Edit§ Enter number (max. 20 digits) (without area code = prefix). Please note: If necessary, scroll to the first Some settings cannot be made simulta- line and enter the name (max. neously by several handsets. If this is 16 digits) (optional). -
Page 56: Setting Up A Busy Signal For When The Msn Is Being Used (Busy On Busy)
Press and hold (idle status). When call waiting is deactivated, the caller will hear the busy tone if you are already making a call and you are the only sub- Assigning a send MSN scriber assigned to this MSN. You can define one send MSN for each "Dealing with a waiting external call –... -
Page 57: Diverting Calls
Diverting calls The following settings are each confirmed by a message in the display and an acknowledge tone. Diverting calls internally Setting up call diversion ¢ ¢ ¢ Only one diversion destination can be set ê (system PIN if Call Divert ¢... -
Page 58: Setting The Base Station
Setting the base station Activating/deactivating music on hold The base station settings are made using a ¢ ¢ ¢ Ð registered handset. Base Music on hold Press to activate or deactivate music §OK§ ‰ Protecting against unauthorised on hold ( = on). -
Page 59: Connecting The Base Station
The following settings are only necessary The KEYPAD function must be activated when your PABX requires them; see the ISDN when you connect your Aton CL401 PABX user guide. to an ISDN PABX that is controlled using Please note: KEYPAD protocol. The digits/characters There are several ways of assigning an MSN to 0–9, * and # are sent as keypad informa-... - Page 60 Activating/deactivating the keypad during a conversation In addition to the permanent settings described above, you can also switch tem- porarily to the keypad. The setting only applies to the current external call and is automatically deacti- vated after the call is ended. Depending on whether Auto.
-
Page 61: Appendix
Appendix Faults and self-help with troubleshooting Care Not every problem signifies a fault in your ¤ telephone. In some cases, problems can Wipe the base station, charging cradle be resolved by briefly interrupting the and the handset with a damp cloth (do power supply to the base station (unplug not use solvent) or an antistatic cloth. - Page 62 Set the charge per unit (page 30). ¥ Check the base station's mains adapter A fee factor of CHF 0.10 is automatically (page 8). transferred in the Swisscom ISDN net- "Base Search" flashes in the display. work. The handset is set to Best Base and no base sta- The other party cannot hear you.
-
Page 63: Warranty/Maintenance/Repair/Approval
Country-specific requirements have been taken into consideration. The repair and the fault action are free of charge. Swisscom hereby declare that this device meets the essential requirements and Purchased devices other relevant regulations laid down in Directive 1999/5/EC. Repair services are performed free of... -
Page 64: Specifications
Specifications Base station power consumption Base station power consumption Recommended batteries In standby mode – Handset in charging cradle approx. 1.6 W Technology: – Handset outside charging approx. 1.3 W Nickel-metal-hydride (NiMH) cradle Size: AAA (Micro, HR03) During a call approx. -
Page 65: Notes On The User Guide
Notes on the user guide Press and hold (idle status). ¤ Press and hold the end call key until the This section explains the meaning of cer- handset returns to idle status. tain typographical conventions that are used in this user guide. Example of multiple line input Example of a menu input In many situations you can change set-... -
Page 66: Writing And Editing Text
¤ When you press and hold a key, the char- Save the changes. acters of that key appear in the display and ¤ Press the display key are highlighted one after the other. When §Save§ ¤ Then press and hold the a key. you release the key, the highlighted char- acter is inserted into the input field. -
Page 67: Accessories
Accessories Handsets Upgrade your device to a cordless PABX: Aton CLx308 handset with charging cradle Illuminated graphical colour display (65k colours) Illuminated keypad Handsfree talking Polyphonic ringer tones Directory for around 250 entries Picture CLIP SMS (precondition: CLIP must be enabled) Headset socket incl. -
Page 68: Mounting The Base Station To The Wall
Mounting the base station to the wall 100 mm approx. 9 mm... -
Page 69: Index
Index Base station best base station ....changing ....Access code . - Page 70 Call waiting appointment reminder ..accepting ....call acceptance ....activating/deactivating call waiting .
- Page 71 paging ..... registering ....Earpiece mode .
- Page 72 Menu end tone ....Key 1 (fast access) ....menu guidance .
- Page 73 PABX Saving (access code) ... . . connecting base station ..Screensaver ....saving access code .
- Page 74 using data (SMS) ....writing ....SMS centre changing number .
Need help?
Do you have a question about the ATON CL401 and is the answer not in the manual?
Questions and answers