Table of Contents
Advertisement
Quick Links
Advertisement
Table of Contents

Subscribe to Our Youtube Channel
Related Manuals for AVer CC30


Summary of Contents for AVer CC30
- Page 1 CC30 User Manual...
- Page 2 Federal Communication Commission Interference Statement This device complies with Part 15 of the FCC Rules. Operation is subject to the following two conditions: (1) This device may not cause harmful interference, and (2) this device must accept any interference received, including interference that may cause undesired operation.
- Page 3 © 2016 AVer Information Inc. All rights reserved. All rights of this object belong to AVer Information Inc. Reproduced or transmitted in any form or by any means without the prior written permission of AVer Information Inc. is prohibited. All information or specifications are subject to change without prior notice.
-
Page 4: Table Of Contents
INTRODUCTION ........................1 Features ........................2 Camera .......................2 Wireless Microphone ..................2 CaptureShare .....................2 Package Contents ......................3 INSTALLATION ........................4 Getting Familiar with the CC30 HD Camera ..............4 Camera .......................4 Rear Panel ......................5 Microphone ......................6 Connections........................7 Basic Installation Steps ..................8 Wireless microphone ..................10 Connection as a Conference Camera............... - Page 5 USE AVER CC30 CAPTURESHARE SOFTWARE ............18 Before You Begin ......................18 Windows ........................18 Tool Bar ......................18 Overlaytool ....................... 23 Recording Interface ..................25 Basic image setting ................... 30 Advanced image setting ................... 31 Video output mode .................... 32 Audio setting .....................
-
Page 6: Introduction
INTRODUCTION Thank you for choosing CC30 HD Camera. CC30 is a HD Camera set providing real-time video transmission with high resolution. Combined with 120-degree wide-angle lens design table to capture wider view and wireless movable wireless microphone allowing you can expand the scene size viewed and ensure the audio quality in a large-scale conference or classroom. -
Page 7: Features
Features Camera Simply Plug and Play Powerful 120° filed of view with 8M pixel resolution Advanced Full HD 1080p image streaming via HDMI USB 2.0 UVC 1.1 supported Built-in microphone Compatible with Video application (Skype™, Skype for Business, Google Hangouts™, Zoom™, WebEx™, Adobe Connect™, WebRTC, YouTube™... -
Page 8: Package Contents
Package Contents The following items are included in the package. Please check if each item is available and confirm if there are damage before using. [Note] Do not disassemble or modify the items by yourself. Contact the dealer for help when the items is failed to work. -
Page 9: Installation
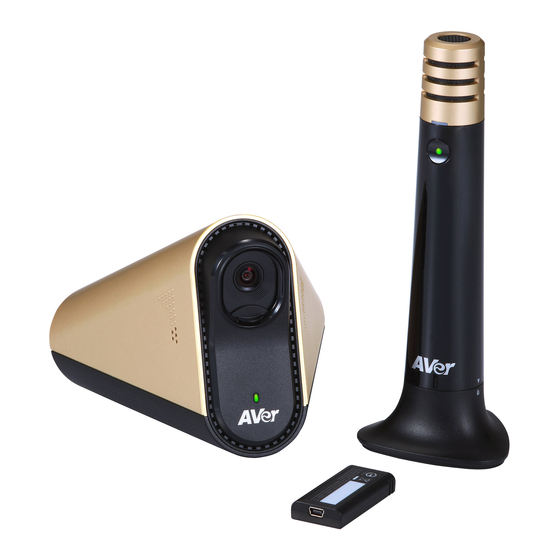
INSTALLATION Getting Familiar with the CC30 HD Camera The main CC30 HD Camera set is including a camera and a microphone. Following shows the appearance of each item and how to connect the set. Camera Name Descriptions Protect the lens and for the privacy. -
Page 10: Rear Panel
Rear Panel Name Descriptions Connect the audio cable to a speaker. And connect the other end of Line Out the audio cable to the line out. Connect the adapter to the power jack. And connect the other end of Power Jack the power cord to a suitable power outlet. -
Page 11: Microphone
Microphone Name Descriptions Show you the status of the MIC battery. MIC Battery Indicator Battery Low (Blinking red) Battery Normal Press this button to turn on/off the wireless microphone. The MIC Power Switch (Indicator) indicator shows you the status of the MIC power. Wireless microphone connected (Solid green) Out of range (Blinking green) Power Off... -
Page 12: Connections
Connections Power Adaptor Wireless Dongle AVer CC30 HDMI Kensington Lock Audio Cable HDMI Cable USB Cable Speaker Laptop Desktop Lecture Recording System... -
Page 13: Basic Installation Steps
Basic Installation Steps Following are basic installation steps of each item. Please install each item carefully for better use. Camera Place the wireless dongle into the wireless dongle slot on camera rear panel. Connect the power adaptor to any power source and the power jack located on the camera rear panel. When the camera starts up, the camera indicator flashes Red. - Page 14 Pull down the privacy shutter of the camera carefully. Clean thoroughly the lens with lens tissue for better viewing effect before using. [Note] 1. You may close the privacy shutter after using for protecting your privacy and protect the lens. 2.
-
Page 15: Wireless Microphone
Wireless microphone Hold the upper part of the microphone and turn counterclockwise carefully to open the microphone. Place two AA batteries in to the battery holder. The battery cathode are toward outside. Hold the upper part back to the base and turn clockwise carefully to close the microphone. [Note] When you close the microphone base, be sure aligning the latch slot avoiding causing damage. -
Page 16: Connect Speaker To Camera
Connect Speaker to Camera Use an audio cable to connect the line out port and a speaker. [Note] It is highly recommended that setting low volume level before turn on the speaker for protecting your hearing. -
Page 17: Connection As A Lecture Capture Camera
Connect HDMI to Lecture Recording System Use a HDMI cable to connect the HDMI output jack and a lecture recording system. Use AVer CC30 CaptureShare Software Please download the software from the following link: http://averusa.com/support/ Global http://www.aver.com/download-center... -
Page 18: Deployment
DEPLOYMENT This chapter explains how to deploy the CC30 HD Camera in a best suitable angle and position for a good visual and audio effect. Using the Camera 1. The camera provides 120° wide view angle. Set the camera able to capture all view expected. -
Page 19: Wireless Microphone Connection
5. Properly use the mini tripod to adjust the height of the camera for better recording effect. Wireless Microphone Connection 1. Build-in 10 meters distance transceiver provides mobility and free cabling arrangement. 2. Do not place the wireless microphone on the edge of a desk to avoid dropping and causing damage. - Page 20 3. Too many people use the wireless microphone simultaneously might cause the voice picked up unclearly. It is recommended that use the wireless microphone in turns. 4. Please make sure that there is no too much obstacle between the camera and the wireless microphone to avoid reducing voice pick-up and the transceiver effect.
-
Page 21: Web Video Conferencing
Web Video Conferencing 1. Open your Video application in your computer or laptop. (For more information, please refer to SOFTWARE APPLICATIONS chapter.) 2. Be sure the camera and the wireless microphone are set within the effective range. 3. The camera provides 120° wide view angle. Set the camera able to capture all view expected. 4. -
Page 22: Lecture Capture
6. You can use CC30 camera and AVer USB supported Visualizer simultaneously. Connect both cameras to your computer or laptop with the CaptureShare software for better effect when using lecture capture function. -
Page 23: Use Aver Cc30 Captureshare Software
[Note] The version may be different. Before You Begin Make sure all connections are connected successfully before you are using the CC30 CaptureShare application. Connections error will cause no image showing, no audio or no reaction. (For more information, please refer to INSTALLATION chapter.) - Page 24 No camera: Shows no camera screen. 1 camera: Shows 1 camera screen. 2 cameras: Shows 2 camera screen.
- Page 25 PIP mode: Picture in Picture mode. One camera small screen is displayed on the other camera full screen at the same time. Sound is usually from the main program only. Select source of camera then connect the camera to the computer or laptop. 2.
- Page 26 3. Record Desktop Click the button to show the Desktop Control. Click the button to start record the movement of the screen of the computer or the laptop. Click the button to pause recording. Click the button to stop recording. Click the button to choose the build-in microphone of the camera or the wireless microphone.
- Page 27 There are two Select Service: YouTube and LiveHouse.in There are four Resolution: 1080P, 720P, 480P, 360P You can set a Stream Key. After setting click the button to confirm the settings. 5. Open File Click the button to review all the recorded videos and captured shots. 6.
-
Page 28: Overlaytool
Overlaytool Click the button to pause the Overlaytool function. Mouse Mode Whiteboard Mode Click the button to enter Whiteboard Mode. The full screen transfers to a whiteboard. Click the button again to exit Whiteboard Mode. Undo Click the button to cancel or reverse the effects of a previous action. - Page 29 Line Click the button to make a line. Shape Click the button to make six different types of shapes Rectangle outline Rectangle Circle outline Circle Triangle outline Triangle Text Click the button to enter text. Erase Click the button to erase a specific object. m.
-
Page 30: Recording Interface
Recording Interface You can make different setting on each recording layout screen. This menu shows when the camera is connected to your computer and laptop successfully. You can adjust these functions before recording or during recording. Following are descriptions for each function: Volume Set the recording volume on the left of the screen. -
Page 31: Digital Zoom
Digital zoom Set the recording digital zoom on the right of the screen. Press the blue dot and move up to zoom in. Conversely move down to zoom out. Capture recording Click the button on the bottom of the screen to take a screen shot. You can use the Capture recording function before recording or during recording. - Page 32 Recording Click the button to start recording. Click the button to pause recording. Click the button to stop recording. Stream setting Streaming is a technology that the videos are broken up into several sections before sending to the end user. The process of the transmission and playback of the video are simultaneous in order to shorten the download times.
- Page 33 There are two Select Service: YouTube and LiveHouse.in There are four Resolution items: 1080P, 720P, 480P, 360P You can set a Stream Key. After setting click the button to confirm the settings.
- Page 34 Recording Setting Click the button on the top of the screen to enter Recording Setting.
-
Page 35: Basic Image Setting
Basic image setting Name Descriptions (1) Brightness Adjust the screen to be brighter or darker. Value: -5,-4,-3,-2,-1,0,1,2,3,4,5 (2) Contrast Adjust the color and light of the picture. Value: 0,1,2,3,4 (3) Saturation Adjust the degree of purity of a color. Value: 1,2,3,4,5,6,7,8,9,10. (4) Sharpness Higher the sharpness is, clearer the picture. -
Page 36: Advanced Image Setting
Advanced image setting Name Descriptions (1) Backlight compensation Backlight compensation allows the camera to adjust the exposure of the entire image to properly expose the subject in the foreground. Value: on/off (2) Noise reduction Adjust the level of reduction of noise during recording. Value: 0,1,2,3 (3) Power frequency It depends on what voltage the country uses. -
Page 37: Video Output Mode
Video output mode Name Descriptions (1) Video output mode Value: H264/MJPG/YUY2 (2) Sensor mode Value: Standard/60fps/8M (3) Frame rate Higher the RATE is, smoother the video. Value: 30fps/20fps/15fps/10fps/5fps (4) Resolution As the resolution goes up, the image becomes clearer, sharper, more defined, and more detailed as well. -
Page 38: Audio Setting
Audio setting Name Descriptions (1) Microphone setting Enable both the CC30 built in microphone and CC30 wireless microphone together. Value: Enable/Disable (2) HDMI output setting Enable CC30 HDMI audio output Value: Enable/Disable. (3) More information Click this link to learn more about CC30 audio setting. -
Page 39: Android
Android Use your android mobile phone as remote controller to control the camera properly. Improve the mobility of a conference or a course. The Same Network The computer or laptop and the mobile phone should share the same Wi-Fi network. Connect to CaptureShare Software 1. - Page 40 2. Find connection information through CaptureShare software on your computer or laptop. In the Network Information of the Other Setting shows IP address or QR code. 3. Enter the IP address or scan the QR code to the CaptureShare APP in your android mobile phone.
- Page 41 4. Select the source as CC30. [Note] The camera is required to connect to your computer or laptop. 5. Press the button firstly and press the button to start recording.
- Page 42 6. After starting recording, your computer or laptop will shows Desktop Control. 7. Press the button to pause recording. Press the button to stop recording. [Note] You can pause or stop recording on your computer or laptop.
- Page 43 8. When the recording is complete, the recording file is saved on your computer or laptop. [Note] Click the button in the CaptureShare software in your computer or laptop to review the recorded videos. 9. Press the button to start stream. This function should set through the CaptureShare software in your computer or laptop.
- Page 44 10. Press the button to capture the screen shot. [Note] Click the button in the CaptureShare software in your computer or laptop to review the captured shots. 11. If you choose the source as Desktop, the recording video and the captured shots will be the screen of your computer or laptop.
-
Page 45: Software Applications
WebEx™, Adobe Connect™, WebRTC and etc.) 2. Some Video application needs specific account before using. 3. Set the CC30 as your primary camera, microphone and speaker devices in your application. (For more information, please refer to chapter INSTALLATION.) 4. Ready to make a video call. -
Page 46: Skype
Skype 1. Download Skype from the official website. (Reference: http://skype.pchome.com.tw/download.html) [Note] A Skype account is required. 2. Install Skype 3. Open Skype 4. Choose CC30 as video camera. - Page 47 5. Choose CC30 Wireless Microphone (Echo canceling microphone) as video microphone. Start to make a video call.
-
Page 48: Google Hangouts
Google Hangouts 1. Open your Google Hangouts. (Reference: https://hangouts.google.com/) [Note] A Google account is required. 2. Choose CC30 as video camera. 3. Choose CC30 Wireless Microphone (Echo canceling microphone) as video microphone. 4. Start to make a video call. -
Page 49: Zoom
Zoom 1. Download Zoom from the official website. (Reference: https://zoom.us/support/download) [Note] A Zoom account is required. Or you can use Google or Facebook account to register. 2. Install Zoom. 3. Open Zoom. 4. Choose CC30 as video camera. - Page 50 5. Choose CC30 Wireless Microphone (Echo canceling microphone) as video microphone. 6. Start to make a video call.
-
Page 51: Troubleshooting
TROUBLESHOOTING Q: There are items in package are damaged. A: Do not disassemble or modify the items by yourself. Contact the dealer for help when the items is failed to work. Q: No audio. Please make sure the wireless microphone is not muted. Please make sure the wireless microphone connections are properly connected as illustrated in the manual. - Page 52 Q: Unable to booting the CaptureShare application Please make sure if the installation is successful. Restart your computer or laptop before use the CaptureShare firstly. Try to reinstall the CaptureShare. Q: Unable to connect the computer or laptop to the mobile phone when use the CaptureShare. Please make sure if the CaptureShare software on your computer or laptop and the CaptureShare APP on your mobile phone installed successful.
- Page 53 Please make sure if the camera connected to your computer or laptop with USB cable successfully. Please make sure if the CC30 is chosen as video camera. Please do not place objects before the camera to avoid influencing the recording effect. It is recommended the use properly the mini tripod to adjust the height of the camera for better recording effect.
-
Page 54: Specifications
SPECIFICATIONS Camera High resolution 8MP 1/3.2” CMOS Image Sensor Zoom ratio 8X digital Field of view 120° (Diagonal), 100° (Horizontal) @ 8MP full resolution Lens f-number F2.0 Built-in Microphone Integrated dual full duplex omni-directional microphone with AEC and NR Video encoder MJPEG, H.264 AVC high profile/baseline profile, H.264 SVC Resolution 3264x2448@5fps, 1080p@30fps, 480p@60fps,... - Page 55 Wireless Microphone Polar pattern Omnidirectional RF carrier frequency range 2.404 to 2.476 GHz Working range 32.8 ft (10 m)1 Microphone sensitivity -36 dB +/- 3 dB Microphone SNR 58 dBA @ 1K Hz, 1 Pa A weighted LED indicator Power and wireless microphone connection status LED x 1 Battery status LED x 1 Battery type AA x 2...
Need help?
Do you have a question about the CC30 and is the answer not in the manual?
Questions and answers