Advertisement
SPARTAK ENTERPRISES, INC.
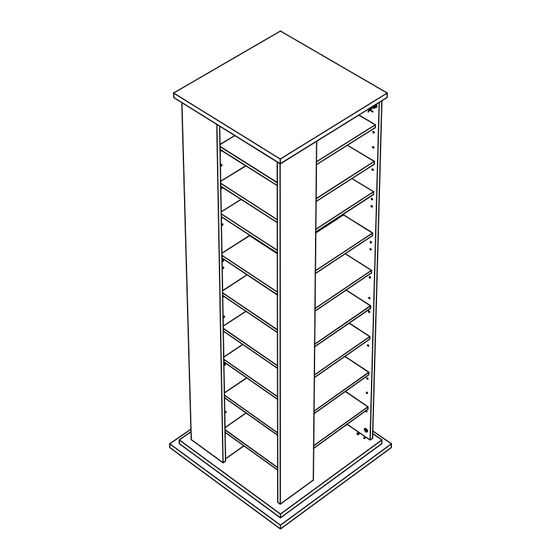
MEDIA TOWER
Model #2392
LOT #2243
IF PARTS ARE MISSING AND OR DEFECTIVE, IF INSTRUCTIONS ARE NOT CLEAR
OR IF YOU ARE EXPERIENCING PROBLEMS ASSEMBLING OUR PRODUCT.
BEFORE YOU RETURN THE PRODUCT TO THE STORE,
PLEASE CALL US TOLL FREE FOR CUSTOMER SERVICE ASSISTANCE
(888) 777-8250
OR SEND US EMAIL AT
help@spartakent.com
PLEASE HAVE ITEM NUMBER READY, AND A REPRESENTATIVE WILL GLADLY ASSIST YOU
SPARTAK ENTERPRISES, INC. 841 E. FRANCIS STR. ONTARIO, CA. 91761 TEL; 909/930-0670 FAX; 909/930-9921
Advertisement
Table of Contents

Related Manuals for venture horizon 2392


Summary of Contents for venture horizon 2392
- Page 1 SPARTAK ENTERPRISES, INC. MEDIA TOWER Model #2392 LOT #2243 IF PARTS ARE MISSING AND OR DEFECTIVE, IF INSTRUCTIONS ARE NOT CLEAR OR IF YOU ARE EXPERIENCING PROBLEMS ASSEMBLING OUR PRODUCT. BEFORE YOU RETURN THE PRODUCT TO THE STORE, PLEASE CALL US TOLL FREE FOR CUSTOMER SERVICE ASSISTANCE...
- Page 2 HARDWARE PART # DESCRIPTION CAMLOCK COVER CAP CCPZXX CAMLOCK CAMLT12 BOLT CAMBT16 ANGLE BRACKET BM25 EURO SCREW SPE610BL SHELFSUPPORT BPXX54 SWIVEL PLATE TRNTPL SWIVEL BOLT TRNTSC BUSHING TRNTIN DOWW830 WOOD DOWEL TOOL REQUIRED PHILLIPS SCREWDRIVER HAMMER...
- Page 3 NOTE: FIRST MAKE SURE THAT YOU HAVE ALL OF THE PARTS LISTED ON THIS SHEET. IF YOU ARE MISSING ANY PIECE(S), DO NOT ASSEMBLE THE UNIT. INSTEAD, CALL OUR CUSTOMER SERVICE NUMBER AT: (888) 777-8250. WE WILL BE HAPPY TO ASSIST YOU. 2392A-Top 2390D-Divider 4pcs...
- Page 4 Do not tighten screw on the angle bracket all the way in this step. Leave it a bit loose until you attach part D in the next step. Then you will tighten the screws. CAMLT12 UNLOCKED POSITION Use small hole #6 from the left end.
- Page 5 Press part (D) in the groove of part (E). The holes in part (D) should face away from part (E), except for holes where brackets are attached, and RED marked end of it should be on the same side as on part (E). Make sure part (E) and (D) are aligned with each other on both ends.
- Page 6 First Step TRNTIN Unfinished Side DOWW830 CAMBT16 Second Step Finshed Side Forth Step Third Step TRNTSC TRNTPL...
- Page 7 Lock camlocks on panels E as you install them before you proceed to next one. Otherwise panels may fall over and cause damage. Make sure you have on top only RED marked ends of panels D & E Turn camlocks clockwise using flat (preferred) or phillips scrdriver until full stop(slightly over 1 2 a turn...
- Page 8 Install top first. Next install one shelf in the middle (hole#8) on each side to restrict movement of inside dividers D. Do not tap with hammer onto shelf supports, instead twist them when inserting in. Turn camlocks clockwise until full stop (slightly over 1 2 a turn to lock the bolt) CCPZXX...
Need help?
Do you have a question about the 2392 and is the answer not in the manual?
Questions and answers