Table of Contents
Advertisement
Advertisement
Table of Contents

Related Manuals for sky rider EAGLE PRO DRW676


Summary of Contents for sky rider EAGLE PRO DRW676
- Page 1 User’s Guide for Model DRW676 v1657-01...
- Page 2 Warnings & Precautions Important Safety Instructions • Increase the separation between the equipment and receiver. • Read and follow all instructions. • Connect the equipment into an outlet on a circuit • Keep these instructions for future reference. different from that to which the receiver is connected. •...
-
Page 3: Table Of Contents
Headless Mode Flips & Tricks WiFi Mode � � � � � � � � � � � � � � � � � � � � � � � 16 Sky Rider Drones App WiFi Flight Start Screen Flight Screen... -
Page 4: Faa Registration
FAA Registration As of December 21, 2015, the U.S. Federal Aviation Administration (FAA) has mandated that all Unmanned Aircraft Systems (UAS) of a certain weight must be registered with the FAA before flying outdoors. This includes aircraft commonly referred to as drones, quadcopters, Unmanned Aerial Vehicles (UAV), and the like. -
Page 5: Orientation
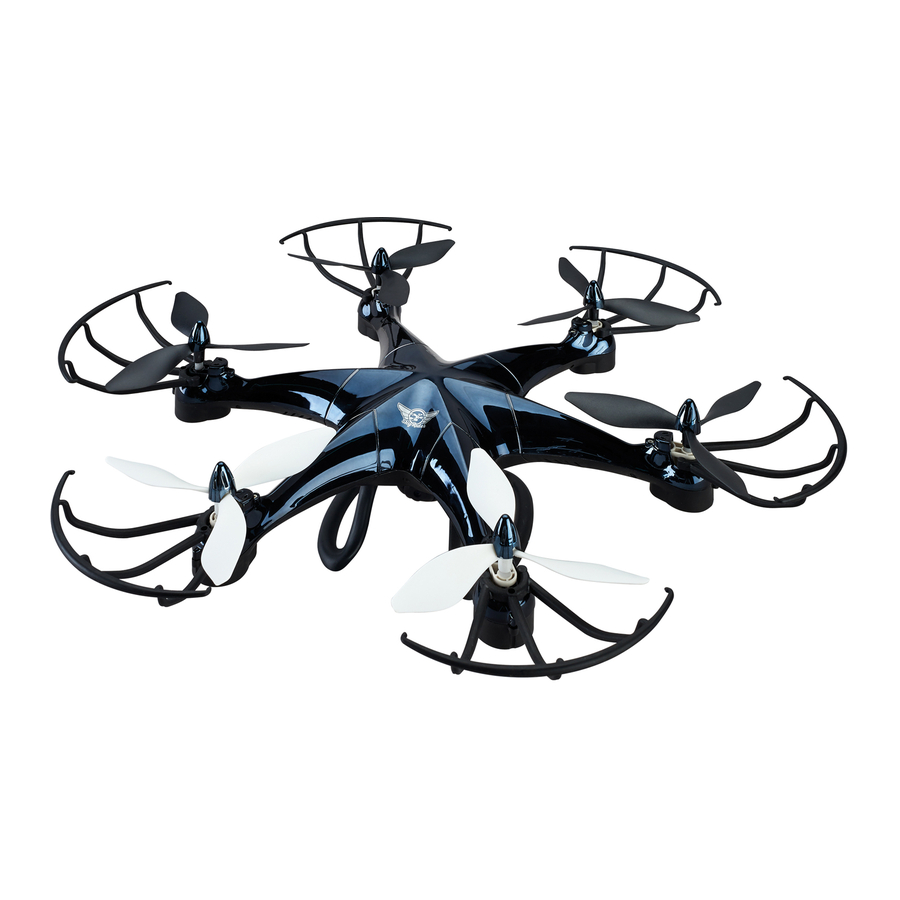
Orientation Includes • Remote control: requires 4 AA batteries (not included) • Rechargeable lithium polymer battery • USB cable for battery recharge • 6 replacement rotors • Screwdriver • Detachable smartphone cradle Overview Rotors Craft Chassis White rotors indicate front of craft. -
Page 6: Remote Control
Remote Control Antenna Power/Status Indicator Flip Press and push Right Control Stick to perform a flip. Left Control Right Control Stick Stick Increase Throttle: Pitch: push forward push forward/ Decrease backward Throttle: Roll/Bank: push backward push left/right Yaw/Spin: push left or right Power Switch Lights/Flight... -
Page 7: Batteries & Charging
Batteries & Charging Battery Info BATTERY SPECIFICATION DURATION CHARGE TIME TYPE Craft 3.7V/750mAH 6 to 8 minutes Approx. 120 Li-Po Battery flight time minutes Remote AA 1.5V Approx. 18 hours Non-rechargeable Batteries Remote Control Battery Installation Use included screwdriver 4 x AA Batteries Battery Cover... -
Page 8: Battery Charging Procedure
Battery Charging Procedure The craft’s lithium-polymer battery must be charged before the unit can be flown. Before charging, be sure the craft and remote control are powered off. Failure to do so may result in injury. Step 1 Make sure the craft is powered OFF, then open the battery cover by gently pulling towards the rear of the craft. - Page 9 Step 4 Connect the USB charging cable to the USB port of a powered ON computer. LIGHT STATUS While charging, the red light in the USB charging cable will be ON. Red Light ON Charging When charging is complete, the red light in the USB charging cable will be OFF.
-
Page 10: Pre-Flight Calibration
Pre-Flight Calibration Craft/Remote Link Before flying, the craft and the remote must be linked together, and the gyroscopes on the craft must be allowed to calibrate to ensure smooth and level flight. Begin with the craft and remote powered off. Step 1 Place the craft on a flat, level surface before you begin. - Page 11 Step 4 Push the Left Control Stick directly forward, wait for a chime to sound, then pull the stick directly backward, and wait for a second chime. When this last chime has sounded, the craft is calibrated and ready to fly� Step 5 Attempt a stable hover, low to the ground or surface you started on.
-
Page 12: Trim Adjustment
Trim Adjustment Setting Trim & Countering Drift Even after the craft is calibrated, it may show a tendency to drift while airborne. Adjusting the trim will help counter this effect and allow you to better control the craft. To avoid potential damage, adjust the trim while in a stable hover, and do not make any sudden movements with the flight controls. - Page 13 Craft pitches/angles forward or backward. Use Pitch Trim buttons left of the Right Control Stick. (Front) Craft rolls/banks left or right. Use Roll Trim buttons under the Right Control Stick. (Front)
-
Page 14: Flying Tips & Features
Flying Tips & Features Tips for Safe Operation • Only fly in large, open spaces, such as a field or a very large indoor area, free of obstacles like power lines, trees, ceiling fans, etc. • When flying indoors, avoid walls and ceilings, as the craft will be drawn towards them if closer than 2 to 3 feet. -
Page 15: Auto-Reverse
Auto-Reverse To enable Auto-Reverse, press down (into the body of the remote) on the Right Control Stick� The remote will emit a chime, and the craft will begin flying in the reverse of the direction it was originally flying. Throttle control will still function, but any directional change from the remote will immediately disable this feature. -
Page 16: Wifi Mode
Scan the appropriate QR code below to download and install the free app software. The app can also be found on the Apple App Store or Google Play Store by searching for Sky Rider Drones� WiFi Flight Note that WiFi control may be disabled if the flying area is experiencing interference from nearby 2.4G equipment. -
Page 17: Start Screen
Step 3 Open your phone’s WiFi settings and activate WiFi, then search for and select Sky Rider from the WiFi networks menu. Once connected, open the app and click on the Play or Start icons to begin flying. When WiFi mode is active, you can save video and images directly to your smartphone. -
Page 18: Flight Screen
Flight Screen Note that the airplane and runway graphic (pictured below) is replaced by the view from the craft’s on board camera when using the app. Photo Video Gallery Craft Speed Intuitive Screen Mode Controls Take a photo. Take a video. Access pictures 30/60/100% and video. -
Page 19: Virtual Reality (Vr) Mode For Vr Headsets
Virtual Reality (VR) Mode for VR Headsets VR Mode splits the phone’s screen for use in a VR headset, allowing any non-pilot to experience the flight of the craft in a fully immersive environment. Simply press the VR Mode button on the screen, place your phone in a VR headset and put on the headset for a drone point-of-view flying adventure. -
Page 20: Attaching The Smartphone Cradle
Attaching the Smartphone Cradle You can use your smartphone and the remote control together by attaching the included smartphone cradle to the top of the remote. This can be useful for photography and video, or for flying the craft just by watching the screen. Step 1 Step 2 Step 3... -
Page 21: Factory Reset
Factory Reset Reset Procedure If for any reason the craft is experiencing difficulty flying or is behaving erratically, and there is no physical damage to any of the mechanical components, the unit may need to be reset to the factory default settings. Step 1 Power ON the remote control. - Page 22 Step 4 Place the craft on a flat horizontal surface, then push both control sticks on the remote all the way down and left, and hold for 2-3 seconds. The lights will begin quickly flashing again. When the lights stop flashing and are solid again, the craft has been reset and is ready to fly.
-
Page 23: Troubleshooting
Troubleshooting If you are experiencing problems using or flying the craft, consult this table. PROBLEM POSSIBLE CAUSES SOLUTION Craft is • No power to remote • Check remote batteries, unresponsive or craft replace if needed • Poor contact between • Check craft battery, be power plugs sure it is fully charged •... -
Page 24: Repair
Repair REMINDER: Pilots are responsible for any damage caused by improper use� Rotor Replacement Rotor Cap The craft comes with 6 replacement rotors, to be used if the originals are broken or badly damaged. To replace a rotor, first remove the rotor Gently pull upwards and remove rotor cap. -
Page 25: Parts
Parts Parts Replacement If any major components of the craft are damaged beyond repair, you can order new parts by contacting the customer support number, or by following the web address below to the product page and clicking on the “Parts and Accessories” tab. Product web address: http://gpx�com/drw676�html Parts Diagram... -
Page 26: Parts List
Parts List PART NAME QUANTITY Rotor A Rotor B Motor A Motor B Lower Frame Rotor Cap Upper Frame Battery Battery Cover LED Cover Landing Skid... -
Page 27: Company Information
Company Information Contact Information Warranty Website: www.gpx.com See included 30 Day Warranty for warranty information. Email Support: prodinfo@dpiinc.com The warranty and the most up-to-date Email Parts: partsinfo@dpiinc.com version of this user’s guide can also be Phone Support: 1-888-999-4215 found at: http://gpx�com/drw676�html International Support To download this User’s Guide in English, Spanish, and French, or to get answers to frequently asked questions, visit the support section at: www�gpx�com...
Need help?
Do you have a question about the EAGLE PRO DRW676 and is the answer not in the manual?
Questions and answers