Table of Contents
Advertisement
Advertisement
Table of Contents

Related Manuals for illy X8 Iperespresso


Summary of Contents for illy X8 Iperespresso
- Page 1 I N S T R U C T I O N M A N U A L...
- Page 2 GENERAL OPERATING RULES Carefully read the instruction manual and warranty limitations The machine must be connected to a grounded power outlet. The machine must be kept clean by frequently washing the grid, the driptray, the capsule holder, the tank, the steam knob, and the air intake EXTREMELY IMPORTANT: never immerse the machine in water or put it in the dishwasher.
-
Page 3: Table Of Contents
MACHINE PARTS ................28 table of contents IMPORTANT SAFEGUARDS. -
Page 4: Machine Parts
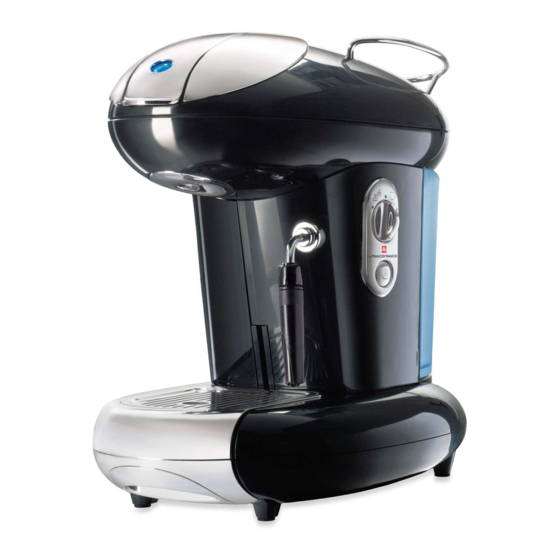
machine parts TEMPERATURE LED SIGNALS coffee ok - steam ok - signals when machine is heating, when temperature is not correct to make coffee, and signals a warning if boiler is empty LEVER TO OPEN/ CLOSE CAPSULE COMPARTMENT (INTERNAL) CAPSULE COMPARTMENT BREWING UNIT HOT WATER/STEAM WAND... - Page 5 POWER CORD CUP HOLDER WATER TANK CONTAINER FOR USED CAPSULES (also contains some liquid) MAIN ON(I)/OFF(O) SWITCH DATA PLATE (below)
-
Page 6: Important Safeguards
important safeguards When using electrical appliances always follow the safety - Do not place the machine on, or near, electrical or gas burners precautions below or inside a hot oven - The machine must be turned USING THE ESPRESSO MACHINE on only when being used. -
Page 7: Cleaning The Espresso Machine
IN CASE OF MALFUNCTIONING a grounded power socket with minimum voltage of if power re- quired is 230Vac if power required is 110Vac - Do not use the appliance if the cord or plug are damaged or if the - If the plug and the socket are not compatible, have the plug re- appliance shows signs of malfunctioning or if it has been damaged in placed by qualified personnel any way. -
Page 8: Machine Signals
machine signals Thanks to the Multi-purpose LED screen, the machine guides the user for correct operation BLUE Light solid The machine is ready to make an espresso, or produce hot water BLUE Flashing The machine is warming up to make espresso and/or hot water BLUE YELLOW Light solid The machine is ready to steam... -
Page 9: Installation And Start-Up Of Espresso Machine
installation and start-up of espresso machine Before connecting the machine to a power supply, carefully read the safeguards listed in the previous chapter Install the cup stand (included in the package) on the top part of the machine; insert the feet in the holes and press firmly Remove the water tank by tipping top of tank slightly backwards first . -
Page 10: Turning On/Off
turning on/off BLUE Before switching on the machine check the water level in the tank; if necessary add water as described previo- usly. To switch the appliance on, push the main on/off switch and move it into the " " position . As the appli- ance warms up;... -
Page 11: Drip Tray Adjustment
drip tray adjustment The X8 appliance is designed to adust to any type of cup you choose To adjust the drip tray, pull the lever located under the tray When the desired position has been reached, pull the lever: position recommended for large cups position recommended for small cups Note: the adjustment must be made before starting the delivery of coffee... -
Page 12: Making Coffee
making coffee The X8 machine is designed to function exclusively with “Metodo Iperespresso” capsules Make sure that the temperature LED is blue and lit solidly Place a cup under the coffee group . Unlock and lift the opening lever of the capsule compartment until the cap- sule is ejected and the empty capsule holder falls back to its normal position (if the holder contains a capsule, it will be expelled and dropped into the used capsule container) Insert the capsule as shown in the picture and make sure that it is inserted correctly... -
Page 13: Making Cappuccino
making cappuccino The machine is equipped with a steam arm to froth milk and prepare one or more cappuccinos Prepare one or more coffees following the steps outlined below Make sure that the capsule compartment is closed Froth the milk as follows: Remove the capsule from the unit. -
Page 14: Making Hot Water
making hot water YELLOW The steam nozzle fitted to the machine can also heat up water Remove the capsule from the unit and any milk residue from the steam nozzle Press the steam button ; the steam icon on the front display flashes to indicate that the machine is heating up Wait for the steam switch to light up (machine ready) followed by a short beep Fill a metal pitcher with the desired quantity of water to be heated... -
Page 15: Preparing Coffee After Generating Steam
preparing coffee after generating steam After generating steam, the appliance cannot produce coffee until the correct coffee temperature has been reached (the temperature LED turns solid blue), or the taste of the coffee will be ruined Therefore, after steaming, it is important to return to coffee mode by pushing the steam button During the cooling stage (approx. -
Page 16: Descaling
descaling The formation of limescale is a natural consequence of using of the machine Descaling is necessary every 2-3 months; if the water is very hard, descaling should be done more frequently Descaling may be done with a non-toxic descaling product for coffee machines available in the market Note: to descale, remove the pannarello wand from the steam spout: loosen the ring nut without removing it and disassemble the top part of the pannarello wand from the steam spout Switch the appliance off... - Page 17 Leave the descaling solution inside the machine (switched off) for approx. 10-15 minutes Repeat steps ( ) to ( ) until the descaling solution in the tank is completely used When the descaling solution is finished, remove the water tank, rinse it carefully and fill it again with fresh drinking water Turn the machine on by moving the main on/off switch to the "...
-
Page 18: Cleaning And Maintenance
cleaning and maintenance The appliance and its components must be cleaned at least once a week Keep the water in the tank fresh; wash the tank and fill it daily with fresh drinking water Do not use ethyl alcohol, solvents, abrasive sponges and/or aggressive chemicals Switch the appliance off and disconnect the plug from the power socket Remove the water tank and wash it Remove the grill and wash it with warm water... - Page 19 Remove the top part of the pannarello wand and wash it with warm water Wash the steam spout with a moist cloth - Extract the used capsule tray by grasping and pulling firmly Empty the residue in the capsule container (Caution: used capsules and some liquid from the coffee extraction will be in the tray) Insert the capsule container as follows: lign the front part in the machine...
-
Page 20: Technical Data
technical data recommendations Casing: ABS To enjoy a high quality espresso, remember to: Internal boiler: Stainless steel - Change the water in the tank daily and empty the drip tray at least once a week Tank: 1.2 liters - Use water with low calcium content to reduce deposits inside the Pump: 15 bar machine Used capsule tray capacity: 7 capsules... -
Page 21: Troubleshooting
PROBLEM SOLUTION IF PROBLEM PERSISTS Connect the plug to a correct power socket The machine does not turn on Move the main selector switch to the "I" position Fill the water tank Check that the capsule was inserted correctly The machine does not make coffee Turn the selector knob on the right side of the machine Carry out a decalcification cycle... -
Page 22: Warranty Limitations
warranty limitations The warranty does not cover damage caused by: - Calcium or by a lack of periodical decalcification In the EU: the WEEE symbol used on this product means that it can not be - Operation with a voltage that differs from the one indicated on the plate disposed of with other domestic waste and must be collected separately. - Page 23 DICHIARAZIONE DI CONFORMITÀ CE - DECLARATION OF CE CONFORMITY DÉCLARATION DE CONFORMITÉ CE - CE KONFORMITÄTSERKLÄRUNG DECLARAÇÃO DE CONFORMIDADE CE - EG CONFORMITEITSVERKLARING illycaffè S.p.A. Dichiara sotto la propria responsabilità che la macchina in seguito denominata, in base alla sua progettazione, costruzione e per l'utilizzo, è conforme alle disposizioni delle direttive CE in materia di sicurezza e salute Declares under its sole responsibility that the following appliance conforms to the CE directive health and safety provisions as regards design, construction and use thereof Déclare sous sa propre responsabilité...
- Page 24 S.p.A. - Via Flavia 110 - 34147 Trieste - Italy - www.illy.com...
Need help?
Do you have a question about the X8 Iperespresso and is the answer not in the manual?
Questions and answers