
Subscribe to Our Youtube Channel
Related Manuals for LG LKD1000


Summary of Contents for LG LKD1000
- Page 1 Dynamic Controller Owner’s Manual MODEL : LKD1000 Before installing and using the product, please read this owner's manual carefully and retain for future reference.
- Page 2 • Caution: Danger of explosion if battery is incor- CAUTION rectly replaced. Replaced only with the same or RISK OF ELECTRIC SHOCK equivalent type recommended by the manufac- DO NOT OPEN turer. Dispose of used batteries according to the manufacturer’s instructions. CAUTION: TO REDUCE THE RISK •...
- Page 3 IMPORTANT SAFETY INSTRUCTIONS CAUTION: PLEASE READ AND OBSERVE ALL WARNINGS AND INSTRUCTIONS IN THIS OWNER’S MANUAL. AND THOSE MARKED ON THE PRODUCT. RETAIN THIS BOOKLET FOR FUTURE REFERENCE. This product has been designed and manufactured to assure personal safety. Improper use can result in electric shock or fire hazard.
-
Page 4: Table Of Contents
INTRODUCTION ........5 Operation the connected camera via the DVR...............14 About LKD1000 Controller .........5 Operation of the camera connected to the LKD1000 controller directly....14 Features ...............5 Camera Setup Menu .........15 Identification of the Controller ......6 Camera setup menu overview ......15 Preset Settings ..........15... -
Page 5: Introduction
INTRODUCTION About LKD1000 Controller This controller is the brand of Dome Camera and DVR Control Keyboard of LG in a surveillance system. You can operate this system very easily and conveniently because of design structure based on biotechnology and various functions for users. In addition, the controller can control using the functions of the LG Dome Camera and LG DVR system. -
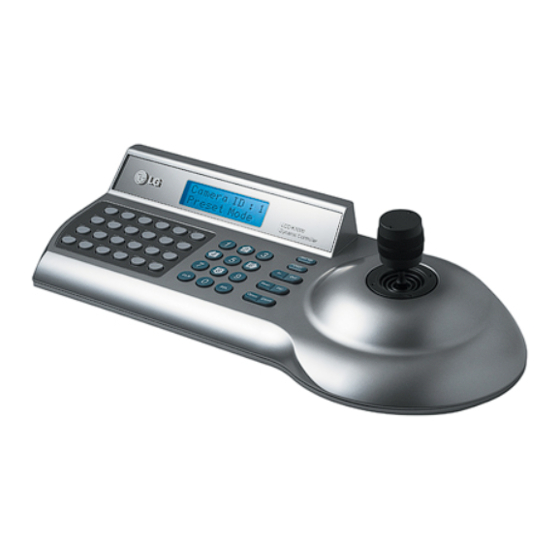
Page 6: Identification Of The Controller
Identification of the Controller d e f k l m n... - Page 7 Controller’s menu. LKD1000 controller, connect the RS-485 1CH of the other LKD1000 controller to this port using the 4 Set Up Button RS-485 cable. Opens controller’s main Set Up menu in the dis- play window.
-
Page 8: Hookup And Settings
Up to LKD1000 16 DVRs. Controller 3 (SLAVER) LKD1000 Controller 4 (SLAVER) Camera 1 Camera 2 Up to 16 controllers. Up to 256 cameras. Note: Please refer to the LG DVR and Camera manuals as necessary for additional connection informa- tion. -
Page 9: Rs-485 Connection
When connecting lines, connect the TX - of the To RS485 1CH LKD1000 controller to RX - of the LG DVR and TX + of the LKD1000 controller to RX + of the LG DVR correctly. To RS485 2CH •... -
Page 10: System Operation
The Setup menu has several submenus. All of these main menus are further divided into submenus. 1. Check that the LG DVR or the camera, the moni- tor and peripherals are connected correctly and Press Set Up to display the setup menu. -
Page 11: Change Password
Change ID Setting 9 10 11 12 13 14 15 16 [ENTER] : Add DVR [CLR] : Del DVR This LKD1000 controller has the controller ID. If you 3. Enter new password using the number buttons About LKD1000 LKD1000 use 2 controller or more simultaneously, set the con- then press ENTER. -
Page 12: Auto Lock Setting
5 minutes. Auto Lock LKD1000 played. Factory Default If you need to, you can reset the LKD1000 controller to its original factory settings. Factory Default LKD1000 Please Enter DVR ID Target DVR ID : _ Please Enter DVR ID 1. - Page 13 3. Press ENTER to change the DVR control mode. • Displays or removes the System Log List. DVR KEY EMULATION /DVR1 • MARK INPUT KEY : Sets the mark point for recording search. • COPY Copies the recording data to an external device.
-
Page 14: Operation The Connected Camera Via The Dvr
Operation of the camera con- era via the DVR. nected to the LKD1000 control- ler directly. You can control the connected camera via the LG DVR KEY EMULATION /DVR1 DVR KEY EMULATION /DVR1 DVR using the LKD1000 controller. You can control the camera connected to the INPUT KEY : 1. -
Page 15: Camera Setup Menu
Please Enter DVR ID Target DVR ID : _ Camera Setup Menu Preset Settings DVR KEY EMULATION /DVR1 DVR KEY EMULATION /DVR1 Preset position is the function to register camera The Camera Setup menu has several sub- INPUT KEY : monitoring positions (preset positions) associated menus: System Setup, Preset Data Load, and with position numbers. - Page 16 INPUT KEY : SET PRESET /DVR1/CAM1 Go to Preset Number (0~127) Tour Speed (0~127) SET PRESET /DVR1/CAM1 DVR KEY EMULATION /DVR1 /DVR1 Park Time(1~255) : Number (0~127) INPUT KEY : SET PRESET /DVR1/CAM1 Speed (0~127) /DVR1/CAM Park Time(1~255) : Number (0~127) GO TO PRESET /DVR1/CAM1 Changing to Picture at Preset Position...
- Page 17 DVR KEY EMULATION /DVR1 INPUT KEY : SET PRESET /DVR1/CAM1 EDIT GROUP /DVR1/CAM1 To edit the group 5. Enter the preset number that is already registered and press ENTER. Set Preset Edit Group You can create a group using preset positions that The preset number is added to the group or Go to Preset Group Tour...
- Page 18 INPUT KEY : INPUT KEY : 1/CAM1 CLEAR ALL PRESET /DVR1/CAM1 [Clear All Preset] Are you sure? Group #1 /DVR1/CAM1 VR1/CAM /DVR1/CAM select gr : To tour the group To clear the preset position 1/CAM1 You can tour the group that is registered already. You can delete a memorized preset position.
- Page 19 2 to 8. memorized in the camera’s memory. SET ALARM INPUT /DVR1/CAM1 (This operating description is based on the LG prod- 6. Repeat the steps 3-6 to set additional Alarm Alarm Input : OFF ( 4 : ON 6 : OFF ) uct.)
-
Page 20: Auto Pan Setup And Activation
6. Repeat steps 3-5 to set additional Alarm Output. inputs 1 to 4 respectively. If alarm input 1 comes in, the camera sends output signals via the alarm output 1 connector on the camera. (This operating description is based on the LG prod- VR1/CAM SET ALARM INPUT /DVR1/CAM1 uct.) -
Page 21: Pattern Setup And Activation
Pattern Setup and Activation 3. By moving the joystick, move the camera to a point you want. You will perform the pattern setup and the pattern 4. Enter a [Auto-Pan No.#] number then press play. ENTER. Note: 5. Enter a [Speed] (0-127) to move to the preset The available patterns differ depending on camera. -
Page 22: Privacy Setup
RECORD PATTERN /DVR1/CAM1 PLAY PATTERN /DVR1/CAM1 Record Pattern [Play Pattern] Pattern No : _ Pattern No : _ 4. Perform desired camera operations by moving 4. Use number buttons to enter the memorized pat- (1~4) (1~4) the joystick or pressing In/Out buttons. tern index number then press ENTER. -
Page 23: Communication Settings
Display : OFF (4:ON 6:OFF) (1~8) Baudrate (9600) Stop Bit ( Protocol (No Protocol) Data Bit ( [LG old], [Pelco P], [Pelco D] and [LG Zoom Zone No : Parity Bit (NONE) Speed (12 Baudrate (9600) Stop Bit ( Cameras]. - Page 24 COMMUNICATION /DVR1/CAM1 Baud Rate (Communication Speed) Setting COMMUNICATION /DVR1/CAM1 Data Bits Setting PROTOCOL /DVR1/CAM1 DATA BIT /DVR1/CAM1 The speed of communication between the system This item lets you set the number of the data bits for Protocol (No Protocol) Data Bit (8bit) controller and the camera.
-
Page 25: Camera Settings
Data Bit (8bit) Stop Bit (1bit fixed) Speed (127,127,3) STOP BIT /DVR1/CAM1 CAMERA SETTING /DVR1/CAM1 Sync Communication Setting Manual Focus Speed Setting Data Bit (8bit) Stop Bit (1bit fixed) Select [Sync Communication] option then press 1. Select [Manual Focus Speed] option then press Speed (127,127,3) ENTER. - Page 26 MANUAL FOCUS SPEED /DVR1/CAM1 MANUAL FOCUS SPEED /DVR1/CAM1 REMOTE PTZ RESET /DVR1/CAM1 REMOTE PTZ RESET /DVR1/CAM1 LOW Speed LOW Speed Remote PTZ Reset MIDDLE Speed Remote PTZ Reset MIDDLE Speed Factory Default HIGH Speed Factory Default HIGH Speed PTZ Position Reset Factory Reset You can reset the connected PTZ camera’s position You can reset the camera’s parameters to the factory...
-
Page 27: Reference
REFERENCE Lens Control The following functions are available with cameras provided with controllable lens. Camera Control Function Camera control functions are operable. It is necessary to set up the camera before using the camera control functions. For further information, refer to the Operating Instructions for the respective combination camera. -
Page 28: Specifications
8 Positions Auto Panning Control 4 Pattern Settings Privacy Zone Masking (8 zones) LG DVR (LDV-S500 series, LE3100 series) key emulation (All function operated by DVR front key is supported). Operating only TX mode Connection Operating only RX mode (Using for controller cascade) - Page 29 P/NO : MFL30580188...
Need help?
Do you have a question about the LKD1000 and is the answer not in the manual?
Questions and answers