
Related Manuals for Sony PXW-Z100


Summary of Contents for Sony PXW-Z100
- Page 1 4-484-009-11(1) Digital 4K Video Camera Recorder PXW-Z100 Operating Guide Before operating the unit, please read this manual thoroughly and retain it for future reference. © 2013 Sony Corporation...
-
Page 2: Table Of Contents
Table of Contents Overview Location and Function of Parts ..........5 On-Screen Indications ............12 LCD/viewfinder screen ..........12 Preparations Power Supply ................14 Charging the battery pack ..........14 Setting the Clock ..............16 Attaching Devices ..............16 Attaching the supplied microphone ......16 Attaching the lens hood with lens cover ...... - Page 3 Recording Basic Operation Procedure ............ 25 Changing Basic Settings ............28 Recording format ............28 Adjusting the image brightness ........28 Adjusting to natural color (White balance) ....29 Audio setup ..............31 Time data ..............32 Useful Functions ..............33 Assignable buttons ............
- Page 4 External Devices Connection Connecting External Monitors and Recording Devices ..52 Operating Clips with a Computer ......... 53 Connecting with a USB cable ........53 Appendices Important Notes on Operation ..........54 Recording time of movies ..........54 Using your camcorder abroad ........56 Formats and Limitations of Outputs ........
-
Page 5: Location And Function Of Parts
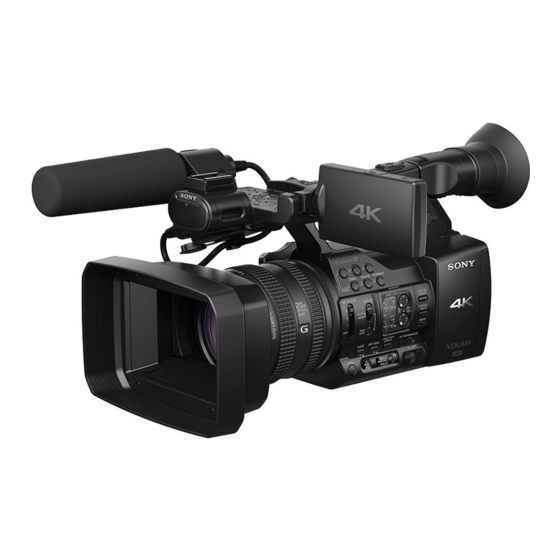
Overview Location and Function of Parts For functions and usage, see the pages in parentheses. Hook for shoulder strap (8) Accessory shoe ASSIGN 7/FOCUS MAGNIFIER button IRIS PUSH AUTO button (33) Air inlet Accessory shoe mount Notes Microphone fixing clamper (16) •... - Page 6 Lens (17) Lens hood with lens cover (17) Internal microphone (31) Front recording lamp (49) The recording lamp flashes if the remaining capacity of recording media or battery is low. ASSIGN 4/ZEBRA button ASSIGN 1 button ASSIGN 2 button* ASSIGN 3 button ASSIGN 6/THUMBNAIL button CH1 (INT MIC/INPUT1/INPUT2) switch AUTO/MAN (CH1) switch (32)
- Page 7 • Do not cover the exhaust vents. AUDIO OUT connectors/VIDEO OUT connector (52, 63) DC IN connector (15) HDMI OUT connector (52) Cable holder Provided for securing a DC cable, etc. UTILITY SD slot (Used for storing and loading the settings (File function), and to be supported by a future upgrade (software update).) TC LINK IN/OUT switch (32)
- Page 8 To attach a shoulder strap Hook for shoulder strap Attach a shoulder strap (sold separately) to the Focus ring (26) hooks for a shoulder strap. Lens cover lever (17) Zoom ring (26) Iris ring (28) GAIN button (28) WHT BAL button* (30) SHUTTER SPEED button (29) AUTO/MANUAL switch (28) (headphones) connector...
- Page 9 OPTION button (36) MENU button (39) THUMBNAIL button (35) * VOLUME+ button and PLAY/PAUSE button have raised tactile dots for your convenience in locating the Playback control buttons (PREV, PLAY/ buttons. PAUSE*, NEXT, STOP, F REV, F FWD) (27) Bottom DATA CODE button (To be supported by future upgrade.) DISPLAY button (12)
- Page 10 To hide the status screen Frame Rate Frame rate that is recorded on • Press the STATUS CHECK button. the XQD memory card Rec Function Special recording that is set to Camera status screen on, and its setting value Displays the electronic shutter settings or the status of the lens.
- Page 11 Media Media icon displayed when information of recording media is inserted in Media B the slot B Protect Protect icon displayed when information of recording media inserted in Media B the slot B is write-protected Remaining meter Remaining capacity of the of Media B recording media inserted in the slot B, expressed with a...
-
Page 12: On-Screen Indications
On-Screen Indications LCD/viewfinder screen While recording, standing by to record, or playback, the statuses and settings of this unit are superimposed on the LCD/viewfinder screen. The statuses and settings of this unit can be turned on/off using the DISPLAY button. The statuses and settings of this unit can be independently turned on/off (page 46). - Page 13 A/B slot media status/remaining space Time data indication (page 19) The time data is displayed when the unit status/ settings are displayed by pressing the DISPLAY When the left side of the icon is orange, button, and “Timecode” in “Display On/Off” of recording is possible.
-
Page 14: Power Supply
Preparations Power Supply Remove the battery pack from the Charger when Charging the battery pack the charge is completed. You can charge the “InfoLITHIUM” battery pack Attaching the battery pack (L series) with the supplied Charger. Press the battery pack against the back of your Notes camcorder and slide it down. - Page 15 Connect the power cord (mains lead) to the Storing the battery pack AC Adaptor. If the battery pack is not in use for a while, run Connect the AC Adaptor to the DC IN jack of down the battery and store it. See page 57 for the camcorder.
-
Page 16: Setting The Clock
Setting the Clock Attaching Devices When you turn the camcorder on for the first time Attaching the supplied after purchasing or the backup battery has microphone completely discharged, the Initial Setting display appears on the viewfinder screen and LCD screen. Set the date and time of the built-in clock, When you use the supplied microphone (ECM- using this display. -
Page 17: Attaching The Lens Hood With Lens Cover
Removing the lens hood with lens cover Turn the lens hood in the opposite direction to the arrow 2 in the illustration while pressing the PUSH (lens hood release) button. Notes • Remove the lens hood with lens cover when you attach/detach a 72mm polarized filter or protective filter. -
Page 18: Using Xqd Memory Cards
This camcorder records audio and video on XQD memory cards inserted in the card slots. About XQD memory cards Use the following Sony XQD memory cards. XQD memory card S series (R/W: 180MB/s*) * Use an XQD memory card with a description of Read / Write 180 MB/s. -
Page 19: Selecting The Memory Card Slot To Be Used For Recording
Notes Formatting an XQD memory card • Data integrity is not guaranteed if the power is turned off or a memory card is removed while it is being If an XQD memory card is not formatted, or was accessed. Data on the card may be destroyed. Be sure formatted with another system, the message that its access lamp is lit in green or off when you turn off the power or remove a memory card. -
Page 20: Using A Usb Wireless Lan Module
Change the “Basic Authentication” settings (page 50) of the System menu as required. Item Setting User Name User name for log-in (factory default setting: “admin”) Password Password for log-in (factory default setting: model name “pxw-z100”) Using a USB Wireless LAN Module... -
Page 21: Using The Wi-Fi Remote Commander
Wi-Fi remote commander displays For details about the menu settings and entering a character string, see “Setup Menu Operations” Smartphone (page 39). Main screen Making a connection • Recording settings indication: S&Q FPS, Shutter, Set “Wi-Fi” in “Wi-Fi” (page 50) of the Preset White, Gamma, System menu to “Enable.”... - Page 22 Cursor screen Playback screen • Status indication • Cursor operation button, menu/status indication: Up, Left, Set, Right, Down, Cancel/Back, Menu, Status • Status indication • Assignable button indication • Playback operation button: F Rev, Play/Pause, F Fwd, Prev, Stop, Next Assign screen Cursor screen •...
- Page 23 Displaying the Wi-Fi remote commander Device Browser Smartphone Android 4.0/4.1/ Chrome V26 The display size of the Wi-Fi remote commander changes according to the device screen size iOS 5 Safari 5 automatically. iOS 6 Safari 6 Tablet Android 4.0/4.1/ Chrome V26 Make a Wi-Fi connection between the device and camcorder (page 20).
-
Page 24: Using A Utility Sd Card
It is also necessary to format an SD memory card if a caution message is displayed when you mount Using a UTILITY SD card Using “Format Media” (page 48) in the You can store the setting value file of the camera Media menu, specify “SD card”... -
Page 25: Basic Operation Procedure
Recording Basic Operation Procedure To use the power zoom lever Basic recording can be performed with the Move the power zoom lever D slightly for a following procedures. slower zoom. Move it further for a faster zoom. Make sure that the necessary devices Wide view: (Wide angle) are attached to the camcorder and power is supplied to them. - Page 26 During recording or standby, set the Notes FOCUS switch B to MAN. • You cannot use the handle zoom lever A when the handle zoom switch B is set to OFF. The focus mode indication changes to “MF.” • You cannot change the zoom speed of the power zoom lever D with the handle zoom switch B.
- Page 27 Playing a recorded clip Clip (recording data) When you stop recording, video, audio and You can play the recorded clip while the subsidiary data from the start to end of the camcorder is in standby mode. recording are recorded as a single clip on an XQD memory card.
-
Page 28: Changing Basic Settings
During recording or standby, set the AUTO/ MANUAL switch H to MANUAL. Changing Basic Settings When the iris is automatically adjusted, press the IRIS button E. You can make changes to the settings based on The iris value appears. When the iris value is the intended usage of the recorded video or automatically adjusted, “A.Iris”... -
Page 29: Adjusting To Natural Color (White Balance)
Notes Adjusting the volume of light • When you set AUTO/MANUAL switch H to AUTO, (ND filter) other manually adjusted items (iris, shutter speed, white balance) also become automatic. You can record the subject clearly by using the ND FILTER switch B when the recording Adjusting the shutter speed environment is too bright. - Page 30 You can adjust and fix the white balance • You can change the color temperature. Set according to the lighting conditions of recording “Color Temp.” in “Preset White” in “White” of environment. the Paint menu, and the white balance memory You can store white balance values in memory A switch B to PRESET, then press the (one...
-
Page 31: Audio Setup
• If the recording level is low, set “INT MIC Audio setup Sensitivity” in “Audio Input” of the Audio menu to “High” (page 43). The following connectors, switches and dials • To reduce wind roar, set “INT MIC Wind allow you to set the sound to be recorded. Filter”... -
Page 32: Time Data
• Set the input level of the microphone by Adjusting the volume “INPUT1 Reference/INPUT2 Reference” in “Audio Input” of the Audio menu When both the CH1/CH2 switches are set to INT (page 43). Adjust according to the MIC, left and right channels are linked to the CH1 sensitivity of the microphone. -
Page 33: Useful Functions
Confirm that the TC LINK IN/OUT switch (page 7) is set to IN, then supply Useful Functions the reference time code. The built-in timecode generator of your camcorder locks to the reference timecode, and Assignable buttons the message “TC IN” is displayed on the screen. Even if the reference timecode from the external The camcorder has seven assignable buttons device is disconnected, the external lock will be... - Page 34 than the one on the table below, the Shutter Value is changed to the value on the table automatically. Frame rate Shutter Value 23.98P 1/24 29.97P 1/30 1/25 1/50 59.94P 1/60 Notes • Slow & Quick Motion mode cannot be used while recording, playing, or displaying thumbnail.
-
Page 35: Thumbnail Screens
Thumbnail Screens Thumbnail Screens When you press the THUMBNAIL button (page 9), clips recorded on the XQD memory card are displayed as thumbnails on the screen. You can start playback from the clip selected on the thumbnail screen. The playback picture can be seen on the LCD/viewfinder screen and external monitors. -
Page 36: Playing Clips
Playing Clips Clip Operations On the thumbnail screen, you can operate the Playing the selected and clips or confirm the subsidiary data for clips using subsequent clips in sequence the thumbnail menu. The thumbnail menu appears when you press the OPTION button Turn the SEL/SET dial (page 9) to move (page 9) on the thumbnail screen. -
Page 37: Displaying The Detailed Information Of A Clip
Displaying the detailed information of a clip Select “Display Clip Properties” from the thumbnail menu. Image of the current clip Recording format Video Codec: Video codec Timecode Size: Picture size TC Index: Timecode of the displayed frame FPS: Frame rate/bit-rate Start: Timecode at the recording starting point Audio Codec: Audio codec End: Timecode at the recording ending point... -
Page 38: Deleting Clips
Deleting clips You can delete clips from the XQD memory card. Select “Select Clip” from “Delete Clip” on the thumbnail menu. You can select multiple clips to be deleted. Press the OPTION button (page 9) after selecting the clip to be deleted. Changing information on the thumbnail screen You can change information of the clip/frame that... -
Page 39: Setup Menu Operations
• When you select an item that you must confirm Settings before execution, the menu display temporarily Setup Menu Operations disappears, and a confirmation message is displayed. Follow the instructions of the message, and specify whether to execute or The Setup menu allowing you to perform various cancel. -
Page 40: Setup Menu List
Setup Menu List The functions and available settings of menus are listed below. The default settings set at the factory are shown in bold face (example: 18dB). Camera menu Camera Menu items Sub items and setting values Contents Gain Gain<H> Sets the preset value <H>... -
Page 41: Paint Menu
Camera Menu items Sub items and setting values Contents Handle Zoom Setting Sets the handle zoom speed. 1 to 8 (3) (This setting is available only when the handle zoom switch is Setting for the set to “FIX.”) handle zoom speed Speed Zoom Setting Turns on/off the fast zoom function. - Page 42 Paint Menu items Sub items and setting values Contents Gamma Gamma Category Select from among “STD” (standard gamma), “CINE.” STD / CINE Adjusting the gamma Gamma Select Selects the gamma table that is used for the gamma compensation compensation. When “Gamma Category” is set to “STD”...
-
Page 43: Audio Menu
Paint Menu items Sub items and setting values Contents Matrix Setting Turns the matrix correction function on/off. On / Off Setting for the Matrix correction Preset Matrix Turns the preset matrix function on/off. On / Off Preset Select Selects the preset matrix. Standard / High Saturation / FL Light / Cinema User Matrix... -
Page 44: Video Menu
Video menu Video Menu items Sub items and setting values Contents Output On/Off Turns the SDI output on/off. On / Off Setting the video output HDMI Turns the HDMI output on/off. On / Off Output Format Sets the resolution of the SDI output. 2048×1080P / 1920×1080P / SET: Execute this function. - Page 45 LCD/VF Menu items Sub items and setting values Contents Marker Setting Turn all marker indications on the viewfinder on/off. On / Off Setting for the marker indications Center Marker Turns on/off the center marker. On / Off Safety Zone Turns the safety zone marker on/off. On / Off Safety Area Selects the size (ratio to the entire screen) of the safety zone...
- Page 46 LCD/VF Menu items Sub items and setting values Contents Display On/Off Shutter Setting Selects the item to be displayed on the LCD screen or the On / Off viewfinder. Selecting the items to be displayed ND Filter Position On / Off Gain Setting On / Off Play Status...
-
Page 47: Tc/Ub Menu
LCD/VF Menu items Sub items and setting values Contents Rec Format On / Off Gamma On / Off TC IN On / Off Audio Format On / Off Wi-Fi Condition On / Off Video Level Warning On / Off Clip Number On / Off TC/UB menu TC/UB... -
Page 48: Media Menu
Recording Menu items Sub items and setting values Contents SDI/HDMI Rec Setting Turns on/off this function that controls recording/stop On / Off recording of the external device by the SDI/HDMI output Control signal. Setting the SDI/ HDMI recording control function Media menu This menu is not available when the media is not loaded. -
Page 49: System Menu
System menu System Menu items Sub items and setting values Contents Rec Format Video Format Sets the recording format. NTSC Area: SET: Execute this function. Setting the 4096×2160 59.94P recording format 4096×2160 29.97P 4096×2160 23.98P 3840×2160 59.94P 3840×2160 29.97P 3840×2160 23.98P 1920×1080 59.94P 1920×1080 29.97P 1920×1080 23.98P... - Page 50 SET: Sets the user name. Authentication Setting basic Password Sets the password (1 to 16 alphanumeric characters). authentication of (pxw-z100) SET: Execute this function. the network Wi-Fi Wi-Fi Selects whether to enable the Wi-Fi connection or not. Enable / Disable...
-
Page 51: Thumbnail Menu
Thumbnail menu Thumbnail Menu items Sub items and setting values Contents Display Clip Opens the detailed information screen of the clip. Properties Displaying the detailed information screen of a clip Delete Clip Execute / Cancel Deletes a selected clip (one or more clips should be selected). Execute: Executes this function. -
Page 52: Connecting External Monitors And Recording Devices
External Devices Connection Connecting External Monitors and Recording Devices To display recording/playback pictures on an external monitor, select the output signal and use an appropriate cable for the monitor to be connected. An output signal from the camcorder can be recorded when a recording device is connected. -
Page 53: Operating Clips With A Computer
With Windows, check that the memory Operating Clips with a card is displayed as a removable disk in My Computer. Computer With Macintosh, check that a “NO NAME” or “Untitled” folder was created on the desktop. (The Macintosh folder name can be changed.) Connecting with a USB cable Notes To use an XQD card reader (sold... -
Page 54: Important Notes On Operation
Appendices Important Notes on Operation Recording time of movies Estimated duration of recording and playback Recording time Approximate time available when you use a fully charged battery pack. (unit: minute) Continuous Typical recording recording time time LCD screen 160 (30P) 145 (60P) 75 (30P) 65 (60P) - Page 55 Notes • Available recording time may vary depending on the recording conditions, subject conditions, etc. • You can record movies to a maximum of 660 scenes in total. • The maximum continuous recording time of movies is approximately 13 hours. •...
-
Page 56: Using Your Camcorder Abroad
Do not leave the camcorder with the lenses Using your camcorder abroad facing the sun Direct sunlight can enter through the lenses, be Power supply focused in the camcorder, and cause fire. You can use your camcorder in any country/ region using the AC Adaptor or Charger supplied Shipping with your camcorder within the AC 100 V to... - Page 57 About battery life • Be sure to set the POWER switch to OFF when not recording or playing back on your • Battery capacity decreases over time and camcorder. The battery pack is also consumed through repeated use. If decreased usage time when your camcorder is in recording standby or between charges becomes significant, it is playback pause.
- Page 58 Sony dealer before operating it • When you bring your camcorder from an air any further. conditioned car or room into a hot place outside.
- Page 59 LCD screen On charging the pre-installed rechargeable battery • Do not exert excessive pressure on the LCD screen, as it may cause damage. Your camcorder has a pre-installed rechargeable • If your camcorder is used in a cold place, a battery to retain the date, time, and other settings residual image may appear on the LCD screen.
- Page 60 Remove dust inside the eye piece and Note on the display viewfinder with a blower. • Pictures on the LCD screen and viewfinder screen may be distorted by the following operations: —Changing the video format —Starting playback from the Thumbnail screen —Reversing the LCD screen •...
-
Page 61: Formats And Limitations Of Outputs
Formats and Limitations of Outputs Video formats and output signals Output formats for the SDI OUT connector Region setting Recording format SDI output setting Output signal/ setting Conversion method “NTSC/PAL Area” in “Video Format” in “SDI” in “Output Output signal “Country”... - Page 62 Notes • If you set “HDMI” in “Output Format” of the Video menu to “4096×2160P” or “3840×2160P,” signals cannot be output from the SDI OUT connector. Output formats from the HDMI OUT connector Region setting Recording format HDMI output setting Output signal/ setting Conversion method...
- Page 63 720×576P 720×576 50P * Compatible with the Sony transmission system. You can connect the camcorder to a Sony 4K television, or a 4K monitor. Picture resolution is Y:Cb:Cr=4:2:0. Output formats from the VIDEO OUT connector Signals to the VIDEO OUT connector cannot be output when “HDMI” in “Output Format” of the Video menu is set to “3840×2160P.”...
-
Page 64: Error/Warning Indications
2 Disconnect the power source, attach the power source again E:62:ss/E:92:ss/ after about 1 minute, and turn the camcorder on. E:94:ss/E:95:ss 3 Contact your Sony dealer or local authorized Sony service facility. Warning indications When one of the following indications is generated, follow the message to resolve the problem. - Page 65 Warning indication Buzzer Recording Cause and measures on LCD/viewfinder lamp Unknown Media(A)* A partitioned memory card or one that contains recorded Please Change clips exceeding the number permitted with this camcorder is loaded. This card cannot be used with this camcorder. Remove it and load a compatible card.
-
Page 66: Licenses
30.0 mm - 600 mm (1 3/16 in. - 23 5/8 in.) Open software licenses (17:9) F1.6 - F3.4 On the basis of license contracts between Sony Filter diameter: 72 mm (2 7/8 in.) and the software copyright holders, this product Color temperature uses open software. - Page 67 Input/Output connectors PAL Area: VIDEO OUT connector 4K: 14.5 W (25P, 250Mbps) Pin connector HD: 15.9 W (50P, 223Mbps) 1 Vp-p, 75 Ω (ohms) unbalanced, sync Operating temperature negative 0 °C to 40 °C (32 °F to 104 °F) AUDIO OUT connectors Storage temperature Pin connectors -20 °C to +60 °C (-4 °F to +140 °F)
-
Page 68: Package Configuration
Design and specifications are subject to change • Manufactured under license from Dolby Laboratories. without notice. Package configuration On trademarks • “XDCAM” is a trademark of Sony Corporation. Charger (1) (AC-VL1) • “XAVC” and are trademarks of Sony Rechargeable battery pack NP-F970 (1) Corporation. - Page 69 • Microsoft, Windows, Windows Vista, and Windows Media are trademarks or registered trademarks of U.S. Microsoft Corporation in the U.S. and other countries. • Mac and Mac OS are registered trademarks of Apple Inc. in the U.S. and other countries. •...
-
Page 70: Index
Index File menu Flicker Reduce 26, 40 Focus Focus ring AC Adaptor FOCUS switch Accessory shoe Format Accessory shoe mount Format Media Accessory shoe plate All File All Reset 28, 40 Gain 33, 49 Assignable Button GAIN button Audio Gain switch Audio Input Gamma Audio menu... - Page 71 Media Full Speed Zoom Media menu SteadyShot Media Near Full System menu MENU button MIC+48V Moisture condensation TC/UB menu MRW-E80 Telephoto Thumbnail menu Thumbnail screen ND filter Time and date Nonlinear editing Time Data Time Zone 32, 47 Timecode Offset White One push button OPTION button USB cable...
- Page 72 Printed in China...
Need help?
Do you have a question about the PXW-Z100 and is the answer not in the manual?
Questions and answers