Beurer BM 75 Instructions For Use Manual
Hide thumbs
Also See for BM 75:
- Instructions for use manual (124 pages) ,
- Instructions for use manual (154 pages)
Table of Contents
Advertisement
Available languages
Available languages
BM 75
D Blutdruckmessgerät
Gebrauchsanweisung .........................................2 - 16
G Blood pressure monitor
Instructions for use ...........................................17 - 31
F Tensiométre
Mode d'emploi ..................................................32 - 46
Manual de instrucciones ................................. 47 - 61
I Misuratore di pressione
Istruzioni per l'uso ............................................62 - 76
T Bilgisayarli tansiyon ölçer
Kullanım kılavuzu ..............................................77 - 91
Инструкция по применению ........................92 - 108
Instrukcja obsługi .........................................109 - 123
....... 124 - 127
Advertisement
Table of Contents

Subscribe to Our Youtube Channel
Related Manuals for Beurer BM 75


Summary of Contents for Beurer BM 75
-
Page 1: Table Of Contents
BM 75 D Blutdruckmessgerät Gebrauchsanweisung .........2 – 16 G Blood pressure monitor Instructions for use ...........17 – 31 F Tensiométre Mode d’emploi ..........32 – 46 E Tensiómetro Manual de instrucciones ......... 47 – 61 I Misuratore di pressione Istruzioni per l’uso ..........62 – 76 T Bilgisayarli tansiyon ölçer... -
Page 2: Gebrauchsanweisung
2. Wichtige Hinweise 1. Kennenlernen Zeichenerklärung Überprüfen Sie das Beurer BM 75 Blutdruckmessgerät auf äußere Unversehrtheit der Verpackung und auf die Vollstän- In der Gebrauchsanweisung, auf der Verpackung und auf dem digkeit des Inhalts. Vor dem Gebrauch ist sicherzustellen, dass Typschild des Geräts und des Zubehörs werden folgende Sym-... - Page 3 • Wenn Sie mehrere Messungen an einer Person durchführen Anwendungsteil Typ BF möchten, warten Sie zwischen den einzelnen Messungen jeweils 5 Minuten. • Mindestens 30 Minuten vor der Messung sollten Sie nicht Gleichstrom essen, trinken, rauchen oder sich körperlich betätigen. Entsorgung gemäß...
-
Page 4: Gebrauchsanweisung
• Vermeiden Sie das mechanische Einengen, Zusammendrü- – Schützen Sie das Gerät vor Stößen, Feuchtigkeit, Schmutz, starken Temperaturschwankungen und direkter Sonnenein- cken oder Abknicken des Manschettenschlauches. strahlung. • Verhindern Sie einen anhaltenden Druck in der Manschette – Lassen Sie das Gerät nicht fallen. sowie häufige Messungen. - Page 5 3. Gerätebeschreibung • Verwenden Sie nur denselben oder einen gleichwertigen Batterietyp. • Immer alle Batterien gleichzeitig auswechseln. • Keine Akkus verwenden! • Keine Batterien zerlegen, öffnen oder zerkleinern. Hinweise zu Reparatur und Entsorgung • Batterien gehören nicht in den Hausmüll. Bitte entsorgen Sie die verbrauchten Batterien an den dafür vorgesehenen Sammel stellen.
- Page 6 Hierzu benötigen Sie ein handelsübliches USB Kabel (im Liefer- umfang enthalten) sowie die PC-Software „HealthManager“. Die Software können Sie kostenlos im Downloadbereich unter Service auf www.beurer.com herunterladen. Systemvoraussetzungen für die Beurer PC-Software „HealthManager“ 1. unterstützte Betriebssysteme: • Windows XP SP3 •...
- Page 7 4. Messung vorbereiten • Diese Zeichen finden Sie auf schadstoffhaltigen Batterien: Batterien einlegen Pb = Batterie enthält Blei, • Entfernen Sie den Deckel des Cd = Batterie enthält Cadmium, Batteriefaches auf der Rück- Hg = Batterie enthält Quecksilber seite des Gerätes. •...
- Page 8 • Stecken Sie das Netzteil in den dafür vorgesehenen An- Im Display blinkt die Monatsanzeige. schluss auf der rechten Seite des Blutdruckmessgerätes. • Wählen Sie mit den Speichertasten M1/ Das Netzteil darf nur an die auf dem Typschild angegebene M2 Ihren gewünschten Monat und bestäti- Netzspannung angeschlossen werden.
- Page 9 Legen Sie nun das freie Ende der Richtige Körperhaltung einnehmen Manschette eng, aber nicht zu stramm um den Arm und schließen Sie den Klettverschluss. Die Manschette sollte so eng angelegt sein, dass noch zwei Finger unter die Manschette passen. Stecken Sie nun den Manschetten - schlauch in den Anschluss für den •...
- Page 10 Die Manschette wird automatisch aufgepumpt. • Schalten Sie das Blutdruckmessgerät mit der START/ STOPP-Taste aus. Damit wird das Messergebnis im Sie können die Messung jederzeit durch das Drücken ausgewählten Benutzerspeicher abgespeichert. der START/STOPP-Taste abbrechen. Wenn Sie vergessen das Gerät auszuschalten, schaltet Der Manschetten-Luftdruck wird langsam abgelassen.
- Page 11 Selbstdiagnose und -behandlung aufgrund der Messergebnisse Bereich der Systole Diastole Maßnahme können gefährlich sein. Befolgen Sie unbedingt die Anweisun gen Blutdruckwerte (in mmHg) (in mmHg) Ihres Arztes. Stufe 1: regelmäßige Kontrol- leichte 140 – 159 90 – 99 Einstufung der Messergebnisse: le beim Arzt Hypertonie Die Messergebnisse lassen sich gemäß...
- Page 12 In diesem Fall sollte die Messung nach einer körperlichen Das Fehlen des Ruheblutdrucks kann unterschiedliche Ur- und mentalen Ruhezeit wiederholt werden. Die Messung des sachen haben, wie z.B. körperliche Belastungen, mentale Blutdrucks muss in körperlicher und mentaler Ruhe stattfinden, Anspannung oder Ablenkung, Sprechen oder Herzrhythmus- da dieser die Referenz zur Diagnostik der Blutdruckhöhe und störungen während der Blutdruckmessung.
- Page 13 • Wenn Sie die jeweilige Speichertaste (M1 – Wenn Sie die Messdaten für Benutzerspeicher einse- oder M2) erneut drücken, wird im Display hen möchten, drücken Sie die Speichertaste M1. die letzte Einzelmessung angezeigt (hier im – Wenn Sie die Messdaten für Benutzerspei- Beispiel Messung 03).
- Page 14 • der Aufpumpdruck höher als 300 mmHg ist ( erscheint im (Near Field Communication) zu übertragen. Display), Dazu benötigen Sie die „Beurer HealthManager“ App. Installie- • bei Abspeicherung der Messwert ein Fehler auftritt ( ren Sie diese im Play Store. scheint im Display), Um die Werte zu übertragen entsperren Sie den Bildschirm...
- Page 15 11. Technische Angaben Zubehör Manschette, Manschettenhalter, Geb- rauchsanweisung, 4x1,5 V AAA Batte- Modell-Nr. BM 75 rien, USB-Kabel, Aufbewahrungstasche Messmethode Oszillometrisch, nicht invasive Blut- Klassifikation Interne Versorgung, IP21, kein AP oder druckmessung am Oberarm APG, Dauerbetrieb, Anwendungsteil Messbereich Manschettendruck 0 – 300 mmHg, Typ BF systolisch 30 –...
- Page 16 über eine primärseitige Siche- eines Zeitraumes von 3 Jahren ab Kaufdatum gegenüber der rung, die das Gerät im Fehlerfall vom Beurer GmbH, Ulm (Germany) geltend zu machen. Netz trennt. Stellen Sie sicher, dass Sie die Batterien Bitte wenden Sie sich im Falle von Reklamationen an unse-...
-
Page 17: Instructions For Use
1. Getting to know your instrument Signs and symbols Check that the packaging of the Beurer BM 75 blood pressure The following symbols are used in these instructions for use, monitor has not been tampered with and make sure that all the on the packaging and on the type plate for the device and ac- required contents are present. - Page 18 • Repeat the measurement if you are unsure of the measured Direct current value. Disposal in accordance with EC Directive • The measurements taken by you are for your information WEEE (Waste Electrical and Electronic only – they are not a substitute for a medical examination! Equipment) Discuss the measurements with your doctor, and never base any medical decisions on them (e.g.
-
Page 19: Instructions For Use
• Ensure that the cuff is not placed on an arm in which the – Only ever use the cuffs provided with the monitor or origi- arteries or veins are undergoing medical treatment, e.g. intra- nal replacement cuffs. Otherwise erroneous results will be vascular access or therapy, or an arteriovenous (AV) shunt. -
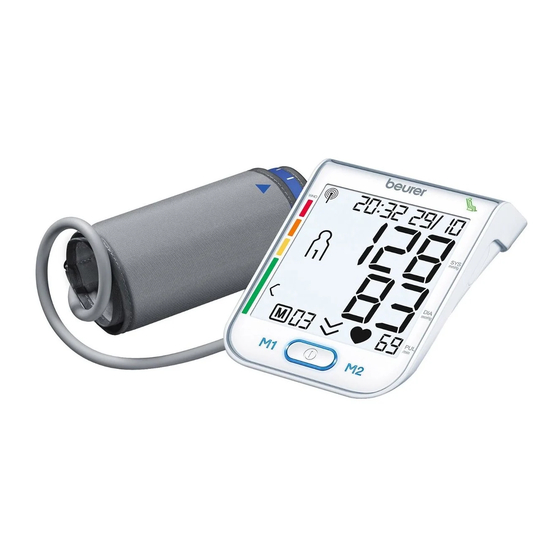
Page 20: Device Description
3. Device description • Never open the instrument. If these instructions are not heeded, the warranty will be null and void. • Never attempt to repair the instrument or adjust it yourself. We can no longer guarantee perfect functioning if you do. •... - Page 21 To do this, you need a regular USB cable (included in delivery) and the „HealthManager“ PC software. The software can be downloaded free of charge from the download area under Service at www.beurer.com. System requirements for the Beurer „HealthManager“ PC software 1. Supported operating systems: • Windows XP SP3 •...
- Page 22 4. Preparing the measurement • The codes below are printed on batteries containing harmful substances: Inserting the batteries Pb = Battery contains lead, • Remove the battery compart- Cd = Battery contains cadmium, ment lid on the rear of the Hg = Battery contains mercury device.
-
Page 23: Measuring Blood Pressure
When doing so, there must not be any batteries in the battery The year flashes on the display. compartment. The mains part can be obtained from specialist • Choose the desired year with the M1/ retailers or from the service address using order number 071.60. M2 memory buttons and confirm with the •... - Page 24 The cuff should be placed on the upper A larger cuff for upper-arm circumferences of 35 to 44 cm can arm so that the lower edge is 2 to 3 cm be obtained from specialist retailers or from the service ad- above the bend of the elbow and dress using order number 163.387.
-
Page 25: Evaluating Results
Performing the blood pressure measurement • appears if the measurement could not be performed properly. Observe the As described above, attach the cuff and adopt the pos- chapter on error messages/troubleshooting ture in which you want to perform the measurement. in these instructions for use and repeat the •... - Page 26 toms (omitted or premature heart beats, slow or excessively fast Blood pressure Systole Diastole Action heart rate) may be caused, among other things, by heart dis- value category (in mmHg) (in mmHg) ease, age, physical predisposition, excessive use of stimulants, Setting 3: seek medical at- stress or lack of sleep.
- Page 27 In this case, nervousness or inner anxiety may be the cause and GREEN: Haemodynamic stability this cannot be cured by brief periods of rest. Existing cardiac ar- Measurement of the systolic and diastolic pressure is in- rhythmias may also prevent a stable blood pressure measurement. creased when the circulatory system is sufficiently at rest and A lack of resting blood pressure can have various causes, such is a very reliable indicator of resting blood pressure.
-
Page 28: Transferring Measurements
• When the relevant memory button (M1 or – To view the measurements for user memory , press M2) is pressed again, the last individual the M1 memory button. measurement is displayed (in this example, – To view the measurements for user memo- measurement 03). - Page 29 • the inflation pressure is higher than 300 mmHg ( appears You will need the “Beurer HealthManager” app for this. The in the display), app can be installed from the Play Store. • an error occurs when storing the measured values (...
-
Page 30: Specifications
11. Specifications Accessories Cuff, cuff holder, instructions for use, 4 x 1.5 V AAA batteries, USB cable, Model no. BM 75 storage pouch Measurement Oscillometric, non-invasive blood pres- Classification Internal supply, IP21, no AP or APG, method sure measurement on the upper arm... -
Page 31: Mains Part
FW 7575M/EU/6/06 Input 100 – 240 V, 50 – 60 Hz Output 6 V DC, 600 mA, only in connection with beurer blood pressure monitor. Supplier Friwo Gerätebau GmbH Protection This device is double insulated and protected against short circuit and overload by a primary thermal fuse. -
Page 32: Mode D'emploi
Les symboles suivants sont utilisés dans le mode d’emploi, sur 1. Premières expériences l’emballage et sur la plaque signalétique de l’appareil et des Vérifiez que l‘emballage du tensiomètre BM 75 de Beurer est accessoires : intact et que tous les éléments sont inclus. Avant l‘utilisation, Attention assurez-vous que l‘appareil et les accessoires ne présentent... - Page 33 • Lorsque vous devez effectuer plusieurs mesures sur une Courant continu personne, patientez à chaque fois 5 minutes entre chaque Élimination conformément à la directive mesure. européenne WEEE (Waste Electrical and • Évitez de manger, boire, fumer ou d’exercer des activités Electronic Equipment) relative aux déchets physiques pendant au moins 30 minutes avant la mesure.
- Page 34 • Évitez de presser, d’aplatir ou de plier le tuyau du brassard doit être conservé dans un environnement approprié afin de en le manipulant. garantir la précision des valeurs et d’optimiser la durée de • Évitez des mesures trop fréquentes ou une pression continue vie du produit : du brassard.
- Page 35 3. Description de l’appareil Risque d‘explosion ! Ne jetez pas les piles dans le feu. • Les piles ne doivent être ni rechargées, ni court-circuitées. • En cas de non utilisation prolongée de l’appareil, sortez les piles du compartiment à piles. •...
- Page 36 Pour cela, vous avez besoin d‘un câble USB courant (inclus dans la livraison) ainsi que du logiciel PC « HealthManager ». Ce logiciel peut être téléchargé gratuitement dans la rubrique Téléchargement du site www.beurer.com. Configuration requise pour le logiciel PC « HealthManager » de Beurer 1.
- Page 37 4. Préparer la mesure • Ces pictogrammes se trouvent sur les piles à substances nocives : Insérez les piles Pb = pile contenant du plomb, • Retirez le couvercle du compar- Cd = pile contenant du cadmium, timent à piles se trouvant sur la Hg = pile contenant du mercure.
- Page 38 Pour cela, le compartiment à piles doit être vide. L’adaptateur L’année clignote à l’écran secteur est disponible en boutique spécialisée ou auprès du • À l’aide des touches de mémoire M1/M2, service après vente sous la référence 071.60. sélectionnez l’année souhaitée et confir- •...
- Page 39 l’artère. Le cordon doit être orienté en direction du milieu de la Adoption d’une posture correcte paume de la main. Refermez maintenant la partie libre de la manchette autour du bras, sans trop serrer, à l‘aide de la fermeture Velcro. Le serrage de la manchette doit permettre de passer deux doigt sous •...
- Page 40 Mesurer la tension artérielle • Les résultats de mesure de la pression systolique, de la pression diastolique et Positionnez la manchette tel que décrit plus haut et ins- du pouls sont affichés. Le voyant de repos tallez-vous dans la position de votre choix pour effectuer (voir chapitre 6) s’allume en fonction du la mesure.
- Page 41 6. Evaluation des résultats Le classement qui s’affiche ainsi que l’échelle de l’appareil permettent d’établir la plage dans laquelle se trouve la tension Arythmies cardiaques: mesurée. Si les valeurs de systole et de diastole se trouvent Pendant la mesure, cet appareil peut identifier une arythmie dans deux plages différentes (par ex.
- Page 42 Cet appareil détermine automatiquement, durant la mesure de suffisamment calme et confortable, ne bougez plus, fermez les la tension, s’il existe ou non un repos circulatoire. yeux, essayez de vous détendre et de respirez calmement. S’il n’existe aucun signe de manque de repos circulatoire, le Si la mesure suivante indique toujours un manque de stabilité, symbole (stabilité...
- Page 43 7. Récupérer et supprimer les valeurs de • Appuyez sur la touche mémoire correspondante (M1 mesure ou M2). Si vous avez choisi la mémoire utilisateur1, appuyez Le résultat de chaque mesure réussie est enregistré avec sur la touche mémoire M1. la date et l’heure.
- Page 44 NFC (Near Field Communication). Pour cela, vous avez besoin de l’application « Beurer Health- Manager ». Installez-la dans le Play Store. Pour transférer les valeurs, déverrouillez l’écran de votre smartphone, et placez le dos de votre téléphone sur la zone de détection NFC du tensiomètre.
-
Page 45: Fiche Technique
11. Fiche technique • Nettoyez l’appareil et le brassard en douceur à l’aide d’un N° du modèle BM 75 chiffon légèrement humide. Mode de mesure Mesure de la tension artérielle au bras, • La fréquence de nettoyage dépend du degré de salissure de oscillométrique et non invasive... -
Page 46: Mode D'emploi
6 V DC, 600 mA, uniquement en associa- techniques sans avis préalable à des fins d’actualisation. tion avec les lecteurs de tension artérielle • Cet appareil est compatible avec le modèle NFC conforme Beurer. aux normes ISO 15693 et ISO 18000-3. Fabricant Friwo Gerätebau GmbH •... -
Page 47: E Tensiómetro Manual De Instrucciones
2. Indicaciones importantes 1. Conocer el aparato Explicación de los símbolos Compruebe que el embalaje del tensiómetro Beurer BM 75 esté intacto y que su contenido esté completo. Antes de En las presentes instrucciones de uso, en el embalaje y en la utilizar el aparato deberá... - Page 48 • Si desea realizar más de una medición en una misma perso- Pieza de aplicación tipo BF na, espere entre medición y medición 5 minutos. • No coma, ni beba, ni fume, ni realice esfuerzos físicos durante un mínimo de 30 minutos antes de realizar la medición. Corriente continua •...
- Page 49 • Evite exponerse a la presión continuada del brazalete y no – No deje caer el aparato. realice mediciones frecuentes. La disminución del flujo san- – No utilice el aparato en la cercanía de fuertes campos mag- guíneo que se produce puede causar lesiones. néticos, manténgalo alejado de equipos de radiotransmisión •...
- Page 50 3. Descripción del aparato • Cambie siempre todas las pilas a la vez. • ¡No utilice baterías! • No despiece, abra ni triture las pilas. Indicaciones sobre la reparación y eliminación de desechos • Las pilas no deben ser desechadas en la basura doméstica. Sírvase desechar las pilas agotadas en los lugares de reco- gida previstos para este efecto.
- Page 51 Para ello se necesita un cable USB convencional (incluido en el suministro) así como el software de PC „HealthManager“. El software puede descargarse gratuitamente del área de des- cargas de la rúbrica Service en www.beurer.com. Requisitos del sistema para el software para PC „HealthManager“ de Beurer 1.
- Page 52 4. Preparar la medición Los usuarios están obligados por ley a eliminar las pilas correctamente. Colocar las pilas • Estos símbolos se encuentran en pilas que • Retire la tapa del comparti- contienen sustancias tóxicas: mento de las pilas situado en la Pb = la pila contiene plomo, parte posterior del aparato.
- Page 53 comercios especializados o solicitarse al servicio de asistencia El indicador del año parpadea en la pantalla. técnica con el número de pedido 071.60. • Seleccione con las teclas de memoriza- • El tensiómetro se debe utilizar exclusivamente con la fuente ción M1/M2 el año deseado y confirme de alimentación aquí...
- Page 54 El tubo de goma debe quedar En los comercios especializados o en el servicio de asistencia posicionado en el centro de la flexura técnica se encuentra disponible un brazalete mayor para contor- del codo, es decir, orientado hacia el nos de brazo de 35 a 44 cm, con el número de pedido 163.387. centro de la palma de la mano.
- Page 55 Medición de la presión sanguínea • aparece cuando la medición no se ha podido realizar correctamente. Consulte Póngase el brazalete como se ha descrito anteriormente el apartado Aviso de errores/Solución de y colóquese en la postura en la que desea realizar la problemas de estas instrucciones de uso y medición.
- Page 56 La arritmia es una enfermedad que se caracteriza por un ritmo y la diástole en el rango „Normal“), el gráfico de la clasificación cardíaco anormal, debido a trastornos en el sistema bioeléctri- del aparato indica siempre el rango más alto. En este ejemplo, co que controla el corazón.
- Page 57 Medición del indicador de calma (por medio del insuficiente o no. En este caso la medición se deberá repetir en diagnóstico HSD) condiciones de calma física y mental. El error más frecuente al medir la presión sanguínea reside en ROJO: No hay estabilidad hemodinámica que en el momento de realizar la medición no existe calma en Es muy probable que la medición de la presión sanguínea la tensión sanguínea (estabilidad hemodinámica), es decir, tan-...
- Page 58 Determinados pacientes con problemas en el ritmo cardíaco o • Pulse la tecla de memorización correspondiente (M1 o cargas mentales de larga duración pueden sufrir de inestabili- M2). dad hemodinámica a largo plazo; esto también es así a pesar Si ha seleccionado el registro de usuario1, deberá de realizar repetidas pausas de relajación.
- Page 59 NFC del tensiómetro. Para garantizar una transferencia perfecta, retire la lámina de protección del smartphone. Inicie la transferencia de datos en la aplicación „Beurer HealthManager“. 9. Limpiar y guardar el aparato 8. Transmisión de los valores de medición •...
- Page 60 Para unas 120 mediciones, según el nivel de 11. Especificaciones técnicas pilas la presión sanguínea y la presión de inflado N.º de modelo BM 75 Accesorios Brazalete, cierre del brazalete, instrucciones Método de Oscilométrico, medición no invasiva de la de uso, 4 pilas AAA de 1,5 V, cable USB, medición...
- Page 61 Salida 6 V DC, 600 mA, solamente en combinación • Este aparato cumple con la norma europea EN60601-1-2 y con los tensiómetros Beurer. está sujeto a las medidas especiales de precaución relativas a la compatibilidad electromagnética. Tenga en cuenta que Fabricante Friwo Gerätebau GmbH...
- Page 62 Controllare l‘integrità esterna della confezione e del contenuto Attenzione del misuratore di pressione Beurer BM 75. Prima dell‘uso assicurarsi che l‘apparecchio e gli accessori non presentino nessun danno palese e che il materiale di imballaggio sia stato Avvertenza rimosso.
- Page 63 • I valori misurati autonomamente hanno solo scopo infor- Smaltimento secondo le norme previste mativo, non sostituiscono i controlli medici. Comunicare al dalla Direttiva CE sui rifiuti di apparecchia- medico i propri valori, non intraprendere in alcun caso terapie ture elettriche ed elettroniche (RAEE) mediche definite autonomamente (ad es.
- Page 64 • Accertarsi che il manicotto non venga applicato su braccia • Proteggere le batterie dal caldo eccessivo. con arterie o vene sottoposte a trattamenti medici, quali Rischio di esplosione! Non gettare le batterie nel fuoco. dispositivo di accesso o terapia intravascolare o shunt arte- •...
- Page 65 • Non riparare o regolare da soli l’apparecchio. In questo caso non è più garantito un funzionamento corretto. • Le riparazioni devono essere eseguite esclusivamente dal servizio assistenza di Beurer o da ri-venditori autorizzati. Prima di ogni reclamo verificare in primo luogo lo stato delle batterie e sosti-tuirle, se necessario.
- Page 66 A tale scopo, sono necessari un cavo USB (fornito in dotazio- ne) disponibile in commercio e il software „HealthManager“. Il software può essere scaricato gratuitamente nell‘area del servizio clienti del sito www.beurer.com. Requisiti di sistema per il software per PC Beurer “HealthManager” 1. Sistemi operativi supportati: • Windows XP SP3 •...
- Page 67 4. Preparazione della misurazione • I simboli riportati di seguito indicano che le batterie contengono sostanze tossiche: Inserimento delle batterie Pb = batteria contenente piombo • Rimuovere il coperchio del vano Cd = batteria contenente cadmio batterie sul retro dell’apparec- Hg = batteria contenente mercurio chio.
-
Page 68: Istruzioni Per L'uso
Funzionamento con l’alimentatore di rete Sul display lampeggia il numero dell’anno. L’apparecchio può essere utilizzato anche con un alimentatore • Con i pulsanti per la memorizzazione di rete. A tale scopo il vano batterie non deve contenere bat- M1/M2 selezionare il numero dell’anno terie. - Page 69 Il bracciale va posizionato sul braccio Attenzione: Utilizzare l’apparecchio esclusivamente con il in modo che il suo bordo inferiore manicotto originale. Il manicotto è adatto a una circonferenza venga a trovarsi 2 – 3 cm al di sopra braccio compresa tra 24 e 36 cm. della piega del gomito e al di sopra Con il codice 163.387 è...
- Page 70 Esecuzione della misurazione della pressione • Premendo i pulsanti per la memorizzazione M1 o M2 selezionare la memoria utente desiderata. Se non si Applicare il manicotto e sistemarsi nella posizione in cui sceglie alcuna memoria utente, la misurazione viene si desidera eseguire la misurazione. salvata nella memoria utente usata per ultima.
- Page 71 ciente. L’aritmia può essere diagnosticata solo da una visita Intervallo dei va- Sistole Diastole Misura da adot- cardiologica da parte di un medico. lori di pressione (in mmHg) (in mmHg) tare Ripetere l’operazione quando al termine della misurazione sul Livello 3: Rivolgersi a un display appare l’icona .
- Page 72 le vostre misurazioni non è possibile ottenere una circolazione VERDE: stabilità emodinamica presente. sufficientemente rilassata. Le misurazioni della pressione sistolica e diastolica vengono La causa di ciò può anche essere una forma di inquietudine effettuate con una circolazione rilassata e riflettono con buon nervosa interna che non può...
- Page 73 7. Ricerca e cancellazione dei valori misurati • Premere il pulsante per la memorizzazione corrispon- dente (M1 o M2). Gli esiti di ogni misurazione corretta vengono memoriz- Una volta selezionata la memoria utente1, utilizzare il zati con data e ora. Quando i dati misurati superano le 60 pulsante per la memorizzazione M1.
- Page 74 NFC (Near Field Communication). Inoltre, è necessaria l’app “Beurer HealthManager”. Installarla dal Play Store. Per trasmettere i valori, sbloccare lo schermo dello smartphone e mantenere il lato posteriore del telefono nell’area di ricono- scimento NFC del misuratore di pressione.
-
Page 75: Dati Tecnici
11. Dati tecnici protettivo dello smartphone. Avviare la trasmissione dati dall’app “Beurer HealthManager”. Codice BM 75 9. Pulizia e custodia dell’apparecchio Metodo di Oscillometrico, misurazione non invasiva misurazione della pressione dal braccio • Pulire accuratamente l’apparecchio servendosi esclusiva- mente di un panno leggermente inumidito. - Page 76 Ai fini dell’aggiornamento i dati tecnici sono soggetti a modifi- Uscita 6 V DC, 600 mA, solo in abbinamento che senza preavviso. con sfigmomanometri Beurer. Produttore Friwo Gerätebau GmbH • Questo apparecchio è compatibile con il modello NFC se- condo le norme ISO 15693 e ISO 18000-3.
-
Page 77: Kullanım Kılavuzu
Dostane tavsiyelerimizle Beurer Müessesesi İşaretlerin açıklaması 1. Tanıtım Cihazın ve aksesuarların kullanım kılavuzunda, ambalajında ve Beurer BM 75 tansiyon ölçme cihazının ambalajının dıştan model etiketinde aşağıdaki semboller kullanılır: hasar görmemiş ve içeriğin eksiksiz olduğundan emin olun. Dikkat Cihazı kullanmadan önce, cihazda ve aksesuarlarında gözle görülür hasarlar olmadığından ve tüm ambalaj malzemelerinin... - Page 78 • Ölçülen değerler ile ilgili şüpheniz varsa, ölçümü tekrarlayın. Elektrikli ve elektronik eski cihazlarla ilgili • Tarafınızca tespit edilen ölçüm değerleri, yalnızca size bilgi AB Yönetmeliği WEEE’ye (Waste Electrical verme amaçlıdır ve doktor tarafından yapılan bir muayenenin and Electronic Equipment) uygun şekilde yerini tutamaz! Ölçüm değerlerinizi doktorunuza bildirin ve bertaraf edilmelidir hiçbir zaman ölçüm sonuçlarından yola çıkarak kendi tıbbi...
- Page 79 • Manşeti, atardamarları veya toplardamarları tıbbi tedavi gören • Manşet el bileğine takılı olmadığı sürece, tuşlara basmayınız. bir kola takmamaya dikkat edin, örn. intravasküler giriş, intra- • Eğer cihaz uzun bir süre kullanmayacaksa, pillerin çıkarılması vasküler tedavi veya arteriovenöz (A-V-) bypass. tavsiye edilir.
- Page 80 • Cihaz, kendiniz tarafından onarılmamalı veya kalibre edil- memeli, yani ayarlanmamalıdır. Aksi halde cihazın kusursuz çalışması garanti edilemez. • Onarımlar sadece Beurer yetkili servisi veya yetkili satıcılar tarafından yapılmalıdır. Fakat her reklamasyondan önce, yine de ilk olarak pilleri kontrol ediniz ve gerekirse bunları değişti- riniz.
- Page 81 Ayrıca, tansiyon ölçme aletinizle ölçtüğünüz değerleri bilgisaya- ra aktarabilirsiniz. Bunun için piyasada sunulan bir USB kablosu (teslimat kapsamında mevcuttur) ve bilgisayar yazılımı „HealthManager“ gereklidir. Bu yazılımı ücretsiz olarak www.beurer.com adresinde Servis altındaki indirme bölümünden indirebilirsiniz. Beurer bilgisayar yazılımı „HealthManager“ için sistem gereksinimleri 1. Desteklenen işletim sistemleri: •...
- Page 82 4. Ölçüme hazırlık • Bu işaretler, zararlı madde içeren pillerin üzerinde bulunur: Pillerin takılması Pb = Pil kurşun içeriyor, • Cihazın arka tarafındaki pil böl- Cd = Pil kadmiyum içeriyor, mesinin kapağını çıkarın. Hg = Pil cıva içeriyor • Dört adet tip 1,5 V AAA (Alkaline tip LR03) pil yerleştirin.
- Page 83 Bunun için pil yuvasında pil olmamalıdır. Adaptörü, 071.60 Ekranda yıl göstergesi yanıp söner. sipariş numarası ile yetkili bir satıcıdan veya servis adresinden • Hafıza düğmeleri M1/M2 ile istediğiniz yılı temin edebilirsiniz. seçin ve BAŞLAT/DURDUR düğmesi • Tansiyon ölçme cihazının zarar görmesini önlemek için, ile onaylayın.
- Page 84 Şimdi manşetin serbest ucunu sıkı, Doğru konuma geçilmesi ancak fazla sıkmayacak şekilde kolun çevresine takın ve cırt cırt bandı kapatın. Manşet, manşetin altına iki parmak sığabilecek sıkılıkta olmalıdır. Şimdi manşet hortumunu manşet fişi girişine takın. • Her ölçümden önce yakl. 5 dakika dinleniniz! Aksi halde ölçüm değerlerinde sapmalar olabilir.
- Page 85 Tansiyon ölçümünü gerçekleştirme • Tansiyon ölçme cihazını BAŞLAT/DURDUR düğmesi kapatın. Böylece ölçüm sonucu, seçilmiş olan Manşeti yukarıda açıklandığı gibi takın ve ölçümü gerçek- kullanıcı hafızasına kaydedilmiş olur. leştirmek istediğiniz duruşa geçin. Cihazı kapatmayı unutursanız, cihaz yaklaşık 3 dakika • Tansiyon ölçüm cihazını çalıştırmak için sonra otomatik olarak kapanır.
- Page 86 göre kendi kendinizi diyagnoz etmeniz ve tedavi etmeniz tehli- Tansiyon Sistol Diyastol Önlem keli olabilir. Doktorunuzun talimatlarına kesinlikle uyunuz. değerlerinin aralığı (mmHg olarak) (mmHg olarak) Düzenli Ölçüm sonuçları kademelendirmesi Yüksek normal 130 – 139 85 – 89 doktor Ölçümler aşağıdaki tabloda kademelendirilip değerlendirilebilir. kontrolü...
- Page 87 Bu durumda ölçüm, bedensel ve ruhsal bir dinlenme süresinin Çoğu uygulama durumunda HSD teşhisi, bir tansiyon ölçümü ardından tekrarlanmalıdır. Tansiyonun ölçümü, bedensel ve sırasında bir dolaşım sükunetinin olup olmadığı konusunda çok ruhsal sükunet içinde gerçekleşmelidir; ancak bu şekilde tan- iyi bir yol göstericidir. Kalp ritmi bozuklukları veya sürekli ruhsal rahatsızlıkları...
- Page 88 • İlgili hafıza düğmesine (M1 veya M2) basın. • İlgili hafıza düğmesine (M1 veya M2) yeniden basarsanız ekranda son münferit Kullanıcı hafızası 1’i seçtiyseniz M1 hafıza düğmesine ölçüm gösterilir (Buradaki örnekte 03 ölçü- basın. mü). Kullanıcı hafızası 2’yi seçtiyseniz M2 hafıza düğme- sine basın.
- Page 89 Ayrıca ölçülen ve cihazda kayıtlı olan değerleri NFC (Near Field sembolü göstergede belirir), Communication) üzerinden akıllı telefonunuza aktarabilirsiniz. • ölçüm değerlerinin kaydedilmesi sırasında hata oluşması ha- Bunun için “Beurer HealthManager” App gereklidir. Bunu Play linde ( sembolü göstergede belirir), Store’dan kurabilirsiniz.
- Page 90 11. Teknik bilgiler Aksesuarlar Manşet, bileklik, kullanma talimatı, 4 adet 1,5V AAA pil, USB kablosu, saklama Model no. BM 75 çantası Ölçüm yöntemi Üst koldan, osilometrik, invazif olmayan Sınıflandırma Dahili besleme, IP21, AP veya APG yok, tansiyon ölçümü devamlı kullanım, uygulama parçası tip BF Ölçüm aralığı...
- Page 91 12. Adaptör Model no. FW 7575M/EU/6/06 Giriş 100 – 240 V, 50 – 60 Hz Çıkış 6 V DC, 600 mA, sadece Beurer tansiyon ölçme cihazı ile birlikte kullanılır. Üretici Friwo Gerätebau GmbH Koruma Cihazın çift koruyucu izolasyonu vardır ve bir hata durumunda cihazın elektrik şebe-...
-
Page 92: Прибор Для Измерения Кровяного Давления В Плечевой Артерии Инструкция По Применению
Внимательно прочтите данную инструкцию по эксплуатации, Проверьте комплектность поставки прибора для измерения сохраните ее и ознакомьте с ней и других пользователей. артериального давления Beurer BM 75 и убедитесь в том, 2. Важные указания что на упаковке нет внешних повреждений. Перед исполь- зованием... - Page 93 Соблюдайте инструкцию по применению Указания по применению • Для сравнительного анализа данных всегда измеряйте свое артериальное давление только в определенные часы. Аппликатор типа BF • Отдыхайте в течение 5 минут перед каждым измерением! • При проведении нескольких сеансов измерения у одного Постоянный...
- Page 94 • Не используйте прибор для измерения артериального • Допускается использование прибора только в целях, давления вместе с высокочастотным хирургическим при- указанных в данной инструкции по применению. Изгото- бором. витель не несет ответственности за ущерб, вызванный • Применяйте прибор только для лиц с обхватом плеча, неквалифицированным...
- Page 95 Поэтому батарейки необходимо хранить в недоступном • В интересах защиты окружающей среды для детей месте! по окончании срока службы следует утилизировать • Обращайте внимание на обозначение полярности: плюс прибор отдельно от бытового мусора. Утилизация (+) и минус (-). должна производиться через соответствующие пункты •...
- Page 96 3. Описание устройства Индикация на дисплее: 1. Дата / время 1. Манжета 2. Систолическое давление 2. Шланг манжеты 3. Диастолическое давление 3. Штекер манжеты 4. Измеренное значение пульса 4. Зона обнаружения NFC 5. Символ пульса 5. Разъем для подключения блока питания и интерфейс USB 6.
- Page 97 (входит в комплект поставки) и программа HealthManager. • Вставьте четыре батарей- Программу можно бесплатно скачать в разделе загрузок ки 1,5 В AAA (алкалиновые, на сайте www.beurer.com. тип LR03). Обязательно проследите за тем, чтобы Системные требования для программного обеспечения батарейки были установлены...
- Page 98 оборудования. Закон обязывает пользователей обеспе- На дисплее замигает год. чить утилизацию батареек. • С помощью кнопок сохранения M1/M2 • Следующие знаки предупреждают о наличии выберите нужный год и подтвердите в батарейках токсичных веществ: выбор нажатием кнопки START/STOP Pb = свинец, Cd = кадмий, На...
- Page 99 Использование с блоком питания Наложить манжету Прибор можно также использовать с блоком питания. Наденьте манжету на обнаженное При этом отделение для батареек должно быть пустым. левое предплечье. Примите меры, Блок питания (номер для заказа 071.60) можно приобрести в чтобы слишком тесные элементы специализированном...
- Page 100 Давление в левой и правой руке может отличаться, что • Чтобы не исказить результаты измерения, следует вести объясняет возможное различие в результатах измерений. себя во время измерения спокойно и не разговаривать. Всегда проводите измерение на одной и той же руке. Измерение...
- Page 101 6. Оценка результатов • появляется, если измерение не уда- Нарушения сердечного ритма: лось выполнить правильно. Выполните действия, описанные в главе «Сообще- Данный аппарат может во время измерения идентифици- ние об ошибке/устранение неисправ- ровать возможные нарушения сердечного цикла и в подоб- ностей»...
- Page 102 Оценка результатов измерений: Степень 1: регулярное Оценку результатов измерений можно провести слабая 140–159 90–99 посещение степень с помощью таблицы, представленной ниже. врача гипертонии Однако эти стандартные значения служат только общим Высокое регулярное ориентиром, так как индивидуальные значения кровяного в допустимых 130–139 85–89 посещение давления...
- Page 103 и достаточно точно отображают кровяное давление в со- Если последующие результаты измерений оказались не- стоянии покоя. стабильны, это означает, что они отображают показатели При наличии данных о недостаточно спокойном состоянии кровяного давления при неспокойном кровообращении, системы кровообращения (гемодинамическая нестабиль- так как Вам не удалось установить во время измерений ность), символ...
- Page 104 7. Просмотр и удаление результатов • Нажмите соответствующую кнопку сохранения (M1 измерения или M2). Если выбрана пользовательская память1, нажми- Результаты каждого успешного измерения сохраня- те кнопку сохранения M1. ются с указанием даты и времени измерения. Когда Если выбрана пользовательская память2, нажми- количество...
- Page 105 памяти будут удалены. Кроме того, у Вас есть возможность перенести измерен- ные и сохраненные на приборе значения на смартфон при помощи NFC (Near Field Communication — «коммуникации ближнего поля»). Для этого Вам понадобится приложение Beurer HealthManager. Загрузите его в Play Store.
- Page 106 • превышается диапазон измерений (на дисплее появляет- помех, снимите чехол со смартфона, если он есть. Запусти- ся те передачу данных в приложении Beurer HealthManager. • не удалось отправить данные на компьютер (на дисплее 9. Очистка и хранение прибора появляется сообщение...
- Page 107 • Этот прибор совместим с моделью NFC согласно стан- Память 2 x 60 ячеек памяти дартам ISO 15693 и ISO 18000-3. Размеры Д 175 мм x Ш 117 мм x В 50 мм • Данный прибор соответствует европейскому стандарту Вес Примерно...
- Page 108 6 В пост. тока, 600 мА, только в Гарантия не распространяется: комбинации с приборами для измерения – на случаи ущерба, вызванного неправильным использо- артериального давления Beurer ванием, Производитель Friwo Gerätebau GmbH – на быстроизнашивающиеся части (батарейки, манжета), – на дефекты, о которых покупатель знал в момент покупки, Защита...
-
Page 109: Q Ciśnieniomierz Instrukcja Obsługi
2. Ważne wskazówk Zespół firmy Beurer 1. Zapoznanie Objaśnienie symboli Ciśnieniomierz Beurer BM 75 należy sprawdzić pod kątem W instrukcji obsługi, na opakowaniu i tabliczce znamionowej zewnętrznych uszkodzeń opakowania oraz kompletności urządzenia oraz akcesoriów znajdują się następujące symbole: zawartości. Przed użyciem należy się upewnić, że urządzenie Uwaga i akcesoria nie wykazują... - Page 110 • Jeśli chcesz wykonać kilka pomiarów u jednej osoby, zacho- Prąd stały waj 5-minutowe przerwy między pomiarami. Utylizacja zgodnie z dyrektywą WE w • Na co najmniej 30 minut przed wykonaniem pomiaru nie sprawie zużytego sprzętu elektrycznego należy jeść, pić, palić ani podejmować wysiłku fizycznego. i elektronicznego WEEE (Waste Electrical •...
- Page 111 • Unikać utrzymywania ciśnienia w mankiecie oraz częstych – Nie stosować urządzenia w pobliżu silnych pól elektroma- pomiarów. Spowodowane tym zaburzenie przepływu krwi gnetycznych, trzymać je z dala od instalacji radiowych i może spowodować uszczerbek na zdrowiu. telefonów komórkowych. • Mankietu nie należy zakładać na ramię, w którym leczone są –...
- Page 112 3. Opis urządzenia • Nie należy używać akumulatorów! • Nie wolno rozmontowywać, otwierać ani rozdrabniać baterii. Wskazówki dotyczące naprawy i utylizacji • Baterii nie wolno wyrzucać do zwykłego pojemnika na śmie- ci. Wyczerpane baterie należy oddawać do punktu zbiórki zużytych baterii. •...
- Page 113 USB (w komplecie) oraz instalacja oprogramowania „HealthManager”. Oprogramowanie można pobrać bezpłatnie w sekcji pobierania (zakładka „Serwis”) na stronie www.beurer.com. Program „HealthManager” firmy Beurer — wymagania systemowe 1. Obsługiwane systemy operacyjne: • Windows XP z dodatkiem SP3 •...
- Page 114 Przygotowanie pomiaru • Na bateriach zawierających szkodliwe związki znajdują się następujące oznaczenia: Włóż baterie Pb = bateria zawiera ołów, • Zdejmij pokrywę komory baterii Cd = bateria zawiera kadm, z tyłu urządzenia. Hg = bateria zawiera rtęć. • Włóż cztery baterie typu 1,5 V AAA (alkaliczne, typ LR03).
- Page 115 Eksploatacja urządzenia z zasilaczem Na wyświetlaczu zacznie migać wskazanie Urządzenie można również używać z zasilaczem. roku. W takim wypadku w urządzeniu nie mogą się znajdować bate- • Za pomocą przycisków pamięci M1/M2 rie. Zasilacz można zamówić w sklepach specjalistycznych lub wybierz żądany format roku i potwierdź...
- Page 116 Mankiet należy zakładać w taki sposób, Przyjęcie prawidłowej pozycj aby jego dolna krawędź znajdowała się 2 – 3 cm nad zgięciem łokcia i tętnicą. Wężyk ustawiony jest w kierunku środka dłoni. Owiń mankiet wokół ramienia tak, aby dobrze do niego przylegał, lecz nie był •...
- Page 117 Powietrze jest pomału spuszczane z mankietu. W przy- • Przed rozpoczęciem kolejnego pomiaru padku rozpoznawalnej tendencji do zbyt wysokiego odczekaj co najmniej 5 minut. ciśnienia krwi, powtarza się pompowanie i zwiększa ciśnienie w mankiecie. Po rozpoznaniu tętna pojawia się symbol tętna 6.
- Page 118 Podane wartości standardowe służą jedynie jako ogólne wy- Zakres wartości Ciśnienie skur- Ciśnienie rozkur- Rozwiązanie tyczne, ponieważ indywidualne wartości ciśnienia u różnych ciśnienia czowe (w mmHg) czoe (w mmHg) osób i w różnych grupach wiekowych różnią się od siebie. Samodzielna Ważne jest więc regularne korzystanie z konsultacji lekarskich. Normalne 120–129 80–84...
- Page 119 bywać się w stanie fizycznego odpoczynku i psychicznego lub rozkojarzenie, rozmowa czy zakłócenia rytmu serca pod- spokoju, ponieważ tylko wówczas jego wyniki mogą stanowić czas pomiaru ciśnienia krwi. podstawę diagnostyki wysokości ciśnienia krwi, a przez to W większości przypadków diagnostyka HSD daje bardzo dobrą sterowania farmakologicznym leczeniem pacjenta.
- Page 120 7. Odczyt i usuwanie wyników pomiaru • Naciśnij przycisk pamięci (M1 lub M2). W przypadku wybrania pamięci użytkownika1 należy Wyniki każdego udanego pomiaru są zapisywane łącznie nacisnąć przycisk pamięci M1. z datą i godziną pomiaru. Jeśli liczba wyników przekroczy W przypadku wybrania pamięci użytkownika2 należy 60, usuwane są...
- Page 121 • Przytrzymaj wciśnięte przyciski M1/M2 przez 5 se- nie NFC (Near Field Communication). kund. W tym celu wymagane jest zastosowanie aplikacji „Beurer Wszystkie wartości bieżącego użytkownika HealthManager”, którą można znaleźć w sklepie Play Store. zostaną skasowane.
- Page 122 11. Dane techniczne • Częstotliwość czyszczenia należy dostosować do stopnia zabrudzenia urządzenia. Ciśnieniomierz i mankiet należy Nr modelu BM 75 czyścić, gdy tylko ulegną zabrudzeniu. Metoda pomiaru Oscylometryczny, nieinwazyjny pomiar • Nie wolno stosować żadnych środków czyszczących, ani ciśnienia na ramieniu rozpuszczalników.
- Page 123 Producent zastrzega sobie prawo do zmiany danych technicz- nych z powodu aktualizacji bez konieczności powiadamiania. Wyjście 6 V DC, 600 mA tylko w połączeniu z ciśnieniomierzami firmy Beurer. • Urządzenie jest kompatybilne z modelem NFC zgodnie z ISO 15693 i ISO 18000-3. Producent Friwo Gerätebau GmbH...
-
Page 124: Electromagnetic Compatibility Information
Guidance and manufacture’s declaration – electromagnetic emissions The BM 75 is intended for use in the electromagnetic environment specified below. The customer or the user of the BM 75 should assure that it is used in such an environment. Emissions test Compliance Electromagnetic environment –... - Page 125 Table 2 Guidance and manufacturer’s declaration – electromagnetic immunity The BM 75 is intended for use in the electromagnetic environment specified below. The customer or the user of the BM 75 should assure that it is used in such an environment.
- Page 126 Table 3 Guidance and manufacturer’s declaration – electromagnetic immunity The BM 75 is intended for use in the electromagnetic environment specified below. The customer or the user of the BM 75 should assure that it is used in such an environment.
- Page 127 Recommended separation distances between portable and mobile RF communications equipment and the BM 75 The BM 75 is intended for use in an electromagnetic environment in which radiated RF disturbances are controlled. The customer or the user of the BM 75 can help prevent electromagnetic interference by maintaining a minimum distance between portable and mobile RF communications equip- ment (transmitters) and the BM 75 as recommended below, according to the maximum output power of the communications equipment.
- Page 128 BEURER GmbH Söflinger Str. 218 89077 Ulm (Germany) • • Tel.: +49 (0) 731 / 39 89-144 Fax: +49 (0) 731 / 39 89-255 • www.beurer.com Mail: kd@beurer.de •...
Need help?
Do you have a question about the BM 75 and is the answer not in the manual?
Questions and answers
تحية طيبة فيما يخص العطل لدي عندما اقوم بعملية القياس بجهاز الضغط تتم كافة الخطوات الا انه عند ظهور النتيجة يعطيني رسالة خطأ