Beurer BM 27 Instructions For Use Manual
Upper arm blood pressure monitor
Hide thumbs
Also See for BM 27:
- User manual ,
- Instructions for use manual (78 pages) ,
- Instructions for use manual (36 pages)
Table of Contents
Advertisement
Advertisement
Table of Contents

Related Manuals for Beurer BM 27


Summary of Contents for Beurer BM 27
- Page 1 BM 27 EN Upper arm blood pressure monitor Instructions for use...
-
Page 2: Table Of Contents
6. Evaluating results ............11 7. Saving, displaying and deleting measured values ..12 With kind regards, Your Beurer team 8. Error messages/troubleshooting ......... 12 9. Cleaning and storing the device and cuff ....12 1. Getting to know your device 10. -
Page 3: Important Notes
This allows you to quickly and easily measure your blood Disposal in accordance with the Waste pressure, save the measured values and display the devel- Electrical and Electronic Equipment EC opment and average values of the measured values taken. Directive – WEEE You are also warned of possible existing cardiac arrhythmia. - Page 4 • Do not use the blood pressure monitor on newborns or Certification symbol for products that are patients with pre-eclampsia. We recommend consulting exported to the Russian Federation and a doctor before using the blood pressure monitor during members of the CIS pregnancy.
- Page 5 • Avoid any mechanical restriction, compression or bending Instructions for storage and maintenance of the cuff line. • The blood pressure monitor is made from precision and • Do not allow sustained pressure in the cuff or frequent electronic components. The accuracy of the measured measurements.
- Page 6 • If a battery has leaked, put on protective gloves and clean • Please dispose of the device in accordance with the battery compartment with a dry cloth. EC Directive – WEEE (Waste Electrical and • Protect batteries from excessive heat. Electronic Equipment).
-
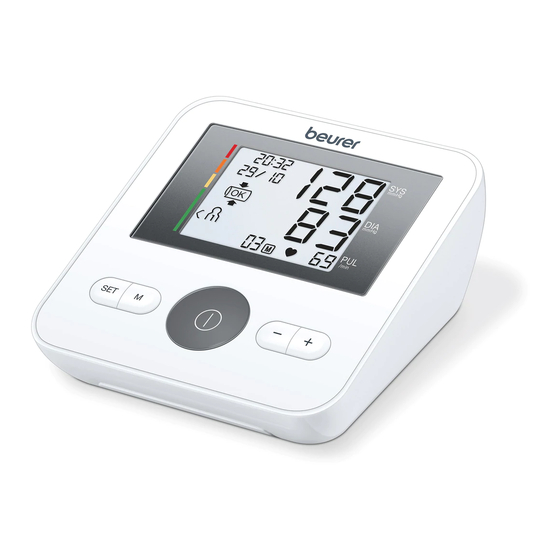
Page 7: Device Description
3. Device description Information on the display: 1. Time and date 1. Cuff 2. Systolic pressure 2. Cuff line 3. Diastolic pressure 3. Cuff connector 4. Calculated pulse value 4. Display 5. Cardiac arrhythmia symbol 5. Connection for cuff connector 6. -
Page 8: Preparing The Measurement
4. Preparing the measurement • The codes below are printed on batteries containing harmful substances: Inserting the batteries Pb = Battery contains lead, • Open the battery compartment lid. Cd = Battery contains cadmium, • Insert four 1.5V AA (alkaline type Hg = Battery contains mercury LR6) batteries. -
Page 9: Measuring Blood Pressure
5. Measuring blood pressure This cuff is suitable for you if the index mark ( ) is within the OK Ensure the device is at room temperature before measuring. range after fitting the cuff on the The measurement can be performed on the left or right arm. upper arm. - Page 10 Adopting the correct posture increase the cuff’s pressure again. As soon as a pulse is found, the pulse symbol will be displayed. • The cuff position control symbol is displayed throughout the entire measurement. If the cuff is ap- plied too tightly or too loosely, then and “...
-
Page 11: Evaluating Results
6. Evaluating results It is important to consult your doctor regularly for advice. Your doctor will tell you your individual values for normal Cardiac arrhythmia: blood pressure as well as the value above which your blood This device can identify potential disruptions of the heart pressure is classified as dangerous. -
Page 12: Saving, Displaying And Deleting Measured Values
7. Saving, displaying and deleting measured 8. Error messages/troubleshooting values In the event of errors, the error message _ appears on the screen. Error messages may appear if: The results of every successful measurement are stored • It was not possible to correctly record the pulse: together with the date and time. -
Page 13: Technical Specifications
10. Technical specifications Permissible sto- -20°C to +55°C, 10-90% relative humi- rage conditions dity, 800-1050 hPa ambient pressure Model No. BM 27 Power supply 4 x 1.5 V AA batteries Measurement Oscillometric, non-invasive blood pres- method sure measurement on the upper arm Battery life For approx. -
Page 14: Replacement Parts And Wearing Parts
The following warranty terms shall apply: and IEC80601-2-30 (Medical electrical equipment – Part 1. The warranty period for BEURER products is either 2 – 30: Particular requirements for the basic safety and 5 years or- if longer- the country specific warranty period essential performance of automated non-invasive sphyg- from date of Purchase. - Page 16 Beurer GmbH • Söflinger Straße 218 • 89077 Ulm, Germany www.beurer.com • www.beurer-healthguide.com...
Need help?
Do you have a question about the BM 27 and is the answer not in the manual?
Questions and answers
The pump stopped working. Where do I send it for repair? BM 26 Fresh batteries. The screen reads but pump does not start.
For repairs, contact your local dealer or the local representation listed in the "service international" section. If returning the unit, include a copy of your receipt and a short report of the defect.
This answer is automatically generated