Table of Contents
Advertisement
USER MANUAL
Model No.:
8LCH-KK-SC-SSF-40
The product in this manual may differ slightly
from that pictured.
SELF CLEAN hot and cold
water cooler and
SINGLE CUP COFFEE BREWER
Combination Unit
Important:
Follow descaling procedure
on page 13
SAVE THIS MANUAL FOR FUTURE USE
WARNING:
TO REDUCE THE RISK OF INJURY, USER
MUST READ INSTRUCTION MANUAL
BEFORE OPERATING PRODUCT.
8LCH-KK-SC-SSF © 2014 Electrotemp Technologies Inc. PN: 5M010303XX03-E
PN: 5M011114XX00(E+F)
Advertisement
Table of Contents

Summary of Contents for Glacial 8LCH-KK-SC-SSF-40
-
Page 1: User Manual
USER MANUAL Model No.: 8LCH-KK-SC-SSF-40 SELF CLEAN hot and cold water cooler and SINGLE CUP COFFEE BREWER Combination Unit Important: Follow descaling procedure on page 13 SAVE THIS MANUAL FOR FUTURE USE WARNING: TO REDUCE THE RISK OF INJURY, USER... -
Page 2: Features
Getting to know your Single Serve Turbo Brewer with Self Cleaning Water Cooler for use with Coffee Capsule or equivalently Pre-Packaged Coffee. FEATURES 2. High temperature, preheated hot 1. 2 in1 appliance saves on water is ready to pour through your valuable counter space. - Page 3 5. Sophisticated Advanced Technology System keeps water HOT and Energy consumption down. 6. Continuous dispensing for 6cups of coffee, no waiting time for heating water. Easy to use intuitive prompt menu. 7. Efficient refrigeration provides up to 1.6 gallon of X-cold water per hour, while making an ice bank for more and colder water.
- Page 4 10. Exceptional hot tank performance and safety efficient, produce hotter water at all times, has a great insulation, triple safety, good for mineral water use. a. Our patented design maintain steady 201°F temperature of hot water. Superior Mineral based insulation keeps heat where it belongs.
-
Page 5: Self-Cleaning
SELF-CLEANING Congratulations! You have acquired state-of-the-art combination unit with water cooler with Self-Cleaning Capabilities. It is designed to preserve an original bottled water quality and to eliminate slime build up in the cold water tank, 5 gallon bottle and internal water passageways. THIS FEATURE IS NOT MEANT TO FILTER OR TO PURIFY DIRTY OR TAP WATER. -
Page 6: Sound's You Might Hear
SOUND’S YOU MIGHT HEAR Although all functions are very quiet, you might hear following sound’s: 1. When without display cooler plugged in, air pump for an ozone start to work and last for 12 seconds. After start up it will work every 4 hours for same period of time. Coolers with display are programmed to have ozone delivery pump to work every 4 hours starting from 12 o’clock. -
Page 7: Safety Precautions
SAFETY PRECAUTIONS WARNING To reduce risk of injury and property damage, user must read this entire manual before assembling, installing & operating combination unit providing coffee brewer and water dispenser. Failure to execute the instructions in this manual can cause personal injury or property damage. -
Page 8: Safety Precautions-Electrical Requirements
SAFETY PRECAUTIONS - Electrical Requirements WARNING Electrical Shock Hazard Plug into a grounded 3 prong outlet. Make sure power prongs(lugs) and ground prong are in good condition, hot bent or altered in any ways. Do not remove ground prong. Do not use an adapter. Do not use an extension cord. -
Page 9: Table Of Contents
For future support please record your serial number (located on label on back of the unit) and date purchased. Staple your receipt to manual. You will need this information to obtain warranty service. Model Number : 8LCH-KK-SC-SSF-40 Serial ID Number: Date of Purchase: Store:... -
Page 10: Specifications
SPECIFICATIONS AC 120V~/60Hz / 12 Amp Power Supply R-134A Refrigerant Type 100W Max Cold Water Power 6 L/H Cold Capacity / Hour 3°C – 10°C / 37.4°F – 50°F Cold Temp Range 1400W Hot Water Power 9 L/H Hot Capacity / Hour 89°C –... -
Page 11: Assembly
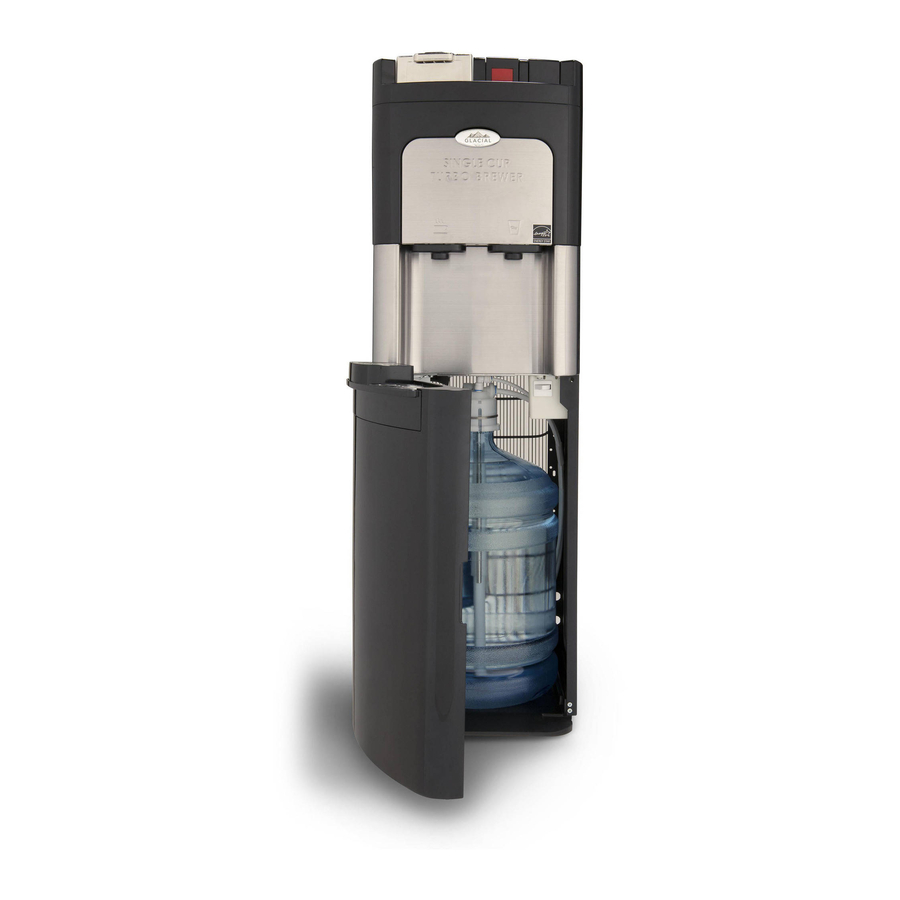
ASSEMBLY WARNING Keep plastic bags away from children. Remove the dispenser from packaging: TO OPEN: 1. Lay dispenser on its side. 2. Open bottom flaps of the cardboard box. 3. Stand cooler up with flaps unfolded. 4. Pull box straight up. 5. -
Page 12: Dispensing Coffee
DISPENSING COFFEE Operating Instructions: 1. Make sure you have turned on RED hot water switch at the back. See No. 16 on page 10. PRE- PRE- HEAT/ HEAT/ START START READY READY Do not open lid when red light is ON Touch “PRE-HEAT”button. -
Page 13: Descaling Your Coffee Brewer/Water Cooler
DESCALING YOUR COFFEE BREWER / WATER COOLER Your brewer and water cooler share a low watt density, external hot water tank heater. If has a larger area to spread heat comparing to ordinary internal water heating elements. You may experience a buildup of mineral scale or calcium deposits, depending on mineral content of the water. -
Page 14: Operation
OPERATION CAUTION CAUTION This water cooler part of combination unit is intended for water cooling only, Do NOT use other liquids. Do NOT use for other purposes. Warranty is void if used for any other liquids including coffee, tea, juices, beer or wine. Using other liquids can be dangerous to your health. This water cooler has been designed to fit standard water bottles with a 3, 5 or 5.2 gallon capacity. - Page 15 Dispense Cold Water Note: After set up it will take up to 1 hour to form an ice bank. During this time compressor may run continuously. This is normal. 1. Position bottle, glass, pitcher or cooking pot securely below cold water tap. a.
-
Page 16: Proper Care & Cleaning
PROPER CARE & CLEANING Note: The Self-clean function sanitizes internal waterways. It does not sanitize outside of the faucets and other external parts of the cooler. General Cleaning Perform: As needed (every 6 months under normal conditions) Time Required: 5 minutes. Note: Do NOT use abrasive materials or chemical cleaners. -
Page 17: How To Adjust Water Temperature For High Altitude To Avoid Boiling
HOW TO ADJUST WATER TEMPERATURE FOR HIGH ALTITUDE TO AVOID BOILING In order to extract most of flavor from your Single Serve Cup your Brewer works at 201 F. It is good for elevations under 3500 feet. - Immediately after power cord is plugged into the electrical outlet, you will hear an audible signal. - At the same time , touch buttons “PREHEAT/READY”... -
Page 18: Troubleshooting
TROUBLESHOOTING Attention: Wet out of the Box: Your machine was functionally tested using reverse osmosis filtered water, the same as used by 5 gallons water bottlers. A small quantity of water may be left after testing. If during car transportation some water had leaked out, it will not affect the workings of the machine. Please wipe water off of the cooler and let it sit overnight before plugging in. - Page 19 No hot water. Preheat LED light just blinks, cold is fine, no hot. Reason: - Possibly high limit thermal fuse had blown. Correction: - Check if Hot Water Switch at the back is in ON position. Check if bottle has water. If problem persist call service center at 1-844-452-2425 and report the problem.
- Page 20 1. Remove U-shaped lock. 2. Press collet and pull tubing out. 3. If end has burrs, clean it up with pencil sharpener, do not make chamfer large, it will cause leak. 4. Push tubing in all the way. 5. Reinstall U-shaped lock. Water is leaking •...
- Page 21 Hot water is not hot • It takes 15 minutes after setup to dispense hot water. • Make sure the power cord is properly connected to a dedicated working outlet. • Make sure Hot Water Power Switch is "ALWAYS ON" and the "Hot Cup" icon is illuminated. That indicates the heating system is turning on.
- Page 22 Dosage of water per coffee cup: • The variation of 0.5OZ is normal for a same setting. Coffee capsule not punctured by needle • Please check if the Coffee Capsule is placed properly. If your pump is not pumping water into cooler. •...
- Page 23 Your Brewer has two capsule piercing needles. One on top, called inlet needle and one at the bottom, called outlet needle. It also has long passageway from the brewer to the exit nozzle. If block- age occurs in the exit nozzle, use unfolded paper clip to clean it out. To maintain proper operation make sure the both needles and exit nozzle are kept clean.
-
Page 24: Correct Upper Needle Seal Installation
Lower needle is not of tubular construction and does not go all the way through. It has U-shaped configuration with slot on its side.It has sealed end. Coffee runs out out of the coffee capsule through the slot in the needle and then into the inside of the coffee capsule using same slot. -
Page 25: How To Reset Hot Tank Safety Switch
HOW TO RESET HOT TANK SAFETY SWITCH If hot tank safety switch trips, reset as per instructions below. hot tank bottom cover compressor shelf pump mount Deflect pump mount to expose acess hole Pic 1 Pic 2 Safety switch 1/4” access hole Use wooden stick to reset switch To reset push stick gently Pic 3... -
Page 26: Open Inspection Porthole
OPENING INSPECTION PORTHOLE WARNING To be performed by quali ed person only. Unplug unit by disconnecting power cord. Unscrew two holding screws from the Lift Coffee Capsule storage tray. back as shown. Beware of hot water. Report observations to service toll phone 1-844-452-2425. -
Page 27: How To Open Control Board Enclosure For An Inspection
HOW TO OPEN CONTROL BOARD ENCLOSURE FOR AN INSPECTION WARNING To be performed by quali ed person only. Unplug unit by disconnecting power cord. Report observations to service toll phone Unscrew two holding screws from the 1-844-452-2425. back as shown. Notice! "Keurig ®...
Need help?
Do you have a question about the 8LCH-KK-SC-SSF-40 and is the answer not in the manual?
Questions and answers