
Related Manuals for Amcrest ATC-1201G


Summary of Contents for Amcrest ATC-1201G
-
Page 1: User Manual
Digital Game & Trail Hunting Camera ATC-1201G User Manual Version 2.0.1 Revised September 21, 2016... -
Page 2: Table Of Contents
Table of Contents Welcome ................................4 Important Security Warning ......................... 4 Important Safeguards and Warnings ......................5 Caution ................................5 1. Features and Specifications ........................6 1.1 General Description ..........................6 1.2 Features ..............................7 1.3 Camera Body Interface ........................7 1.3 Camera Components and Feature ...................... - Page 3 4.1.12 ISO ..............................22 4.1.13 Video Length............................ 23 4.1.14 Video Sound ............................ 23 4.1.15 Interval............................. 23 4.1.16 Timer ..............................24 4.1.17 Enter Password ..........................24 4.2 Playback ..............................24 4.2.1 Viewing Photo or Video ........................24 4.2.2 Delete Photo or Video ........................25 4.2.3 Lock Photo or Video ........................
-
Page 4: Welcome
Welcome Thank you for purchasing our ATC-1201G Amcrest Digital Game and Hunting Trail Camera! This user manual is designed as a reference tool for the installation and operation of your camera. Here you can find information about the camera’s features and functions, and information to aid in troubleshooting. -
Page 5: Important Safeguards And Warnings
5. Accessories Use only the accessories recommended by manufacturer. Before installation, please open package and ensure that all components are present. Contact Amcrest directly if anything is broken or missing in the package. Caution The working voltage of the camera is 6.0V. The camera can be powered by four or eight AA batteries (using four AA batteries will offer less battery output). -
Page 6: Features And Specifications
1. Features and Specifications 1.1 General Description The Amcrest ATC-1201G is a big game hunting camera which can be triggered by any movement in a specified region monitored by highly sensitive Passive Infrared (PIR) motion sensors. It can also automatically capture high quality pictures (up to 12 Megapixels) and record 1080p HD video clips (WVGA or QVGA). -
Page 7: Features
Both video and image files may be played on the built in 2” Color LCD screen while camera is on TEST Mode. Interval Timer/Multi-Shot The ATC-1201G Digital Game and Hunting Trail Camera has a minimum interval of one second and maximum interval is 30 minutes. This means the PIR works will be disabled after each trigger for the interval time you set. -
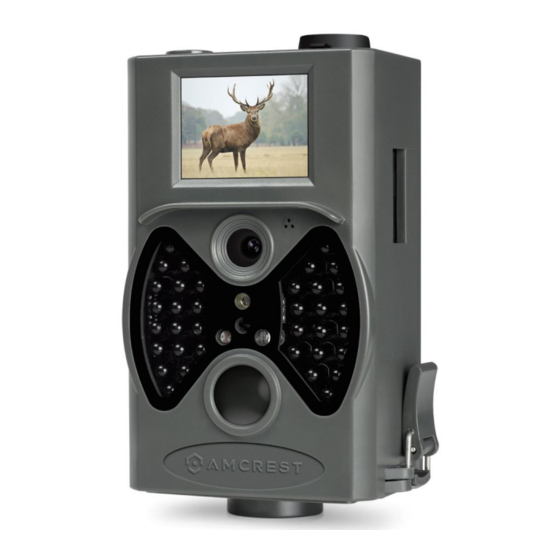
Page 8: Camera Components And Feature
1.3 Camera Components and Feature Name Bottom Cover SD-Card Slot USB Connector TV Out connector PIR (Passive Infrared) Infrared Flash Lens 2-inch color LCD Display Sound recorder Lock Power switch Battery compartment Portable remote control 1.4 Remote Control The remote control is primarily used for custom settings and password input. This is an infrared wireless remote control. -
Page 9: Navigating
NOTE: Remote control is located inside of the camera. 1.4.1 Navigating Press UP or DOWN to select or highlight a menu item, press LEFT or RIGHT to select the menu item options, and press OK to make a selection. 1.4.2 Characters Press the “*”... -
Page 10: Supported Format
1.6 Supported Format Item Format Photo Video SD Card Format FAT32 NOTE: If problems occur when reading the SD-card, try testing the SD-card on other devices to see if the same problem occurs. If the SD-card still fails to work, please format the card using a computer and then reinsert the card into the camera and try again. -
Page 11: Easy Operation
2. Easy Operation 2.1 Power Supply To supply power to the camera, four or eight AA size batteries are needed. Open the bottom cover. Confirm that the power switch is in the OFF (right) position, pull out the battery holder. Load the fully charged batteries into the holder according to the polarity shown below. Push the battery holder back into the battery chamber. -
Page 12: Insert The Sd-Card
When in a low-battery state, the camera will be automatically shut down. Please change the batteries at this time. 2.2 Insert the SD-card Insert a SD-Card into the card slot with contacts facing the front of the camera. Camera must be on Off Mode when SD-Card is being inserted. -
Page 13: Enter Test Mode
Then slide the power switch to ON mode. After switching to the ON mode, the motion indication LED (red) will blink for about 15 seconds. The 15 second timer is a buffer before the camera starts to capture photos or videos, e.g. for closing and locking the bottom cover, fixing the camera on a tree, or walking away from the area being monitored. -
Page 14: Activate Laser Pointer
2. View using a TV monitor which connects to the camera with a TV cable Press RIGHT on the remote from the main screen. The latest image will be shown on the LCD screen of the camera or TV monitor. Press UP to view the previous image and press DOWN for the next image. Detailed operations like deleting images or videos are described in the “Advanced Operations”... -
Page 15: Advanced Operations
4. Advanced Operations From the basic operations of the camera in previous chapters, the camera has three basic operation modes: 1. OFF mode: Power switch is set to the OFF position (Right). 2. TEST mode: Power switch is set to the TEST position (Middle). 3. -
Page 16: Photo Settings
4.1.1 Photo Settings... -
Page 17: Video Setting
4.1.2 Video Setting... -
Page 18: System Setting
4.1.3 System Setting... -
Page 19: Default
4.1.4 Default Default Settings are listed as below: Icon Setting Default Options Mode Camera Camera, Video, Camera & Video Language English English, French, German, Spanish and Russian Resolution (Camera) 12M, 8M,5M Interval 5 Seconds 5-30 Seconds,1-30 Minute Multi Single Single,3,6,9 Pictures Auto Auto,100,200,400 Resolution(Video) -
Page 20: General Settings
Timer 0:0:0 to 23:59:59 Adjust Format SD Card Internal Memory, SD Card TV Mode NTSC PAL,NTSC Password Off, On 4.1.5 General Settings The steps are suitable for the following menu items: Camera Mode , Photo Size , Video Size , Multi , Video Length , Interval , and Timer... -
Page 21: Photo Size
e) Press DOWN to select OK. OK will be highlighted. Press OK to start formatting the SD-card. During formatting, the display screen will show a message, “Please Wait” as below. Please Wait! Press MENU return to the info display without saving the settings. 4.1.8 Photo Size The Photo Size options include three resolutions: 8MP, 5MP and 3MP. -
Page 22: Multi
following: a) Press MENU to display the settings menu. b) Press RIGHT twice to navigate to the Setup menu (“Setup” will appear at the top right of the screen). Press DOWN then OK to select Date/Time. d) Press UP and DOWN to modify the value of the date and time. e) Press RIGHT and LEFT to select the different fields to modify. -
Page 23: Video Length
4.1.13 Video Length This menu is used to set the length of the video that is recorded after it has been triggered. The Video Length option has four values: 10 Seconds, 30 Seconds, 60 Seconds, and 90 Seconds. The following shows how to set video length to 30 Seconds, provided that the previous value is 10 Seconds: a) Press MENU to display the settings menu. -
Page 24: Timer
4.1.16 Timer The Timer defines a certain time period, in a 24-hour format, during the day when the camera can be triggered. The rest of the time the device is shut off. The effective value of the hour ranges from 0 to 23 while the minute ranges from 0 to 59. -
Page 25: Delete Photo Or Video
e) Press UP to view the previous picture (or video) and DOWN for the next. Press OK to return to Live Image Feed. When viewing images, the total number of all images in the SD-card and the index of the displaying image will be shown respectively. - Page 26 If any issue occurs after an improper upgrading process, the camera can potentially stop functioning properly. First download the most recent firmware from http://www.amcrest.com/firmware To update firmware, follow the below steps: 1) Unzip the update file. 2) Copy the .bin file to an SD card.
- Page 27 After inserting the battery tray with AA batteries while the camera is on OFF mode, move the selection switch to TEST mode. The Amcrest logo should appear then the image of what the camera has in frame. While in TEST mode, you will be able to adjust the camera settings to your preference and needs.
-
Page 28: Glossary Of Terms
Glossary of Terms Firmware: To prevent unauthorized access and maintain the camera’s security, Amcrest will periodically update its software which is available at amcrest.com/firmware. We recommend running on the latest firmware for maximum security and best product performance. ON Mode: In this mode, camera is ready to capture images or video on the default settings if it has not been configured under TEST mode. -
Page 29: Appendix I: Technical Specifications
Appendix I: Technical Specifications Image Sensor Type(True 8 Mega Pixels Color CMOS Megapixels) Memory SD Card 8MB~32GB Lens F=3.1; FOV=60 ° Size 145mm * 80mm * 55 mm IR Filter: Full Automatic IR Filter TFT Display Screen: 2.0 inch PIR Sensitivity 3 sensitivity levels: High/Normal/Low PIR Sensor Sight Angle 100 Degrees... -
Page 30: Appendix Ii: Parts List
Appendix II: Parts List Part Name Quantity Digital Camera Wireless controller USB Cable TV cable User’s Manual...
Need help?
Do you have a question about the ATC-1201G and is the answer not in the manual?
Questions and answers