Dogtra 3500NCP super-x series Owner's Manual
Remote controlled dog training collars
Hide thumbs
Also See for 3500NCP super-x series:
- Owner's manual (85 pages) ,
- Code setting manual (4 pages) ,
- Product manual (14 pages)
Advertisement
Available languages
Available languages
Owner's Manual
Remote Controlled Dog Training Collars
3500NCP Super-X Series
Dogtra-Europe
Immeuble "Le Vauban"
Parc d'activités de la Verriere
4, rue de Panicalé
78320 La Verrière, France
Tél 01 30 62 65 65
Fax 01 30 62 66 11
E-mail info@dogtra-europe.com
MADE IN KOREA
www.dogtra-europe.com
Copyright © 2008 Dogtra Company All rights reserved. (4)
Advertisement
Chapters

Related Manuals for Dogtra 3500NCP super-x series


Summary of Contents for Dogtra 3500NCP super-x series
- Page 1 Parc d’activités de la Verriere 4, rue de Panicalé 78320 La Verrière, France Tél 01 30 62 65 65 Fax 01 30 62 66 11 E-mail info@dogtra-europe.com MADE IN KOREA www.dogtra-europe.com Copyright © 2008 Dogtra Company All rights reserved. (4)
-
Page 2: Table Of Contents
CONTENU PRINCIPALES CARACTERISTIQUES RAPPORT DE SECURITE ET DE SANTE DU PRODUIT LE CONTENU DE LA MALLETTE DESCRIPTION DE L’EMETTEUR FONCTIONNEMENT DES BOUTONS DESCRIPTION DU RECEPTEUR CHARGEUR DE BATTERIE COMMENT TESTER VOTRE COLLIER MISE EN PLACE DU COLLIER SUR LE CHIEN LA CHARGE DES BATTERIES RECEPTION ACCESSOIRES... -
Page 3: Principales Caracteristiques
PRINCIPALES CARACTERISTIQUES PRINCIPALES CARACTERISTIQUES MERCI D’AVOIR CHOISI LES COLLIERS ELECTRO STATIQUES DOGTRA, LES Un émetteur facile à utiliser. MEILLEURS AU MONDE! Bouton d’intensité fonctionnant comme un rhéostat, augmentant progressivement l’intensité La série de stimulation sans aucun saut entre les niveaux Conçue pour des conditions de dressage... -
Page 4: Rapport De Securite Et De Sante Du Produit
Une mallette de transport Interférence avec d’autres dispositifs électroniques Le système de filtrage de la technologie Dogtra assure un minimum d’interférences avec d’autres dispositifs électroniques (téléphones portables, systèmes de surveillances etc.). Notre microprocesseur numérique offre des milliers de codes uniques pour éliminer... -
Page 5: Description De L'emetteur
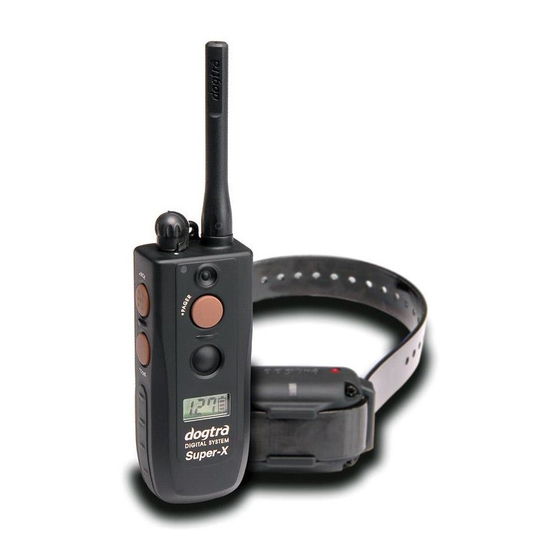
DESCRIPTION DE L’EMETTEUR DESCRIPTION DE L’EMETTEUR DESCRIPTION DE L’EMETTEUR Point rouge de contact magnétique Les antennes pour les émetteurs Interrupteur basculant Bouton d’intensité “Nick” & “Continu” Une antenne courte de 8cm est fournie avec “Pager” pour l’émmetteur de série le premier chien (Voyant lumineux) (Bouton Gris) L’antenne doit être vissée sur la partie supérieure de... - Page 6 DESCRIPTION DE L’EMETTEUR DESCRIPTION DE L’EMETTEUR “Regular” a 127 niveaux de stimulation: (0) est le niveau le plus bas et (127) le plus haut. Lorsque le bouton d’intensité est tourné à fond vous obtenez la puissance maximale d’intensité, soit 127. “Mild”a 63 niveaux de stimulation: (0) est le plus bas et (63) le plus haut.
- Page 7 DESCRIPTION DE L’EMETTEUR DESCRIPTION DE L’EMETTEUR Ecran LCD (Affichage à cristaux liquides) de Bouton d’intensité rhéostatique l’émetteur Le bouton d’intensité est situé sur la partie supérieure L’affichage du LCD indique le niveau de stimulation de l’émetteur. (0-127) sur l’écran. Il appara t quand le boutôn Le chiffre 0 indique le niveau le plus faible et le 127 le “marche/arrêt”...
- Page 8 DESCRIPTION DE L’EMETTEUR DESCRIPTION DE L’EMETTEUR Entretien de l’émetteur LCD en température froide. Au cours de températures froides (moins de 10 degrés), l’affichage à cristaux liquide (LCD) peut être faible ou long à répondre. Attendre jusqu’à ce que l’affichage devienne bien visible avant de choisir n’importe quel niveau d’intensité...
-
Page 9: Fonctionnement Des Boutons
DESCRIPTION DE L’EMETTEUR FONCTIONNEMENT DES BOUTONS FONCTIONNEMENT DES BOUTONS (2 chiens) Interrupteur à bascule “Nick” & “Continu” Bouton -chien Marche/Arrêt “Nick” & “Continu” (Bouton Gris) -chien “Pager” ème -chien (Bouton Gris) La prise jack pour chargeur de batterie de “Nick” & “Continu” (Bouton Orange) ème -chien... - Page 10 FONCTIONNEMENT DES BOUTONS FONCTIONNEMENT DES BOUTONS Interrupteur à bascule “Nick” & “Continu” Bouton “Pager” Sur la face avant de l’émetteur, se trouve Les boutons “Pager” sont situés sur la face avant de l’interrupteur à bascule. Il permet de sélectionner l’émetteur. Le bouton Orange correspond au la fonction “Nick”...
-
Page 11: Description Du Recepteur
DESCRIPTION DU RECEPTEUR DESCRIPTION DU RECEPTEUR DESCRIPTION DU RECEPTEUR Réceptacle de chargement de Batterie et bouchon de prise jack Sangle Point rouge magnétique Marche/Arrêt Pour activer le collier recepteur, placer le point Electrodes rouge du dos de l’émetteur sur le point rouge du récepteur. - Page 12 (Vert = charge complète, Ambre = charge moyenne, L’antenne interne Rouge = besoin de charge) Aucun collier Dogtra ne possède d’antenne visible. Lorsque le bouton “Continu” est actionné sur l’émetteur, le voyant du collier luit de façon statique aussi longtemps que le bouton est maintenu appuyé, avec un durée limite de 12 secondes.
-
Page 13: Chargeur De Batterie
2. Placer la lampe test, incluse dans l’équipement, Remarque : Utiliser seulement la batterie au sur les électrodes comme sur le dessin. Lithium-Polymère ainsi que le chargeur fourni avec votre équipement pour charger votre collier Dogtra. Ainsi vous évitez tout dommage éventuel de votre matériel. -
Page 14: Mise En Place Du Collier Sur Le Chien
COMMENT TESTER VOTRE COLLIER MISE EN PLACE DU COLLIER SUR LE CHIEN 3. Allumer l’émetteur en appuyant sur le bouton bleu MISE EN PLACE DU COLLIER SUR LE CHIEN situé sur le coté droit de l’émetteur jusqu’à ce que l’écran LCD s’allume. L’écran LCD montre l’état de charge de la batterie, et la LED (Voyant lumineux) clignote toutes les 4 secondes. -
Page 15: La Charge Des Batteries
MISE EN PLACE DU COLLIER SUR LE CHIEN LA CHARGE DES BATTERIES LA CHARGE DES BATTERIES Dogtra utilise des électrodes en acier chirurgical inoxydable et du plastique anti-microbien pour protéger la peau de votre chien. ATTENTION! Eviter de laisser le collier sur le cou du chien pendant plus de 8 heures à... - Page 16 2 heures avant la Remarque : Seuls les batteries et accessoires fournis première utilisation. par Dogtra doivent être utilisés afin de ne pas endommager le matériel. 1. Brancher les câbles de chargement entre l’émetteur et le récepteur, voir dessin page 27.
-
Page 17: Reception
RECEPTION ACCESSOIRES RECEPTION ACCESSOIRES a une portée de Les équipements suivants peuvent être obtenus 1,600 mètres. Selon la configuration du terrain où séparément. vous utilisez votre collier, la portée peut varier. Collier factice Vous aurez une meilleure portée si vous tenez l’émetteur loin de votre corps et si vous ne le tenez Le collier factice est recommandé... -
Page 18: Entretien
à la partie “Guide de de son épaule, etc Dépannage” du manuel avant de nous le renvoyer. Si vous avez des questions, ou besoin de renseignements, vous pouvez vous adresser directement à info@dogtra-europe.com ou appelez au +33 (0)1 30 62 65 65. - Page 19 GUIDE DE DEPANNAGE GUIDE DE DEPANNAGE éloignez-vous de tout ce qui pourrait nuire au bon 2. La lampe test fonctionne mais je ne sens pas fonctionnement de votre collier. d’impulsion. - Votre tolérance peut être très forte comme votre 4. Mon collier ne reste pas chargé. chien, ou votre peau est très épaisse, essayer alors de poser les deux électrodes sur le bout de vos - La prise de chargement doit être propre avant de...
- Page 20 Dépannage” de la notice d’utilisation et appeler le Service Après- Pour valider la garantie Dogtra vente au +33 (0)1 30 62 65 65 avant de retourner l’appareil à Dogtra- Conserver la facture d’achat de votre produit Dogtra. Europe pour une réparation. Les frais de transport pour renvoyer des produits sous garantie à...
-
Page 21: Declaration De Conformite Ce
CE DECLARATION DE CONFORMITE CONTENTS CE DECLARATION DE CONFORMITE OVERVIEW MAIN FEATURES Nous, la Société Dogtra-Europe, déclarons sous notre PRODUCT SAFETY AND HEALTH seule responsabilité que STATEMENTS Nom de modèle : 3500NCP & 3502NCP PACKAGE CONTENTS satisfait à toutes les dispositions de la Directive DESCRIPTION OF TRANSMITTER R&TTE Directive 1999/5/EC... -
Page 22: Overview
OVERVIEW OVERVIEW MAIN FEATURES THANK YOU FOR PURCHASING THE WORLD’S Easy-to-use, ergonomic transmitter. FINEST DOGTRA E-COLLAR! Rheostat dial allows for gradual increases in stimulation intensity with no jumps between levels (0-127). Designed for X-treme training conditions Two-dog models allow the trainer to control two... -
Page 23: Product Safety And Health Statements
PRODUCT SAFETY AND HEALTH STATEMENTS PACKAGE CONTENTS Proper e-collar use Transmitter Dogtra e-collars are intended for the sole purpose of behavior modification of dogs. They are not intended Receiver (two receiver/collars for for human use or use on other animals. Dogtra... -
Page 24: Description Of Transmitter Parts
DESCRIPTION OF TRANSMITTER PARTS DESCRIPTION OF TRANSMITTER PARTS DESCRIPTION OF TRANSMITTER PARTS transmitter Antenna On/Off Magnatic Red Dot Transmitter Antenna Rheostat Nick/Cont. Intensity Dial Toggle Switch A 8 cm antenna is supplied with the Indicator Light (LED Window) ON/OFF Switch The antenna must be fastened to the transmitter before using the unit. - Page 25 DESCRIPTION OF TRANSMITTER PARTS DESCRIPTION OF TRANSMITTER PARTS “regular” mode. “Mild” has 63 stimulation levels: (0) is the lowest and (L63) the highest. This feature gives the trainer a much wider range in the power band for highly sensitive dogs. The LCD display will show (L) along with the intensity level (0-L63) when your unit is in the “Mild”...
- Page 26 DESCRIPTION OF TRANSMITTER PARTS DESCRIPTION OF TRANSMITTER PARTS Rheostat Intensity Dial LCD Screen The LCD screen indicates the stimulation level (0- The Rheostat Intensity Dial is located on the top of the 127) for Regular or (0-L63) for Mild on the screen. transmitter: (0) being the lowest level and (127) being the highest while in the Regular Mode.
- Page 27 DESCRIPTION OF TRANSMITTER PARTS DESCRIPTION OF TRANSMITTER PARTS Care for LCD Transmitters in Cold Temperature In cold temperatures (10 degrees F or below), the Liquid Crystal Display (LCD) on your transmitter may be dim or slow to respond. Wait until the display becomes visible before selecting any training level.
-
Page 28: Button Function
DESCRIPTION OF TRANSMITTER PARTS BUTTON FUNCTION BUTTON FUNCTION Nick/Cont. Toggle Switch -dog Nick & Cont. ON/OFF Switch (Gray Button) -dog Pager (Gray Button) -dog Nick & Cont. -dog (Orange Button) Pager Transmitter Battery Charging Receptacle & (Orange Button) Rubber Plug has five Located on the backside of the transmitter, the buttons and a toggle switch on the transmitter. - Page 29 BUTTON FUNCTION BUTTON FUNCTION When either the orange or gray stimulation button is Transmitter Power ON/OFF pressed and the toggle is set on “Nick” the receiver emits a single, rapid pulse of electrical stimulation. The button on the right side of the transmitter is the “ON/OFF”...
-
Page 30: Description Of Receiver/Collar Parts
DESCRIPTION OF RECEIVER /COLLAR PARTS DESCRIPTION OF RECEIVER /COLLAR PARTS DESCRIPTION OF RECEIVER /COLLAR PARTS Battery Charging Receptacle and Cover Collar strap Receiver ON/OFF Magnetic Red Dot Contact Points To activate the receiver/collar, place the red dot on the back of the transmitter to the red dot on the receiver/collar. - Page 31 Red = needs charge) Internal Antenna When the “Constant” button on the transmitter is All Dogtra e-collars have non-exposed antennas pushed, the collar indicator light will glow steadily that are located inside the receiver/collar. (either green, amber, or red based on the remaining battery life), as long as you hold the button down, for up to 12 seconds.
-
Page 32: Battery Charger
NOTE : Only use Dogtra-approved Lithium- 2. Place the Test light included in the package Polymer Battery Chargers for your Dogtra e-collar. contents on the contact points as shown in the This will prevent any damage that can be incurred from attempting to use a different charger. -
Page 33: Fitting The Collar On The Dog
TESTING FITTING THE COLLAR ON THE DOG 3. Turn the transmitter on by pressing the blue button FITTING THE COLLAR ON THE DOG on the right side of the transmitter until the LCD screen illuminates. The LCD screen shows the amount of battery life remaining and the LED blinks once every 4 seconds. -
Page 34: Charging The Batteries
INTENSITY SELECTION The 3500NCP Super-X series has a Rheostat Intensity Dial on the top of the transmitter (0 is the uses Lithium- lowest and 127 is the highest). Remember that you Polymer batteries. - Page 35 Note : The unit has a partial charge when it leaves transmitter and receiver. the Dogtra facility, upon receipt of the collar, be sure to give it a full 2-hour initial charge before the first use.
-
Page 36: Reception
RECEPTION ACCESSORIES RECEPTION ACCESSORIES The following items may be purchased separately. collar has a range of 1,600m. Depending on the way you use your transmitter, the transmitter range may vary. U.S.A. Charger Hold the transmitter away from your body and avoid Designed for use with 110V AC electrical outlets in touching the antenna, to get the greatest range. -
Page 37: Basic Maintenance
If you suspect your unit is malfunctioning please refer to the “Troubleshooting Guide” before you send your unit in for service. If you have any questions or concerns, you may direct your inquiries to info@dogtra-europe.com or call +33 (0)1 30 62 65 65. - Page 38 +33 (0)1 30 62 65 65. Dogtra. This is the only time you should open the unit, any other unauthorized servicing of the unit 3. The transmitter has no range, or stimulation is voids your limited lifetime warranty.
-
Page 39: Warranty And Repair Informaion
One-Year / Two-Year Limited Warranty warranty. Dogtra-Europe provides the original purchaser with a 2-YEAR The removal of serial numbers from any Dogtra products will void the LIMITED WARRANTY for the products sold by Dogtra-Europe and warranty. its authorized distributors/retailers. The warranty begins from the date of Dogtra reserves the right to retain and discard any parts or accessories the original purchase. -
Page 40: Ec Declaration Of Conformity
EC DECLARATION OF CONFORMITY EC DECLARATION OF CONFORMITY We, Dogtra Company declare under our sole We, Dogtra Company declare under our sole We, Dogtra Company declare under our sole responsibility that the product responsibility that the product responsibility that the product Model Name : 3500NCP &...
Need help?
Do you have a question about the 3500NCP super-x series and is the answer not in the manual?
Questions and answers