Table of Contents
Advertisement
Advertisement
Table of Contents

Related Manuals for Elumen8 Beam 1RE


Summary of Contents for Elumen8 Beam 1RE
- Page 1 Beam 1RE Order Code: ELUM015 User Manual www.prolight.co.uk...
-
Page 2: Table Of Contents
TABLE OF CONTENTS 1. Safety Instructions .................. 2 2. Technical Specifications ................4 3. Description ....................5 3.1 Control Panel ................... 5 4. How To Set The Unit ................5 4.1 Main Functions ................5 4.2 Home Position Adjustment ............10 4.3 Error Information ................11 5. Control By Universal DMX Controller ........... 12 5.1 Connection ..................12 5.2 Address Setting ................13 5.3 DMX 512 Configuration ..............13 6. Troubleshooting ..................16 7. Maintenance and Cleaning ..............17... -
Page 3: Safety Instructions
1. Safety Instructions Please read carefully the instruction manual, which includes important information about installation, usage and maintenance. WARNING Please keep this User Guide for future consultation. If you sell the unit to another user, be sure that they also receive this instruction manual. Important: Damages caused by the disregard of this user manual are not subject to warranty. The dealer will not accept liability for any resulting defects or problems. Unpack and check carefully that there is no transportation damage before using the unit. — The unit is for indoor use only. Use only in a dry location. — Only to be installed and operated by qualified personnel. — Do not allow children to operate the fixture. — Use safety cables when installing the unit. Handle the unit by its base only. Do not carry with — its head. The unit must be installed in a location with adequate ventilation, at least 50cm from adjacent — surfaces. Be sure that no ventilation slots are blocked; otherwise the unit will overheated. — Before operating, ensure that the voltage and frequency of power supply matches the power —... - Page 4 more than 12 meters. Disconnect mains power before fuse/lamp replacement or servicing. — Replace fuse/lamp only with the same type. — In the event of a serious operating problem, stop using the unit immediately. — Never turn the unit on and off in short intervals. — The housing, lenses, or the ultraviolet filter must be replaced if they are visibly damaged. — Do not open the unit as there are no user serviceable parts inside. — Do not attempt to repair the unit by yourself. Repairs carried out by unskilled people can lead — to damage or malfunction. Please contact the nearest authorized technical assistance center if needed. Disconnect the mains power if the fixture is not to be used for a long time. — Use the original packing materials before transporting the unit. — To prevent or reduce the risk of electrical shock or fire, do not expose the unit to rain or —...
-
Page 5: Technical Specifications
2. Technical Specification Ÿ DMX Channels: 12 channels Ÿ Control mode: DMX, Master slave, Sound active Ÿ LCD display Ÿ One gobo wheel with 15 gobos plus open Ÿ One colour wheel with 14 colours plus open Ÿ 0~100% dimming and variable strobe speeds Ÿ Voltage: AC 100~240V, 50/60Hz Ÿ Power Consumption: 190W Ÿ LED: OSRAM SIRIUS HRI 100W Ÿ Beam Angle: 3° Ÿ Weight: 9.2Kgs Ÿ Dimension: 387 x 284 x 255mm... -
Page 6: Description
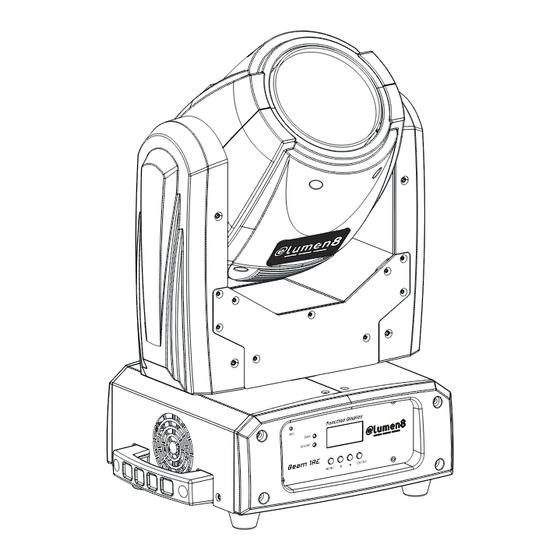
3. Description 3.1 Control Panel 1. Button: MENU To select the programming functions DOWN To go forward in the selected functions UP To go backward in the selected functions ENTER To confirm the selected functions 2. Microphone: To receive music for sound active; 3. LED: DMX On DMX input present SOUND Flashing Sound activation 4. Function Display: Used to show the various menus and selected functions; 5. Fuse(T5A): Protects the unit from over-voltage or short circuit; 6. Power In/out: Used to connect to supply power. 7. DMX In/out: 3-pin XLR connectors for DMX 512 operation; 4. How To Set The Unit 4.1 Main Function Press the MENU button into menu mode, press the UP and DOWN buttons until the required function is shown on the display. Select the function by pressing the ENTER button. Use the UP and DOWN buttons to choose the submenu, press the ENTER button to store and automatically return to the last menu. Press the MENU button or leave the unit idle for one minute to exit the... - Page 8 DMX Address To select the DMX Address, press the ENTER button to show DMX ADDRESS on the display. Use the UP/DOWN buttons to adjust the address from 001 to 512. Once the address has been selected, press the ENTER button to setup. To go back to the functions without any changes press the MENU button again. Press and hold the MENU button for about one second or wait for one minute to exit the menu mode.
- Page 9 Sound Sense To select the Sound Sense, press the ENTER button to show SOUND SENSE on the display. Use the UP/DOWN buttons to adjust the value from 0 to 100. Once the mode has been selected, press the ENTER button to setup. To go back to the functions without any changes press the MENU button again. Press and hold the MENU button for about one second or wait for one minute to exit the menu mode. Pan Inverse To select the Pan Inverse, press the ENTER button to show PAN INVERSE on the display. Use the UP/DOWN buttons to select the Inverse (pan inversion) or Normal (normal) mode. Once the mode has been selected, press the ENTER button to setup. To go back to the functions without any changes press the MENU button again. Press and hold the MENU button for about one second or wait for one minute to exit the menu mode.
- Page 10 Fixture Time To select the Fixture Time, press the ENTER button and the display will show the number of working hours of the unit. To go back to the functions press the MENU button again. Press and hold the MENU button about one second or wait for one minute to exit the menu mode. Lamp Time To select the Lamp Time, press the ENTER button and the display will show the number of working hours of the lamp. To go back to the functions press the MENU button again. Press and hold the MENU button about one second or wait for one minute to exit the menu mode. Lamp On To select the Lamp On, press the ENTER button to show the LAMP ON on the display. Use the UP/DOWN buttons to select the On (Lamp on) or Off (Lamp off). Once selected, press the ENTER button to setup. To go back to the functions without any changes press the MENU button again.
-
Page 11: Home Position Adjustment
Reset To select Reset, press the ENTER button and all channels of the unit will return to their standard positions. 4.2 Home Position Adjustment Press and hold the MENU button for at least 3 seconds then press and hold the ENTER button for at least 5 seconds to enter into offset mode to adjust the home position for the motors. Use the Up and Down buttons to adjust the value, press the ENTER button to setup. To go back to the functions without any changes press the MENU button. PAN OFFSET —Pan home position adjustment To select the Pan Offset, press the ENTER button to show PAN OFFSET on the display. Use the UP and DOWN buttons to adjust the value from -127 to 127, press the ENTER button to store. Press the MENU button to exit. TILT OFFSET —Tilt home position adjustment To select the Tilt Offset, press the ENTER button to show TILT OFFSET on the display. Use the UP and DOWN buttons to adjust the value from -127 to 127, press the ENTER button to store. Press the MENU button to exit. DIMMER OFFSET —Dimmer flag position adjustment To select the Dimmer Offset, press the ENTER button to show DIMMER OFFSET on the display. Use the UP and DOWN buttons to adjust the value from 0 to 255, press the ENTER button to store. Press the MENU button to exit. -
Page 12: Error Information
COLOUR OFFSET —Colour home position adjustment To select the Colour Offset, press the ENTER button to show the COLOUR OFFSET on the display. Use the UP and DOWN buttons to adjust the value from -127 to 127, press the ENTER button to store. Press the MENU button to exit. GOBO OFFSET —Gobo home position adjustment To select the Gobo 1 Offset, press the ENTER button to show GOBO OFFSET on the display. Use the UP and DOWN buttons to adjust the value from -127 to 127, press the ENTER button to store. Press the MENU button to exit. Prism OFFSET —Prism home position adjustment To select the Prism Offset, press the ENTER button to show PRISM OFFSET on the display. Use the UP and DOWN buttons to adjust the value from 0 to 255, press the ENTER button to store. Press the MENU button to exit. 4.3 Error Information Lamp Startup Fail It appears when there is no lamp fitted or the lamp has failed. Temperature Sense Error It appears when temperature check board is damaged. Lamp Too Hot Power Off It appears when the temperature is detected higher than 110 . Check if the unit is properly ventilated, or the fans are faulty. Lamp Too Hot Low Power It appears when temperature is detected higher than 105 , the unit will run on a low power level. Maintenance Fixture It appears when the maintenance remaining time becomes 0S, please enter menu mode and reset the time. -
Page 13: Control By Universal Dmx Controller
Memory Initial Fail It appears when the memory IC is damaged. CPU-B Error, CPU-C Error, CPU-D Error They appear when a PCB board or cables are damaged. Pan Reset Error, Pan Encode Error, Tilt Reset Error, Tilt Encode Error, Shutter Reset Fail, Dimmer Reset Fail, Color Reset Fail, Gobo Reset Fail, Focus Reset fail. They may appear when turning on or resetting the unit or when a PCB is damaged. Please contact qualified maintenance. 5. Control By Universal DMX Controller 5.1 Connection 1. At last unit, the DMX cable has to be terminated with a terminator. Solder a 120-ohm 1/4W resistor between pin 2(DMX-) and pin 3(DMX+) into a 3-pin XLR-plug and plug it in the DMX-output of the last unit. -
Page 14: Address Setting
input of the next unit. The cable cannot be branched or split to a “Y” cable. DMX 512 is a very high-speed signal. Inadequate or damaged cables can easily distort the signal and shut down the system. 3. The DMX output and input connectors are a pass-through type to maintain the DMX circuit, when one of the units’ power is disconnected. 4. Each unit needs to have a DMX address to receive the data by the controller. The address number is between 0-511 (usually 0 & 1 are equal to 1). 5. The end of the DMX 512 system should be terminated to reduce signal errors. 6. - Page 15 000-255 PAN FINE TILT 000-255 0° - 220° 000-255 TILT FINE PAN/TILT SPEED 000-255 fast " slow DIMMER 000-255 0%~100% STROBE: 000-007 Standby 008-015 Open 016-131 Strobe: Slow " Fast 132-139 Open 140-181 Fast Close Slow Open 182-189 Open 190-231 Fast Open Slow Close 232-239 Open 240-247 Random Strobe 248-255 Open COLOR: 000-008 Open 009-016 Colour1 017-025 Colour2 026-033 Colour3...
- Page 16 028-031 Gobo7 032-035 Gobo8 036-039 Gobo9 040-043 Gobo10 044-047 Gobo11 048-051 Gobo12 052-055 Gobo13 056-059 Gobo14 060-063 Gobo15 064-068 Gobo1 Shaking 069-072 Gobo2 Shaking 073-076 Gobo3 Shaking 077-080 Gobo4 Shaking 081-084 Gobo5 Shaking 085-089 Gobo6 Shaking 090-093 Gobo7 Shaking 094-097 Gobo8 Shaking 098-101 Gobo9 Shaking 102-105 Gobo10 Shaking 106-110 Gobo11 Shaking 111-114 Gobo12 Shaking 115-118...
-
Page 17: Troubleshooting
210-229 Null 230-239 Lamp Off 240-249 Null 250-255 Sound Function 6. Troubleshooting Following are a few common problems that may occur during operation. Here are some suggestions for easy troubleshooting: A. The unit does not work, no light output and the fan does not work 1. Check the power connection and main fuse. 2. Check the power on LED to see if it is illuminated. B. Not responding to DMX controller 1. DMX LED should be on. If not, check DMX connectors and cables to see if they are connected correctly. 2. If the DMX LED is on and no response to the desk, check the address settings and DMX polarity. -
Page 18: Maintenance And Cleaning
7. Cleaning Cleaning: The cleaning of internal and external optical lenses and/or mirrors must be carried out periodically to optimize light output. Cleaning frequency depends on the environment in which the fixture operates: damp, smoky or particularly dirty surrounding can cause greater accumulation of dirt on the unit’s optics. Ÿ Clean with soft cloth and use normal glass cleaner. Ÿ Always dry the parts carefully. Ÿ Clean the external optics at least every 20 days. Clean the internal optics at least every 30/60 days. - Page 19 Declaration of Conformity We declare that our products (lighting equipments) comply with the following specification and bears CE mark in accordance with the provision of the Electromagnetic Compatibility (EMC) Directive 89/336/EEC. EN55103-1: 2009+A1:2012; EN55103-2: 2009; EN61000-3-2: 2014; EN61000-3-3: 2013. & Harmonized Standard EN 60598-1:2015; EN 60598-2-17:1989 + A2:1991; EN 62471:2008; EN 62493: 2010 Safety of household and similar electrical appliances Part 1: General requirements...
- Page 20 Innovation, Quality, Performance...
Need help?
Do you have a question about the Beam 1RE and is the answer not in the manual?
Questions and answers