Advertisement
Quick Links
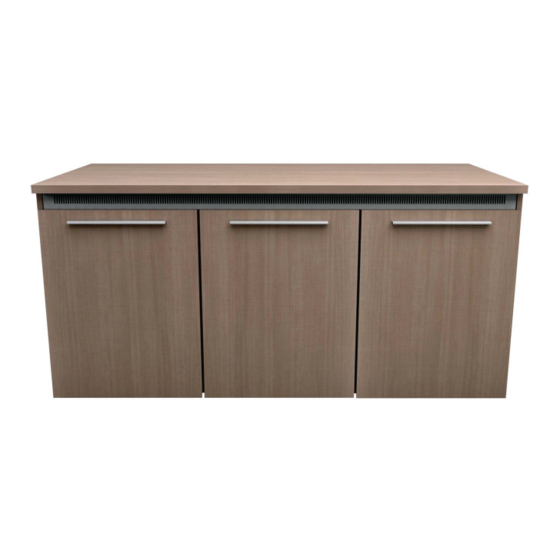
Thank you for purchasing the C5 Series Credenza Rack. Please read all instructions thoroughly
before assembling this product.
PRODUCT FEATURES
- Built-in thermostatically controlled cooling.
- Heavy duty frame ships separate to allow for equipment integration before finished surfaces are
attached.
- 14 rackspaces per bay.
- Factory installed casters.
- Weight rating of 800 pounds, including finishing kit*, with maximum 350 pounds located on
top surface. (*Middle Atlantic Products supplied finishing kit is 200 pounds complete)
assembly instructions
C5 SERIES
CREDENZA RACK
I-00661
Rev E
Advertisement

Related Manuals for Middle Atlantic Products Credenza Rack


Summary of Contents for Middle Atlantic Products Credenza Rack
- Page 1 C5 SERIES CREDENZA RACK Thank you for purchasing the C5 Series Credenza Rack. Please read all instructions thoroughly before assembling this product. PRODUCT FEATURES - Built-in thermostatically controlled cooling. - Heavy duty frame ships separate to allow for equipment integration before finished surfaces are attached.
- Page 2 WARNINGS WARNING - Death or serious injury may occur when children climb on audio and/or video equipment urniture. A remote control or toys placed on the furnishing may encourage a child to climb on the furnishing and as a result the furnishing may tip over on to the child. AVERTISSEMENT - La mort ou la blessure sérieuse peut se produire quand les enfants s'élèvent sur des meubles d'audio et/ou de matériel vidéo.
- Page 3 FAN NOTES TURN ON TEMPERATURE: The blower will turn on at 87° F (30.5° C) and run proportionately. Speed increases with temperature from 87° F (30.5° C) to 95° F (35° C). At 95° F (35° C) and above, the blower will run at full speed. The blower will stop running at 85° F (29.4° C). A) TEMPERATURE PROBE: Temperature detection probe (A).
-
Page 4: Vent Installation
VENT INSTALLATION 1) Place vent underneath the flange. (FIGURE A) 2) Using a #2 Phillips driver, install the 10-32 screws into the top of the vent (FIGURE A). Use hardware kit #91-00507. FIGURE A Page 4... -
Page 5: Side Panel Installation
SIDE PANEL INSTALLATION NOTE: For accessories related to the Side Panels, please read those instructions thoroughly before continuing with the installation below 1) Install side panels by placing the four pre-installed hooks into the four slots on the frame. (FIGURE B) NOTE: When installing side panels, ensure door hinge plates are located at the front of the frame. - Page 6 HARDWARE KIT QTY Configuration Hardware Kit 1-Bay 91-00514 91-00508/91-00518 2-Bay 91-00515 91-00508/91-00518 3-Bay 91-00516 91-00508/91-00518 TOP SURFACE INSTALLATION NOTE: For accessories related to the Top Surface, please read those instructions thoroughly before continuing with the installation below NOTE: If installing a monitor mount, please read the instructions with the monitor mount prior to installing.
-
Page 7: Door Installation
DOOR INSTALLATION 1) Install doors using provided wood screws (two places per door) as shown (HW Kit #91-00518). (FIGURE D) Factory Installed Bumpers (NOTE: (3) Three replacement bumpers supplied) FIGURE D Page 7... - Page 8 DOOR INSTALLATION ONTO MULLION 1) Door to be installed onto credenza frame using provided screws (two places per door) as shown (HW Kit #91-00518). (FIGURE E) FIGURE E Page 8...
- Page 9 LOCK/KNOB INSTALLATION 1) Install lock/knob into pre-drilled pilot holes. (FIGURE F) FIGURE F HINGE ADJUSTMENTS Door in open position FIGURE G Directional adjustments apply to the door in the closed position. Hinge adjustment is done with door in open position. Refer to (FIGURE G) for appropriate adjustments. Side Adjustment: Adjusts horizontal placement of door.
- Page 10 WARRANTY Middle Atlantic Products, Inc. (the "Company") warrants the C5 Credenza Frame to be free from defects in material or workmanship under normal use and conditions for the lifetime of the product, the Cladding for (7) seven years, and the Fans for (3) three years from the date of shipment by the Company.
Need help?
Do you have a question about the Credenza Rack and is the answer not in the manual?
Questions and answers