Table of Contents
Advertisement
Advertisement
Table of Contents

Related Manuals for CareFusion Infant Flow


Summary of Contents for CareFusion Infant Flow
- Page 1 Infant Flow LP nCPAP system ® Clinical training workbook...
-
Page 2: Table Of Contents
Infant Flow LP system ....................7 Infant Flow SiPAP configurations ................8 Infant Flow SiPAP display screen ................9 Infant Flow CPAP and circuit set-up ................10 Humidification and nCPAP ..................11 Airway temperature probe placement ..............11 Infant Flow SiPAP sensor calibration ............... 12 Infant Flow SiPAP set-up guide ................. -
Page 3: Infant Nasal Cpap
Infant nasal CPAP Introduction Worldwide each year, approximately 15 million (1 out of every 10) babies are born prematurely. Premature or low-birth weight (LBW) infants are at a high risk for respiratory problems due to underdeveloped lungs. Common neonatal respiratory conditions include apnea of prematurity, respiratory distress syndrome, transient tachypnea of the newborn (TTN), meconium aspiration syndrome, pulmonary edema and post-extubation support. -
Page 4: Infant Nasal Cpap
Physiologic effects of nasal CPAP in neonates 3–4,10 Infant nasal CPAP Stretches lung Splint open airways and pleura Recruits alveoli Increases pharyngeal Stabilizes chest wall Stimulates the Stimulates lung and prevents cross section and diaphragm J receptors and HIBR growth alveoli collapse Improves Reduces central... - Page 5 Indications for use 2– 5 • Congenital malformations of the upper airway (cleft palate, choanal atresia or tracheoesophageal fistula) • Abnormalities on physical examination • Congenital diaphragmatic hernia or untreated - Increased WOB bowel obstruction - Increased respiratory rate • Poor respiratory drive unresponsive to CPAP therapy - Intercostal and substernal recession (frequent apnea episodes associated with oxygen - Grunting and nasal flaring...
-
Page 6: Cpap Modalities
6 LPM. Conventional CPAP (V-CPAP): Utilizes a traditional mechanical Pandt and Associates demonstrated that the Infant Flow ventilator to deliver a constant flow of gas. CPAP is created variable flow technology delivered a consistent level of by changing the expiratory port orifice size. -
Page 7: Variable Flow Technology
1 0 ,1 2 What is variable flow technology? 10,11 The patented Infant Flow LP generator is a new form of The Infant Flow LP patented dual-jet variable flow variable flow that uses vortices technology to reduce the generator utilizes fluidic technology to deliver a imposed WOB during inhalation. -
Page 8: Self Assessment
Self assessment 1. Describe RDS: 8. Match the generator parts to the diagram: Pressure line Impinging jets Exhaust tube Drive line Patient 2. List three indications for nCPAP therapy: 3. List three benefits of nCPAP therapy: 4. List three potential complications to nCPAP therapy: Notes: 5. -
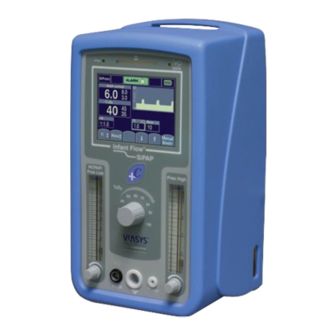
Page 9: Infant Flow Sipap Driver Overview
Infant Flow SiPAP driver overview Infant Flow LP system The Infant Flow LP nCPAP system is a comprehensive system for delivering unique nCPAP therapy. The system consists of: • Infant Flow SiPAP driver • Infant Flow LP generator assembly • Infant Flow LP fixation—bonnet or headgear •... -
Page 10: Infant Flow Sipap Configurations
Infant Flow SiPAP configurations The Infant Flow SiPAP driver is sold globally and is available In select areas, additional languages or an international icon in different configurations. The two main models are Infant overlay may be used in place of the English text. The operation Flow SiPAP Plus and Infant Flow SiPAP Comprehensive. -
Page 11: Infant Flow Sipap Display Screen
Infant Flow SiPAP display screen Mode, control settings and function buttons Alarm priority/alarm Operational silence indicator information Mode Battery indicator charge Pressure/Time graphics or monitored Monitored parameters display parameters Control/Setting indicators Soft key color code Alarm management White letter High priority Key enabled •... -
Page 12: Infant Flow Cpap And Circuit Set-Up
Infant Flow SiPAP and circuit set-up Circuit set-up 1. Gather the nCPAP supplies: • Infant Flow SiPAP driver • Single-limb, heated breathing circuit • Infant Flow LP generator kit • Infant Flow LP fixation device • Humidifier and chamber • Sterile water bag 2. -
Page 13: Humidification And Ncpap
Humidification and nCPAP Humidification practice guidelines recommend gas temperature Heated humidification is recommended for nCPAP therapy. between 34 and 41 °C to provide a humidity level of The normal functions of the nose and air passages of 33 to 44 mgH O/L with artificial airways. -
Page 14: Infant Flow Sipap Sensor Calibration
Two-point oxygen sensor calibration Two-point oxygen sensor calibration should be performed 9 LPM prior to turning on the Infant Flow SiPAP driver on. before initially using the Infant Flow SiPAP driver and with When the Infant Flow SiPAP driver is turned on, a power on each circuit change. -
Page 15: Infant Flow Sipap Set-Up Guide
4. To use the low breathing rate/apnea monitor, connect Set-up menu screen the transducer interface to the Infant Flow SiPAP driver. Press the flashing question mark under the infant respiratory sensor icon. This will change to a static checkmark to confirm the setting. -
Page 16: Infant Flow Sipap Set-Up Guide
Main screen with active alarm 16.0 Flow pressure nomogram 14.0 The Infant Flow SiPAP LP system is subject to a direct 12.0 relationship between the controlled gas flow and airway pressure. For example, 9 LPM of gas flow provides 10.0 approximately 5 cmH O CPAP. -
Page 17: Respiratory Abdominal Sensor
Respiratory abdominal sensor Respiratory abdominal sensor (optional) For use only with the Infant Flow SiPAP Plus and breathes, the most movement is between the lowest Comprehensive nCPAP drivers. The respiratory abdominal rib and the abdomen. sensor enables the clinician to monitor for apnea/low breath 2. -
Page 18: Self Assessment
2. If condensation occurs in the breathing circuit, what should you do? 8. When should you perform an oxygen sensor calibration on the Infant Flow SiPAP? 3. Explain how to disable the oxygen sensor: Notes: 4. Demonstrate how to reset the alarm limits when the device is in operation: 5. -
Page 19: Infant Flow Sipap Ncpap Driver
Infant Flow SiPAP nCPAP driver Modes of operation nCPAP mode nCPAP mode delivers constant, stable positive pressure be set for a duration of 0.1 to 3 seconds to produce to infant airways to help restore the FRC in assisting the a “sigh.”... - Page 20 Timed BiPhasic breaths are given at the set backup rate, PHigh BiPhasic + LBR/apnea mode and T-high. If the infant triggers within the next time-out This mode is the application of BiPhasic therapy with low period, the alarm silences and triggered-BiPhasic resumes. breath rate detection via the respiratory abdominal sensor If no breaths are detected after the next apnea timeout, and transducer interface.
-
Page 21: Biphasic Mode Strategy
BiPhasic mode strategy SiPAP settings SiPAP is a strategy that assists infants who are spontaneously • Increase rate, which: breathing yet require some assistance. The theoretical ° Increases alveolar recruitment and ventilation benefits of the SiPAP strategy are that the sigh cycles may °... - Page 22 “supply air to lungs mode was launched. for oxygenation.” • 2001: The swivel connector was added to the Infant Flow • 1914: A. Von Reuss described using CPAP to generator, and the bonnet design was changed.
-
Page 23: Sipap Exercises And Self Assessment
SiPAP exercises and self assessment Exercise No. 1 Attach the SiPAP circuit, and occlude the nasal prongs. Enter these settings on the SiPAP driver: • Set low pressure flow rate at 9 LPM • Set FiO at 21% • Set high pressure flow rate at 2 LPM •... - Page 24 Exercise No. 4 (comprehensive model only) Ensure the Infant Flow transducer and abdominal respiratory sensor (ARS) are attached. Switch to BiPhasic trigger mode. Set these parameters: • Low pressure flow rate at 9 LPM • Rate of 25 • High pressure flow rate at 2 LPM •...
-
Page 25: Infant Flow Lp Generator Assembly
The low pressure refers to the driving pressure. The proximal pressure line connects with the circuit Compared to other variable flow devices, the Infant Flow LP pressure line to enable monitoring the pressure generator utilizes 80% less driving pressure on average to delivered directly to the patient interface. -
Page 26: Infant Flow Lp Interfaces
The Infant Flow LP interface features soft, comfort-fit prongs and masks that provide an effective seal and minimize the potential for skin necrosis. The Infant Flow LP interfaces are available in five sizes to fit your infant’s needs. The masks and prongs do not contain latex or Bisphenol A (BPA). - Page 27 Infant Flow LP mask Flexible bellow: Between the mask body and the generator Anatomically sized mask: The mask allows ample room connection, a flexible bellow allows the mask to find for the infant’s nose that minimizes pressure points and a natural position over the infant’s nose, which helps helps ensure patient comfort.
-
Page 28: Infant Flow Lp Fixation Devices
Applying excessive cotton bonnets and patented comfort-wrap headgear or uneven pressure can result in necrosis to the infant’s skin secures the generator quickly and easily while minimizing and potentially inhibit recovery. The Infant Flow LP nCPAP pressure points. Comfort-wrap headgear Bonnets... -
Page 29: Self Assessment
Self assessment 1. What type of technology does the generator utilize? Notes: 2. List three features of the generator: 3. List three features of the nasal prongs: 4. List three features of the nasal mask: 5. Explain why the design of the fixation device and nasal interface is important: 6. -
Page 30: Infant Flow Lp Patient Set-Up
Infant Flow LP patient set-up Infant Flow LP interfaces Depending on the facility’s protocol and the infant’s need, to routinely alternate between the nasal prongs and mask. either nasal prongs or nasal masks may be used with the The goal is to provide a good seal within and around the variable-flow generator. - Page 31 Note: The nasal prongs and nasal mask are single patient use and should be discarded at the end of therapy. Too large Correct size Too small If the mask is too large, leaks may If the outside of the triangle fits If the mask is too small, it occur around the perimeter.
-
Page 32: Fixation Devices
Fixation devices The Infant Flow LP nCPAP system provides the clinician with application and quickly accommodate changes in the two fixation options. Some clinicians may prefer the soft infant’s head size. cotton bonnets for use with very low birth-weight infants or... -
Page 33: Headgear Application
Headgear application Depending on the facility’s preference, the clinician may Match the head circumference to the measurement listed use a headgear or bonnet fixation device. To select the on the package and/or back of the headgear. appropriate size headgear, use a measuring tape marked in centimeters to measure the infant’s head circumference. -
Page 34: Generator Assembly Preparation
Generator assembly preparation Following the facility’s protocol, set up the Infant Flow SiPAP the breathing circuit supply line to the drive line of the or nCPAP driver and attach a breathing circuit. The heated, generator assembly. Ensure the fittings are tight. Attach single-limb infant breathing circuit must be compatible the nasal prongs or nasal mask to the generator. -
Page 35: Generator Assembly And Interface Attachment To Headgear
Generator assembly and interface attachment Do not overtighten. If the headgear is too tight, it may The generator assembly has a support cradle used to cause head molding and additional pressure points secure the generator assembly to the headgear and help against the infant’s delicate skin. - Page 36 Correct headgear placement 6. Inspect the headgear 1. The straps are aligned correctly to the brow line. The After applying the headgear, inspect it for proper fit, strap placement and tension. When properly attached, the center strap is properly folded back, without too much generator should sit perpendicular to the infant’s face.
-
Page 37: Bonnet Application
Bonnet application Depending on the facility’s preference, the clinician Tip: Bonnet sizing—Do not use a head may use either a bonnet or headgear fixation device. To circumference measurement, as it does not select the appropriate bonnet size, use the colored sizing provide an accurate measurement. -
Page 38: Generator Assembly And Interface Attachment To Bonnet
Generator assembly and interface attachment to bonnet A special pad on the bonnet holds the support cradle in infant’s nose. The bonnet should cover the ears and place. This secures the generator assembly to the bonnet fit snugly to prevent slippage—do not overtighten and helps properly align the nasal prongs or mask to the the side straps. - Page 39 Adjust the strap tension 1. Adjust the tension of the side straps. If the bellows on the prongs or mask are collapsed, the straps are too tight. The gray side straps should lie low and horizontally across the infant’s cheeks. Ensure the straps are not resting against the eyes.
-
Page 40: Bonnet Application (Alternative Method 1)
Bonnet application (alternative method 1) The previous section outlined the most common method it more convenient or easier to use one of the methods for applying the bonnet. However, some clinicians may find described in the following pages. Thread the gray straps to the bonnet As one alternative method, to apply the bonnet with gray straps pre-threaded: 1. -
Page 41: Bonnet Application (Alternative Method 2)
Bonnet application (alternative method 2) A second method for applying the bonnet is attaching the bonnet and generator assembly. Clinicians should use generator assembly to the bonnet prior to application. All the method that they are most comfortable with and best fits three methods discussed are acceptable ways to apply the the situation. -
Page 42: Incorrect Application Of Fixation Device And Generator Assembly
Incorrect application of fixation device and generator assembly Properly sizing and placing the fixation device, headgear or If the fixation device is too large, slippage can occur, bonnets is essential for the proper alignment and stability creating additional torque on the generator assembly of the generator assembly. - Page 43 Incorrect bonnet position 1. The bonnet is seated too high on the forehead. 2. The support attachment pad is not midline to the nasal profile. Corrective action: Reposition the bonnet. The side of the bonnet should cover the infant’s ears, and the front of the bonnet should sit at the brow line.
-
Page 44: Incorrect Application Of Generator Assembly And Interface
Incorrect application of generator assembly and interface Properly sizing and placing the patient interface are Conduct routine checks according to the facility’s protocols essential for optimal therapy delivery. Incorrectly applying to ensure the proper placement of the interface. the interface may lead to air leaks, pressure points, nasal injury and therapy interruption. - Page 45 Improper mask size 1. The mask is too large if the top of the mask rests on the glabella, the area between the eyebrows. 2. The mask is too large if the bottom of the mask covers the infant’s lips. 3.
-
Page 46: Final Inspection Of Nasal Interface Placement
Final inspection of nasal interface placement After applying the fixation device and generator assembly, is key to the success of nCPAP therapy. Confirm that the conduct a final check for the proper placement of the nasal prescribed pressure is being delivered. prongs and mask. -
Page 47: Self Assessment And Return Demonstration
3. Use the sizing guide to select the correct interface size. Nasal prongs: Nasal mask: Observation skills assessment This Infant Flow LP system has not been applied correctly. Identify at least four application errors:... - Page 48 Observation skills assessment This Infant Flow LP system has not been applied correctly. Identify five application errors: Are there any additional application errors? Notes:...
-
Page 49: Routine Ncpap Care
Routine nCPAP care Final inspection and routine care From the initial application of nCPAP therapy throughout the infant. The type and frequency of monitoring and its progress, inspect the system after set-up and routinely, assessment carried out varies depending on each facility’s every three to four hours to ensure therapy effectiveness policies and procedures and individual patient needs. - Page 50 Infant assessment and monitoring Nasal care 3 ,5 ,1 7 • Skin color Prevention is the key to reducing nasal septum damage. Preterm infants have very thin, fragile skin • Chest wall stability (e.g., retractions) due to the immature development of the stratum •...
- Page 51 The infant’s nares may take on a more rounded Feeding 3–5 appearance when the prongs have been in place for nCPAP is not a contraindication to feeding. Infants a time. This is only temporary, and the nares will return receiving nCPAP can be breast, bottle or tube fed, to normal size after therapy.
-
Page 52: Frequently Asked Questions
Q. The masks keep collapsing. What should I do? Q. Can I use my bonnets from the original Infant Flow nCPAP system with the new Infant Flow LP system? A. Check the position and placement of the generator assembly. - Page 53 Q. The infant has thickened oral and nasal sections. Do I Q. Can you nebulize medication through the Infant Flow need to carry out routine suctioning? LP generator? A. When receiving nCPAP therapy, routinely suctioning the A.
- Page 54 Moisture under the hydrocolloid Infant Flow SiPAP nCPAP driver Q. When should I calibrate the oxygen sensor? Q. I have disabled the oxygen sensor. Do I need to use an external oxygen analyzer? A.
- Page 55 Infant Flow SiPAP nCPAP driver (continued) Q. Can the SiPAP nCPAP driver deliver nitric oxide? Q. What triggers the SiPAP nCPAP driver to alarm? A. The FDA has approved the use of the INOMAX A. Refer to the operator manual for the list of alarm DS with the SiPAP driver for delivering nitric oxide.
-
Page 56: Self Assessment
3. List at least three assessments that should be conducted every three to four hours while on nCPAP therapy: Notes: 4. List three ways to help prevent nasal injury: 5. The Infant Flow LP components are interchangeable with the original Infant Flow nCPAP system. True False 6. -
Page 57: Glossary
The device used to secure the generator use, dual-jet generator that delivers the CPAP therapy. to the infant, referring to either the bonnet or headgear. The patented Infant Flow LP Generator is designed to Fluidic flip: The key to the functionality of the Infant reduce the added work of breathing by providing active Flow LP Generator. - Page 58 Infant Flow transducer: The connection from the SiPAP Variable flow CPAP (VF-CPAP): The creation of a CPAP driver to the respiratory abdominal sensors for respiratory level based on flow utilizing fluidic principles. Rather rate monitoring and synchronization. than provide a constant flow of gas, VF-CPAP provides a direction of gas flow that depends on the infant’s...
-
Page 60: References
Yorba Linda, CA 92887 714.283.8493 fax carefusion.com © 2013 CareFusion Corporation or one of its subsidiaries. All rights reserved. Infant Flow, CareFusion and the CareFusion logo are trademarks or registered trademarks of CareFusion Corporation or one of its subsidiaries. RC2191 (0813/2500)
Need help?
Do you have a question about the Infant Flow and is the answer not in the manual?
Questions and answers