
Related Manuals for NanoCam Plus NCP-MIRDVRHD2


Summary of Contents for NanoCam Plus NCP-MIRDVRHD2
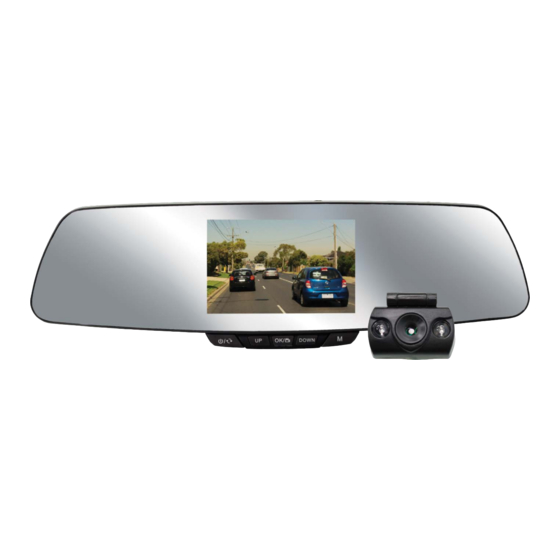
- Page 1 NCP-MIRDVRHD2 USER MANUAL CLIP ON MIRROR MONITOR WITH BUILT-IN DASH CAM DVR & REAR CAMERA...
-
Page 2: Table Of Contents
Caution ........................................4 Battery warning ....................................4 Notes on Installation ....................................4 Introduction .....................................5 Features .....................................5 Package Contents ..................................5 Product Overview ..................................6 Getting Started ....................................6 Inserting the Memory Card .................................6 Installing the Clip on Mirror DVR..............................6 2.2.1 Connecting the Rear facing Camera ..........................7 2.2.2 Adjust the device position ..............................7 2.2.3 Connect to Power ................................7 Powering the Mirror DVR On / Off ...............................7... - Page 3 Photo Mode ....................................12 Photo Menu ....................................12 3.1.1 Image Quality...................................12 3.1.2 White Balance .................................13 3.1.3 Exposure ..................................13 3.1.4 Date Stamp ..................................14 Setting Menu ....................................14 3.2.1 Date / Time..................................14 3.2.2 Language ..................................14 3.2.3 Format .....................................15 3.2.4 Default Settings ................................15 Playback Screen ..................................16 3.3.1 Deleting Photos &...
-
Page 4: Caution
Caution • Ensure you are using your Mirror DVR within your countries’ road laws. Please make sure you are familiar with your local road legislation before use. • Avoid leaving your Mirror DVR in direct sunlight for extended periods of time in an unventilated space. •... -
Page 5: Introduction
1. Introduction Thank you for purchasing a NanoCam Plus Clip On Mirror DVR with Integrated 1080P Dash Cam DVR & 720p Rear Camera. We are certain that our product will give you trouble free operation while providing you with a safety feature that enhances your driving experience. -
Page 6: Product Overview
1.3 Product Overview 1. USB/Rear Camera Input (M) button 2. Power Input (12V, DC) 9. 5.0” IPS LCD Screen 3. Micro SD Card Slot 10. Heat Dissipation / Air Flow 4. Power On/Off button 11. Fastening Clips (Up) button 12. Wide Angle Lens (OK/Rec) button 13. -
Page 7: Connecting The Rear Facing Camera
2.3.2 Manual Power On/Off and Reset 2.3.2.1 Manual Power On Press and hold the Power button on the front of the Mirror DVR until the Nanocam Plus start up screen appears. -
Page 8: Power Off
2.3.2.2 Power Off If the Mirror DVR is currently recording, please manually stop the recording by pressing the button. Press and hold the Power button on the front of the Mirror DVR. After powering off the device please wait for 10 seconds before powering the Mirror DVR on again. -
Page 9: Using The Clip On Mirror Dvr
4. Press to enter the Date/Time. 5. Use the buttons to edit the selected digit and the button to confirm and progress to the next digit. 6. To save and exit the date and time menu, press the button Note: 1. -
Page 10: Video Menu
2.7 Video Menu When the Mirror DVR is powered on the video screen will start by default. In this screen recording will automatically start and can be stopped by pressing the button. To access the Menu, ensure that the Mirror DVR is not recording then press and hold the button for 2 seconds. -
Page 11: Exposure
2.7.3 Exposure Exposure is used to manually control the light sensitivity settings. To change the Exposure setting follow the instructions below. 1. Press the Button to stop the Mirror DVR from recording. 2. Press and hold the Button for 2 seconds to enter the Menu. 3. -
Page 12: G Sensor
2.7.6 G Sensor The G Sensor defines the required force needed to trigger emergency recording. Once Emergency recording is triggered the current recording will be saved and protected from being saved over by the normal loop recording. To set the required sensitivity please follow the instructions below. -
Page 13: White Balance
2. Press and hold the Button for 2 seconds to enter the Menu. 3. Use the buttons to navigate the Menu and highlight the Image Quality setting and press to select. 4. Use the buttons to highlight your required image resolution, then press the button to confirm your selection. -
Page 14: Date Stamp
3.1.4 Date Stamp Date Stamp is used to stamp your photos with the date and time they were taken. To select your preferred date and time format follow the instructions below. 1. Press the button to stop the Mirror DVR from recording. 2. -
Page 15: Format
Use the buttons to highlight your preferred language and the button to confirm your selection. Note: 1. Menus cannot be accessed while the camera is recording. Please stop the recording before attempting to access the menu. 3.2.3 Format Formatting the Micro SD card will delete all information on the inserted Micro SD Card and prepare the card for use with the Mirror DVR. -
Page 16: Playback Screen
3.3 Playback Screen This screen is used to playback photos and videos. To access the Playback Screen ensure that the camera is not recording and short press the button. This will send the camera to the Photo Screen. While in the Photo Screen, short press the button again which will bring you to the Playback Screen. -
Page 17: Menu Tables
4.0 Menu Options AUTO RECORD FULL HD (1080P) RESOLUTION 10 SECONDS 30 SECONDS HD (720P) SCREEN AUTO-OFF 20 SECONDS IMAGE QUALITY MUTE AUDIO DATE SET DATE/TIME ENGLISH RUSSIAN 1 MINUTE 5 MINUTES LOOP RECORDING LANGUAGE CHINESE CHINESE SIMPLIFIED 3 MINUTES KOREAN CHINESE TRADITIONAL CAMERA FLIP... -
Page 18: Technical Specifications
5.0 Technical Specifications SCREEN 5.0" LENS 120° CAMERA ROTATION 20° VIDEO RESOLUTION 1080P (Front) | 720p (Rear) VIDEO FORMAT .MOV FRAMES IMAGE RESOLUTION 2M, 3M, 5M, 8M, 10M, 12M 18M PHOTO FORMAT .JPG MOTION DETECTION CYCLE RECORDING MEMORY CARD TYPE MICRO SD CARD (CLASS 6-10) CAPACITY UP TO 32GB... -
Page 19: Warranty
This warranty is provided in addition to your rights under the Australian & New Zealand Consumer Law. NanoCam Plus warrants that this product is free from defects in material and workmanship for a period of 12 months from the date of purchase or for the period stated on the packaging. - Page 20 www.nanocamplus.com.au www.nanocamplus.co.nz...
Need help?
Do you have a question about the NCP-MIRDVRHD2 and is the answer not in the manual?
Questions and answers