HP 1405-5 Installation And Getting Started Manual
1405 switch series
Hide thumbs
Also See for 1405-5:
- Quick start manual (16 pages) ,
- Installation and getting started manual (45 pages)

Related Manuals for HP 1405-5


Summary of Contents for HP 1405-5
- Page 1 HP 1405 Switch Series Installation and Getting Started Guide HP 1405-5 Switch (J9791A) HP 1405-5G Switch (J9792A) HP 1405-8 Switch (J9793A) HP 1405-8G Switch (J9794A)
- Page 3 HP 1405 Switch Series Installation and Getting Started Guide...
- Page 4 Applicable Products accompanying such products and services. Nothing herein should be construed as constituting an additional warranty. HP shall not be liable for technical or editorial errors or omissions contained herein. HP 1405-5 Switch (J9791A)
-
Page 5: Table Of Contents
Contents 1 Introducing the Switch Front of the Switch ..........1-2 Network Ports . - Page 6 HP Customer Support Services ........3-6...
-
Page 7: Introducing The Switch
HP 1405-5G Switch (J9792A) HP 1405-8 Switch (J9793A) HP 1405-8G Switch (J9794A) Throughout this manual, these switches will be referred to as the 1405-5 Switch, 1405-5G Switch, 1405-8 Switch, and 1405-8G Switch. The 1405-5 Switch has 5 auto-sensing 10/100Base-TX RJ-45 ports. -
Page 8: Front Of The Switch
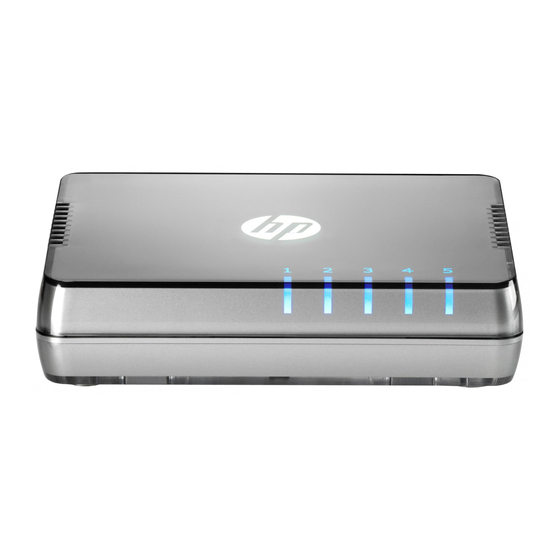
Introducing the Switch Front of the Switch Front of the Switch HP 1405-5 Switch (J9791A) HP 1405-5G Switch (J9792A) Power LED Link/Activity LEDs HP 1405-8 Switch (J9793A) HP 1405-8G Switch (J9794A) Power LED Link/Activity LEDs... -
Page 9: Network Ports
LED indicators. Table 1-1. Switch Status LEDs Switch LEDs State Meaning HP Power LED The switch is properly receiving power. (white) No power connection. The switch is NOT receiving power. Port LEDs Link/Act The port is enabled and receiving a link indication from the connected device. -
Page 10: Back Of The Switch
Introducing the Switch Back of the Switch Back of the Switch HP 1405-5 Switch (J9791A) HP 1405-5G Switch (J9792A) RJ-45 ports DC power connector HP 1405-8 Switch (J9793A) HP 1405-8G Switch (J9794A) RJ-45 ports DC power connector Power Connector The switches do not have a power switch. They are powered on when the external AC/DC power adapter is connected to the switch and to a power source. -
Page 11: Switch Features
■ 9216-byte Jumbo frames to improve performance of large data transfers. ■ The 1405-5 Switch includes support for up to 2048-byte mini-Jumbo frames to improve performance of large data transfers. ■ Support for IEEE 802.1p prioritization Quality of Service (QoS) to deliver data to devices based on the priority and type of traffic. -
Page 12: Installing The Switch
Installing the Switch This chapter provides installation information for the 1405-5 Switch, 1405-5G Switch, 1405-8 Switch, and 1405-8G Switch. Included Parts The switches have the following components: Documentation kit ■ ■ Wall/table-mount accessory kit: • Four rubber feet • Two wall-mount tapping screws... - Page 13 Installing the Switch Included Parts External AC/DC power adapters and power cords, one of the following: ■ • Universal External AC/DC Power Adapter All countries/regions 5066-1122 Power cord options for Universal AC/DC Adapter Australia/New Zealand 8121-0870 China 8120-8373 Continental Europe/Denmark/ ..Switzerland/Israel/Vietnam/Indonesia 8120-6314 India...
-
Page 14: Installation Precautions
The mark is your assurance that the power cord can be used safely with the switch. If the supplied power cord does not fit, contact HP networking support. ■ When installing the switch, the AC outlet should be near the switch and should be easily accessible in case the switch must be powered off. -
Page 15: Installation Procedures
Installing the Switch Installation Procedures Installation Procedures These steps summarize your switch installation. The rest of this chapter provides details on these steps. Prepare the installation site (page 2-5). Make sure the physical environment into which you will be installing the switch is properly prepared, including having the correct network cabling ready to connect to the switch and having an appropriate location for the switch. -
Page 16: Prepare The Installation Site
Installing the Switch Installation Procedures 1. Prepare the Installation Site ■ Cabling Infrastructure - Ensure the cabling infrastructure meets the necessary network specifications. See appendix A, “Cabling and Technology Information Specifications” for more information: Installation Location - Before installing the switch, plan its location and ■... -
Page 17: Verify The Switch Passes Self Test
Installing the Switch Installation Procedures 2. Verify the Switch Passes Self Test Before mounting the switch in its network location, you should first verify it is working properly by plugging it into a power source and verifying it passes its self test. Connect the AC/DC adapter’s power cord to the power connector on the back of the switch, and then plug the AC/DC power adapter into a nearby properly grounded electrical outlet. - Page 18 The mark is your assurance that the power cord can be used safely with the switch. If the supplied power cord does not fit, contact HP networking support.
-
Page 19: Led Behavior
Installing the Switch Installation Procedures LED Behavior After Initialization: The Power LED remains on. • The port Link/Act LEDs on the front of the switch go into their normal • operational mode: – If the ports are connected to active network devices, the Link/Act LEDs stay on or may be blinking to indicate port activity. -
Page 20: Horizontal Surface Mounting
Installing the Switch Installation Procedures RJ-45 Ports Wall Tapping screws Wall anchors Figure 2-3. Wall mounting the switch Horizontal Surface Mounting Place the switch on a table or other horizontal surface. The switch comes with rubber feet in the accessory kit that can be used to help keep the switch from sliding on the surface. - Page 21 Installing the Switch Installation Procedures Figure 2-4. Horizontal surface mounting 2-10...
-
Page 22: Connect The Switch To A Power Source
Installing the Switch Installation Procedures 4. Connect the Switch to a Power Source Plug the AC/DC adapter’s power cord into the switch, and then plug the AC/DC power adapter into a nearby AC power source. N o t e The switches are shipped with one of two types of AC/DC power adapter; either the universal AC/DC adapter with an AC power cord, or the wall plug- in AC/DC adapter (without an AC power cord). -
Page 23: Connect The Network Cables
Use only the AC/DC power adapter and power cord (if applicable), supplied with the switch. Use of other adapters or power cords, including those that came with other HP networking products, may result in damage to the equipment. 5. Connect the Network Cables Connect the network cables, described under “Cabling Infrastructure”... -
Page 24: Sample Network Topologies
Installing the Switch Sample Network Topologies Sample Network Topologies This section shows a few sample network topologies for implementing the switches. Twisted-pair straight-through or cross-over cables INTERNET Router Cable / ADSL Modem Figure 2-7. Basic configuration The switches are designed to be used as desktop switches to which end nodes, printers and other peripherals are directly connected, as shown in the above illustration. -
Page 25: Troubleshooting
Troubleshooting This chapter describes how to troubleshoot your 1405-5 Switch, 1405-5G Switch, 1405-8 Switch, and 1405-8G Switch. This document describes troubleshooting from a hardware perspective. This chapter describes the following: ■ basic troubleshooting tips (page 3-1) diagnosing with the LEDs... - Page 26 Troubleshooting Basic Troubleshooting Tips Faulty or loose cables. Look for loose or obviously faulty connections. ■ If the cables appear to be OK, make sure the connections are snug. If that does not correct the problem, try a different cable. ■...
-
Page 27: Diagnosing With The Leds
Troubleshooting Diagnosing with the LEDs Diagnosing with the LEDs Table 3-1 shows LED patterns on the switch that indicate problem conditions for general switch operation troubleshooting. LED patterns for General Switch Troubleshooting Check in the table for the LED pattern you see on your switch. Refer to the corresponding diagnostic tip on the next few pages. -
Page 28: Diagnostic Tips
If the power source and power cord are OK and this condition persists, the switch power supply may have failed. Call your HP networking authorized network reseller, or use the electronic support services from HP to get assistance. For software license, warranty, and support information, visit www.hp.com/networking/support. -
Page 29: Hardware Diagnostic Tests
Troubleshooting Hardware Diagnostic Tests Hardware Diagnostic Tests Testing the Switch by Resetting It If you believe the switch is not operating correctly, you can reset the switch to test its circuitry and operating code. To perform a reset, power cycle the switch;... -
Page 30: Hp Customer Support Services
Additionally, your HP-authorized network reseller can provide you with assistance, both with services that they offer and with services offered by HP. Before Calling Support Before calling your networking dealer or HP Support, to make the support... -
Page 31: Switch Specifications
Specifications Switch Specifications Physical Width Depth Height Weight 1405-5 Switch (J9791A) 11.5 cm (4.53 in) 9.15 cm (3.6 in) 3.35 cm (1.32 in) 0.18 kg (0.4lbs) 1405-5G Switch (J9792A) 11.5 cm (4.53 in) 9.15 cm (3.6 in) 3.35 cm (1.32 in) 0.18 kg (0.4 lbs) -
Page 32: Environmental
Specifications Switch Specifications Environmental Operating Non-Operating Temperature 0°C to 40°C (32°F to 104°F) -40°C to 70°C (-40°F to 158°F) Relative humidity 15% to 95% at 40°C (104°F) 15% to 90% at 65°C (149°F) (non-condensing) Maximum altitude 3048 m (10,000 ft)* 3048 m (10,000 ft) The operating maximum altitude should not exceed that of any accessory being connected to any switch. -
Page 33: Cabling And Technology Information Specifications
Specifications Cabling and Technology Information Specifications Cabling and Technology Information Specifications Table A-1. Cabling Specifications 10 Mbps Operation Category 3, 4 or 5, 100-ohm unshielded twisted-pair (UTP) or shielded twisted-pair (STP) cable, complying with IEEE 802.3 10BASE-T specifications. 100 Mbps Operation Category 5, 100-ohm UTP or STP cable, complying with IEEE 802.3u Twisted-pair copper 100BASE-TX specifications. -
Page 34: Twisted-Pair Cable/Connector Pin-Outs
Specifications Twisted-Pair Cable/Connector Pin-Outs Twisted-Pair Cable/Connector Pin-Outs The Auto-MDIX Feature: In the default configuration, “Auto”, the fixed 10/ 100/1000Base-T ports on the switches all automatically detect the type of port on the connected device and operate as either an MDI or MDI-X port, whichever is appropriate. - Page 35 Specifications Twisted-Pair Cable/Connector Pin-Outs For 100 Mbps connections to the ports, use 100-ohm Category 5 UTP or ■ STP cable only, as supported by the IEEE 802.3u Type 100Base-TX standard. ■ For 1000 Mbps connections, 100-ohm Category 5e or better cabling is recommended.
-
Page 36: Straight-Through Twisted-Pair Cable For 10 Mbps Or 100 Mbps Network Connections
Specifications Twisted-Pair Cable/Connector Pin-Outs Straight-through Twisted-Pair Cable for 10 Mbps or 100 Mbps Network Connections Because of the Auto-MDIX operation of the 10/100 ports on the switch, for all network connections, to PCs, servers or other end nodes, or to hubs or other switches, you can use straight-through cables. -
Page 37: Crossover Twisted-Pair Cable For 10 Mbps Or 100 Mbps Network Connection
Specifications Twisted-Pair Cable/Connector Pin-Outs Crossover Twisted-Pair Cable for 10 Mbps or 100 Mbps Network Connection The Auto-MDIX operation of the 10/100 ports on the switch also allows you to use crossover cables for all network connections, to PCs, servers or other end nodes, or to hubs or other switches. -
Page 38: Straight-Through Twisted-Pair Cable For 1000 Mbps Network Connections
Specifications Twisted-Pair Cable/Connector Pin-Outs Straight-Through Twisted-Pair Cable for 1000 Mbps Network Connections 1000Base-T connections require that all four pairs of wires be connected. Cable Diagram N o t e Pins 1 and 2 on connector “A” must be wired as a twisted pair to pins 1 and 2 on connector “B”. -
Page 39: B Emc Regulatory Statements
EMC Regulatory Statements Regulatory Statements FCC Class B This equipment has been tested and found to comply with the limits for a Class B digital device, pursuant to Part 15 of the FCC Rules. These limits are designed to provide reasonable protection against harmful interference in a residential installation. - Page 40 … A-2 switch … 1-1 auto MDI/MDI-X operation … A-6, A-8 diagnostic tests … 3-5 HP Auto-MDIX feature … A-4 end-to-end connectivity … 3-5 testing the switch only … 3-5 testing twisted-pair cabling … 3-5 back of switch description …...
- Page 41 … 2-8 10/100Base-TX, location on switch … 1-4 descriptions of … 1-3 connecting to … 2-12 error indications … 3-3 HP Auto-MDIX feature … A-4 Fault network connections … 2-12 behavior during self test … 2-8 power connector … 1-4 location on switch …...
- Page 42 … A-7 physical … A-1 testing … 3-5 safety … A-2 twisted-pair ports straight-through cable HP Auto-MDIX feature … A-4 pin-out … A-6, A-8 switch connecting to a power source … 2-11 wall description … 1-1 mounting switch on …...
- Page 43 4 – Index...
- Page 44 © Copyright 2012 Hewlett-Packard Development Company, L.P. The information contained herein is subject to change without notice. The only warranties for HP products and services are set forth in the express warranty statements accompanying such products and services. Nothing herein should be construed as constituting an additional warranty.
Need help?
Do you have a question about the 1405-5 and is the answer not in the manual?
Questions and answers