Table of Contents
Advertisement
Advertisement
Table of Contents

Subscribe to Our Youtube Channel
Related Manuals for Crestron CI-KNX


Summary of Contents for Crestron CI-KNX
- Page 1 Crestron CI-KNX KNX Control Interface Operations & Installation Guide...
- Page 2 This document was prepared and written by the Technical Documentation department at: Crestron International Oude Keerbergsebaan 2 B-2820 Rijmenam - Belgium Tel.: +32.15.50.99.50 All brand names, product names and trademarks are the property of their respective owners. ©2009 Crestron Electronics, Inc.
- Page 3 Crestron CI-KNX KNX Control Interface Operations & Installation Guide...
-
Page 4: Important Safety Instructions
Prevent foreign objects from entering the device. The Crestron CI-KNX can be used with Class 2 output wiring. All brand names, product names and trademarks are the property of their respective owners. ©2009 Crestron Electronics, Inc. -
Page 5: Table Of Contents
Example Program ...................... 14 Uploading and Upgrading ......................15 Programs and Firmware .................... 15 Operation ..........................16 Main Module: Crestron KNX IO v3.0 ............... 16 Object Modules ......................16 The different types of object modules ............... 16 Data type 1 bit ......................17 Data type 4 bit ...................... -
Page 7: Knx Control Interface: Ci-Knx
KNX Control Interface: CI-KNX Introduction The Crestron CI-KNX is a control interface by which a Crestron control system can be coupled to a KNX (previously known as KNX) installation using Ethernet (TCP/IP). Also, the Crestron CI-KNX filters the desired information out of received... -
Page 8: Physical Description
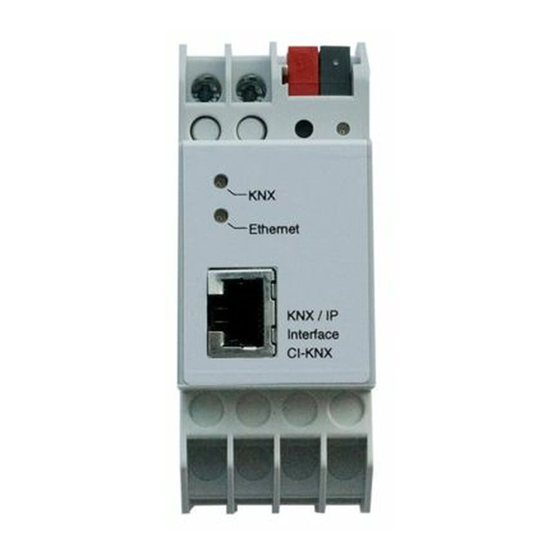
2.36 in (6 cm) Weight 0.179 lbs (0.081 kg) 1. The latest software versions can be obtained from the Crestron website. Refer to the NOTE following these footnotes. 2. Crestron 2-Series control systems include the AV2 and PRO2. Consult the latest Crestron Product Catalog for a complete list of 2-Series control systems. - Page 9 Crestron CI-KNX KNX Control Interface Crestron CI-KNX Physical View KNX Control Interface: Crestron CI-KNX 3 Operations & Installation Guide – DOC. 0008...
- Page 10 Programming Button Press to set the unit in ETS programming mode. Learn LED Color: red Red when the CI-KNX is in programming mode. KNX LED Color: Green Lights up to indicate bus voltage on KNX. Flashes to indicate telegram traffic.
-
Page 11: Setup
KNX Control Interface Setup Network Wiring The Crestron CI-KNX is used as interface for connecting to KNX on data point level (KNX Application Layer). It is possible to connect to KNX-Bus everywhere over LAN. A bus connection over the internet with Crestron CI-KNX is also possible ... - Page 12 ETS. Attention!: When changing this parameter, all the data point descriptions will be exchanged in ETS. IP-Configuration Set the IP address assignment parameter to ‘static’ 6 KNX Control Interface: Crestron CI-KNX Operations & Installation Guide – DOC. 0008...
- Page 13 Crestron CI-KNX KNX Control Interface IP-Address: Enter the IP-Address of the Crestron CI-KNX here. IP-Subnetwork mask: Enter the subnet mask here. The mask helps the device to discover, KNX Control Interface: Crestron CI-KNX 7 Operations & Installation Guide – DOC. 0008...
-
Page 14: Operations & Installation Guide – Doc
IP-Gateway-Address: Enter the IP-Address of the gateway here. Hint: Fill out 0.0.0.0 if the Crestron CI-KNX is only used in the local LAN. Example for IP-Address assignment The Crestron CI-KNX shall be accessed using a PC IP-Address of the PC: 192.168.1.30... - Page 15 If you change the parameter “Download of data point description”, all data point descriptions will be exchanged in ETS. Parameter: The Crestron CI-KNX has 16 free parameters, which can be read out over Ethernet. These can be used for client specific purposes. Parameter Byte: For each of the 16 parameters, a value between 0 and 255 can be entered.
- Page 16 Crestron CI-KNX as interface to KNX If the IP-configuration of the Crestron CI-KNX is valid, then this device can act as an interface to KNX. In order to use this function, go to the ETS (version 3.0c or higher), take Extras/Options and then the tab communication: Click on Configure Interfaces…...
-
Page 17: Ci-Knx Setup
ETS. To do so, one needs the ETS library file included in Crestron CI-KNX archive (CI-KNX.vd2). Once you’ve added the CI- KNX you can right click on it and choose “Edit Parameters…” to open the CI-KNX configuration screen.. - Page 18 KNX Control Interface Crestron CI-KNX This will open the CI-KNX configuration screen. At this screen you can add new KNX objects or you can change the general settings as described in the previous paragraph. Every object has the following parameters: ...
-
Page 19: Installation
Group Address will be triggered accordingly. E.g. when a lighting zone switch object is added to this Group Address, then sending a 1 to the CI-KNX object will turn the lighting zone to 1 and sending a 0 will turn it off. -
Page 20: Programming Software
Crestron has developed an assortment of Windows -based software tools to develop a controlled system. You can create a program to control the Crestron CI-KNX using the Crestron programming tool SIMPL Windows.. For the minimum recommended software versions, visit the Version Tracker page of the Crestron website (www.crestron.com/versiontracker). -
Page 21: Uploading And Upgrading
Crestron to dealers. Firmware upgrades are available from the Crestron website as new features are developed after product releases. One has the option to upload programs via the programming software or to upload and upgrade via the Crestron Toolbox. For details on uploading and upgrading, refer to the SIMPL Windows help file or the Crestron Toolbox help file. -
Page 22: Operation
The different types of object modules For every different data type in the KNX/KNX system (also called EIS type) there is a specific Crestron module, this will allow you to send or read out any specific KNX command or signal. -
Page 23: Data Type 1 Bit
(e.g. level 70%). Therefore the KNX 1Byte module requires an analog value on its input, it also gives out an analog value as feedback: KNX Control Interface: Crestron CI-KNX 17 Operations & Installation Guide – DOC. 0008... -
Page 24: Data Type 2 Byte
Values to set the correct temperature (1800d, 2200d) depend on the KNX device. Data type 4 Byte The 4 byte module is almost identical to the “Crestron CI-KNX 2 Byte v1.6” module. In this case however the value to be controlled and read out is 32 bit (0d to 4294967295d). -
Page 25: Data-Type 14 Byte
“Transmit for received data” checkbox (page 9- 10). Therefore, KNX Data Type module contains a digital input called “Poll_Value” for polling the value for the KNX data type. KNX Control Interface: Crestron CI-KNX 19 Operations & Installation Guide – DOC. 0008... - Page 26 Use the “Poll_Value” inputs on the KNX Data Type modules to poll for individual values once the program is started. Polling is only possible if you enable the “Read” flag in the ETS software. 20 KNX Control Interface: Crestron CI-KNX Operations & Installation Guide – DOC. 0008...
-
Page 27: Problem Solving
Crestron's award winning customer service team by calling Crestron at +32-15-509920. You can also log onto the online help section of the Crestron website (www.crestron.com/onlinehelp) to ask questions about Crestron products. First-time users will need to establish a user account to fully benefit from all available features. - Page 28 KNX Control Interface Crestron CI-KNX Check the Crestron website periodically for manual update availability and its relevance. Updates are identified as an “Addendum” in the Download column. 22 KNX Control Interface: Crestron CI-KNX Operations & Installation Guide – DOC. 0008...
-
Page 29: Software License Agreement
This Agreement may only be modified by a writing signed by an authorized officer of Crestron. Updates may be licensed to You by Crestron with additional or different terms. This is the entire agreement between Crestron and You relating to the Software and it supersedes any prior representations, discussions, undertakings, communications or advertising relating to the Software. - Page 30 “applets” incorporated into the Software), the accompanying media and printed materials and any copies of the Software are owned by Crestron or its suppliers. The Software is protected by copyright laws and international treaty provisions. Therefore, you must treat the Software like any other copyrighted material, subject to the provisions of this Agreement.
-
Page 31: Return And Warranty Policies
Purchasers should inquire of the dealer regarding the nature and extent of the dealer's warranty, if any. CRESTRON shall not be liable to honor the terms of this warranty if the product has been used in any application other than that for which it was intended or if it has been subjected to misuse, accidental damage, modification or improper installation procedures. - Page 32 KNX Control Interface Crestron CI-KNX 26 KNX Control Interface: Crestron CI-KNX Operations & Installation Guide – DOC. 0008...
- Page 33 Crestron CI-KNX KNX Control Interface KNX Control Interface: Crestron CI-KNX 27 Operations & Installation Guide – DOC. 0008...
Need help?
Do you have a question about the CI-KNX and is the answer not in the manual?
Questions and answers