Table of Contents
Advertisement
Advertisement
Table of Contents

Related Manuals for Antrica ANT-4000E


Summary of Contents for Antrica ANT-4000E
- Page 1 !"#$%&&&' ()*+%,-&.&/+&,(0,120'3,'"430'5 6789,:;<=;>, 189),*)&...
-
Page 2: Safety Precautions
We appreciate you purchasing the ANT-4000E. Before installing the product, please read the following carefully. ! Make sure you turn off the power before installing the ANT-4000E. ! Do not install under the direct sunlight or in dusty areas. ! Make sure you use the product within the temperature and humidity specified in the specification. - Page 3 Table of Contents...
-
Page 4: About This Manual
The Manual includes instructions for installation, operation and configuration of the ANT-4000E as well as troubleshooting. The ANT-4000E will be used as a generic part number and where options are mentioned this will be referred to as the ANT-4000EXX where XX is used to identify the options part number 2. -
Page 5: User Interface
! Audio 2x HDMI audio supported - Compressed or uncompressed " " Stereo Audio one way 44.1kHz / 48kHz , 16 bit ADC. " RCA stereo jacks and mini stereo headphone jacks ! Network Static IP & Dynamic IP (DHCP) Support 10/100 ethernet "... -
Page 6: Contents Of Box
3. Contents of Box Contents of Box User Manual (CD) Power adapter and Cable ANT-4000E S c r e w s Software CD B r a c k e t s (fitted) (fitted) -
Page 7: Panel Layout
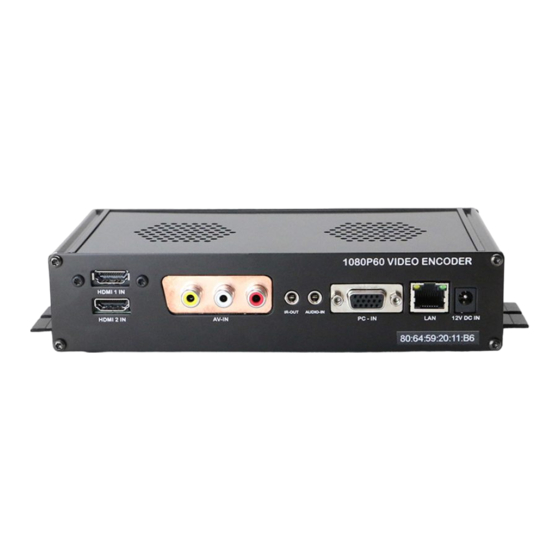
4. Panel Layout ! Front View 1 2 3 4 5 6 7 8 9 10 Parts Function HDMI 1 HDMI input number 1 HDMI 2 HDMI input number 2 CVBS Video Composite Video Input RCA Audio L Audio input left Audio R Audio input Right IR Out... - Page 8 ! Rear View 1 2 3 4 5 6 7 8 9 10 Part Function Serial Two way serial connector Serial Data Rx output Serial Data Tx input 3.3V 3.3 volts DC out Ground Ground LED1 Power indicator LED1=On= 12v Power On LED2 System booting (blinking), Booted (On) "...
-
Page 9: Quick Start Guide
Connect a suitable video source via one of the external Video and Audio inputs provided on the ANT-4000E. Video resolution can be from PAL NTSC up to 1920 x1080 at 60 Hz or frames/second. A full list of supported video formats is described later in this manual. (HDMI , CVBS, VGA and Component (using a Component to VGA dongle) . - Page 10 ! Quick Start- Streaming video to VLC player/ Set Top Box. The ANT-4000E can be set to stream video to a software decoder such as VLC player. There are two modes supported : a) RTSP video plus Audio b) MPEG-TS mode Video Only! Top test Software decoding using VLC player please follow these instructions: 1) Browse to the ANT-4000E IP address using Internet Explorer.
-
Page 12: Installation
6. Installation- Connecting Network & Serial Ports " Connecting the Network Cable The ANT-4000E has a 10/100 RJ45 Ethernet port for connection to a network or external wireless device Connecting the Serial Ports " The ANT-4000E has a two way serial connection capability via a “Virtual Cable” function. This... - Page 13 ANT-4000E is paired up with an ANT-4000D decoder unit. 3.3V data may be sent bi-directionally for control and command applications. Serial data is sent as is subject to the serial port configurations (See System...
-
Page 14: System Configuration
Web Based System Setup 7. System Configuration Address of Encoder (Fixed) Gateway of Network Multicast IP address Adress of Decoder Submit Click to changes: changes cause LED3 to Flash will be saved when this To identify which Encoder is buttion pressed.However if being setup system is rebooted changes will be lost unless also saved... -
Page 15: Serial Port Configuration
7. Serial Port Configuration Serial data Baud Rate 1200-11520 Stop Bit 1-2 Character size CS5-CS8 Parity Odd Even Disable Submit changes: changes will be saved when this buttion pressed.However if system is rebooted changes Refresh will be lost unless also saved this web page. - Page 16 To upgrade the firmware use the Browse button below to locate the new Firmware file on your computer Once the F/W file is selected click UPLOAD. This will cause the ANT-4000E to upload the file into temporary memory. This may take several seconds Once the UPLOAD process is finished the web page will show a WRITE TO FLASH box as shown below.
- Page 17 7. Streaming Control (1) - Information Screen Information about Decoder connected to this encoder Information about this Encoder Select Video and Audio Ports Information on Video/ Audio/Streaming if connected In systems where a large GOP is used it may be necessary to force an I frame to be generated to assist the decoder in locking on to the...
- Page 18 RTSP mode but ultra low latency is not supported. P2P mode is default if the RTSP server is turned OFF. MPEG-TS mode is used when the ANT-4000E is streaming via UDP to a set top box or soft decoder capable of decoding MPEG Transport Stream (H264 only) . Note Audio...
- Page 19 7. Streaming Control (2)- GOP and Intra Modes ANT-4000E supports two modes of sending the I frame: I and P frames sent separately. This is referred to as GOP mode (Group Of Pictures). An I frame or reference frame is generated followed by a number of P frames (Predictive) determined by the GOP SIZE setting (e.g GOP=60 is 1x I frame followed...
-
Page 20: Encoder Configuration
7. Streaming Control (2)- Video Bitrate, Framerate & Audio & Video maximum bitrate framerate and On Screen Display can be set using these settings. Very low bitrates for certain fast action video sequences or higher resolutions may cause blocking / artifacts. &... -
Page 21: Save Changes
8. Save Changes On each Setup page there is a button called SUBMIT . This causes the changes on that page to be enabled. However if the system is rebooted these changes will be lost. To write the changes on ALL pages into the system FLASH memory go to this page and click SAVE Click here to Save ALL changes made and... - Page 22 9. Reboot System & Factory Reset ! Reboot Simply this is a Soft Reboot of the system which saves unplugging the 12 volt power cord. This is useful if a remote reboot is required Press here to Reboot " FACTORY RESET To restore the Encoder to Factory default settings and factory IP address 192.168.0.151 HDMI 1 input is default on factory reset Press and Hold...
- Page 23 10 Using P2P Low Latency Mode with ANT-4000D Connect ANT-4000E plus ANT-4000D to a network Configure the Decoder with the Encoders IP address and Encoder with Decoders IP address in the PEER IP section of System Setup The example below shows the encoder System Configuration page with the IP address of the...
- Page 24 10 Using P2P Low Latency Mode with ANT-4000D Select the correct Video Input and Output ports on the ANT-4000E and ANT-4000D In all cases make sure you save the setting changes by clicking SUBMIT on each web page and then on completion SAVE CHANGES on the save changes web page.
- Page 25 10 Using VLC player as a video Decoder ! VLC Setup VLC player can be used as a decoder in both RTSP and MPEG-TS modes. RTSP supports full AAC audio plus video whilst MPEG-TS only supports video. Open VLC Player and click MEDIA the OPEN NETWORK STREAM.
- Page 26 " " " " " " Resolution Select video compression resolution. Compression resolutions are different depending on input formats. The scaling option is used when compression resolution is different from input compression. Without the scaling option, the input video image will be cut according to compression resolution.
- Page 27 Possible values between 0 and 255. There will be no I-frames if 0 is selected. H.264 Profile " Select H.264 Profile: High Profile or Baseline Profile The standard defines various sets of capabilities, which are referred to as profiles, targeting specific classes of applications.
- Page 28 " Motion Detection Area Editing Configure regions for motion detection. Regions of arbitrary shape can be configured by the following steps. $ Enable Edit item. % Select editing Mode. Set is for including cells into the motion detection region and Erase is for excluding.
- Page 29 Select the output format for the monitor preview according to the video Input and monitor specification. " The following output format is available according to the video input format Output format Available Input format NTSC (720x480) Composite NTSC, SD-SDI NTSC, HDMI PAL (720x576) Composite PAL, SD-SDI PAL, HDMI 720p60 (1280x720)
-
Page 30: Network Configuration
The sampling rate is fixed to 32KHz when AAC is selected. Note that when ANT-4000E is connected to a decoder, the decoder’s audio algorithm should be set identically to transmit audio settings. ! Mode " Select audio operation mode Mode... - Page 31 Simple Network Management Protocol (SNMP) is used by network management systems to communicate with network elements. SNMP lets TCP/IP-based network management clients use a TCP/IP-based internetwork to exchange information about the configuration and status of nodes. SNMP can also generate trap messages used to report significant TCP/IP events asynchronously to interested clients.
- Page 32 DHCP ☞ Please ask for IP address information from an ISP provider or network manager. Dynamic DNS is a method, protocol, or network service that provides the capability for a networked device, such as a router or computer system using the Internet Protocol Suite, to notify a domain name server to change, in real time (ad-hoc) the active DNS configuration of its configured hostnames, addresses or other information stored in DNS.
- Page 33 ! SNMP " ANT-4000E can be used as an SNMP agent. It is compatible to both SNMPv1 and SNMPvec. Settings for using SNMP (Simple Network Management Protocol) are as following SNMP Listen Port: The port is for connecting external devices when the system operates as an SNMP client.
- Page 34 ! Multicast " Multicast IP The multicast IP address selection range is between 224.0.1.0 and 238.255.255.255. The selection can be used only when media protocol is set to Multicast. The Multicast menu is used for the Multicast connection request from a decoder or VMS / NVR software to transmit Multicast stream to the decoder or VMS / NVR software.
- Page 35 " Domain Name: In case the server is registered with a DDNS server, the registered domain name is displayed. " MAC Address: Display the MAC address of the server. In case the server is registered with a DDNS server, the MAC address is used for DDNS registration. "...
- Page 36 Direct Keyboard Control: Keyboard controller can be connected to ANT-4000E directly to control pan tilt zoom and focus ! Sensor Type There are two sensor input ports on ANT-4000E. Each of the sensor ports can be configured to the following. Function...
-
Page 37: Event Configuration
! Sensor Schedule Each sensor port can be enabled or disabled by a day (of week) and hour unit. Sensor is disabled with a grey-colored block. 6. Event Configuration $ Enter a name ! Move PTZ Camera to the desirable view. #Save "... - Page 38 ! Local & Remote Event Configuration " The event configuration configures the actions for each event type. Local section configures the actions for events from local (self) system, and the configuration activates local devices. Remote sections configure the actions for events from remote (peer) system. "...
-
Page 39: Event Record
different port is configured in the SMTP server, this port needs to be changed accordingly). " Sender Address: Enter an account registered in the SMTP server. ID & password: When the server requires authentication, ID and Password of an E-mail "... -
Page 40: Recording Configuration
Configure up to 15 preset positions. Preset function is not available on some PTZ receivers. Make sure to check if a PTZ receiver supports preset ! Preset Configuration " Set the PTZ Presets by following the next steps $ Move cameras to desired view using PTZ control buttons. % Enter Preset name. -
Page 41: Usb Device
USB Device USB hard disk or a memory stick can be used, and at least 1GB size is recommended. Either EXT3 or FAT32 file system can be used. A disk with either EXT3 or FAT32 file system can be read in a Linux PC. -
Page 42: Disk Information
case of formatting through True Manager, the disk is formatted as EXT3. The File system can be unstable and easily broken if you format the disk in FAT32 on Windows PC. * Recording features has been added from 102D_001 firmware version. * Less than 4Mbps of video bit rate is recommend when you record and monitor video at the same time since it may cause frame loss. - Page 43 ! Event Type " Three recording modes are supported in ANT-4000E: Full-time, Event, Disconnect. In case of Event recording, event types can be selected among several events. Selected event type is used for configuring the schedule table. Up to 4 event types can be configured and each event type can be a combination of sensor, video loss and motion event.
- Page 44 (of a week) and time. " Each of recording mode configures the recording operation as follows: Record off : No recording Continuous : Records continuously Disconnect: Data is recorded when the system loses the connection to its client(Decoder, VMS/NVR) etc. When one of its multiple clients system is disconnected, this doesn’t happen. Event Type: Records when an event configured in Event Type setting happens.
-
Page 45: Search And Playback
Search and Playback ! Recorded File " Recorded video and audio data can be saved as AVI format on the disk. " In general, one AVI file is created for an event in case of event-based recording. However, it is possible that recorded data, caused by series of events happening quickly and continuously, may be merged to a single AVI file. - Page 46 " Pressing the Save button, the file will be stored in the PC. The AVI file can be played with Windows Media Player. " If you press Open in the dialog, the file will be downloaded and played automatically with Media Player.
-
Page 47: Formatting Disk
" It is possible to delete multiple files at once. Formatting Disk " True Manager is used to format a disk which is connected to the system. " After connecting True Manager to a system, choose Disk Manage on the Tools menu "... -
Page 48: User Configuration
" There may be a damaged file system if you turn off the power of the ANT-4000E or disconnect the USB memory stick or USB HDD while data is being written. " In case of FAT32, recording can’t be done normally if the file system is damaged. If this happens, the disk or memory stick should be reformatted on the PC. - Page 49 Privilege Allowed Operations Remarks All operations User id = admin Admin All operations except for user Manager configuration Live viewing and PTZ control User Live viewing only Guest " Add User The Page for adding a user appears on pressing the Add button User ID and password need to be entered and privilege level needs to be selected.
-
Page 50: Decoder Configuration
In case of changing the admin password, old password is checked first. " Modify Privilege Level Pressing Modify Privilege button after selecting a user shows a page for changing the privilege. It is not permitted to change the privilege level of admin user. ! Login Policy Authentication Type "... -
Page 51: Video Configuration
Decoder Configuration is slightly different from Encoder Configuration. Different configurations from the encoder will be explained in this Decoder Configuration section 1. System Configuration By setting System Mode to Decoder in System configuration, the system will reboot and start to work as a Decoder. - Page 52 ! Output format Regardless of input resolution of the Encoder or IP camera, Decoder of the ANT-4000E can display video format as follows; " NTSC (720 x 480) " PAL (720 x 576) " 720p60 (1280x720) 1080p60 (1920 x 1080) "...
- Page 53 Network page of Decoder has a section for specifying the remote system to connect to. ! Remote Type " Normal : Connection for ANTRICA Encoder and decoder...
- Page 54 " RTSP/RTP: Decoder system can make connection though RTSP protocol and get the stream via RTP. It is also possible to make connection with other vendor’s H.264 IP camera supporting standard RTSP/RTP and standard H.264 algorithm. To make an RTSP connection, set Remote Type to “RTSP”, enter the RTSP URL of remote "...
-
Page 55: Display Configuration
Server. To connect to Encoder or IP Camera via Streaming Server, Use Streaming Server should be set to On and information about the Streaming Server (SS) needs to be configured appropriately. " SS IP address: IP address of Streaming server "... -
Page 56: Appendix A : Sensor And Alarm Port
! Disconnection " Decoder system’s output mode on disconnected state can be configured Freeze : Video image of the last frame is shown when there is a disconnection. Black Screen: Black Screen is shown when there is a disconnection. ! LED "... - Page 57 ! Sensor Port " Terminal Type - Voltage Rating: 150VAC - Current Rating : 2A - Color : Red " Sensor Signal Input Type - NO Contact Signals " Connection to External Device ! Alarm Port " Terminal Type - Voltage Rating: 150VAC - Current Rating : 2A...
-
Page 58: Relay Type
" Relay Type - Contact Rating : 1A 30VDC - Switching Power : Max 30W 62.5VA - Switching Voltage : Max 60VDC " Alarm Signal Output Type - NO/NC Contact Signals " Connection to External Device 2. Appendix B : Serial Port ! RS-232 Port "... - Page 59 -Pin Arrangement -Pin Description Pin NO Pin Name Description RS232 TX(Transmit) RS232 RX(Receive) Ground ! RS-422/485 Port " Port Type -4 PIN -Pin Diagram -Pin Description Pin No. Pin Name Description RS422 RX- RS422 RX+ RS422 TX- or RS485 TRX- selectable by S/W Setup RS422 TX+ or RS485 TRX+ selectable by S/W Setup...
Need help?
Do you have a question about the ANT-4000E and is the answer not in the manual?
Questions and answers