Samsung MG23F301T Series Owner's Instructions & Cooking Manual
Hide thumbs
Also See for MG23F301T Series:
- Owner's instructions & cooking manual (288 pages) ,
- Owner's instructions & cooking manual (180 pages) ,
- Owner's instructions & cooking manual (180 pages)
Table of Contents
Advertisement
Available languages
Available languages
MG23F301T**
MG23F302T**
هائلة
إمكانات
فرن امليكروويف
.Samsung شكر ً ا لشرائك هذا املنتج من
، ً للحصول على خدمة أكثر تكام ال
الرجاء تسجيل املنتج اخلاص بك على
www.samsung.com/register
إرشادات ودليل الطهي للمالك
ال يغطي اتصاالت اخلدمة اخلاصة بشرح تشغيل املنتج أو تصحيحSamsung الرجاء العلم بأن ضمان
.التركيب غير السليم أو تنفيذ عمليات الصيانة والتنظيف العادية
.% 100 مت إنتاج هذا الدليل باستخدام ورق م ُ عاد تدويره بنسبة
MG23F301TAK_SG_DE68-04178R-00_AR.indd 1
2013-12-26
11:21:00
Advertisement
Chapters
Table of Contents

Related Manuals for Samsung MG23F301T Series


Summary of Contents for Samsung MG23F301T Series
- Page 1 إرشادات ودليل الطهي للمالك ال يغطي اتصاالت اخلدمة اخلاصة بشرح تشغيل املنتج أو تصحيحSamsung الرجاء العلم بأن ضمان .التركيب غير السليم أو تنفيذ عمليات الصيانة والتنظيف العادية .% 100 مت إنتاج هذا الدليل باستخدام ورق م ُ عاد تدويره بنسبة...
- Page 2 2 .............................. معلومات السالمة 11 ............................دليل البحث السريع استخدام كتيب اإلرشادات 12 ................................ميزات الفرن 12 ....................................الفرن . تتضمن إرشادات املالك معلومات قيمة تتعلق بالطهيSAMSUNG لقد حصلت اآلن على فرن ميكروويف 13 ................................لوحة التحكم :باستخدام فرن امليكروويف 13 ................................األدوات اإلضافية احتياطات السالمة...
- Page 3 حتذير: ي مُ كن استخدام هذا اجلهاز من ق ِ بل األطفال البالغني من إرشادات هامة تتعلق بالسالمة العمر 8 سنوات أو أكثر أو األشخاص الذين لديهم قدرات عقلية .اقرأ اإلرشادات بعناية واحتفظ بها كمرجع في املستقبل أو حسية أو جسدية ضعيفة أو من لديهم نقص في اخلبرة أو .تأكد...
- Page 4 حتذير: قد ينتج عن تسخني املشروبات باستخدام فرن إذا تعرض سلك التيار الكهربي للتلف، فيجب استبداله بواسطة الشركة املص ن ّ عة أو مسؤول الصيانة التابع لها أو امليكروويف حدوث فوران شديد عند غليانها لذا يجب توخي .أشخاص مؤهلني بنفس الكفاءة لتجنب التعرض للمخاطر .احلذر...
- Page 5 ي مُ كن استخدام هذا اجلهاز من ق ِ بل األطفال البالغني من العمر حتذير (وظيفة الفرن فقط) - اختياري 8 سنوات أو أكثر أو األشخاص الذين لديهم قدرات عقلية أو حتذير: عند تشغيل اجلهاز في "وضع اجلمع"، يجب أال يستخدم حسية...
- Page 6 تركيب فرن امليكروويف إذا تعرض سلك التيار الكهربي للتلف، فيجب استبداله بواسطة الشركة املص ن ّ عة أو مسؤول الصيانة التابع لها أو 85 ضع الفرن على سطح أملس مسطح يرتفع عن األرض مبقدار .أشخاص مؤهلني بنفس الكفاءة لتجنب التعرض للمخاطر سم.
- Page 7 • متراكمة تنظيف فرن امليكروويف • متنع إغالق الباب بشكل صحيح يجب تنظيف األجزاء التالية من فرن امليكروويف على فترات نظف جتويف فرن امليكروويف بعد كل مرة تستخدمه فيها :منتظمة ملنع تراكم الدهون وبقايا الطعام مبحلول تنظيف، ولكن اترك فرن امليكروويف فترة كافية ليبرد •...
- Page 8 يجب أال ّ تقوم باستبدال مصباح اإلضاءة بنفسك ألغراض تخزين فرن امليكروويف وإصالحه .السالمة يجب مراعاة بعض االحتياطات البسيطة عند تخزين فرن معتمدSamsung الرجاء االتصال بأقرب مركز خدمة عمالء .امليكروويف أو صيانته .لالستعانة مبهندس مؤهل الستبدال املصباح يجب عدم استخدام الفرن في حالة تعطل الباب أو تلف...
- Page 9 حتذير: قد ينتج عن تسخني املشروبات باستخدام فرن امليكروويف حدوث ال ت مُ دخل أصابعك أو أي مواد غريبة إلى الفرن. وفي حالة دخول أي مواد فوران شديد عند غليانها، لذا يجب توخي احلذر عند التعامل مع األواني؛ غريبة إلى الفرن (مثل املاء)، افصل مأخذ الكهرباء واتصل بأقرب مركز ملنع...
- Page 10 ،ال تقم بتشغيل فرن امليكروويف عندما يكون فارغ ً ا. وعند حدوث ذلك تنبيه سيتم إيقاف تشغيل فرن امليكروويف ملدة 03 دقيقة للحفاظ على سالمتك. ومن ثم َّ ، فإننا نوصي بوضع كوب ماء داخل الفرن بشكل دائم "استخدم األواني املناسبة لالستخدام في أفران امليكروويف "فقط"؛ و"ال .المتصاص...
- Page 11 دليل البحث السريع بفرض رسوم مقابل استبدال أ ي ّ أجزاء ملحقة أو إصالح أ ي ّ عيب جتميلي في حالة تلفSamsung ستقوم :الوحدة و/أو تلف األجزاء امللحقة أو فقدها بسبب العميل. العناصر التي يغطيها هذا الشرط .(أ) وجود نتوء أو كشط أو كسر في الباب أو املقبض أو اللوحة اخلارجية أو لوحة التحكم...
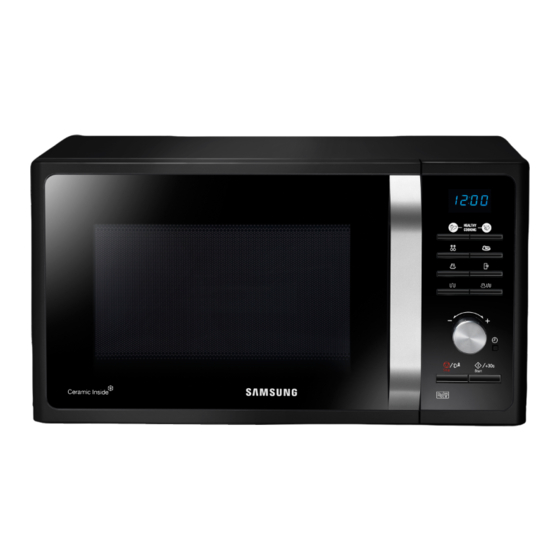
- Page 12 ميزات الفرن .إذا أردت شواء بعض الطعام .) ( 1. اضغط على الزر الشواية الفرن .2. حدد وقت الطهي بلف القرص الدوار حسب احلاجة ( ) (تشغيل/+03 ثانيةStart/+30s 3. اضغط على الزر الباب مقبض الباب القرص الدوار فتحات التهوية أداة التدوير الشواية...
- Page 13 األدوات اإلضافية لوحة التحكم نوفر لك العديد من األدوات اإلضافية التي يكنك استخدامها بطرق متعددة وفقً ا للطراز الذي قمت .بشرائه .1. احللقة الدوارة، يتم وضعها في وسط الفرن .تعمل احللقة الدوارة على تدوير الصينية الدوارة : الغرض 2. الصينية الدوارة، يتم وضعه على احللقة الدوارة مع وضع مركزه على أداة .التدوير...
- Page 14 التأكد من أن الفرن يعمل بشكل صحيح امليكروويف والشواية وضع التشغيل ) ( الشواية ( امليكروويف .يتيح لك اإلجراء البسيط التالي التأكد من أن الفرن يعمل بشكل صحيح طول الوقت .افتح باب الفرن بواسطة جذب املقبض املوجود إلى يني باب الفرن. ضع كو ب ً ا من املاء على الصينية الدوارة .ثم...
- Page 15 الطهي/التسخني ضبط الوقت .يوضح اإلجراء التالي كيفية طهي الطعام أو إعادة تسخينه يحتوي فرن امليكروويف على ساعة مضم ّ نة. عند توصيل الكهرباء، يتم عرض األرقام "0:" أو "88:88" أو .تأكد "دوم ً ا" من إعدادات الطهي قبل ترك الفرن دون مالحظة ."00:21"...
- Page 16 ضبط مدة الطهي مستويات الطاقة ) (تشغيل/+03 ثانيةStart/+30s يكنك زيادة مدة الطهي بالضغط على الزر .يكنك االختيار من بني مستويات الطاقة املوجودة أدناه .) مرة واحدة لكل 03 ثانية ترغب في إضافتها مقدار الطاقة (تشغيل/+03 ثانية) مرة واحدة إلضافة 03 ثانيةStart/+30s اضغط على الزر مستوى...
- Page 17 استخدام برامج الطهي الصحي: اخلضروات واحلبوب استخدام ميزات الطهي الصحي يوضح اجلدول التالي 21 برنامج ً ا تلقائي ً ا للنظام الغذائي الصحي لطهي اخلضروات أو احلبوب. ويحتوي ميزات الطهي الصحي بها عشرين وق ت ً ا للطهي مبرم َ جني مسبقً ا. فهي ال حتتاج إلى ضبط وقت الطهي أو اجلدول...
- Page 18 مدة االنتظار الكمية مدة االنتظار الكمية التوصيات الطعام الرمز التوصيات الطعام الرمز )(بالدقيقة )(جرام )(بالدقيقة )(جرام ال ب ُ رغل السبانخ استخدم طبقً ا زجاجي ً ا كبير ً ا له غطاء من اغسل السبانخ ونظفّ ها. ثم ضعها في وعاء أدوات...
- Page 19 أضف إليه ملعقة من عصير الليمون. ثم )(2 قطع الطازج .Samsung عند الطهي باستخدام فرن امليكروويف من قم بتغطيتها بطبقة من ورق امليكروويف وتعد هذه األداة مثالية لطهي األرز واملعجنات واخلضراوات، وما إلى ذلك في وقت قياسي، مع االحتفاظ احلراري. ثم اثقب الغطاء. ثم ضع الطبق على...
- Page 20 :فك التجميد مدة االنتظار مدة الطهي مستويات كيفية اإلعداد الكمية الطعام )(بالدقيقة )(بالدقيقة الطاقة .ضع األطعمة اجملمدة في وعاء البخار بدون الغطاء. سيظل السائل في قاع اإلناء ولن يؤثر على الطعام الوعاء + الغطاء 006 واط 004 جم )اليخني (بارد :الطهي...
- Page 21 وMG23F301TJ* وMG23F301TC* استخدام طبق التحمير (متوفر بالطرز .5. حدد وقت الطهي والطاقة املناسبني )(راجع اجلدول املوجود على اجلانب ) فقطMG23F302TJ* وMG23F302TC* كيفية تنظيف طبق التحمير ً يسمح طبق التحمير ليس فقط بتحمير الطبقة العلوية من الطعام باستخدام الشواية، لكنه أيض ا .قم...
- Page 22 مدة الطهي مدة التسخني مدة الطهي مدة التسخني الطاقة الكمية الطعام الطاقة الكمية الطعام )(بالدقيقة )امل ُ سبق (دقيقة )(بالدقيقة )امل ُ سبق (دقيقة 7,5-6,5 054 واط + الشواية 003 إلى 053 جم )البيتزا (مثلجة 7,5-7 006 واط + الشواية )قطعتان...
- Page 23 استخدام ميزة طبقي استخدام برامج اإلذابة التلقائية للثلج ميزة "طبقي" لها وقتان للطهي م مُ برمجان مسبق ا ً . فهي ال حتتاج إلى ضبط وقت الطهي أو مستوى يبني اجلدول التالي برامج "إذابة التجميد السريعة" والكميات املراد فك جتميدها وأوقات االنتظار والتوصيات .الطاقة.
- Page 24 ( 4. اضغط على الزر الشواية مدة االنتظار حجم الوجبة التوصيات الكود / الطعام )(بالدقيقة )(جم :تظهر العالمات اآلتية :النتيجة 2. الوجبات النباتية ضع الوجبة في طبق خزفي وقم بتغطيتها 350-300 بطبقة من ورق امليكروويف احلراري. يناسب هذا 450-400 املثلجة البرنامج...
- Page 25 2. لتشغيل ميزة صفارة التنبيه مرة أخرى، اضغط على الزرين ( 2. اضغط الزر جمع امليكروويف والشواية ( ) (إيقاف/توفير الطاقةStop/Energy Saving ) و :تظهر العالمات اآلتية :النتيجة ( ) (تشغيل/+03 ثانيةStart/+30s .) مرة أخرى ملدة ثانيتني )(وضع امليكروويف والشواية :النتيجة...
- Page 26 دليل أواني الطهي مسموح باستخدامها تعليقات أوعية الطهي مع امليكروويف املعادن للطهي باستخدام فرن امليكروويف، يجب أن تتمكن أشعة امليكروويف من اختراق الطعام دون أن تنعكس .على األطباق أو متتصها األطباق املستخدمة .قد تتسبب في حدوث ماس كهربائي أو نشوب حريق األطباق...
- Page 27 دليل طهي اخلضراوات املمدة دليل الطهي استخدم أوعية مناسبة مصنوعة من البيركس لها غطاء. قم بطهي الطعام مع وضع الغطاء مدة احلد .األدنى، راجع اجلدول. تابع عملية الطهي حتى حتصل على النتيجة املطلوبة قلب الطعام مرتني أثناء الطهي ومرة بعد الطهي. أضف امللح أو التوابل أو الزبد بعد الطهي. اترك الطعام أشعة...
- Page 28 دليل طهي اخلضراوات الطازجة دليل طهي األرز واملعجنات استخدم أوعية مناسبة مصنوعة من البيركس لها غطاء. أضف 03 إلى 54 مللي من املاء البارد (ملعقتني استخدم إنا ء ً ا كبير ً ا من البايركس له غطاء مع مراعاة أن حجم األرز يتضاعف أثناء :األرز...
- Page 29 التسخني وفترات االنتظار مدة االنتظار الوقت اإلرشادات الكمية الطعام )(بالدقيقة )(بالدقيقة .من املفيد مالحظة املدة التي استغرقها تسخني الطعام في املرة األولى، للرجوع إليها في املستقبل .تأكد دوم ً ا من انبعاث البخار الساخن من الطعام الذي مت إعادة تسخينه قط...
- Page 30 إعادة تسخني طعام األطفال مدة االنتظار الوقت اإلرشادات الطاقة الكمية الطعام )(بالدقيقة )(بالدقيقة طعام األطفال: قم بتفريغه في طبق خزفي عميق. قم بتغطيته بغطاء بالستيكي. يقلب جي د ً ا بعد إعادة !التسخني ضع اليخني في طبق خزفي 6,5-5,5 006 واط 053 جم...
- Page 31 فك التجميد اليدوي مدة االنتظار اإلرشادات الوقت الطاقة الكمية الطعام )(بالدقيقة تعد أشعة امليكروويف أسلو ب ً ا ممتا ز ً ا في إذابة التجميد عن الطعام. تقوم أشعة امليكروويف بإذابة التجميد فرغ احملتويات في طبق 02 ثانية 006 واط 091 جم...
- Page 32 الشواية مدة االنتظار الوقت اإلرشادات الكمية الطعام )(بالدقيقة )(بالدقيقة يوجد جزء التسخني اخلاص بالشواية حتت سقف جتويف الفرن. وتعمل الشواية أثناء غلق الباب ودوران الدواجن الصينية الدوارة. يؤدي دوران الصينية الدوارة إلى حتمير الطعام بشكل متساو ٍ . ويؤدي التسخني املسبق .للشواية...
- Page 33 :مالحظة هامة الوقت الوقت اإلرشادات اإلضافي اإلضافي الطاقة الكمية الطعام املمد عند استخدام وضع اجلمع (امليكروويف + الشواية)، تأكد من وجود جزء التسخني اخلاص بالشواية حتت )الثاني (دقيقة )األول (دقيقة السقف في الوضع األفقي وعدم وجوده عند اجلدار اخللفي في الوضع الرأسي. يجب وضع الطعام على احلامل...
- Page 34 الوقت الوقت الوقت الوقت اإلرشادات اإلضافي اإلضافي الطاقة الكمية الطعام الطازج اإلرشادات اإلضافي اإلضافي الطاقة الكمية الطعام الطازج )الثاني (دقيقة )األول (دقيقة )الثاني (دقيقة )األول (دقيقة امسح الدجاجة بقليل ٍ من الزيت 18-15 18-15 + 006 واط 0021 جم الدجاج املشوي قم...
- Page 35 .مصباح الضوء ال يعمل ينبغي عدم استبدال مصباح الضوء بيديك ألسباب وقائية. ي مُ رجى االتصال بأقرب مركز خدمة عمالء • .، لكي يرسلوا إليك مهندس ً ا محتر ف ًا الستبدال املصباحSamsung معتمد من 35 - العربية MG23F301TAK_SG_DE68-04178R-00_AR.indd 35...
- Page 36 املواصفات الفنية جاهدة إلى حتسني جودة منتجاتها باستمرار. لذا، تخضع مواصفات التصميمSAMSUNG تسعى شركة .وإرشادات املستخدم للتغيير دون إشعار مسبق MG23F302T** MG23F301T** و الطراز 032 فولت - 05 هرتز مصدر التيار الكهربي استهالك الطاقة 0021 واط امليكروويف 0011 واط...
- Page 37 Veuillez noter que la garantie Samsung n’inclut pas les déplacements du service après-vente pour expliquer le fonctionnement de l’appareil, corriger une installation non correcte ou exécuter des travaux de nettoyage ou d’entretien réguliers.
-
Page 38: Table Of Contents
Consignes de sécurité ..................... 2 UTILISATION DU MANUEL D'UTILISATION Présentation rapide ....................11 Vous venez d'acquérir un four micro-ondes SAMSUNG. Ce manuel contient Fonctions du four .....................12 de nombreux conseils et instructions sur son utilisation : Four ........................12 • Consignes de sécurité... - Page 39 CONSIGNES DE SÉCURITÉ IMPORTANTES AVERTISSEMENT : cet appareil peut être utilisé LISEZ ATTENTIVEMENT CE MANUEL ET par des enfants à partir de 8 ans et des personnes CONSERVEZ-LE PRÉCIEUSEMENT EN VUE ayant des capacités physiques, sensorielles ou D'UNE CONSULTATION ULTÉRIEURE. mentales réduites ou un manque d'expérience et de Assurez-vous que ces consignes de sécurité...
- Page 40 AVERTISSEMENT : si vous faites réchauffer des Cet appareil n'est pas conçu pour être utilisé par des liquides au four micro-ondes, l'ébullition peut survenir personnes (y compris les enfants) inexpérimentées ou à retardement ; faites donc bien attention lorsque vous dont les capacités physiques, sensorielles ou mentales sortez le récipient du four.
- Page 41 Installez le four à micro-ondes de telle façon que la AVERTISSEMENT : L'appareil et ses parties prise reste facilement accessible. accessibles chauffent pendant l'utilisation. Prenez garde à ne pas toucher les éléments Le four micro-ondes est destiné à être posé sur un chauffants.
- Page 42 Si le cordon d'alimentation de l'appareil est Maintenez l'appareil et son cordon hors de la portée endommagé, il devra être remplacé par le des enfants âgés de moins de 8 ans. fabricant, son réparateur agréé ou par toute L'appareil n'est pas conçu pour être utilisé avec une personne qualifiée afin d'éviter tout danger.
- Page 43 NETTOYAGE DU FOUR MICRO-ONDES 4. Nettoyez le plateau si nécessaire, ce dernier étant adapté au lave-vaisselle. Pour empêcher l'accumulation de graisses et de Ne laissez JAMAIS s'écouler d’eau dans les résidus d'aliments, nettoyez régulièrement les orifices de ventilation. N'utilisez JAMAIS de éléments suivants : produits abrasifs ou de solvants chimiques.
-
Page 44: Rangement Et Entretien Du Four
MICRO-ONDES l'ampoule pour des raisons de sécurité. Veuillez contacter le service d'assistance Pour le rangement ou la réparation de votre four Samsung le plus proche afin qu'un ingénieur micro-ondes, vous devez respecter quelques qualifié remplace l'ampoule. précautions simples. N'utilisez pas le four si la porte ou ses joints sont AVERTISSEMENT endommagés :... - Page 45 AVERTISSEMENT : si vous faites réchauffer des liquides au N'insérez pas vos doigts ou de substances étrangères (ex. : eau) dans l'appareil ; si de l'eau pénètre dans l'appareil, débranchez le four micro-ondes, l'ébullition peut survenir à retardement ; faites cordon d'alimentation et contactez votre centre de dépannage le donc bien attention lorsque vous sortez le récipient du four.
- Page 46 CONSIGNES PERMETTANT D'ÉVITER UNE EXPOSITION Ne faites jamais chauffer d'œufs (frais ou durs) dans leur coquille EXCESSIVE AUX MICRO-ONDES. car ils risquent d'exploser, et ce même une fois le cycle de cuisson terminé ; ne faites jamais réchauffer de bouteilles, de pots ou de (FONCTION MICRO-ONDES UNIQUEMENT) récipients fermés hermétiquement ou emballés sous vide.
-
Page 47: Présentation Rapide
Samsung facturera les travaux de réparation lorsqu'un accessoire doit être réparé ou un défaut esthétique corrigé, si l'endommagement de l'appareil et/ou l'endommagement ou la perte de l'accessoire a été occasionné par le Si vous souhaitez faire cuire des aliments. -
Page 48: Fonctions Du Four
fonctions du four Si vous souhaitez faire griller des aliments. 1. Appuyez sur le bouton Gril ( ). FOUR 2. Sélectionnez le temps de cuisson désiré en tournant le bouton de réglage. 3. Appuyez sur le bouton Start/+30s (Départ/+30s) 1. POIGNÉE PORTE 2. -
Page 49: Tableau De Commande
TABLEAU DE COMMANDE ACCESSOIRES Selon le modèle de votre four micro-ondes, vous disposez de plusieurs accessoires à fonctionnalités multiples. 1. Anneau de guidage : à placer au centre du four. Fonction : L'anneau de guidage sert de support au plateau tournant. 2. Plateau tournant : à placer sur l'anneau de guidage en emboîtant la partie centrale sur le coupleur. -
Page 50: Utilisation Du Four
VÉRIFICATION DU BON FONCTIONNEMENT DE VOTRE FOUR Mode de CUISSON COMBINÉE MW ( GRIL ( ) fonctionnement La procédure suivante vous permet de vérifier à tout moment que votre four fonctionne correctement. Ouvrez la porte du four en tirant sur la poignée située sur le côté droit de la porte. -
Page 51: Réglage De L'horloge
RÉGLAGE DE L'HORLOGE CUISSON/RÉCHAUFFAGE Votre four micro-ondes est équipé d'une horloge. Lors de la mise sous tension, Suivez les instructions ci-dessous lorsque vous souhaitez faire cuire ou réchauffer « :0 », « 88:88 » ou « 12:00 » s'affiche automatiquement. Réglez l'heure actuelle. des aliments. Vérifiez TOUJOURS les réglages de cuisson avant de laisser le four Vous pouvez afficher l'heure au format 24 ou 12 heures. -
Page 52: Puissances
PUISSANCES RÉGLAGE DU TEMPS DE CUISSON Vous pouvez augmenter le temps de cuisson en appuyant sur Les puissances figurant ci-dessous sont disponibles. le bouton Start/+30s (Départ/+30s) ( ) autant de fois que Puissance en watts vous souhaitez ajouter de tranches de 30 secondes. Puissance Micro-ondes GRIL... -
Page 53: Utilisation Des Fonctions De Réalisation De Plats Sains
UTILISATION DES FONCTIONS DE RÉALISATION DE PLATS SAINS UTILISATION DES PROGRAMMES DE RÉALISATION DE PLATS SAINS : LÉGUMES ET CÉRÉALES Les fonctions de réalisation de plats sains ont vingt durées de cuisson pré- programmées. Vous n'avez donc besoin de régler ni le temps de cuisson, ni Le tableau suivant présente les 12 programmes automatiques de réalisation la puissance. - Page 54 Type Portion Temps de Type Portion Temps de Code Consignes Code Consignes d'aliment repos (min) d'aliment repos (min) Épinards Rincez et nettoyez les épinards. Mettez- Boulghour Utilisez un grand plat en verre équipé les dans une cocotte en verre et couvrez. d’un couvercle Ajoutez deux volumes N'ajoutez pas d'eau.
-
Page 55: Guide Pour La Cuisson À La Vapeur (Modèles Mg23F301Tf*, Mg23F301Tj*, Mg23F302Tf*, Mg23F302Tj* Uniquement)
(2 parts) assiette en céramique, ajoutez 1 cuillère Le cuiseur-vapeur du four à micro-ondes Samsung utilise le principe de cuisson à soupe de jus de citron. Recouvrez-les à la vapeur ; il est spécialement adapté à la réalisation de plats sains et rapides à... - Page 56 DÉCONGÉLATION : Type Temps de Temps de Quantité Puissances Accessoires d'aliment cuisson (min) repos (min) Placez les aliments surgelés dans le bol du cuiseur-vapeur, sans couvrir. Le liquide restera au fond du bol et n'altérera pas la saveur des aliments. Plat mijoté 400 g 600 W Bol + couvercle...
-
Page 57: Utilisation Du Plat Croustilleur (Modèles Mg23F301Tc*, Mg23F301Tj*, Mg23F302Tc*, Mg23F302Tj* Uniquement)
UTILISATION DU PLAT CROUSTILLEUR 5. Sélectionnez le temps de cuisson et la puissance appropriés. (Reportez-vous au tableau ci-contre.) (MODÈLES MG23F301TC*, MG23F301TJ*, MG23F302TC*, MG23F302TJ* UNIQUEMENT) Comment nettoyer le plat croustilleur ? Lavez le plat à l'eau chaude savonneuse et rincez-le à l'eau claire. Ce plat croustilleur vous permet de faire dorer les aliments en surface en faisant N'utilisez ni grattoir ni éponge métallique ;... -
Page 58: Utilisation De La Fonction Power Defrost (Décongélation Automatique)
Type Temps de Temps de Temps de Quantité Puissance Temps de d'aliment préchauffage (min.) cuisson (min) Type d'aliment Quantité Puissance préchauffage cuisson (min) (min.) Hamburger 2 hamburgers (125 g) 600 W + Gril 7-7½ (surgelé) Pizza 300 à 350 g 450 W + Gril 6½-7½... -
Page 59: Fonctionnalité Mon Plat
UTILISATION DES PROGRAMMES DE FONCTIONNALITÉ MON PLAT DÉCONGÉLATION AUTOMATIQUE Cette fonction propose 2 programmes de cuisson. Vous n'avez donc besoin de régler ni le temps de cuisson, ni la puissance. Pour définir la quantité, tournez le bouton de Le tableau suivant répertorie les divers programmes de décongélation automatique, réglage vers la droite ou vers la gauche. -
Page 60: Choix Des Accessoires
4. Appuyez sur le bouton Gril ( Temps de Code/Aliment Quantité (g) Consignes repos (min) Résultat : Les indications suivantes s'affichent : 2. Repas 300-350 Placez les aliments dans une assiette végétarien 400-450 en céramique et recouvrez-la d'un film réfrigéré plastique résistant aux micro-ondes. 5. -
Page 61: Arrêt Du Signal Sonore
2. Pour réactiver le signal sonore, appuyez de nouveau pendant 2. Appuyez sur le bouton Cuisson combinée ( deux secondes sur les boutons Stop/Energy Saving (Arrêt/ Résultat : Les indications suivantes s'affichent : Économie d'énergie) ( ) et Start/+30s (Départ/+30s) (mode micro-ondes et gril) Résultat : 600 W (puissance de sortie) -
Page 62: Guide Des Récipients
guide des récipients Adapté à la Récipient cuisson aux Remarques Pour faire cuire des aliments dans le four micro-ondes, il est nécessaire que les micro-ondes micro-ondes pénètrent dans les aliments sans être réfléchies ou absorbées par le Métal plat utilisé. Le choix du type de récipient est donc essentiel. Pour cela, assurez-vous •... -
Page 63: Guide De Cuisson
guide de cuisson Guide de cuisson pour les légumes surgelés Utilisez une cocotte en Pyrex avec couvercle adaptée à la cuisson au four. Faites cuire les aliments à couvert pendant la durée minimale préconisée MICRO-ONDES (consultez le tableau). Poursuivez la cuisson selon votre goût. Les micro-ondes sont d'abord attirées puis absorbées par l'eau, la graisse et le Remuez deux fois pendant la cuisson et une fois après. - Page 64 Guide de cuisson pour le riz et les pâtes Guide de cuisson pour les légumes frais Utilisez une cocotte en Pyrex avec couvercle adaptée à la cuisson au four. Riz : Utilisez une grande cocotte en Pyrex avec couvercle, car le riz Ajoutez 30 à...
- Page 65 Temps de réchauffage et de repos Type Temps Temps de Quantité Consignes Lorsque vous faites réchauffer un type d'aliment pour la première fois, notez le temps d'aliment (min) repos (min) nécessaire pour pouvoir vous y référer ultérieurement. Oignons 250 g 5½-6 Émincez les oignons ou coupez-les en Vérifiez toujours que les aliments réchauffés sont uniformément chauds.
- Page 66 FAIRE RÉCHAUFFER DES ALIMENTS POUR BÉBÉ Type Temps Temps de Quantité Puissance Consignes d'aliment (min) repos (min) ALIMENTS POUR BÉBÉ : Versez les aliments dans une assiette creuse en céramique. Recouvrez le récipient d'un couvercle en plastique. Remuez bien après Plat mijoté 350 g 600 W 5½-6½...
- Page 67 DÉCONGÉLATION MANUELLE Type Temps de Quantité Puissance Heure Consignes d'aliment repos (min) Les micro-ondes constituent un excellent moyen de décongeler les aliments. Elles permettent de faire décongeler progressivement les aliments en un temps record. Bouillie 190 g 600 W 20 s. Versez les aliments pour bébé...
- Page 68 GRIL Temps Temps de Type d'aliment Quantité Consignes (min) repos (min) L'élément chauffant du gril est situé sous la paroi supérieure du four. Il fonctionne lorsque la porte est fermée et que le plateau tourne. La rotation du plateau permet Volaille de dorer uniformément les aliments.
- Page 69 Remarque importante : Temps Temps Lorsque le mode combiné (micro-ondes + gril) est utilisé, veillez à ce que l'élément Aliments pour le pour le Quantité Puissance Consignes chauffant du gril se situe sous la paroi supérieure en position horizontale et non sur surgelés 1er côté...
- Page 70 Temps Temps Temps Temps Aliments pour le pour le Aliments pour le pour le Quantité Puissance Consignes Quantité Puissance Consignes frais 1er côté 2ème côté frais 1er côté 2ème côté (en min) (en min) (en min) (en min) Tartine Hawaï 2 morceaux 450 W + Gril 3½-4...
-
Page 71: Dépannage Et Code D'erreur
à résoudre le problème, contactez votre service d'assistance • Vous ne devez pas remplacer vous-même l'ampoule pour des raisons de sécurité. clientèle SAMSUNG local. Veuillez contacter le service d'assistance Samsung le plus proche afin qu'un ingénieur qualifié remplace l'ampoule. Français - 35 MG23F301TAK_SG_DE68-04178R-00_FR.indd 35... -
Page 72: Caractéristiques Techniques
SAMSUNG s'efforce sans cesse d'améliorer ses produits. Les caractéristiques et le mode d'emploi de ce produit peuvent être modifiés sans préavis. Modèle MG23F301T**, MG23F302T** Alimentation 230 V - 50 Hz Consommation d'énergie Micro-ondes 1200 W Gril 1100 W Mode de cuisson combinée 2300 W... - Page 73 Owner’s Instructions & Cooking Guide Please be advised that the Samsung warranty does NOT cover service calls to explain product operation, correct improper installation, or perform normal cleaning or maintenance. This manual is made with 100 % recycled paper.
-
Page 74: Safety Information
................2 Using This insTrUcTion booklET Quick look-up guide ................11 You have just purchased a SAMSUNG microwave oven. Your Owner’s oven features ..................12 Instructions contain valuable information on cooking with your microwave Oven ....................12 oven: Control panel ..................13 •... -
Page 75: Important Safety Instructions
imporTanT safETy insTrUcTions Warning: This appliance can be used by rEad carEfUlly and kEEp for fUTUrE children aged from 8 years and above and rEfErEncE. persons with reduced physical, sensory or mental capabilities or lack of experience Make sure that these safety precautions are and knowledge if they have been given obeyed at all times. - Page 76 Warning: Microwave heating of beverages This appliance is not intended for use by can result in delayed eruptive boiling, persons (including children) with reduced therefore care must be taken when handling physical, sensory or mental capabilities, the container. or lack of experience and knowledge, unless they have been given supervision or Warning: The contents of feeding bottles instruction concerning use of the appliance...
- Page 77 If the oven generates a strange noise, a Warning: Ensure that the appliance is burning smell, or smoke is emitted, unplug switched off before replacing the lamp to the power plug immediately and contact your avoid the possibility of electric shock. nearest service center.
-
Page 78: Installing Your Microwave Oven
4. This microwave oven has to be positioned The door or the outer surface may get hot so that plug is accessible. when the appliance is operating. If the supply cord is damaged, it must be Keep the appliance and its cord out of reach replaced by the manufacturer, its service of children less than 8 years. -
Page 79: Cleaning Your Microwave Oven
clEaning yoUr microWavE ovEn 4. Wash the dishwasher-safe plate whenever necessary. The following parts of your microwave oven do noT spill water in the vents. nEvEr should be cleaned regularly to prevent grease use any abrasive products or chemical and food particles from building up: solvents. -
Page 80: Storing And Repairing Your
Please contact nearest authorised A few simple precautions should be taken Samsung customer care,to arrange for a when storing or having your microwave oven qualified engineer to replace the bulb. serviced. The oven must not be used if the door or... - Page 81 Do not insert fingers or foreign substances, If any Keep children away from the door when opening or foreign substance such as water has entered the closing it as they may bump themselves on the door appliance, unplug the power plug and contact your or catch their fingers in the door.
-
Page 82: Precautions To Avoid Possible Exposure To Excessive Microwave Energy
Samsung will charge a repair fee for replacing an accessory or repairing a cosmetic defect if the damage to the unit and/or damage to or loss of Do not operate the microwave oven when it is the accessory was caused by the customer. -
Page 83: Quick Look-Up Guide
1. Place the food in the oven. nearest service centre or find help and information online at www. Select the power level by pressing the microwave samsung.com. ) button one or more times. • This microwave oven is supposed for heating food. It is intended for domestic home-use only. -
Page 84: Oven Features
oven features if you want to grill some food. 1. Press the grill ( ) button. ovEn 2. Select the cooking time by turning the dial knob as required. 3. Press the start/+30s ( ) button. 1. DOOR HANDLE 7. DOOR 2. -
Page 85: Control Panel
conTrol panEl accEssoriEs Depending on the model that you have purchased, you are supplied with several accessories that can be used in a variety of ways. 1. roller ring, to be placed in the centre of the oven. purpose : The roller ring supports the turntable. -
Page 86: Oven Use
chEcking ThaT yoUr ovEn is opEraTing Operation Mode MW ( GRILL ( ) COMBI ( corrEcTly The following simple procedure enables you to check that your oven is working correctly at all times. Open the oven door by pulling the handle on the right side of the door. (Steam cooker) Place a glass of water on the turntable. -
Page 87: Setting The Time
sETTing ThE TimE cooking/rEhEaTing Your microwave oven has an inbuilt clock. When power is supplied, “:0”, The following procedure explains how to cook or reheat food. “88:88” or “12:00” is automatically displayed on the display. ALWAYS check your cooking settings before leaving the oven unattended. Please set the current time. -
Page 88: Power Levels
poWEr lEvEls adjUsTing ThE cooking TimE You can choose among the power levels below. You can increase the cooking time by pressing the start/+30s ( ) button once for each 30 seconds output to be added. power level grill Press the start/+30s button once for each 30 seconds to be added. -
Page 89: Using The Healthy Cooking Features
Using ThE hEalThy cooking fEaTUrEs Using hEalThy cooking programmEs : vEgETablEs & grains The Healthy Cooking Features has twenty pre-programmed cooking times. You do not need to set either the cooking times or the power level. You can The following table presents the 12 Healthy diet auto programmes for adjust the item of the serving by turning the dial knob. - Page 90 portion standing portion standing code food recommendations code food recommendations tieme (min.) tieme (min.) Spinach Rinse and clean spinach. Put into Bulgur Use a large glass ovenware dish a glass bowl with lid. Do not add with lid. Add double quantity of water.
-
Page 91: Power Steam Cooking Guide (Only Mg23F301Tf*, Mg23F301Tj*, Mg23F302Tf*, Mg23F302Tj* Models)
The Power Steamer is based on the principle of steam cooking, and is juice. Cover with microwave designed for fast, healthy cooking in your Samsung Microwave oven. cling film. Pierce film. Put dish on This accessory is ideal for cooking rice, pasta, vegetables, etc. in record turntable. - Page 92 DEFROSTING: cooking standing power food portion time time handling Place the frozen food in the steam bowl without the lid. The liquid will levels (min.) (min.) remain in the bottom of the pot and will not harm the food. 400 g 600 W Bowl + Lid Stew...
-
Page 93: Using The Crusty Plate (Only Mg23F301Tc*, Mg23F301Tj*, Mg23F302Tc*, Mg23F302Tj* Models)
PRECAUTIONS: 4. Place the crusty plate on the metal rack (or turntable) in the microwave. Take special care when opening the lid of your steamer, because the steam escaping may be very hot. Use oven gloves when handling after cooking. 5. -
Page 94: Using The Auto Power Defrost Feature
preheating cooking time preheating cooking time food portion power food portion power time (min.) (min.) time (min.) (min.) burger 2 pieces 600 W + Grill 7-7½ pizza (chilled) 300-350 g 450 W + Grill 6½-7½ (frozen) (125 g) < recommendations > < recommendations > Preheat crusty plate. -
Page 95: Using The My Plate Feature
Using ThE aUTo poWEr dEfrosT programmEs Using ThE my plaTE fEaTUrE The following table presents the various Auto power Defrost programmes, The my plate feature has 2 pre-programmed cooking times. You do not quantities, standing times and appropriate recommendations. Remove all need to set either the cooking times or the power level. -
Page 96: Choosing The Accessories
4. Press the grill ( ) button. serving standing code/food recommendations size (g) time (min.) result : The follwing indications are displayed: 2. chilled 300-350 Put meal on a ceramic plate and vegetarian 400-450 cover with microwave cling film. This meal programme is suitable for meals 5. -
Page 97: Switching The Beeper Off
2. To switch the beeper back on, press the stop/ 2. Press the combi ( ) button. Energy saving ( ) and start/+30s ( result : The following indications are displayed: buttons again for two second. (microwave and grill mode) result : 600 W (out power) -
Page 98: Cookware Guide
cookware guide cookware microwave-safe comments glassware To cook food in the microwave oven, the microwaves must be able to • Oven-to-tableware Can be used, unless decorated with penetrate the food, without being reflected or absorbed by the dish used. ✓ a metal trim. -
Page 99: Cooking Guide
cooking guide Cooking guide for frozen vegetables Use a suitable glass pyrex bowl with lid. Cook covered for the minimum time - see table. Continue cooking to get the result you prefer. MICROWAVES Stir twice during cooking and once after cooking. Add salt, herbs or butter Microwave energy actually penetrates food, attracted and absorbed by its after cooking. - Page 100 Cooking Guide for rice and pasta Cooking Guide for fresh vegetables Use a suitable glass pyrex bowl with lid. Add 30-45 ml cold water (2-3 rice : Use a large glass pyrex bowl with lid - rice doubles in tbsp.) for every 250 g unless another water quantity is recommended – see volume during cooking.
- Page 101 Heating and standing times Time standing food portion instructions When reheating food for the first time, it is helpful to make a note of the time (min.) time (min.) taken – for future reference. Onions 250 g 5½-6 Cut onions into slices or halves. Always make sure that the reheated food is piping hot throughout.
- Page 102 REHEATING BABY FOOD Time standing food portion power instructions (min.) time (min.) baby food: Empty into a deep ceramic plate. Cover with plastic lid. Stir well after reheating! Stew 350 g 600 W 5½-6½ Put stew in a deep (chilled) ceramic plate. Cover Let stand for 2-3 minutes before serving.
- Page 103 MANUAL DEFROSTING standing food portion power Time instructions time (min.) Microwaves are an excellent way of defrosting frozen food. Microwaves gently defrost frozen food in a short period of time. This can be of great Baby 190 g 600 W 20 sec. Empty into ceramic porridge deep plate.
- Page 104 GRILL Time standing food portion instructions (min.) time (min.) The grill-heating element is located underneath the ceiling of the cavity. It operates while the door is closed and the turntable is rotating. The Poultry turntable’s rotation makes the food brown more evenly. Preheating the grill Chicken 500 g 14½-15½...
- Page 105 Important remark: 1st side 2nd side Whenever the combination mode (microwave + grill) is used, make sure that frozen food portion power time time instructions the grill heating element is under the ceiling in the horizontal position and (min.) (min.) not on the back-wall in the vertical position.
- Page 106 1st side 2nd side 1st side 2nd side fresh fresh portion power time time instructions portion power time time instructions food food (min.) (min.) (min.) (min.) Toast 2 pcs 450 W + 3½-4 Toast the bread slices Roast 1200 g 600 W + 15-18 15-18 Brush chicken with oil...
-
Page 107: Troubleshooting And Error Code
Turn off the microwave oven and try setting again. • Was an appropriate power level chosen? If it occurs again, call your local SAMSUNG Customer Care Centre. The light bulb is not working. For any codes not listed above, or if the suggested solution does not •... -
Page 108: Technical Specifications
SAMSUNG strives to improve its products at all times. Both the design specifications and these user instructions are thus subject to change without notice. model mg23f301T**, mg23f302T** Power source 230 V ~ 50 Hz Power consumption Microwave 1200 W Grill 1100 W...
Need help?
Do you have a question about the MG23F301T Series and is the answer not in the manual?
Questions and answers