Table of Contents

Related Manuals for CDA HNG7410FR


Summary of Contents for CDA HNG7410FR
- Page 1 Indu-Gas Hob Installation, Use and Maintenance Customer Care Department • The Group Ltd. • Harby Road • Langar • Nottinghamshire • NG13 9HY T : 01949 862 012 F : 01949 862 003 E : customer.care@cda.eu W : www.cda.eu www.cda.eu...
- Page 2 Appliance information: Please enter the details on the appliance rating plate below for reference, to assist CDA Customer Care in the event of a fault with your appliance and to register your appliance for guarantee purposes. Appliance Model...
- Page 3 CE Declarations of Conformity: This appliance has been manufactured to the strictest standards and complies with all applicable legislation, including Gas safety, Electrical safety (LVD) and Electromagnetic interference compatibility (EMC). Parts intended to come into contact with food conform to EEC/89/109. IMPORTANT INFORMATION FOR CORRECT DISPOSAL OF THE PRODUCT IN ACCORDANCE WITH EC DIRECTIVE 2002/96/EC.
- Page 4 • The use of a gas appliance produces heat and humidity in the room in which it is installed. Ensure that the room is well ventilated, either by the use of natural ventilation outlets (e.g. windows) or a ducted extractor. •...
- Page 5 • Do not cook unopened tins of food directly on the hob. • Never put cooking foil or plastic materials on the ceramic surface when the hob is hot. These materials could melt and cause damage to the hob. • Do not use the hob if the glass surface is cracked or damaged to prevent the risk of electric shock.
- Page 6 As such, CDA guarantee only that our product is compliant. With regard to the compliance of the pacemaker or any potential incompatibility, you should obtain information from...
- Page 7 Cooking on Induction The principle of induction cooking is based on magnetic effect. When you put your cookware on an induction zone and switch it on, the electronic boards in the hob produce induced currents in the base of the cookware and instantly raise its temperature. This heat is then transferred to the food inside the cookware.
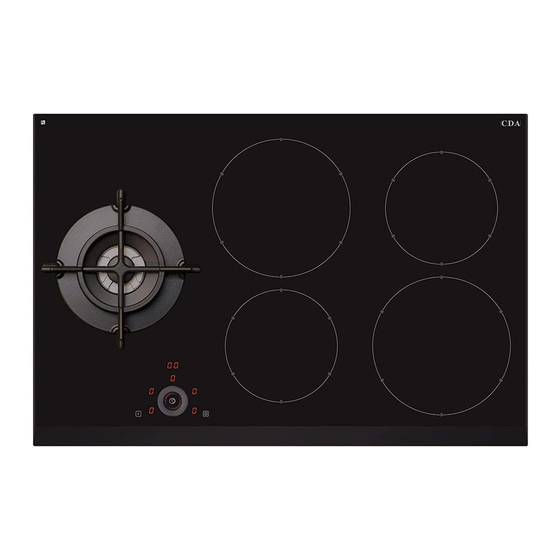
- Page 8 Fig. 1 Fig. 2...
- Page 9 Key to Figs 1 & 2 Gas burner: 1. Wok burner 5.0kW Induction zones: 2. Rear middle 2.3kW (3.0kW with booster) 215mm 3. Rear right 1.4kW 175mm 4. Front right 2.3kW (3.0kW with booster) 215mm 5. Front middle 1.4kW 175mm Control panel: 6.
-
Page 10: Using Your Hob
The table below offers guidance as to what each power level is for. Power level Type of cooking Switched off Melting (butter/chocolate) or keeping food warm Keeping food hot or to heat small quantities of liquid Heat larger quantities of liquid (sauces etc.) Slow boiling, e.g spaghetti, soups, stews, potatoes Gentle frying Browning meats, frying fish, omelettes... - Page 11 To switch a cooking zone on • Touch the “Zone selection point” for the zone required to activate its setting mode (The “Zone display” becomes brighter to show it is activated). Note: The “Zone selection points” are not marked with printing on the panel but are at the closest parts of the “Circular slider groove”...
- Page 12 To switch a cooking zone off • Touch the “Zone selection point” for the zone required to activate its setting mode (The “Zone display” becomes brighter to show it is activated). • Then, use the “Circular slider groove” to reduce the power level to “0”, by sliding your finger around it anti-clockwise.
- Page 13 To cancel the pause function Touch the pause key for one second, then within five seconds touch the “Circular slider”. Cooking will resume at the same settings as before the pause function was activated. Booster The hob is equipped with a booster function, allowing a higher power level than the maximum for approximately ten minutes.
- Page 14 Timer The hob is equipped with a timer that allows a finish time to be set for the end of cooking on any zone, between a minimum of one minute and a maximum of 99 minutes. To set the timer •...
-
Page 15: Minute Minder
To cancel the timer • Touch the “Zone selection point” for the zone required to activate its setting mode. • Touch the “Timer” key to select the timer option: The “Timer” display shows the time remaining. • Then, use the “Circular slider groove” to decrease its time setting to “0”, by sliding your finger around it anti-clockwise. - Page 16 To cancel the minute minder • Touch the “On/Off” key for approximately two seconds to switch the hob back on. • Touch the “Timer” key to select the timer option: The “Timer” display shows the time remaining. • Then, use the “Circular slider groove” to decrease its time setting to “0”, by sliding your finger around it anti-clockwise.
-
Page 17: Pan Detection
Pan detection The hob is equipped with a sensor that will advise when the pan is removed from the zone, or is unsuitable for use on induction hobs. The zone display will show “U” until a suitable pan is placed on the zone. - Page 18 Efficient Use of Your Gas Wok Burner The hob is equipped with a single gas burner, designed to accommodate most shapes and sizes of pan. For best results, only use pans with flat bottoms on the basic pan support. If using a wok the wok support must be fitted onto the basic pan support.
- Page 19 Correct Use of the Gas Burner Burner mounting • It is essential to ensure that all the burner parts and pan supports are properly assembled on the appliance to work correctly. • A blue and stable flame shows that the burner is working properly. •...
-
Page 20: Safety System
Safety system • The burner is equipped with a safety system (thermocouple) and an ignition system. • The ignition starts automatically once a power level is selected for the cooking zone. • If the flame goes out accidentally the ignition will restart the burner. •... - Page 21 Correct Use of the Wok Pan Adaptor The wok pan adaptor is a special stand that is designed to be fitted over the triple ring burner to give support to round bottomed woks. When using a wok, always place the wok pan adaptor in position over the pan support on the triple ring burner as shown in Fig.
-
Page 22: Care And Maintenance
Care and Maintenance Always disconnect the appliance from the power supply before undertaking any cleaning or maintenance. Important: • Steam cleaners must not be used when cleaning this appliance. • You should use a non-abrasive cleaner to clean the hob top. Any abrasive cleaner (including Cif) will scratch the surface and could erase the control panel markings. - Page 23 Burner Size Nominal Rating Simmer Rat- G20/20mbar Natural Gas Flow Rate (L/H) (kW) (kW) Triple / Wok Note: this hob is not suitable for conversion to LPG gas supply.
-
Page 24: Troubleshooting
Troubleshooting On first use You observe that Possible Causes What should you do? Check that it is set up properly The electrical connection of the Installation blows a fuse. (see the Electrical Connection hob is incorrect section) On switching on You observe that Possible Causes What should you do? - Page 25 Refer to the section on “Pause The hob is in pause mode. “l l” shows on the displays. function” on pages 12-13. The electronic system is Contact CDA Customer Care for “E” shows on the display. defective. advice. Refer to the section on “Residual “H”...
-
Page 26: Mains Electricity Connection
Mains Electricity Connection Warning! this appliance must be earthed We recommend that the appliance is connected by a qualified electrician, who is a member of the N.I.C.E.I.C. and who will comply with the I.E.T. and local regulations. This hob is intended to be connected to permanent fixed wiring by a double pole switch, having a contact separation of at least 3mm in all poles. - Page 27 • As the appliance is not fitted with an accessible plug, a means of disconnection from the power supply must be must be included in the fixed installation, in accordance with the installation regulations. • The inlet cable must be positioned so that it does not touch any of the hot parts of the hob or oven.
-
Page 28: Gas Supply Requirements
Any service call arising from incorrect installation may result in a charge. CDA and its representatives cannot be held responsible for any matters resulting from incorrect connection, or related to either the absence of an earth connection or a faulty earth connection. - Page 29 • The CDA Group Ltd is not legally able to provide any assistance in the installation of gas appliances except to Gas Safe registered installers. Any Gas Safe registered fitter requiring help must provide their name, address and registration number. Information supplied will be validated before help is provided.
-
Page 30: Natural Gas To Lpg Conversion
Ventilation All rooms require a window or equivalent (e.g. a door) which can be opened. Some rooms require a permanent vent in addition to a win- dow (see below). This unit must not be used in a room which is less than 5m . -
Page 31: Fitting The Hob
Fitting the Hob Unpacking the hob: Take care not to lose or mishandle any parts. Fitting position of the hob: This appliance must be installed a minimum of 50mm from any back wall and a minimum of 150mm away from any adjacent vertical surfaces, e.g. - Page 32 • This appliance is designed to be installed into cabinet units capable of withstanding temperatures 65°C above ambient or greater (typically 80-90°C). • If there is no oven to be built in below the hob it is recommended that, an isolation shelf should be fitted to protect the user from high temperatures.
-
Page 33: How To Install The Hob
How to Install the Hob Installation Dimensions (mm) HNG7410 Overall width Overall depth Worktop cutout width Worktop cutout depth 1. Make the required hole in the worktop. Note that before doing this, check the instructions supplied with any cooker hood to ensure that you will have the required clearance. - Page 34 >65mm 490mm 750mm 400mm HNG7410 Cutout width (W) 750mm Landing (L) 165mm Fig. 11 Fig. 10 Fig. 12...
-
Page 35: Energy Efficiency Information
Energy Efficiency Information A) Measurement and calculation methods • The gas hob was CE approval according to the Gas Appliance Directives 2009/142/EC. • The energy efficiency of this gas hob was tested and measured according to EN 30-2-1-1998+A1-2003+A2-2005. • The energy efficiency of the gas burners and the hob were calculated according to COMMISSION REGULATION (EU) No. - Page 36 Energy Efficiency Information - Gas Hob Attribute Symbol Value Units Model identification HNG7410FR Type of hob Built in Number of gas burners Energy efficiency per gas burner Tr: 54.70 Gas burner Energy efficiency for the gas hob 54.7...
- Page 37 Energy Efficiency Information - Electric Hob Attribute Symbol Value Units Model identification HNG7410FR Type of hob Built in Number of cooking zones and/or areas Heating technology (induction cooking zones Induction and cooking areas, radiant cooking zones, solid cooking plates) zones For circular cooking zones or area: diameter of Ø...
- Page 38 NOTES:...
- Page 39 NOTES: E & O E. All instructions, dimensions and illustrations are provided for guidance only. CDA reserve the right to change specifications without prior notice.
- Page 40 Group Ltd. • Harby Road • Langar • Nottinghamshire • NG13 9HY T : 01949 862 012 F : 01949 862 003 E : customer.care@cda.eu W : www.cda.eu T : 01949 862 012 F : 01949 862 003 E : customer.care@cda.eu W : www.cda.eu www.cda.eu...
Need help?
Do you have a question about the HNG7410FR and is the answer not in the manual?
Questions and answers