Table of Contents
Advertisement
Advertisement
Table of Contents

Related Manuals for Martin Mania DC3


Summary of Contents for Martin Mania DC3
- Page 1 Mania DC3 user manual...
- Page 2 Measurements are expressed in millimeters. Ø13 © 2004-2005 Martin Professional A/S, Denmark. All rights reserved. No part of this manual may be reproduced, in any form or by any means, without permission in writing from Martin Professional A/S, Denmark. P/N 35000156, Rev. B...
-
Page 3: Table Of Contents
Mania DC3 Specifications ........ - Page 4 Mania DC3 user manual...
-
Page 5: Introduction
NTRODUCTION Thank you for selecting a Martin Mania DC3. The Mania DC3 is a motorized oil wheel projector that features variable oil wheel rotation speed and direction as well as remote operation in which up to four fixtures can be controlled from one remote control. The beam angle can be adjusted from 25°... - Page 6 The lamp must be changed if it becomes damaged or thermally deformed. If the external power cord of this luminaire is damaged, it must be replaced by a special cord exclusively available from your Martin dealer. Avoiding electric shocks Warning Always disconnect from mains power before replacing the lamp, fuses, or any part, and when not in use.
-
Page 7: Unpacking
U N P A C K I N G The packing material is carefully designed to protect the fixture during shipment – always use it to transport the fixture. The following items are supplied with the Mania DC3: • 3-wire (grounding/earthing-type) power cable • User manual •... -
Page 8: Mania Dc3 Overview
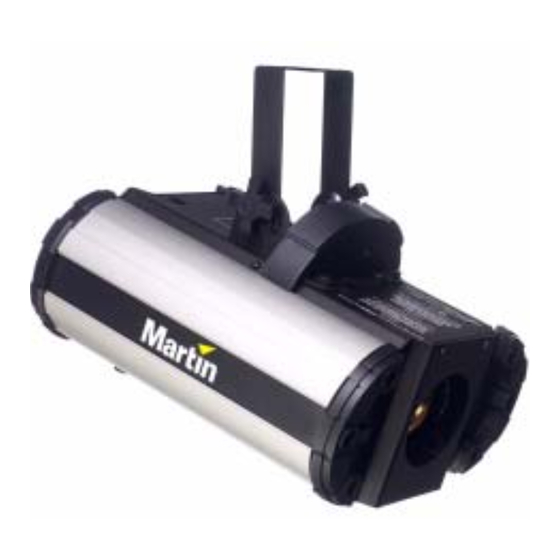
M A N I A D C 3 O V E R V I E W Safety cable Oil wheel rotation speed control attachment point AC supply setting Mains switch Remote control input Mains socket Remote control output Fuse holder Cooling fan Thumb screw (cover lock) Oil wheel rotation direction switch Mania DC3 user manual... -
Page 9: Installation
Martin dealer. Configuring for local mains power The Mania DC3 has a switch-selectable power supply that can operate in the following voltage ranges at 50-60 Hz: • 115 - 120 volts (setting 115) •... -
Page 10: Choice Of Mounting
C H O I C E O F M O U N T I N G The Mania DC3 may only be operated in a standing position or hung overhead with a clamp. The fixture can be installed at an angle pointing... - Page 11 Always use a secure means of secondary attachment. For indoors use only. To hang the Mania DC3 on an overhead support: 1. Check that the structure can support at least 10 times the weight of all installed fixtures, clamps, cables, auxiliary equipment, and other items.
-
Page 12: Operation
F O C U S I N G T H E M A N I A D C 3 Focus is adjusted using the knob next to the lens. Twist the knob until a sharp image is acquired. Do not look directly into the light. Mania DC3 user manual... -
Page 13: Oil Wheel Rotation
R E M O T E C O N T R O L O P E R A T I O N The remote control unit can control up to four daisy- chained Mania DC3s. Connect the remote control to the RJ-45 In connector on the first Mania DC3 fixture Rotation speed Rotation speed and connect successive fixtures using the RJ-45 Out connector. -
Page 14: Basic Service
C L E A N I N G Regular cleaning of the elements in the optical path, as well as the air vents, is vital to maintaining the operational quality of the Mania DC3. Important! Excessive dust, smoke residue and particle buildup degrades performance and causes overheating and damage to the fixture that is not covered by the warranty. -
Page 15: Lamp Maintenance
Caution Hot lamp. Important The Mania DC3 is supplied with a Philips 6958 24V 250W 10H lamp (Martin P/N 97000115) with an average life of 1000 hours. The fixture must only be used with this lamp. Using any other lamp type may damage the fixture and will invalidate the product warranty. - Page 16 2. Remove the thumb screw holding the cover in place. 3. Slide the fixture cover open. 4. Holding the bulb as close to the base as possible, pull it out of the bulb socket with a gentle rocking motion. Mania DC3 user manual...
-
Page 17: Installing An Oil Wheel
5. Replace the bulb. Use only a Philips 6958 24V 250W 10H lamp (Martin P/N 97000115). 6. Close the fixture cover and tighten the thumb screw, taking care not to trap any wires. 7. Reapply power to the fixture. I N S T A L L I N G A N O I L W H E E L The Mania DC3 is supplied with a multi-colored oil wheel. - Page 18 7. Use the 2mm Allen key supplied with the Mania DC3 to tighten the two grub screws in the oil wheel hub and clamp the oil wheel in place on its spindle.
-
Page 19: Installing A Gobo Or Filter
500 hours of service. This means that as a general rule, the Mania DC3 will require two oil wheels and one lamp for every 1000 hours of operation. -
Page 20: Reconfiguring The Beam
Martin dealer as an accessory. The lens is factory-set to 25°, but this can be changed to 32° as follows. You will need the 2mm Allen key supplied with the Mania DC3 for this operation. To reconfigure the lens: 1. - Page 21 2. Turn the fixture over and remove the thumb screw holding the cover in place. 3. Slide the fixture cover open. 4. Turn the focus knob clockwise as far as it will go. This will move the lens module towards the front of the fixture, giving enough space to remove the lens module.
- Page 22 (C) and thin spacer (B). Insert the thick spacer (E) supplied with the fixture and retighten the retaining ring (D). 32° beam angle 25° beam angle Remove B + C Insert E 9. Retain components B and C for possible future use. Mania DC3 user manual...
-
Page 23: Lens Assembly
Fuse holder 3. Replace the fuse with one of the same type. The fuse rating is listed on the serial number label and in “Mania DC3 Specifications” on page 25. 4. Replace the fuse holder. Basic service... -
Page 24: Troubleshooting
Burned out lamp Install new lamp Fixture too hot Allow to cool Improve air flow around fixture No action Electrical malfunction Refer to a Martin service technician Fuse blows repeatedly Electrical malfunction Refer to a Martin service technician Mania DC3 user manual... -
Page 25: Mania Dc3 Specifications
DC3 S ANIA PECIFICATIONS P H Y S I C A L Size without mounting bracket (LxWxH) . . .340x290x215 mm (13.4x11.4x8.5 in.) Weight..........9 kg (19.8 lbs) C O N S T R U C T I O N Housing. - Page 26 O R D E R I N G I N F O R M A T I O N Mania DC3, 220-240 V ........P/N 90430070 Mania DC3, 115-120 V.
- Page 28 • Olof Palmes Allé 18 • 8200 Aarhus N • Denmark Tel: +45 8740 0000 • Fax +45 8740 0010...
Need help?
Do you have a question about the Mania DC3 and is the answer not in the manual?
Questions and answers