Table of Contents
Advertisement
Available languages
Available languages
Quick Links
Download this manual
See also:
User Manual
BEDIENUNGSANLEITUNG
USER'S MANUAL
MODE D'EMPLOI
MANUAL DEL USUARIO
CM-860
Club-Mixer
©
COPYRIGHT
Für weiteren Gebrauch aufbewahren!
Nachdruck verboten!
Keep this manual for further needs!
All rights reserved!
Gardez ces instructions pour des utilisations ultérieurs!
Réproduction interdite!
Guarde este manual para posteriores usos.
Prohibida toda reproducción!
Advertisement
Table of Contents

Subscribe to Our Youtube Channel
Related Manuals for Omnitronic CM-860


Summary of Contents for Omnitronic CM-860
- Page 1 BEDIENUNGSANLEITUNG USER'S MANUAL MODE D'EMPLOI MANUAL DEL USUARIO CM-860 Club-Mixer © COPYRIGHT Für weiteren Gebrauch aufbewahren! Nachdruck verboten! Keep this manual for further needs! All rights reserved! Gardez ces instructions pour des utilisations ultérieurs! Réproduction interdite! Guarde este manual para posteriores usos.
- Page 2 MASTER...
-
Page 4: Table Of Contents
MULTI-LANGUAGE-INSTRUCTIONS Inhaltsverzeichnis/Table of contents Sommaire/Contenido 1. EINFÜHRUNG............................... 5 2. SICHERHEITSHINWEISE..........................6 3. BESTIMMUNGSGEMÄSSE VERWENDUNG ....................6 4. ANSCHLÜSSE .............................. 7 5. GERÄTEÜBERSICHT........................... 9 6. BEDIENUNG ............................... 12 7. PROBLEMBEHEBUNG ..........................12 8. AUSTAUSCHEN DES CROSSFADERS ....................12 9. REINIGUNG UND WARTUNG........................13 10. -
Page 5: Einführung
- diese Betriebsanleitung genau beachten. 1. EINFÜHRUNG Wir freuen uns, dass Sie sich für einen OMNITRONIC CM-860 Club-Mixer entschieden haben. Wenn Sie nachfolgende Hinweise beachten, sind wir sicher, dass Sie lange Zeit Freude an Ihrem Kauf haben werden. Nehmen Sie den OMNITRONIC CM-860 aus der Verpackung. -
Page 6: Sicherheitshinweise
2. SICHERHEITSHINWEISE Dieses Gerät hat das Werk in sicherheitstechnisch einwandfreiem Zustand verlassen. Um diesen Zustand zu erhalten und einen gefahrlosen Betrieb sicherzustellen, muss der Anwender unbedingt die Sicherheits- hinweise und die Warnvermerke beachten, die in dieser Bedienungsanleitung enthalten sind. Unbedingt lesen: Bei Schäden, die durch Nichtbeachtung dieser Bedienungsanleitung verursacht werden, erlischt der Garantieanspruch. -
Page 7: Anschlüsse
Leitungen. Vergewissern Sie sich, dass die Leitungen sicher befestigt sind. • An das CM-860 lassen sich bis zu 3 Endstufen anschließen. Das Ausgangssignal des Master 1-Signals lässt sich über den Master 1-Fader und den Balance-Regler einstellen. Das Ausgangssignal des Master 2- Signals lässt sich über den Master 2-Regler einstellen. - Page 8 • Das CM-860 verfügt über einen separat regelbaren DJ-Mic Kanal (DJ MIC). Das DJ MIC Mikrofon lässt sich über die XLR/Klinke-Einbaubuchse auf der Frontplatte anschließen. An diese Buchse lassen sich sowohl Klinken- als auch XLR-Stecker anschließen. Mit dem TALKOVER-Wahlschalter können Sie den Gesamtpegel der anderen Signalquellen reduzieren ohne den Mikrofonpegel zu verstellen.
-
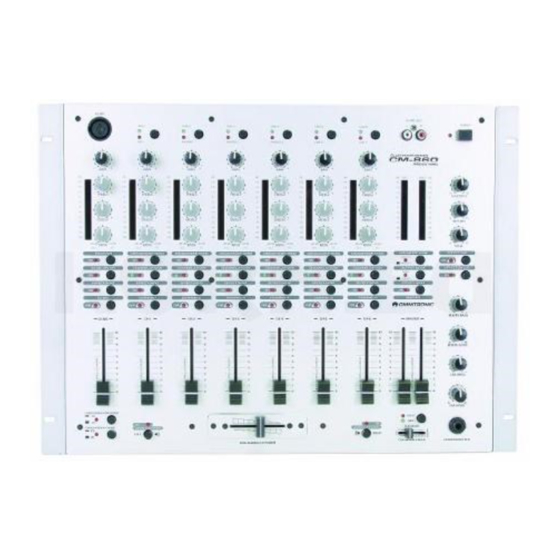
Page 9: Geräteübersicht
5. GERÄTEÜBERSICHT 5.1 Vorderseite DJ MIC LINE 1 LINE 2 LINE 3 LINE 4 LINE 6 LINE 8 DJ REC-OUT MIC 1 PHONO 1 PHONO 2 PHONO 3 LINE 5 LINE 7 POWER GAIN GAIN GAIN GAIN GAIN GAIN GAIN LEFT RIGHT TREBLE... - Page 10 Mit dem MONO/STEREO-Schalter können Sie den Signalausgang auf mono bzw. stereo stellen. Wenn Sie z. B. Tonquellen mit Monoausgang über nur einen Cinch-Stecker an das CM-860 angeschlossen haben, schalten Sie den Signalausgang auf mono, so dass das Ausgangssignal an beiden Ausgängen anliegt.
- Page 11 L'intérieur de l'appareil ne contient pas de parties nécessitant un entretien. L'entretien et les réparations seulement par un revendeur autorisé! un entretien. L'entretien et les réparations seulement par un revendeur autorisé! OMNITRONIC SHOWEQUIPMENT GmbH, GERMANY OMNITRONIC SHOWEQUIPMENT GmbH, GERMANY BALANCED MASTER 1 OUTPUT...
-
Page 12: Bedienung
Stecken Sie hier die Anschlussleitung des Netzteils ein und fixieren Sie sie mit der Überwurfmutter. 6. BEDIENUNG Schalten Sie das Gerät über den Netzschalter ein. Sobald Audio-Signale anliegen, wird der Signalpegel der Audio-Quelle auf dem Display angezeigt. Der Eingangssignalpegel lässt sich über den jeweiligen Gain-Regler einstellen. 7. -
Page 13: Reinigung Und Wartung
9. REINIGUNG UND WARTUNG LEBENSGEFAHR! Vor Wartungsarbeiten unbedingt allpolig vom Netz trennen! Das Gerät sollte regelmäßig von Verunreinigungen wie Staub usw. gereinigt werden. Verwenden Sie zur Reinigung ein fusselfreies, angefeuchtetes Tuch. Auf keinen Fall Alkohol oder irgendwelche Lösungsmittel zur Reinigung verwenden! Im Geräteinneren befinden sich keine zu wartenden Teile. -
Page 14: Introduction
- follow the instructions of this manual 1. INTRODUCTION Thank you for having chosen an OMNITRONIC CM-860. If you follow the instructions given in this manual, we can assure you that you will enjoy this device for many years. Unpack your OMNITRONIC CM-860. -
Page 15: Safety Instructions
2. SAFETY INSTRUCTIONS This device has left our premises in absolutely perfect condition. In order to maintain this condition and to ensure a safe operation, it is absolutely necessary for the user to follow the safety instructions and warning notes written in this user manual. Important: Damages caused by the disregard of this user manual are not subject to warranty. -
Page 16: Connections
• You can connect up to 3 amplifiers to the CM-860. The output signal of the Master 1-signal can be adjusted via the Master 1-fader and the balance-control. The output signal of the Master 2-signal can be adjusted via the Master 2-control. - Page 17 Occupation balanced stereo-1/4“ jack-plug: • Additionally, the CM-860 features one more ¼" Mic 1 jack plug on the rearpanel. You can adjust the microphone volume using the CH-1 fader. Make sure that the LINE 1/MIC 1-switch is set to MIC 1.
-
Page 18: Description Of The Device
5. DESCRIPTION OF THE DEVICE 5.1 Frontpanel DJ MIC DJ REC-OUT LINE 1 LINE 2 LINE 3 LINE 4 LINE 6 LINE 8 MIC 1 PHONO 1 PHONO 2 PHONO 3 LINE 5 LINE 7 POWER GAIN GAIN GAIN GAIN GAIN GAIN GAIN... - Page 19 (31) BOOTH BASS-CONTROL Used to increase or lower the LOWs of the Booth signal. (32) BOOTH CONTROL The CM-860 features a DJ BOOTH monitor system. Connect your monitor system with the BOOTH- sockets on the rearpanel. (33) CUE BASS-CONTROL Used to increase or lower the LOWs of the Cue signal.
-
Page 20: Operation
L'intérieur de l'appareil ne contient pas de parties nécessitant un entretien. L'entretien et les réparations seulement par un revendeur autorisé! un entretien. L'entretien et les réparations seulement par un revendeur autorisé! OMNITRONIC SHOWEQUIPMENT GmbH, GERMANY OMNITRONIC SHOWEQUIPMENT GmbH, GERMANY BALANCED MASTER 1 OUTPUT... -
Page 21: Problem Cart
7. PROBLEM CART PROBLEM: CAUSE: REMEDY: No power. • The power-cord is not connected. • Check the power-cord and any extension- cables. No sound. • The PHONO/LINE-switch of the respective • Put the PHONO/LINE-switch into the channel is in the wrong position. correct position. -
Page 22: Technical Specifications
10. TECHNICAL SPECIFICATIONS Power supply: 9-12 V AC, 400 mA via power unit included in the delivery Power consumption: 60 W Dimensions: 482 x 48 x 44 mm Weight: 1 kg Please note: Every information is subject to change without prior notice. 03/02 ©... -
Page 23: Introduction
- est priée de suivre strictement les instructions de service suivantes. 1. INTRODUCTION Nous vous remercions d'avoir choisi un OMNITRONIC CM-860. Si vous respectez les instructions de service suivantes, vous allez profiter longtemps de votre achat. Sortez l'OMNITRONIC CM-860 de son emballage. -
Page 24: Instructions De Sécurité
2. INSTRUCTIONS DE SECURITE Cet appareil a quitté les ateliers dans un état irréprochable. Pour assurer un bon fonctionnement, sans danger, l'utilisateur doit suivre les instructions contenues dans ce mode d'emploi. Attention: Tout dommage occasionné par la non observation des instructions de montage ou d'utilisation n'est pas couvert par la garantie. -
Page 25: Connexions
REC OUT avec les faders CHANNEL, les régulateurs du son et le régulateur GAIN. • Le CM-860 dispose d’un canal de micro réglable (MIC 1). Vous pouvez connecter votre microphone à la douille XLR/jack au face avant. Cette douille accepte des microphones avec jack 6,3 mm ou jack XLR. - Page 26 Occupation du jack 6,35 mm symétrique: • Additionellement, le CM-860 dispose d'une douille MIC 1 au dos de l'appareil acceptant seulement des Jacks 6,3 mm. Vous pouvez contrôler le niveau du microphone MIC 1 avec le fader CH-1. Assurez-vous que le sélecteur LINE 1/MIC 1 est mis à position MIC 1.
-
Page 27: Description De L'appareil
5. DESCRIPTION DE L'APPAREIL 5.1 Panneau avant DJ MIC LINE 1 LINE 2 LINE 3 LINE 4 LINE 6 LINE 8 DJ REC-OUT MIC 1 PHONO 1 PHONO 2 PHONO 3 LINE 5 LINE 7 POWER GAIN GAIN GAIN GAIN GAIN GAIN GAIN... - Page 28 Pour élever ou réduire les basses. (32) RÉGULATEUR BOOTH Le CM-860 dispose d’un système moniteur pour la cabine du DJ. Connectez vos haut-parleurs moniteur actives avec les douilles BOOTH au dos de l’appareil. Le régulateur BOOTH règle le niveau. (33) RÉGULATEUR CUE BASS Pour élever ou réduire les basses.
- Page 29 L'intérieur de l'appareil ne contient pas de parties nécessitant un entretien. L'entretien et les réparations seulement par un revendeur autorisé! un entretien. L'entretien et les réparations seulement par un revendeur autorisé! OMNITRONIC SHOWEQUIPMENT GmbH, GERMANY OMNITRONIC SHOWEQUIPMENT GmbH, GERMANY BALANCED MASTER 1 OUTPUT...
-
Page 30: Maniement
6. MANIEMENT Avec l'interrupteur POWER, vous pouvez mettre l'appareil sous/hors ténsion. Quand le mixer reçoit des signaux audio, le niveau du signal est affiché sur l'affichage. Vous pouvez ajuster le niveau du signal d'entrée grâce au régulateur Gain réspectif. 7. PROBLEMES PROBLEME: CAUSE: SOLUTION:... -
Page 31: Caractéristiques Techniques
Si des pièces de rechange sont nécéssaires, toujours utiliser des pièces d'origine. Pour tout renseignement complémentaire, n'hésitez pas à nous contacter téléphoniquement. Notre spécialiste se tient à votre entière disposition pour répondre à toutes les questions que vous pourriez vous poser. -
Page 32: Introducción
-estar cualificada -seguir las instrucciones de este manual 1. INTRODUCCIÓN Gracias por haber elegido un OMNITRONIC CM-860. Desembale su CM-860. Antes de la puesta en marcha inicial, por favor asegúrese de que no hay daños causados durante el transporte. Si los hubiese, consulte a su proveedor y no use el aparato. -
Page 33: Instrucciones De Seguridad
2. INSTRUCCIONES DE SEGURIDAD Este aparato ha salido de nuestro establecimiento en absolutas perfectas condiciones. Para mantener esta condición y asegurar un manejo seguro, es absolutamente necesario para el usuario seguir las instrucciones de seguridad y notas de advertencia escritas en este manual del usuario. Importante: Los daños causados por no hacer caso de las instrucciones de este manual del usuario no están sujetos a garantía. -
Page 34: Conexiones
Asegúrese de que los cables están fijados adecuadamente. Puede conectar hasta 3 a amplificadores al CM-860. Puede reglar la señal master 1 con el Masterfader 1 y el controlador "Balance". Puede reglar la señal master 2 con el Masterfader 2. Puede reglar la señal Booth con el regulador de nivel Booth. - Page 35 Tierra El CM-860 también posee de un casquillo jack mono 6,35 mm MIC 1 en el panel trasero. Puede reglar el nivel del micrófono con el fader CH-1. Asegúrese que el interruptor LINE 1/MIC 1 está en la posición MIC 1.
-
Page 36: Vista General Del Aparato
5. VISTA GENERAL DEL APARATO 5.1 Panel frontal DJ MIC LINE 1 LINE 2 LINE 3 LINE 4 LINE 6 LINE 8 DJ REC-OUT MIC 1 PHONO 1 PHONO 2 PHONO 3 LINE 5 LINE 7 POWER GAIN GAIN GAIN GAIN GAIN GAIN... - Page 37 (22) Conmutador "Stereo/Mono" Para conmutar la señal master a stereo o mono. Si ha conectado orígenes de tono con salida mono mediante una clavija cinch al CM-860, conmute la señal master a mono para tener la señal en las dos salidas.
-
Page 38: Operación
L'intérieur de l'appareil ne contient pas de parties nécessitant un entretien. L'entretien et les réparations seulement par un revendeur autorisé! un entretien. L'entretien et les réparations seulement par un revendeur autorisé! OMNITRONIC SHOWEQUIPMENT GmbH, GERMANY OMNITRONIC SHOWEQUIPMENT GmbH, GERMANY BALANCED MASTER 1 OUTPUT... -
Page 39: Solución De Problemas
7. SOLUCIÓN DE PROBLEMAS PROBLEMA: CAUSA: SOLUCION: La alimentación no se conecta. • El cable de alimentación no está • Compruebe el cable de alimen- conectado. tación y cables de extension. No hay sonido. • El interruptor PHONO/LINE del • Pone el interruptor PHONO/LINE canal respectivo no está... -
Page 40: Especificaciones Técnicas
10. ESPECIFICACIONES TÉCNICAS Alimentación: 9-12 V AC, 400 mA mediante unidad de alimentación incluso Consumo: 60 W Dimensiones: 482 x 48 x 44 mm Peso: 1 kg Nota: Todas las especificaciones dadas en este manual están sujetas a modificación sin previo aviso.
Need help?
Do you have a question about the CM-860 and is the answer not in the manual?
Questions and answers