Table of Contents
Advertisement
Available languages
Available languages
Quick Links
BEDIENUNGSANLEITUNG
USER'S MANUAL
MODE D'EMPLOI
MANUAL DEL USUARIO
CM-860
Club-Mixer
©
Für weiteren Gebrauch aufbewahren!
Copyright
Keep this manual for future needs!
Nachdruck verboten!
Gardez ce mode d'emploi pour des
Reproduction prohibited!
utilisations ultérieures!
Réproduction interdit!
Guarde este manual para posteriores usos.
Prohibida toda reproducción.
Advertisement
Table of Contents

Subscribe to Our Youtube Channel
Related Manuals for Omnitronic CM-860 Club-Mixer


Summary of Contents for Omnitronic CM-860 Club-Mixer
- Page 1 BEDIENUNGSANLEITUNG USER'S MANUAL MODE D'EMPLOI MANUAL DEL USUARIO CM-860 Club-Mixer © Für weiteren Gebrauch aufbewahren! Copyright Keep this manual for future needs! Nachdruck verboten! Gardez ce mode d’emploi pour des Reproduction prohibited! utilisations ultérieures! Réproduction interdit! Guarde este manual para posteriores usos. Prohibida toda reproducción.
- Page 2 MASTER...
-
Page 4: Table Of Contents
MULTI-LANGUAGE-INSTRUCTIONS Inhaltsverzeichnis/Table of contents Sommaire/Contenido 1. EINFÜHRUNG ............................... 6 1.1 Features ..............................6 2. SICHERHEITSHINWEISE..........................7 3. BESTIMMUNGSGEMÄSSE VERWENDUNG ....................7 4. ANSCHLÜSSE .............................. 8 5. GERÄTEÜBERSICHT..........................10 5.1 Vorderseite............................. 10 5.2 Rückseite ............................... 12 6. BEDIENUNG ............................... 13 7. PROBLEMBEHEBUNG ..........................13 8. - Page 5 You can find the latest update of this user manual in the Internet under: Vous pouvez trouvez la dernière version de ce mode d'emploi dans l'Internet sous: Vd. puede encontrar la versión más reciente de este manual en el Internet bajo: www.omnitronic.com 5/41 10006940_V_2_3.DOC...
-
Page 6: Einführung
- sich die letzte Version der Anleitung im Internet herunter laden 1. EINFÜHRUNG Wir freuen uns, dass Sie sich für einen OMNITRONIC CM-860 Club-Mixer entschieden haben. Wenn Sie nachfolgende Hinweise beachten, sind wir sicher, dass Sie lange Zeit Freude an Ihrem Kauf haben werden. -
Page 7: Sicherheitshinweise
2. SICHERHEITSHINWEISE Dieses Gerät hat das Werk in sicherheitstechnisch einwandfreiem Zustand verlassen. Um diesen Zustand zu erhalten und einen gefahrlosen Betrieb sicherzustellen, muss der Anwender unbedingt die Sicherheits- hinweise und die Warnvermerke beachten, die in dieser Bedienungsanleitung enthalten sind. Unbedingt lesen: Bei Schäden, die durch Nichtbeachtung dieser Bedienungsanleitung verursacht werden, erlischt der Garantieanspruch. -
Page 8: Anschlüsse
Bitte beachten Sie: Beim Einsatz einer Beschallungsanlage in öffentlichen bzw. gewerblichen Bereichen ist eine Fülle von Vorschriften zu beachten, die hier nur auszugsweise wiedergegeben werden können. Der Betreiber muss sich selbständig um Beschaffung der geltenden Sicherheitsvorschriften bemühen und diese einhalten! Vermeiden Sie Erschütterungen und jegliche Gewaltanwendung bei der Installierung oder Inbetriebnahme des Gerätes. - Page 9 • Der Master 2-Ausgang lässt sich über zwei Cinch-Buchsen anschließen. Vergewissern Sie sich, dass die Buchsen richtig belegt sind (L & R). • Über die BOOTH-Buchsen können Sie entweder Aktiv-Monitorboxen für Ihre DJ-Kabine (Booth) oder eine zusätzliche Endstufe zur Einrichtung einer weiteren Zone anschließen. •...
-
Page 10: Geräteübersicht
werden. Die PHONO/LINE-Schalter müssen auf LINE gestellt werden, damit sich die Linesignale steuern lassen. Der Pegel wird kanalweise gesteuert. • Soundeffektgeräte lassen sich an die EFFECTS-Buchsen anschließen. Dadurch lassen sich zusätzliche Soundeffekte einspielen. • Stecken Sie die Anschlussleitung des Netzteils in die AC IN-Buchse ein. Stecken Sie das Netzteil in die Steckdose ein. - Page 11 (7) CROSSFADE-TASTE Über die Crossfade-Taste können Sie bestimmen, dass dieser Kanal auf den Crossfader gelegt wird. (8) ASSIGN TO-TASTE Über die Assign To-Taste können Sie wählen, auf welche Seite des Crossfaders der mit der Crossfade- Taste ausgewählte Kanal gelegt wird. (9) EFFECT-SEND-TASTE Mit den Effect-Send-Tasten bestimmen Sie, welcher Kanal an die Effect Send-Buchsen ausgegeben wird.
-
Page 12: Rückseite
(31) BOOTH BASS-REGLER Mit dem BASS- Regler können Sie die Bässe des Mikrofonsignals verstärken bzw. zurücknehmen. (32) BOOTH-REGLER Mit dem BOOTH-Regler können Sie den BOOTH-Ausgangspegel einstellen. (33) CUE BASS-REGLER Mit dem BASS- Regler können Sie die Bässe des Mikrofonsignals verstärken bzw. zurücknehmen. (34) CUE LEVEL-REGLER Mit dem CUE LEVEL-Regler können Sie die Kopfhörerlautstärke einstellen, ohne das gemischte Signal zu verändern. -
Page 13: Bedienung
(47) BOOTH Zum Anschluss Ihres Monitorsystems. (48) BALANCED MASTER 1 OUTPUT Symmetrischer Ausgang des Mastersignals Master 1. (49) X-START-BUCHSEN Über die Start-Buchse lässt sich der jeweilige CD-Player über den Crossfader fernsteuern. Wenn Sie einen CD-Player mit Faderstart-Funktion verwenden, schließen Sie das Mischpult dort an die Control-Buchse an. Bitte beachten Sie, dass an diese Buchsen niemals Spannung angelegt werden darf. -
Page 14: Reinigung Und Wartung
9. REINIGUNG UND WARTUNG LEBENSGEFAHR! Vor Wartungsarbeiten unbedingt allpolig vom Netz trennen! Das Gerät sollte regelmäßig von Verunreinigungen wie Staub usw. gereinigt werden. Verwenden Sie zur Reinigung ein fusselfreies, angefeuchtetes Tuch. Auf keinen Fall Alkohol oder irgendwelche Lösungsmittel zur Reinigung verwenden! Im Geräteinneren befinden sich keine zu wartenden Teile. -
Page 15: Introduction
- download the latest version of the user manual from the Internet 1. INTRODUCTION Thank you for having chosen an OMNITRONIC CM-860. If you follow the instructions given in this manual, we can assure you that you will enjoy this device for many years. -
Page 16: Safety Instructions
2. SAFETY INSTRUCTIONS This device has left our premises in absolutely perfect condition. In order to maintain this condition and to ensure a safe operation, it is absolutely necessary for the user to follow the safety instructions and warning notes written in this user manual. Important: Damages caused by the disregard of this user manual are not subject to warranty. -
Page 17: Connections
Please note: when using this speaker-system in public or industrial areas, a series of safety instructions have to be followed that this manual can only give in part. The operator must therefore inform himself on the current safety instructions and consider them. Do not shake the device. - Page 18 • The CM-860 features one separately controllable microphone channel (DJ MIC). This microphone can be connected via the XLR/1/4“ jack-mounting socket on the front panel accepting ¼" jack plugs and XLR-plugs. With the Talkover-button, you can attenuate the level of all other signal-sources without affecting the microphone volume.
-
Page 19: Description Of The Device
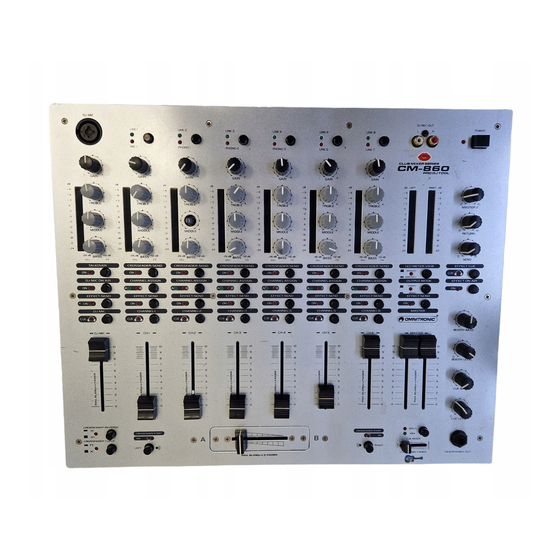
5. DESCRIPTION OF THE DEVICE 5.1 Front panel DJ MIC LINE 1 LINE 2 LINE 3 LINE 4 LINE 6 LINE 8 DJ REC-OUT MIC 1 PHONO 1 PHONO 2 PHONO 3 LINE 5 LINE 7 POWER GAIN GAIN GAIN GAIN GAIN GAIN... - Page 20 (12) CROSSFADER REVERSE-SWITCH With this function, you can invert the Crossfader-channels. In the loose position, channel 1 is on the left Crossfader-side, in the pressed position, "2-1" channel 1 is on the right Crossfader-side. (13) CURVE ON/OFF-BUTTON With the Curve On/Off-button, you can between the Crossfader-modes Soft and Sharp. In the Soft- mode, the Crossfader fades between the channels in a linear, continuous manner.
-
Page 21: Rear Panel
desired channel. When you set the CUE MIXING-fader to PGM (CUE-buttons without function), you can cue the output signal of the mixer. When you set the CUE MIXING-fader to to the center position, you can cue both the channel-signal you selected and the output-signal. -
Page 22: Problem Cart
7. PROBLEM CART PROBLEM: CAUSE: REMEDY: No power. • The power-cord is not connected. • Check the power-cord and any extension- cables. No sound. • The PHONO/LINE-switch of the respective • Put the PHONO/LINE-switch into the channel is in the wrong position. correct position. -
Page 23: Technical Specifications
10. TECHNICAL SPECIFICATIONS Power supply: 2 x 15 V AC, 50 Hz ~ Power consumption: 60 W Inputs: 3 phono, 7 line, 1 effect return, 2 mic Outputs: 2 Master, 1 Booth, 1 Rec, 1 Effect Send, 2 Faderstart Minimum input voltage: Microphone: 1 mV RMS Phono:... -
Page 24: Introduction
- télécharger la version ultérieure du mode d'emploi d'Internet 1. INTRODUCTION Nous vous remercions d'avoir choisi un OMNITRONIC CM-860. Si vous respectez les instructions de service suivantes, vous allez profiter longtemps de votre achat. Sortez l'OMNITRONIC CM-860 de son emballage. -
Page 25: Instructions De Sécurité
2. INSTRUCTIONS DE SECURITE Cet appareil a quitté les ateliers dans un état irréprochable. Pour assurer un bon fonctionnement, sans danger, l'utilisateur doit suivre les instructions contenues dans ce mode d'emploi. Attention: Tout dommage occasionné par la non observation des instructions de montage ou d'utilisation n'est pas couvert par la garantie. -
Page 26: Connexions
Lorsqu'une température ambiante est de +45° C l'humidité relative atmosphérique ne doit pas dépasser 50 %. Cet appareil ne peut être mis en service qu'à une altitude entre -20 et 2000 m au-dessus du niveau de la mer. N'utilisez l'appareil qu'après avoir pris connaissance de ses fonctions et possibilités. Ne laissez pas des personnes incompétentes utiliser cet appareil. - Page 27 • Si vous désirez effectuer un enregistrement, connectez votre platine à cassette ou votre magnétophone aux douilles REC OUT. Le fader MASTER n'influence pas les niveaux REC OUT. Vous pouvez contrôler le niveau REC OUT avec les faders CHANNEL, les régulateurs du son et le régulateur GAIN. •...
-
Page 28: Description De L'appareil
5. DESCRIPTION DE L'APPAREIL 5.1 Panneau avant DJ MIC DJ REC-OUT LINE 1 LINE 2 LINE 3 LINE 4 LINE 6 LINE 8 MIC 1 PHONO 1 PHONO 2 PHONO 3 LINE 5 LINE 7 POWER GAIN GAIN GAIN GAIN GAIN GAIN GAIN... - Page 29 (12) SELECTEUR CROSSFADER REVERSE Avec cette fonction, vous pouvez reverser les canaux du Crossfader. Dans la position libre, le canal 1 est à la gauche du Crossfader, dans la position enfoncée, le canal 2 est à la gauche du Crossfader. (13) BOUTON CROSSFADER CURVE Avec ce bouton vous pouvez déterminer la caractéristique du crossfader.
-
Page 30: Dos De L'appareil
Fonction Cue Mix (position libre): le mix réglable du signal Cue et master sont sur les deux côtés du casque d'écoute. (37) CUE MIXING FADER Branchez le casque d'écoute pour préécouter à la douille HEADPHONES. Choisissez le canal désiré à l'aide des boutons CUE. -
Page 31: Maniement
6. MANIEMENT Avec l'interrupteur POWER, vous pouvez mettre l'appareil sous/hors ténsion. Quand le mixer reçoit des signaux audio, le niveau du signal est affiché sur l'affichage. Vous pouvez ajuster le niveau du signal d'entrée grâce au régulateur Gain réspectif. 7. PROBLEMES PROBLEME: CAUSE: SOLUTION:... -
Page 32: Caractéristiques Techniques
L'intérieur de l'appareil ne contient pas de parties nécéssitant un entretien. L'entretien et les réparations doivent être effectuées par un technicien compétent! Si des pièces de rechange sont nécéssaires, toujours utiliser des pièces d'origine. Pour tout renseignement complémentaire, n'hésitez pas à nous contacter par téléphone. Notre spécialiste se tient à... -
Page 33: Introducción
-pasar el manual a cada sucesivo poseedor o usuario del producto -descargar la última versión del manual del Internet 1. INTRODUCCIÓN Gracias por haber elegido un OMNITRONIC CM-860. Si Vd. respecte las instrucciones sucesivas, aseguremos que vaya a gozarse mucho de su compra. Desembale su CM-860. -
Page 34: Instrucciones De Seguridad
2. INSTRUCCIONES DE SEGURIDAD Este aparato ha salido de nuestro establecimiento en absolutas perfectas condiciones. Para mantener esta condición y asegurar un manejo seguro, es absolutamente necesario para el usuario seguir las instrucciones de seguridad y notas de advertencia escritas en este manual del usuario. Importante: Los daños causados por no hacer caso de las instrucciones de este manual del usuario no están sujetos a garantía. -
Page 35: Conexiones
La humedad relativa no debe ser mas de 50 % en una temperatura ambiente de 45° C. Este aparato sólo debe ser utilizado en una altura entre -20 y 2000 m arriba del mar. Maneje el aparato sólo después de familiarizarse con sus funciones. No permita el manejo a personas que no conocen el aparato lo suficientemente bien. - Page 36 El CM-860 posee un canal de micrófono controlable ("DJ Mic"). El micrófono "DJ Mic" puede ser conectado mediante el casquillo XLR/jack en el panel frontal. Con la tecla “Talkover” puede atenuar todas las otras señales sin afectar al volumen del micrófono. Ocupación del casquillo XLR incorporado: Ocupación de la clavija jack, simétrica: Clavija jack estereo, simétrica:...
-
Page 37: Vista General Del Aparato
5. VISTA GENERAL DEL APARATO 5.1 Panel frontal DJ MIC DJ REC-OUT LINE 1 LINE 2 LINE 3 LINE 4 LINE 6 LINE 8 MIC 1 PHONO 1 PHONO 2 PHONO 3 LINE 5 LINE 7 POWER GAIN GAIN GAIN GAIN GAIN GAIN... - Page 38 (12) Selector Crossfader Reverse Con está función , Vd. puede invertar los canales del Crossfader. En la posición no enfoncada liegt el canal 1 está en la izquierda del Crossfader, en la posición enfocada el canal 2 está en la derecha del Crossfader.
-
Page 39: Panel Trasero
teclas "Cue". Cuando Vd. pone el fader "Cue Mixing" en PGM, puede oír la señal de salida del mezclador. Cuando el Fader "Cue Mixing" está en la posición intermedia, puede oír la señal de supervisión y de salida. 5.2 Panel trasero (38) Casquillo jack MIC 1 Conecte su micrófono con clavija jack 6,35 mm. -
Page 40: Solución De Problemas
7. SOLUCIÓN DE PROBLEMAS PROBLEMA: CAUSA: SOLUCION: La alimentación no se conecta. • El cable de alimentación no está • Compruebe el cable de alimen- conectado. tación y cables de extension. No hay sonido. • El interruptor PHONO/LINE del • Pone el interruptor PHONO/LINE canal respectivo no está... -
Page 41: Especificaciones Técnicas
10. ESPECIFICACIONES TÉCNICAS Alimentación: 2 x 15 V AC, 50 Hz~ Consumo: 60 W Entradas: 3 phono, 7 line, 1 effect return, 2 mic Salidas: 2 Master, 1 Booth, 1 Rec, 1 Effect Send, 2 Faderstart Voltaje mínimo: Micrófono: 1 mV RMS Phono: 3 mV RMS Line:...
Need help?
Do you have a question about the CM-860 Club-Mixer and is the answer not in the manual?
Questions and answers