Table of Contents
Advertisement
Quick Links
©
COPYRIGHT
Nachdruck verboten!
All rights reserved!
Réproduction interdite!
Prohibida toda reproducción!
BEDIENUNGSANLEITUNG
BEDIENUNGSANLEITUNG
BEDIENUNGSANLEITUNG
BEDIENUNGSANLEITUNG
USER'S MANUAL
USER'S MANUAL
USER'S MANUAL
USER'S MANUAL
MODE D'EMPLOI
MODE D'EMPLOI
MODE D'EMPLOI
MODE D'EMPLOI
MANUAL DEL USUARIO
MANUAL DEL USUARIO
MANUAL DEL USUARIO
MANUAL DEL USUARIO
PM-524
Pro-Mixer
Für weiteren Gebrauch aufbewahren!
Keep this manual for further needs!
Gardez ces instructions pour des utilisations ultérieurs!
Guarde este manual para posteriores usos.
Advertisement
Table of Contents

Related Manuals for Omnitronic Pro-Mixer PM-524


Summary of Contents for Omnitronic Pro-Mixer PM-524
- Page 1 MODE D'EMPLOI MODE D'EMPLOI MODE D'EMPLOI MODE D'EMPLOI MANUAL DEL USUARIO MANUAL DEL USUARIO MANUAL DEL USUARIO MANUAL DEL USUARIO PM-524 Pro-Mixer © COPYRIGHT Für weiteren Gebrauch aufbewahren! Nachdruck verboten! Keep this manual for further needs! All rights reserved! Gardez ces instructions pour des utilisations ultérieurs! Réproduction interdite!
- Page 2 Afin de prévenir tous risques d’électrocution et de court-circuits, ne pas exposer à l’humidité. Attention! Ne pas ouvrir le boîtier! Débrancher avant de remplacer le fusible. Utiliser un fusible de rechange de même type. Typ/Type: OMNITRONIC PM-524 EL MASTER BOOTH LINE 3 PHONO 3 LINE 2...
-
Page 4: Table Of Contents
MULTI-LANGUAGE-INSTRUCTIONS Inhaltsverzeichnis Table of contents Sommaire Contenido EINFÜHRUNG ..............................5 SICHERHEITSHINWEISE ..........................6 BESTIMMUNGSGEMÄSSE VERWENDUNG....................6 ANSCHLÜSSE ..............................7 GERÄTEÜBERSICHT ............................9 PROBLEMBEHEBUNG........................... 12 REINIGUNG UND WARTUNG ........................12 TECHNISCHE DATEN ............................ 13 INTRODUCTION.............................. 14 SAFETY INSTRUCTIONS..........................15 OPERATING DETERMINATIONS ........................15 CONNECTIONS............................... -
Page 5: Introduction
- follow the instructions of this manual INTRODUCTION Thank you for having chosen a OMNITRONIC PM-524. If you follow the instructions given in this manual, we can assure you that you will enjoy this device for many years. Unpack your OMNITRONIC PM-524. -
Page 6: Safety Instructions
SAFETY INSTRUCTIONS CAUTION! Be careful with your operations. With a dangerous voltage you can suffer a dangerous electric shock when touching the wires! This device has left our premises in absolutely perfect condition. In order to maintain this condition and to ensure a safe operation, it is absolutely necessary for the user to follow the safety instructions and warning notes written in this user manual. -
Page 7: Connections
• You can connect up to 2 amplifiers to the PM-524. The output signal of the Master-signal can be adjusted via the Master-control and the Balance-control. The output-signal of the Booth-signal can be adjusted via the Booth-control. - Page 8 • Additionally, the PM-524 features two more ¼" MIC 2 and MIC 3 jack-sockets on the rearpanel. You can adjust the microphone volume using the CH-2 and CH-3 fader. Make sure that the PHONO/LINE/MIC-switch is set to MIC. Occupation unbalanced mono-1/4“ jack-plug: •...
-
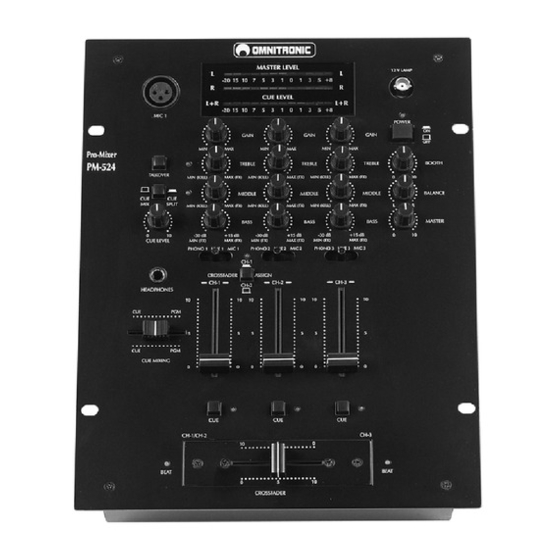
Page 9: Description Of The Device
MASTER LEVEL 12 V LAMP MAX 120 mA – 20 15 CUE LEVEL – 20 15 MIC 1 POWER GAIN GAIN GAIN Pro-Mixer PM-524 BOOTH TREBLE TREBLE TREBLE TALKOVER MIN (KILL) MAX (FX) MIN (KILL) MAX (FX) MIN (KILL) MAX (FX) - Page 10 When you set the CUE MIXING-fader to to the center position, you can cue both the channel-signal you selected and the output-signal. (20) BOOTH-CONTROL The PM-524 features a DJ BOOTH monitor system. Connect your monitor system with the BOOTH- sockets on the rearpanel. (21) BALANCE-CONTROL Used to adjust how much of the signal is sent to the left and right MASTER-socket.
- Page 11 115/230 V AC, 50/60 Hz ~ SELECTOR Gesamtanschlusswert/Power consumption: 30 W Sicherung/Fuse: F 0,5 A, 250 V OMNITRONIC SHOWEQUIPMENT GmbH, GERMANY OUTPUT CH-3 CH-2 CH-1 FUSE F 0.5 A, 250 V (23) GND (Ground terminal) Connect the ground lead of the turntable with this terminal. This helps to reduce humming and pop noise.
-
Page 12: Problem Chart
PROBLEM CHART PROBLEM: CAUSE: REMEDY: No power. • The power-cord is not connected. • Check the power-cord and any extension-cables. No sound. • The PHONO/LINE/MIC-switch of the • Put the PHONO/LINE/MIC-switch respective channel is in the wrong into the correct position. position. -
Page 13: Technical Specifications
Replacing the Crossfader Instructions for replacing the crossfader: • Remove the fader knob. • Remove the two outer screws on the fader-panel. • Take the fader out and unplug the connection-cable. • Connect the new fader and fix it in the device. The fader-panel of the replacement-crossfader cannot be used for the Design-version.
Need help?
Do you have a question about the Pro-Mixer PM-524 and is the answer not in the manual?
Questions and answers