Table of Contents
Advertisement
Quick Links
BEDIENUNGSANLEITUNG
USER'S MANUAL
MODE D'EMPLOI
MANUAL DEL USUARIO
EX-840
Club-Mixer
©
Für weiteren Gebrauch aufbewahren!
Copyright
Keep this manual for future needs!
Nachdruck verboten!
Gardez ce mode d'emploi pour des
Reproduction prohibited!
utilisations ultérieures!
Réproduction interdit!
Guarde este manual para posteriores usos.
Prohibida toda reproducción.
Advertisement
Table of Contents

Related Manuals for Omnitronic Club-mixer EX-840


Summary of Contents for Omnitronic Club-mixer EX-840
- Page 1 BEDIENUNGSANLEITUNG USER'S MANUAL MODE D'EMPLOI MANUAL DEL USUARIO EX-840 Club-Mixer © Für weiteren Gebrauch aufbewahren! Copyright Keep this manual for future needs! Nachdruck verboten! Gardez ce mode d’emploi pour des Reproduction prohibited! utilisations ultérieures! Réproduction interdit! Guarde este manual para posteriores usos.
-
Page 6: Table Of Contents
MULTI-LANGUAGE-INSTRUCTIONS Inhaltsverzeichnis Table of contents Sommaire Contenido 1. EINFÜHRUNG............................... 8 1.1 Features ..............................8 2. SICHERHEITSHINWEISE..........................9 3. BESTIMMUNGSGEMÄSSE VERWENDUNG .................... 10 4. ANSCHLÜSSE ............................10 5. GERÄTEÜBERSICHT..........................12 5.1 Vorderseite............................. 12 5.2 Rückseite ............................... 14 6. BEDIENUNG ............................... 15 7. - Page 7 You can find the latest update of this user manual in the Internet under: Vous pouvez trouvez la dernière version de ce mode d'emploi dans l'Internet sous: Vd. puede encontrar la versión más reciente de este manual en el Internet bajo: www.omnitronic.com 7/44 10007050X35NXS_V_1_0.DOC...
-
Page 8: Features
- include every supplementay update with the original manual 1. INTRODUCTION Thank you for having chosen an OMNITRONIC EX-840. If you follow the instructions given in this manual, we can assure you that you will enjoy this device for many years. -
Page 9: Safety Instructions
possible via cue mixing-fader • Master-out 15-fold LED-level-displays (L/R) • Output signal adjustable via Master-fader (Master 1) or Master-control (Master 2) • Separately controllable monitor-output (DJ-booth) for connecting active-speakers or an additional amplifier • 2 Master-Out, Booth-Out and Rec-Out via 2 RCA- sockets each •... -
Page 10: Operating Determinations
• You can connect up to 3 amplifiers to the EX-840. The output signal of the Master 1-signal can be adjusted via the Master 1-fader and the balance-control. The output signal of the Master 2-signal can be adjusted via the Master 2-control. - Page 11 Occupation balanced stereo-1/4“ jack-plug: • Additionally, the EX-840 features one more ¼" Mic 1 jack plug on the rearpanel. You can adjust the microphone volume using the CH-1 fader. Make sure that the LINE 1/MIC 1-switch is set to MIC 1.
-
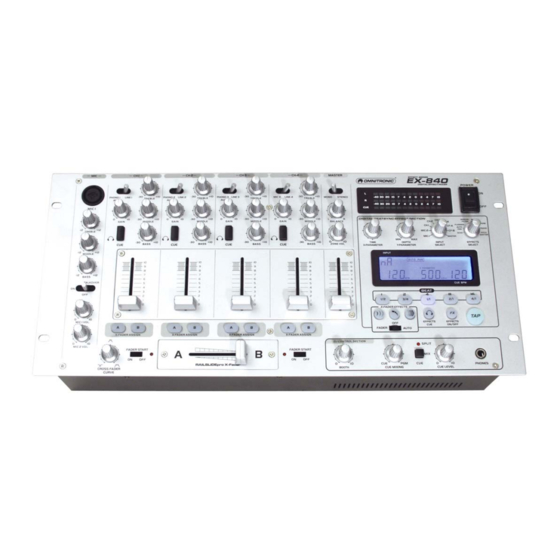
Page 12: Description Of The Device
5. DESCRIPTION OF THE DEVICE 5.1 Frontpanel (1) PHONO / LINE / AUX-SWITCH Used to select the input to be sent to the individual channel. (2) GAIN-CONTROL Used to set the level of the input signal. (3) CUE-BUTTON Use the CUE-button in order to select the channel(s) to be monitored. (4) TREBLE-CONTROL Used to increase or lower the HIs of the input signal. - Page 13 (19) MASTERFADER Adjusts the level of the master 1 output. (20) ZONE VOLUME CONTROL The EX-840 features a DJ BOOTH monitor system. Connect your monitor system with the BOOTH- sockets on the rearpanel. (21) BALANCE-CONTROL Used to adjust how much of the signal is sent to the left and right MASTER-socket.
-
Page 14: Rearpanel
5.2 Rearpanel (40) MIC 2-SOCKET Connect your microphone with ¼" jack plug here. (40) MIC 3-SOCKET Connect your microphone with ¼" jack plug here. (42), (43), (44) LINE / PHONO / AUX INPUT-SOCKETS Input socket for CH-1, CH-2 and CH-3. Connect turntables equipped with MM pickup cartridge to PHONO input. -
Page 15: Problem Cart
7. PROBLEM CHART PROBLEM: CAUSE: REMEDY: No power. • The power-cord is not connected. • Check the power-cord and any extension-cables. No sound. • The PHONO/LINE/AUX-switch of the • Put the PHONO/LINE/AUX-switch respective channel is in the wrong into the correct position. position. -
Page 16: Technical Specifications
Should you need any spare parts, please use genuine parts. Should you have further questions, please contact your dealer. 10. TECHNICAL SPECIFICATIONS Power supply: 115/230 V AC, 50/60 Hz ~ Power consumption: 35 W Inputs: 3 phono, 4 line, 3 mic Input Sensitivity: Microphone 1: 1.7 mV RMS, 2,2 kOhms...
Need help?
Do you have a question about the Club-mixer EX-840 and is the answer not in the manual?
Questions and answers